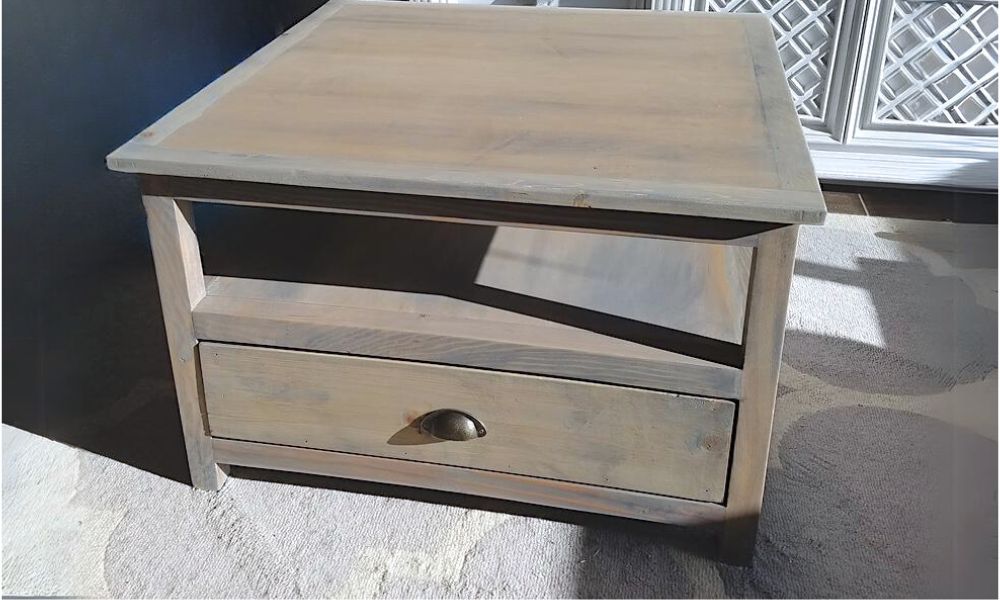


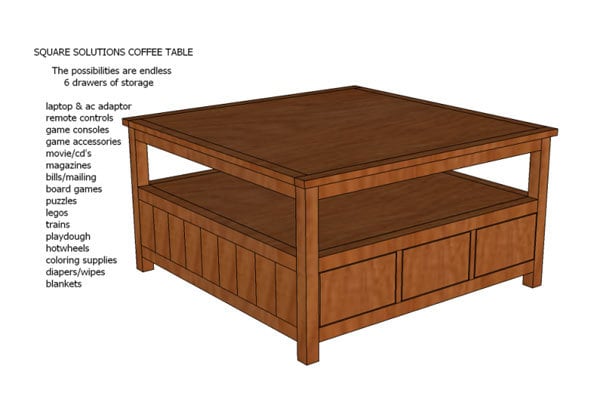
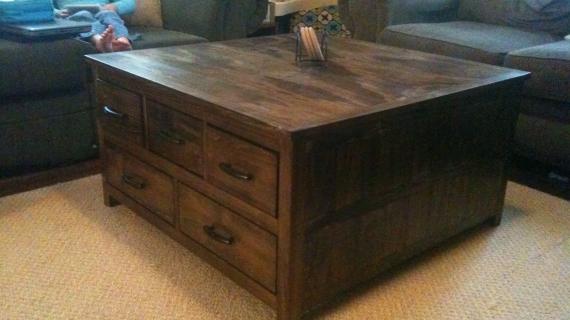
A square coffee table with lower drawers and an optional large shelf, this woodworking plan is easy to modify in size and functionality. We love the square size and the wood construction, you can paint or stain it any color you please. Free step by step plans.
All of my projects are inspired by function. Furniture can have style and solve a problem at the same time. Last night I found myself sitting at the computer browsing through all of these projects and decided it was time to go through the Google sketch-up tutorial from Ana and learn how to create my own plans for my dream functioning square coffee table. At step 3 or 4 I was pulling my hair and couldn't figure out why I was wasting my time when I could have drawn it faster on graph paper (that's how we were taught back in the 90's). Once I caught on I found myself up till 4 in the morning playing around. Then when I got the hang of it I preceded with my coffee table. I can't wait to build it!

All of my projects are inspired by function. Furniture can have style and solve a problem at the same time. Last night I found myself sitting at the computer browsing through all of these projects and decided it was time to go through the Google sketch-up tutorial from Ana and learn how to create my own plans for my dream functioning square coffee table. At step 3 or 4 I was pulling my hair and couldn't figure out why I was wasting my time when I could have drawn it faster on graph paper (that's how we were taught back in the 90's). Once I caught on I found myself up till 4 in the morning playing around. Then when I got the hang of it I preceded with my coffee table. I can't wait to build it!
Skill Level: Intermediate
Estimated Cost: $50-$100
Preparation
- 7- 2×2 @ 8 feet long
- 5- 1×2 @ 8 feet long
- 3- 1×4 @ 8 feet long
- 5- 1×6 @ 8 feet long
- 1/2 sheet of 3/4″ hardwood plywood
- drawer slides & drawer pulls/handles
- screws, nails
- finishing supplies
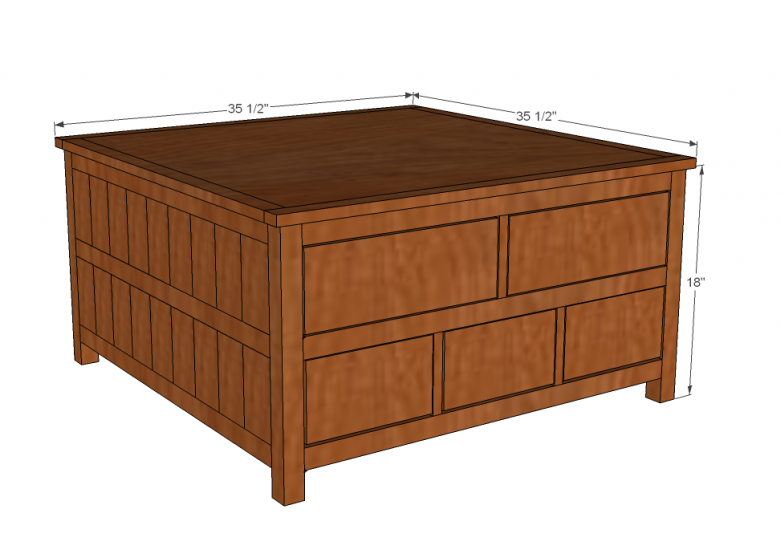
- 4 – 2×2 @ 18″ (legs)
- 15 - 2×2 @ 31 1/2″ (parts of front back sides & drawer supports)
- 6 – 1×2 @ 5 3/4″ (front and back drawer dividers)
- 7 – 1×2 @ 31 1/2″ (drawer slide supports)
- 36 – 1×4 @ 5 3/4″ (planks for sides)
- 2 – 1×2 @ 32 1/2″ (top trim)
- 2 – 1×2 @ 35 1/2″ (top trim)
- 1 – 3/4″ plywood @ 32 1/2″ x 32 1/2″ (top) IF YOU ARE PAINTING just use a solid piece of MDF: 35 1/2″ x 35 1/2″ no trim pieces needed
- 2 – 1×6 @ 14 1/8″ (lg drawer back)
- 2 – 1×6 @ 15 1/8″ (lg drawer front)
- 20 – 1×6 @ 15″ (lg & sm drawer sides)
- 3 – 1×6 @ 8 3/4″ (sm drawer back)
- 3 – 1×6 @ 9 3/4″ (sm drawer front) for the drawer bottoms use the left over plywood or mdf
- 6 – 3/4″ plywood @ 7 1/4″ x 15″ (sm drawer bottoms)
- 4 – 3/4″ plywood @ 12 5/8″ x 15″ (sm drawer bottoms)


Instructions
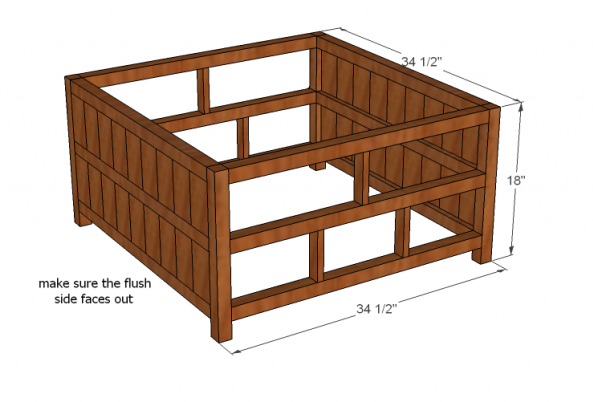
Step 1

Build 2 of these side pieces. I would use the Kreg Jig™ and pocket hole screws for this project but maybe nails and wood glue would also work. A flat work surface is a must.
Step 2
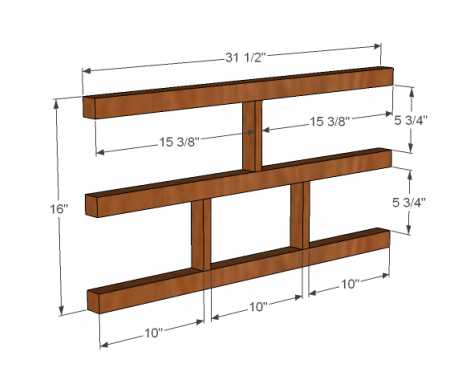
Build 2 of these pieces. One for the front and back. Make sure your measurements are right on and square for a proper drawer fit.
Step 3
Attach the front, back, and sides together. Make sure your box is square.
Step 4
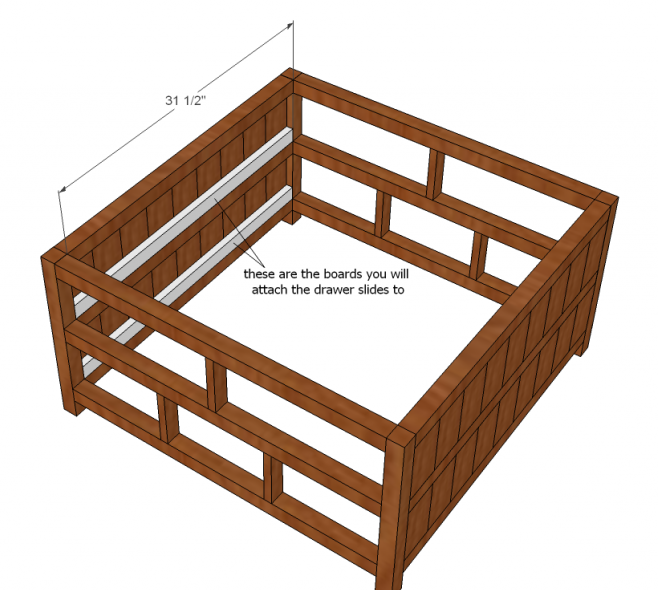
Attach the boards for the drawer slides. There are 4 in this step 2 on each side.
Step 5
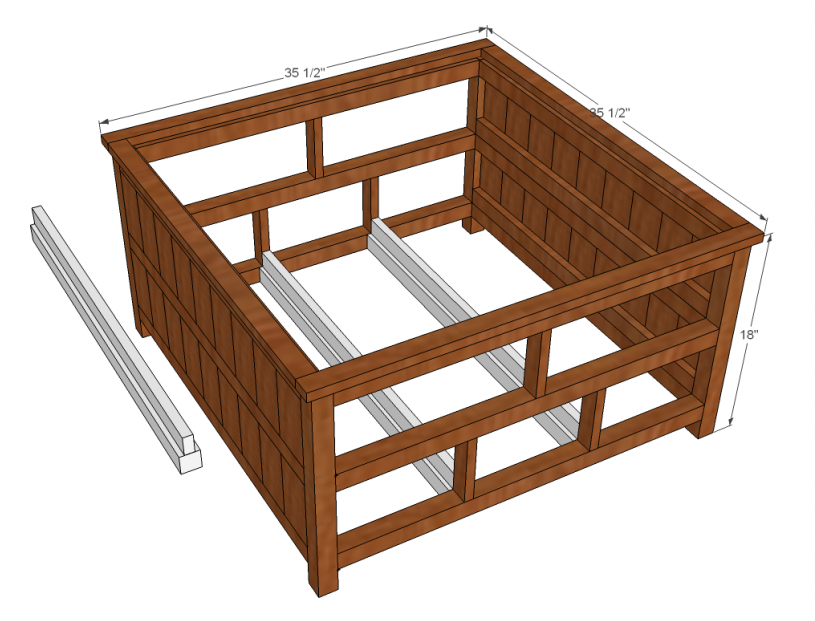
Step 6
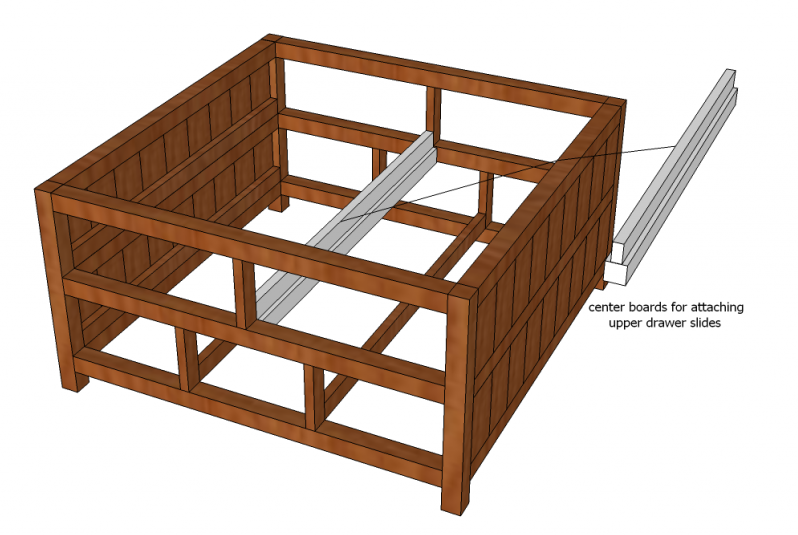
Attach the support for the top drawer slides. Same as step 5.
Step 7
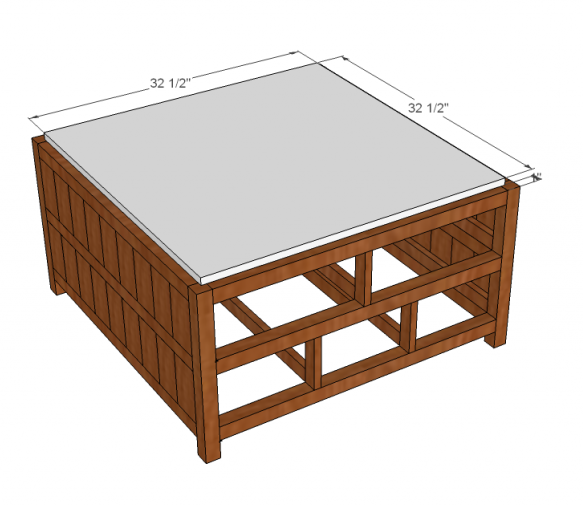
Center the top piece on the frame and attach with 2″ nails and glue.
IF YOU ARE PAINTING and went with a solid piece of MDF for the top piece, center it on the top of the box with a 1/2″ overhang and attach with 2″ nails and glue.
Step 8
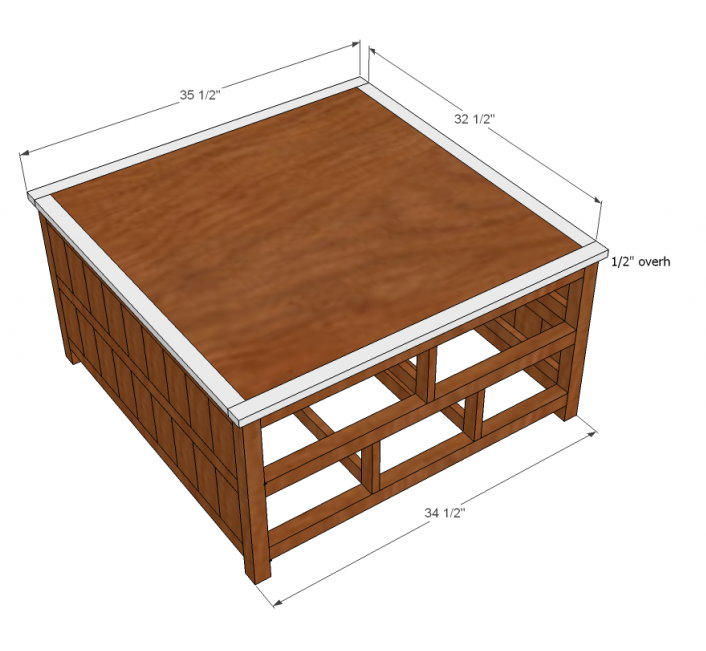
Attach the trim with 2″ nails and glue. There should be a 1/2″ overhang on each side.
If you used MDF for the full top skip this step.
Step 9
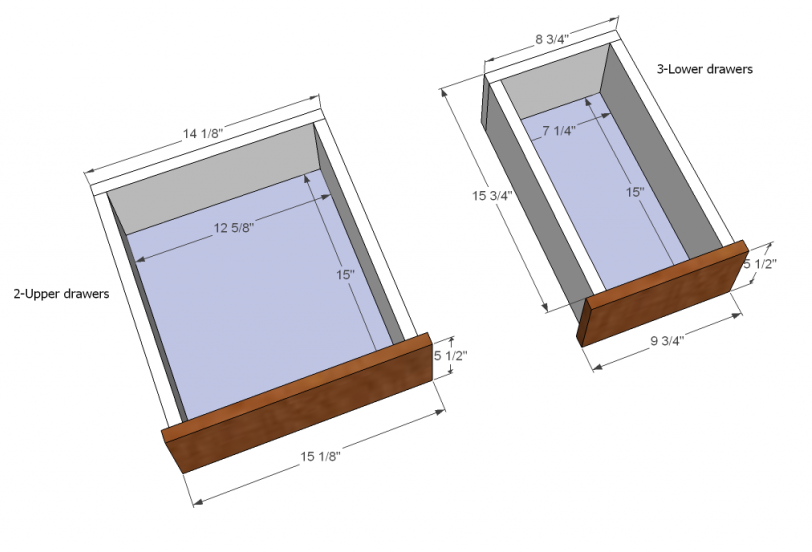
Build your drawers around the drawer bottom. Be precise with your measurements and keep them square.
Install drawer slides and drawer pulls.
Step 10

This is an idea if you don’t need as many drawers.
I have a bin that I throw scraps of wood in and this plan will definitely use a lot of those scraps. I estimated the cost of wood by using furring strips.
I will be painting and distressing mine so I am going to use MDF for the top piece.
In between each layer of paint I rub the surface down with steel wool and wipe off the dust with a damp cloth. Thinner coats are better.


Comments
Jami (not verified)
Fri, 02/11/2011 - 21:08
You are amazing!
You are amazing! Congratulations getting through to the next level with SketchUp. I'm not quite there yet, maybe I need to just stay up all night and figure it out.
I love the functionality of this piece. Well done.
* Be careful with steel wool, though, you can end up with rust under your finish coat.
:)
Bonnie from Lo… (not verified)
Sat, 02/12/2011 - 03:35
Very nice, well-thought out
Very nice, well-thought out plans! This could also be modified very easily to be like Mom's lego or train table. Talk about massive storage!! Great job Lori! Keep up the good work!
Jennifer (not verified)
Sat, 02/12/2011 - 04:46
great job!! i tried learning
great job!! i tried learning the sketch up but dont seem to get the hang of it!! i am soo lost and confused!! but hey i know ill get it .. it so hard with four kids ... GREAT JOB !!
Hillary (not verified)
Sat, 02/12/2011 - 05:01
I love this! I've been
I love this! I've been looking for a coffee table with an upholstered top, and I think I could modify this to work with upholstery. Excellent. Thanks!
loriinvegas (not verified)
Sat, 02/12/2011 - 06:15
Thanks so much for the kind
Thanks so much for the kind words! I just printed the plans and am off to purchase the wood to hopefully build it today. I just noticed the first mistake.
on the cut list I didn't add enough pieces for the drawers. It should be
4- large drawer backs
4- large drawer fronts
6- small drawer backs
6- large drawer backs
As I build it today, I'll make note of anything else I find. :)
Stevi (not verified)
Sat, 02/12/2011 - 06:27
I have been wanting something
I have been wanting something like this! You did a GREAT job!
Tonia (not verified)
Sat, 02/12/2011 - 11:05
OMG, I can not wait to see
OMG, I can not wait to see your finished table. I SO WANT THIS> I AM GOING TO BUILD THIS AFTER I SEE YOURS!!! GOOd LUCK!!!!!!!!
Lisa (not verified)
Sat, 02/12/2011 - 15:46
Those are the best drawer
Those are the best drawer slides I've ever seen! Great job! :)
Tonia (not verified)
Thu, 02/17/2011 - 13:20
did you get to build this?
did you get to build this?
SoAmi6y
Mon, 10/03/2011 - 13:38
Small Drawers
I made this as a 30th birthday present for my husband. Just a couple things to mention to anyone making this project. First of all, I spent way more than $50-$100, but that could have been made worse by the fact I altered the table to make it square and also made a matching end table, anyhoo, I spent $200+ for the first trip for the lumber, stain and poly. That's not to mention the drawer hardware and screws I bought later. Next, make sure you get the right size drawer slides. There was nothing in the patter that specifically said what size slides to get. I ended up needing slides that cover 3/4 in gap, but got some that were 3/8 wide per side, so I ended up having to use nuts in between the slides and the edges of the supports to get the right gap for the drawers to close. When the pattern says make sure that your measurements are exact and that your stuff is square, it means it. The drawers are hard enough as it is, but if they aren't square and perfect, they turn into a nightmare fast. Easy enough to avoid, just make sure you pay attention to detail while making your cuts, and you can probably avoid the problem all together. Last but not least, the bottom drawers are narrow. Like too narrow to fit a magazine. I made a version without the top row of drawers, and added an extra drawer to make the rectangle. The drawers look really cool, but the inside dimensions are only 7 3/4" which isn't wide enough to fit a legal pad, or magazine. I can find plenty of junk to put in mine, but it might have been nice to be able to put the magazines in drawers. All in all, I love the table, my husband loves the table, and lots of people were impressed I made it myself. I'll try and post a pic too!
Chelseylcary (not verified)
Mon, 03/26/2012 - 18:26
Is it possible to show the
Is it possible to show the plans for the table with just the bottom drawers? I'm looking to make this soon. Thanks
rvalentineiii
Fri, 02/28/2020 - 17:52
Step 1 Which piece of wood…
Step 1
Which piece of wood do you use to build the walls?2x2 or 1x2?