Have you ever needed to cut a board on your miter saw to say, exactly 12 inches? After careful setup and cutting, just to be sure, you measure and you find your cut is really 12 inches + oh... a smidgeon. Rats, now what? I guess if you have plenty of time to kill, you could sand it. Or perhaps you could decide you're gonna 'fix it'. Brimming with confidence, you stride back to the miter saw to trim that smidgeon off. Only then do you discover you actually trimmed 2 1/2 smidgeons off, and now all your board is good for is practicing your jump shot into the scrap bucket.
My personal record for doing this is 3 times for want of a single board. (At this point I decided to call it a day and went to a local bar.)
Great care is not always enough. Psychology may be at play here. We sure enough don't want that board to be 11 and 15/16. So it's a natural tendency to say 'if I miss, I want to miss long'. But missing a little long is only useful if we have a way to truly 'fix it'.
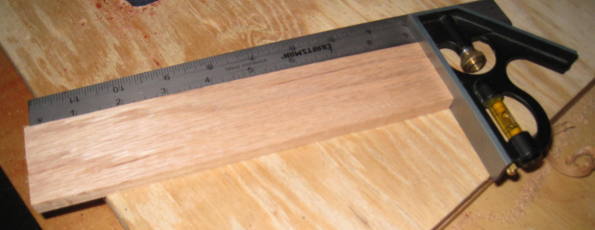
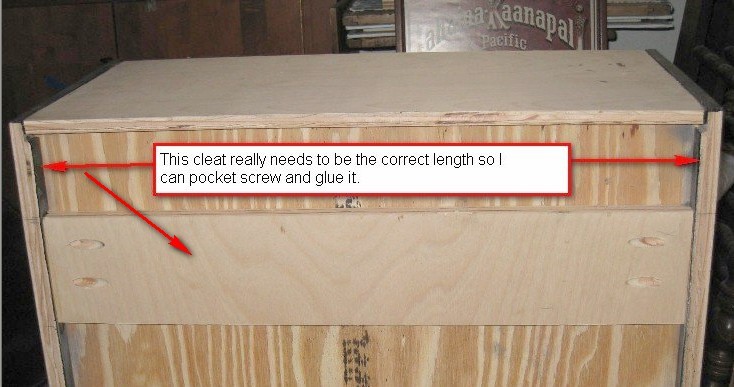
Sometimes, such as in the case of the first photo below, you will really, really need a cut to be perfect. And there is a solution; I just wish I remembered where I first read this technique. I'd like to give attribution as it has surely saved me plenty of heart-ache. But alas, the aging process of my brain continues unabated.
So here is how you can sneak up to a perfect length cut with a miter saw.
- The face of a saw blade is a tiny, predictable bit narrower than the blade's cutting teeth. It turns out to be just about 1/32nd of an inch (1/64th on each side). So to use this fact when it just has to be perfect, 1st intentionally cut the piece slightly over length.
- Next, with the power off, pull the miter saw blade down. Be very careful here not to inadvertently start the saw, especially if your trigger is built into the handle.
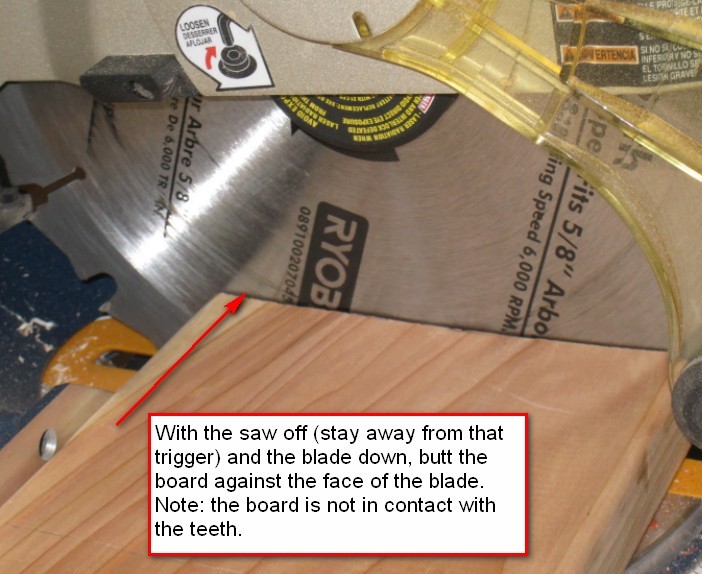
- With the power off, the blade down, fingers off the trigger, butt the board up against the face (not teeth) of the blade. See photo 2 below.
- ABSOLUTELY DO NOT start the saw in this position. With the power still off and a firm grip on the board raise the blade. It should just scrape the board on the way up. With the board still locked in position -all the normal safety rules apply here- make your cut.
- You'll find that you trimmed just about a 64th off, likely all as sawdust. Now measure or test for fit. It may take a few passes depending on how much you over-cut, but that is the point of sneaking up on it. Soon you will have that board at the perfect length.
Note: I have not used a sliding compound miter saw and thus cannot tell you if these instructions would apply to that type of miter saw. If you have such a saw, please be careful and look for any safety issues that might apply to using a technique similar to this with that type of saw.
Comments
TLE
Thu, 03/31/2011 - 09:06
How to Section
This is very helpful information. Is there any way this could be added to the How To section so it can be easily found later?
In reply to How to Section by TLE
bluejazz
Thu, 03/31/2011 - 09:39
Thanks
I'm glad you found it useful. I would certainly have no issue with a posting there. Of course that is Ana's call.
claydowling
Thu, 03/31/2011 - 10:44
Another trick
If you need two pieces to be the same length, you can clamp a stop block to the fence at the right length. Building a support rail, which requires a longer bench, you can put your stop blocks pretty far out.
Another trick which can be useful is to use something called a shooting board with a jack plane. If you google it you'll see. Once I made one I'd never consider building something without it. You need to be good at sharpening, because the blade needs to be sharp for this to work, but it's really easy to get exact lengths that way.
Milhouse
Thu, 03/31/2011 - 16:35
Thanks!
I am not a perfectionist, due to not wanting to put in the effort required, so I really enjoy these helpful tricks and shortcuts!
Matty (not verified)
Thu, 10/27/2011 - 06:40
I usually place the tape
I usually place the tape measure on the board then bring the saw blade down till it just barely touches the tape measure. Then while holding the saw blade in one hand, and the tape measure/board in the other, I slightly push & pull the board left or right until the teeth of the blade just barely touch the graduation line on the measuring tape. Lift the blade up, using the now free hand to remove the tape, and cut away. Works for me for making exacting cuts.