


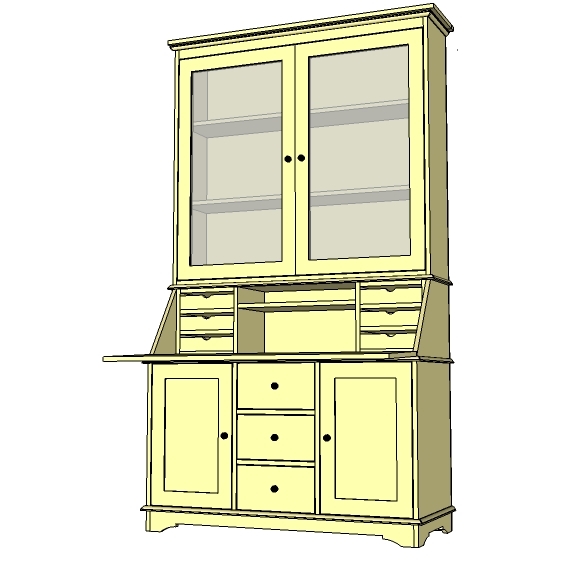
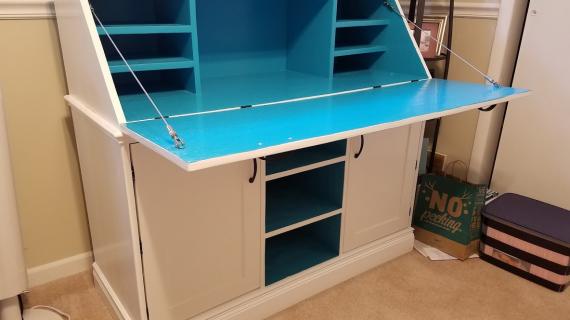
The secretary piece to the Grant Collection. Features six small drawers and a large shelf. Secretary top folds down for a desk.

Preparation
- 1 x20 Board leftover from base unit
- 1/4 Sheet of 3/4″ Plywood or MDF (for the hinge out desktop)
- Scrap 1/4″ plywood leftover from the base unit
- 1 – 1×12 @ 8 feet long
- 1 – 1×12 @ 10 feet long
- 3 – 1×3 @ 8 feet long
- 1 – stick 3/4″ moulding – 8 feet long (if they sell these in 7 foot sticks, you can use that too)
- 2 ” screws or 1 1/4″ pocket hole screws
- 1 1/4″ and 2″ finish nails
- wood glue
- wood filler
- finishing supplies
- 1 – 1×20 @ 46 1/2″ (Bottom)
- 2 – 1×20 @ 12 3/4″ (Sides)
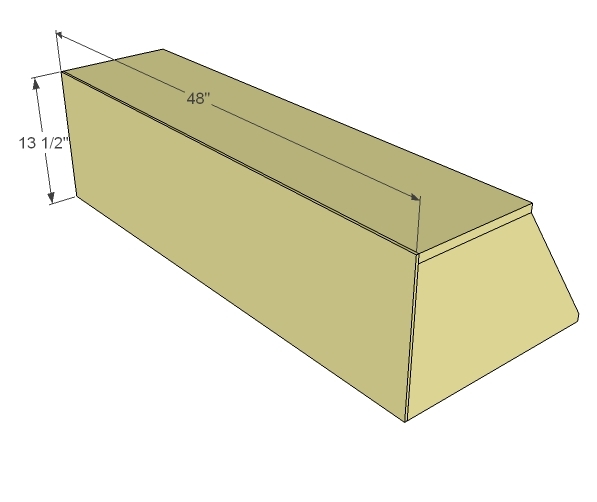
- 1 – 1×12 @ 48″ (Top)
- 1 – 1/4″ Plywood @ 48″ x 13 1/2″
- 8 – 1×12 @ 10 3/4″ (Shelves)
- 4 – 1×12 @ 12″ (Sides)
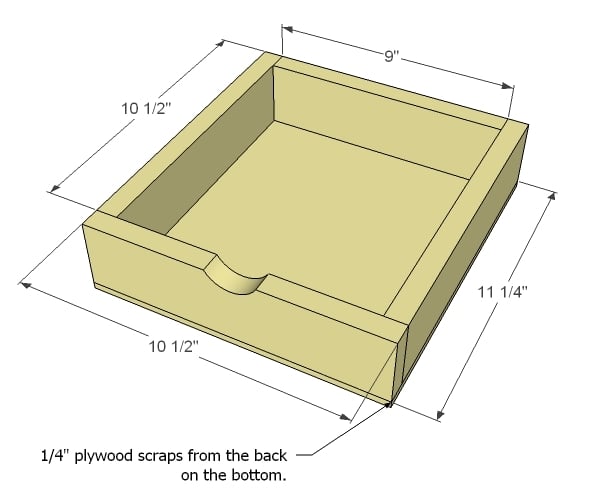
- 18 – 1×3 @ 10 1/2″ (Drawer Sides and Front)
- 6 – 1×3 @ 9″ (Drawer Backs)
- 6 – 1/4″ Plywood @ 10 1/2″ x 11 1/4″ (Drawer Bottoms)
- 1 – 1×12 @ 22″ (Shelf)
- 1 – 3/4″ Plywood @ 14″ x 48″


Please read through the entire plan and all comments before beginning this project. It is also advisable to review the Getting Started Section. Take all necessary precautions to build safely and smartly. Work on a clean level surface, free of imperfections or debris. Always use straight boards. Check for square after each step. Always predrill holes before attaching with screws. Use glue with finish nails for a stronger hold. Wipe excess glue off bare wood for stained projects, as dried glue will not take stain. Be safe, have fun, and ask for help if you need it. Good luck!
Instructions
Step 1
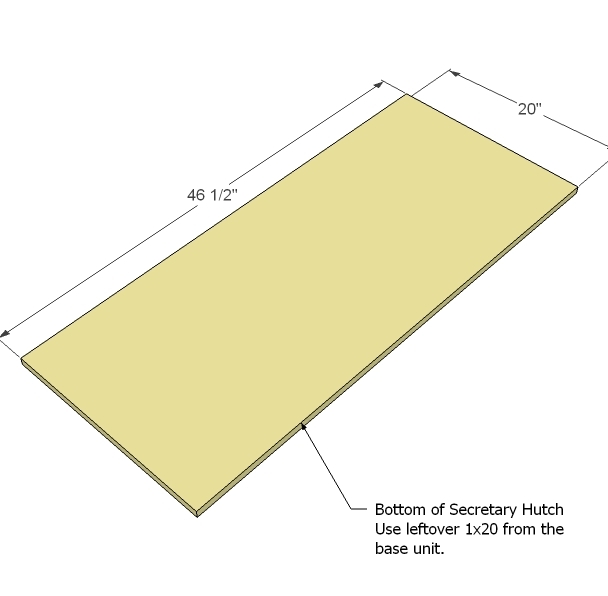
The base of the Secretary Hutch is a 1×20 @ 46 1/2″ long, or simply a piece of 3/4″ plywood or MDF cut to the size shown above.
Step 2

Sides and Bottom
Cut the sides out as shown above. 1x12s can vary in width so measure the width of your 1x12s and adjust the cuts as shown above. If you choose to have your 1x12s made from a sheet of 3/4″ plywood ripped into strips, to minimize waste, make your 1x12s 11 1/2″ wide.
Step 3

Top
Add the top to the hutch as shown above. Use screws and glue, as this piece is not fully face framed. Adjust for square.
Step 4
Back
Tack the back on to your SQUARE hutch. Use finish nails and glue or screws (you can use short ones).
Step 5

Step 6
Drawers
Make six of these little drawers. Just build a box from 1x3s as shown above (finish nails and glue would do just fine here) and tack 1/4″ plywood to the bottom. When you go to finish, make sure you sand and fill the edges of the 1/4″ plywood so it appears supper smooth.
Step 7

Shelf
Insert the two drawer pieces into the hutch and measure and cut your shelf to fit the difference. Should be 22″. You can either make the shelf fixed or drill holes and insert shelf pins according to the instruction on the shelf pin package (shelf pins can vary in size and installation methods). You can also add additional shelves if you like (for example, one shelf for the laptop, one for the keyboard and mouse storage).
Step 8

Edge Moulding
Cut the edge moulding to fit and nail and glue down, mitering corners at 45 degree angles.
Step 9
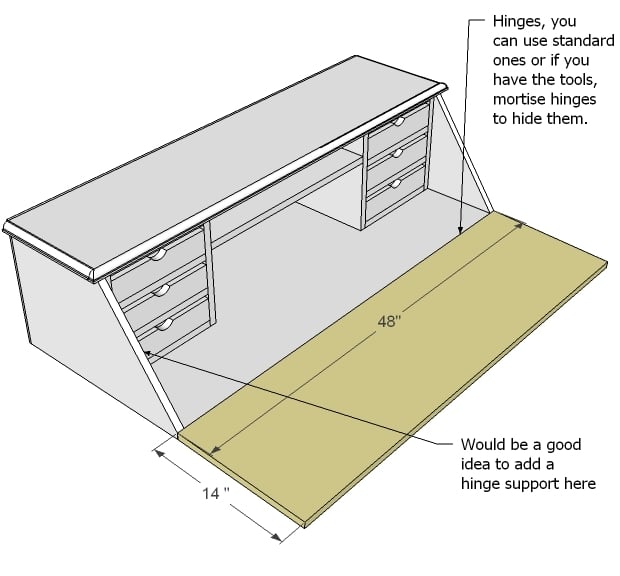
Flip Down Desk
Attach the flip down desk to the desk interior with hinges as shown above. You can use any standard low profile hinge here. Also recommended is hinge supports to keep the desktop open at just the right angle. Install magnetic clasps to keep the hinged top closed when closed on the insides of the sides.
Step 10
When you assemble the piece, make sure you screw the hutch to the base, as the hutch could tip forward when weight is placed on the flip down top. If you also add the top hutch, make sure you screw down and also use a tip resistant kit to keep the entire project from tipping forward.
It is always recommended to apply a test coat on a hidden area or scrap piece to ensure color evenness and adhesion. Use primer or wood conditioner as needed.
Comments
mindymom79
Tue, 04/12/2011 - 09:06
how much weight will flip down desk support?
I love the flip down desk. I'm actually thinking of putting it in my kitchen, and using it as a baker's rack. What I'm wondering is if I put my kitchenaid mixer on it, will it break? and if so, is there a way to make it support more weight? Thanks.
Nesting (not verified)
Mon, 05/30/2011 - 10:46
To support the flip-down shelf
Some flip-down hutches come with a drawer or even just 2-3 support beams that pull out under the flip-down door/work area to support the surface. You could easily build the base up about 2" and make slots for some pull-out support beams. This would allow it to take more weight, like your stand mixer.
David Britton,… (not verified)
Tue, 06/28/2011 - 15:42
better support on hinged front on grand hutch.
Dear Ana,
It might help if you put sliding hindges on the end of the table that come down in front. Put them on the ends and fasten them to the side of the flop down and to the main hutch.
Guest (not verified)
Wed, 09/07/2011 - 19:35
rough estimate for cost and time...
could you give me a rough estimate for the cost and the time for this project? trying to figure out if it is worth attempting. thanks.
Rhoni T (not verified)
Wed, 09/28/2011 - 15:06
missing a plan
how is the plan for the hutch part of this plan listed? I have found the base and secetary plans.