


A hutch for the Grant Secretary Collection. Features two doors, three shelves, and a solid top for extra storage.

Preparation


Please read through the entire plan and all comments before beginning this project. It is also advisable to review the Getting Started Section. Take all necessary precautions to build safely and smartly. Work on a clean level surface, free of imperfections or debris. Always use straight boards. Check for square after each step. Always predrill holes before attaching with screws. Use glue with finish nails for a stronger hold. Wipe excess glue off bare wood for stained projects, as dried glue will not take stain. Be safe, have fun, and ask for help if you need it. Good luck!
Instructions
Step 1

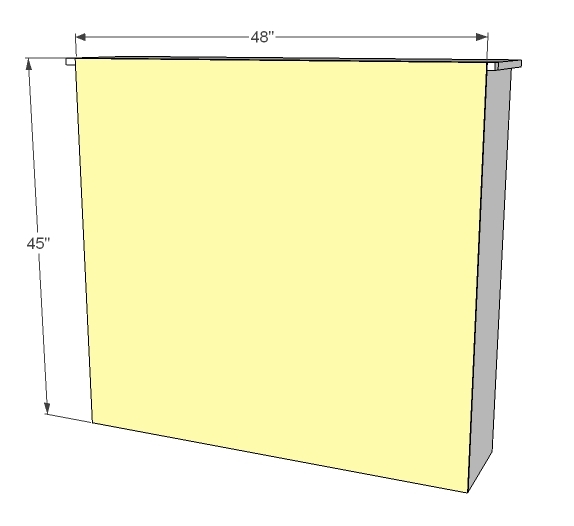
Build the Box
Build the box as shown above. If you can, use 1 1/4″ pocket holes or 2″ countersunk screws and glue. Adjust for square.
Step 2

Shelves
If you choose fixed shelves, add them now, flush to the back. Otherwise, you can add these later with shelf pins.
Step 3

Header
Attach the header as shown above.
Step 4

Top, Back
Mark the top back 1 1/2″ from both ends. Attach to the top with either 2″ screws or finish nails with wood glue. Adjust the shelf for square.
Step 5

Step 6
Back
Attach the back with 1 1/4″ finish nails and glue. If your shelves are fixed, attach to the shelves too.
Step 7

Moulding
Glue and 3/4″ finish nails (or just glue and clamps) to attach moulding, mitered at 45 degrees around corners.
Step 8

Doors
In a perfect world, your doors would measure as shown above. But it is always best to build your doors to fit the opening. I like to leave a 1/8″ gap around my doors. These doors are shown with a 1×3 frame, with 1/8″ lexan glass attached to the backside using mirror clips. Use Frameless Full Inset Euro Style Hinges to attach doors with hidden hinges. You will need to install mirror catches to keep the doors flush on the front when closed.
Step 9
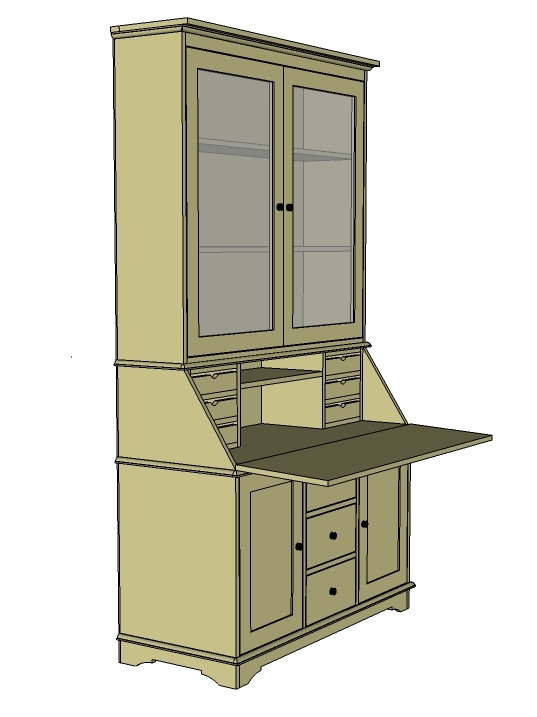
When you assemble the entire secretary, you will need to screw all of the pieces together. I recommend 1 1/4″ screws, from the top underside of the lower cabinet, into the bottom of the upper cabinets. You will also need to install a tip resistant kit to ensure the piece does not topple forward, especially when the secretary top is down with weight applied or the glass doors are open. Attach the tip resistant kit to a stud in the wall behind the secretary.
It is always recommended to apply a test coat on a hidden area or scrap piece to ensure color evenness and adhesion. Use primer or wood conditioner as needed.

Comments
Jenna Smith (not verified)
Fri, 04/01/2011 - 09:02
Thank you!
Ana - you are talented & amazing. I hadn't stopped by for a while & was delighted to see this pattern. I bought the base at the PB Outlet & wondered about building the top. :) Now I can.
Carly Jane (not verified)
Sun, 10/14/2012 - 09:34
Woohoo!!
Thank you so much for this tutorial! I'm in dire need of a hutch to store the lovely new china my fiance and I are getting for our wedding and this will fit the bill perfectly! I already have a secretary desk that was given to me when my Grandmother passed away and this way I don't have to get rid of it to make room for a new hutch, it can stay with us, just adapted :)