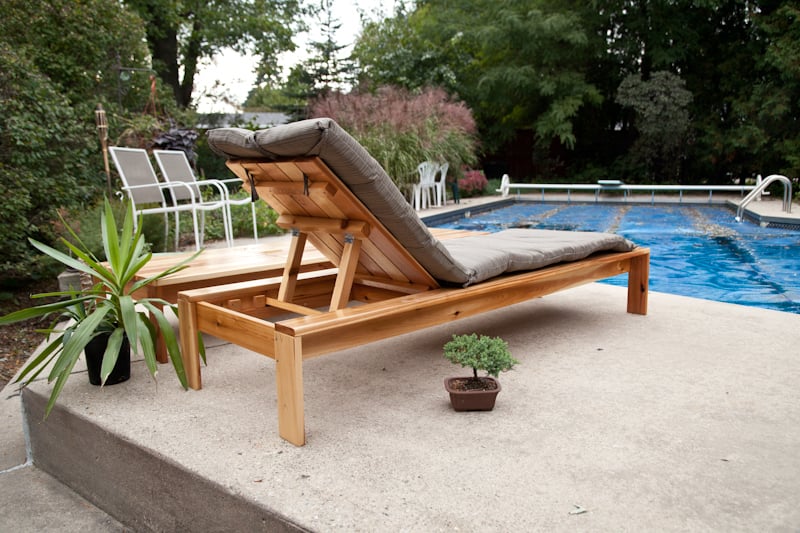


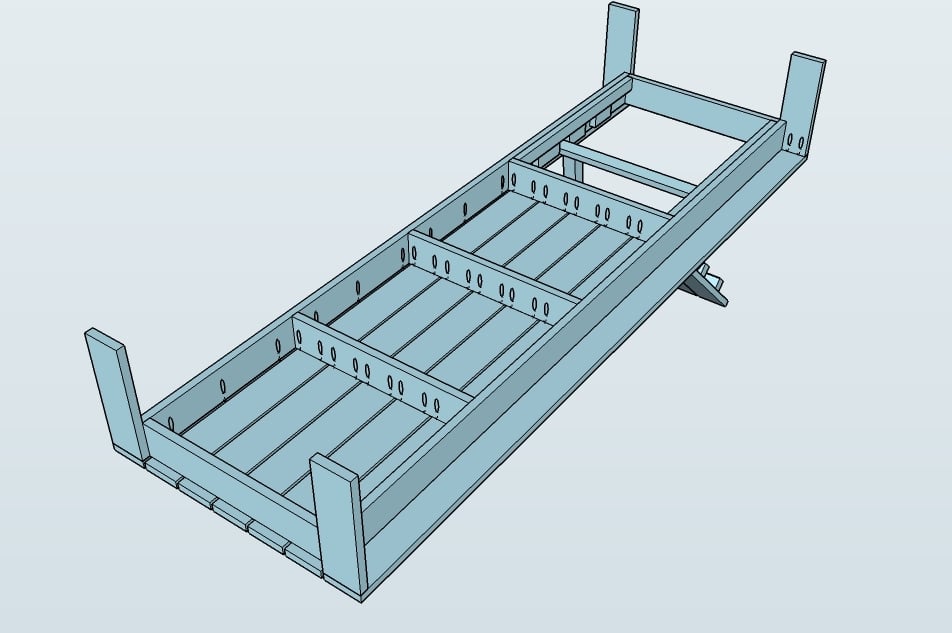
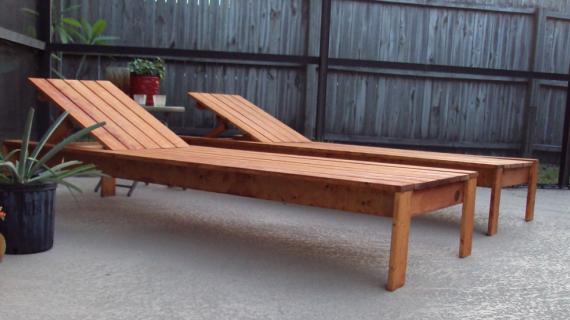
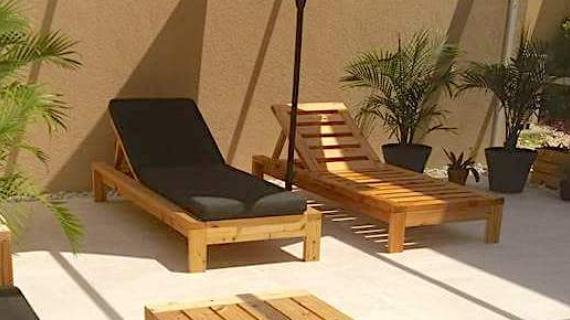
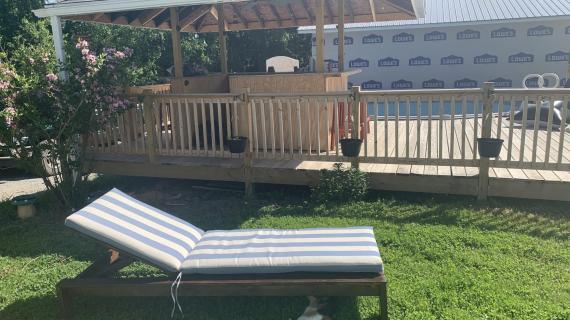
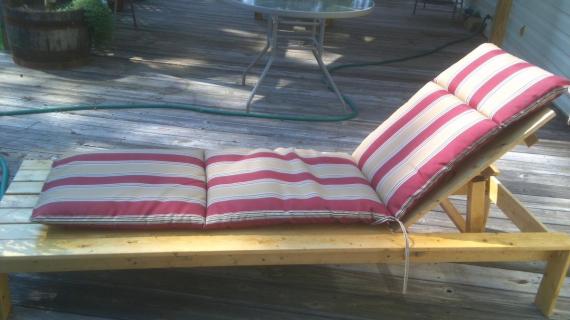
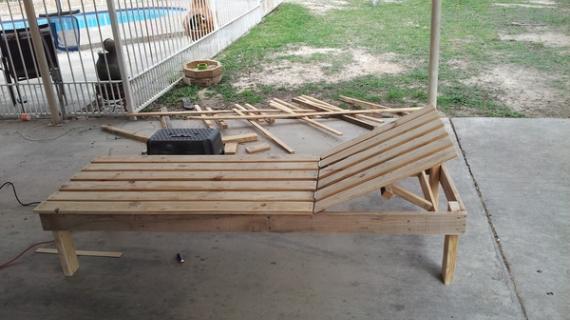
The outdoor chaise lounge gets a modern twist! Build your own and save money, using off the shelf lumber and step by step plans from Ana-White.com
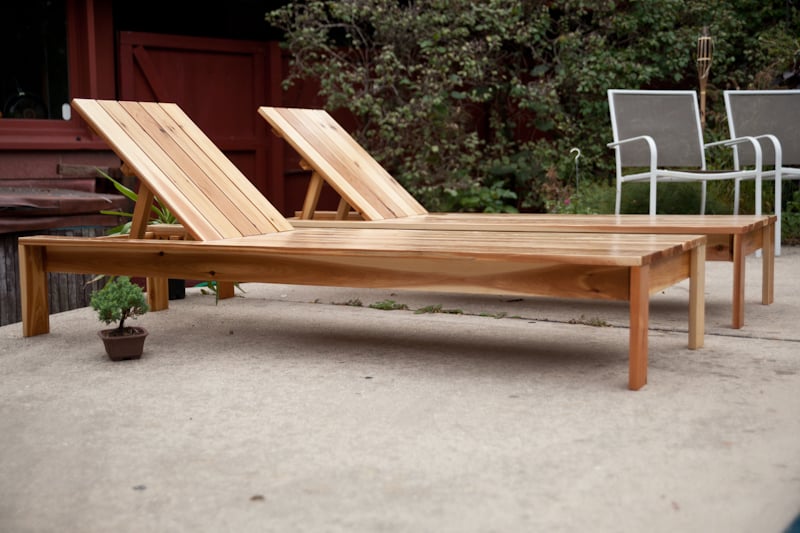
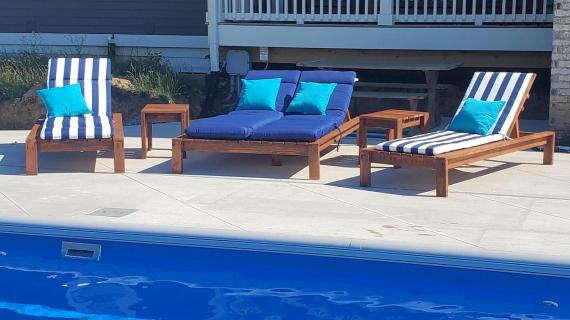
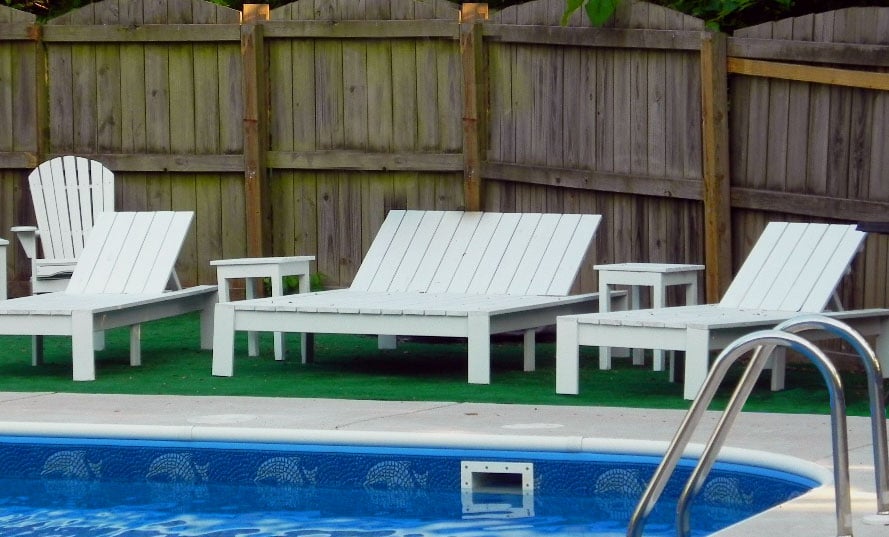
Special thanks to Wiscousonian for reader submitted photos.
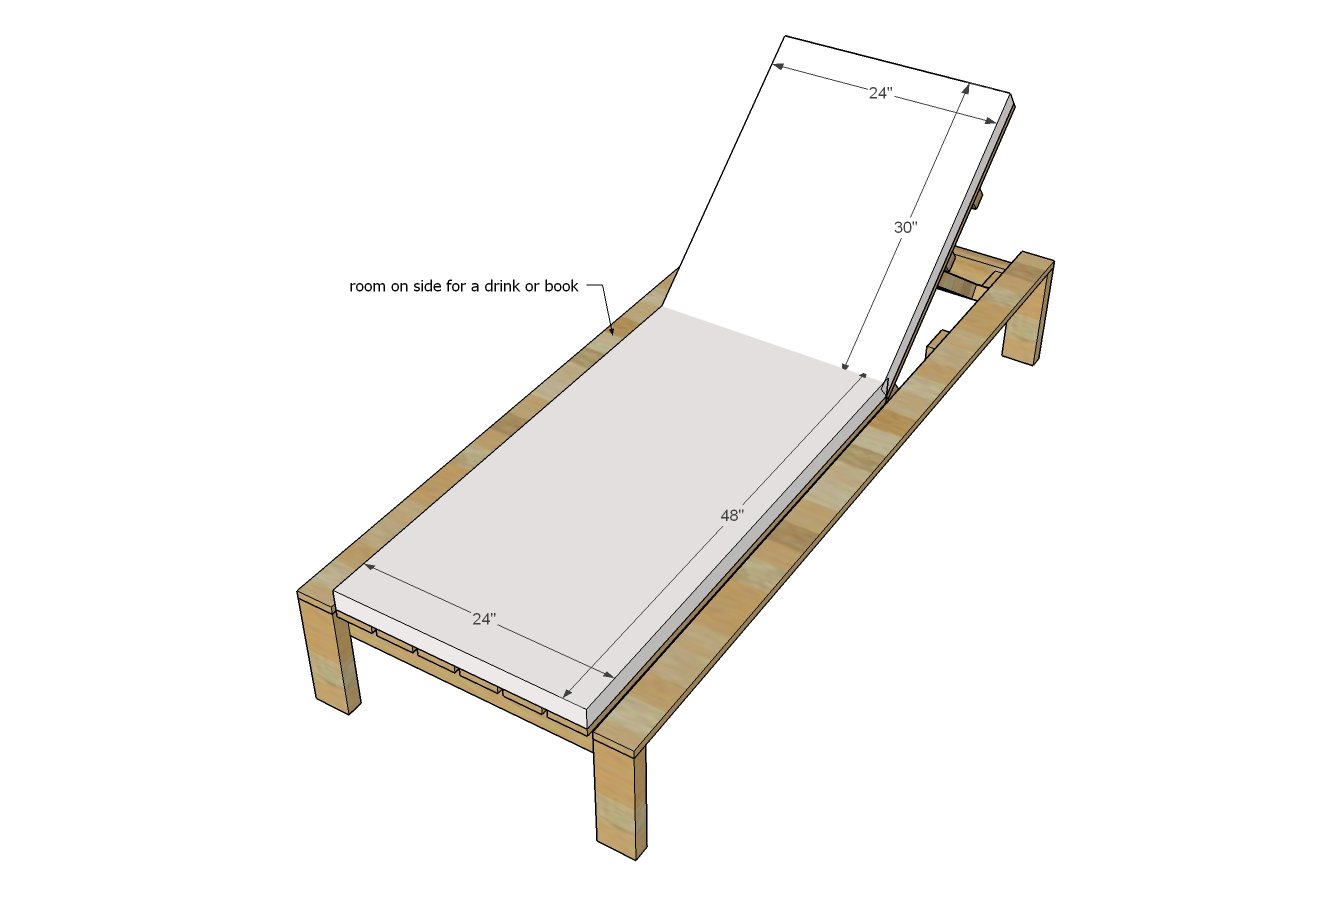
Fits Standard Cushion Size
This plan fits a cushion size with seat 48" x 30" and back 24" x 30". You can easily alter the dimensions to fit different sized cushions.
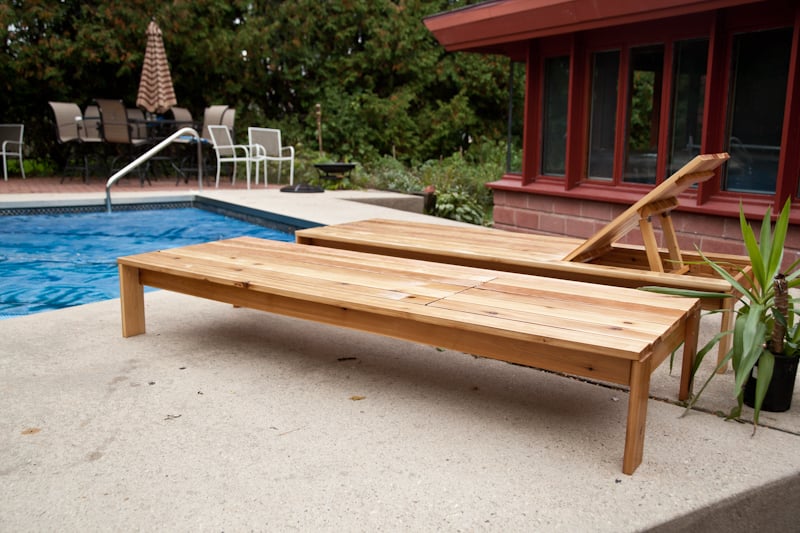
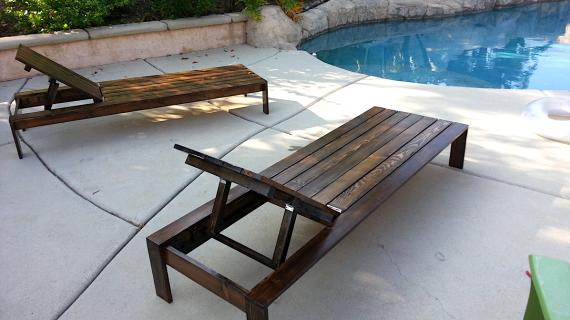
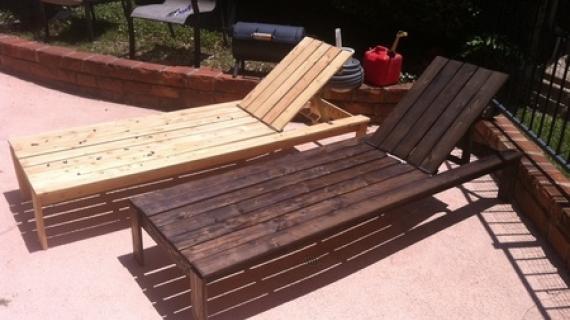
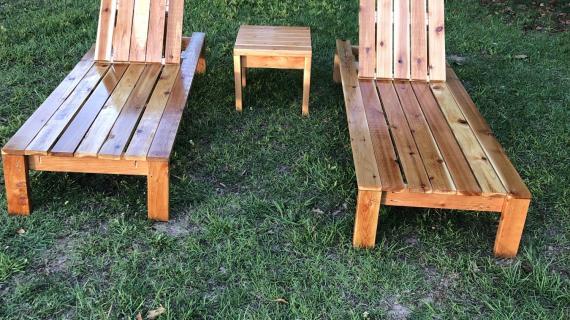
Matching Double Chaise Lounge Plans Also Available
We have also created matching double width outdoor chaise lounges plans for your convenience. You can find those plans here.

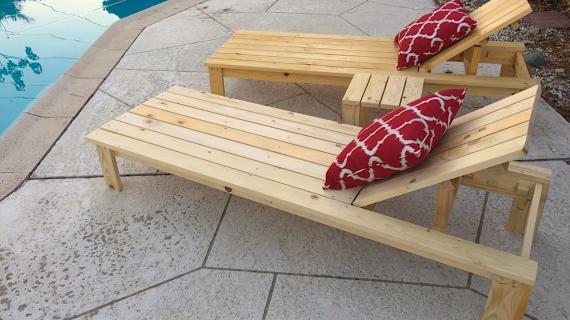
Matching Leftovers Wood Side Table Plans
You will have some scrap wood 1x4s leftover when you are done. We have created a plan to use the leftover 1x4s to create a side table.
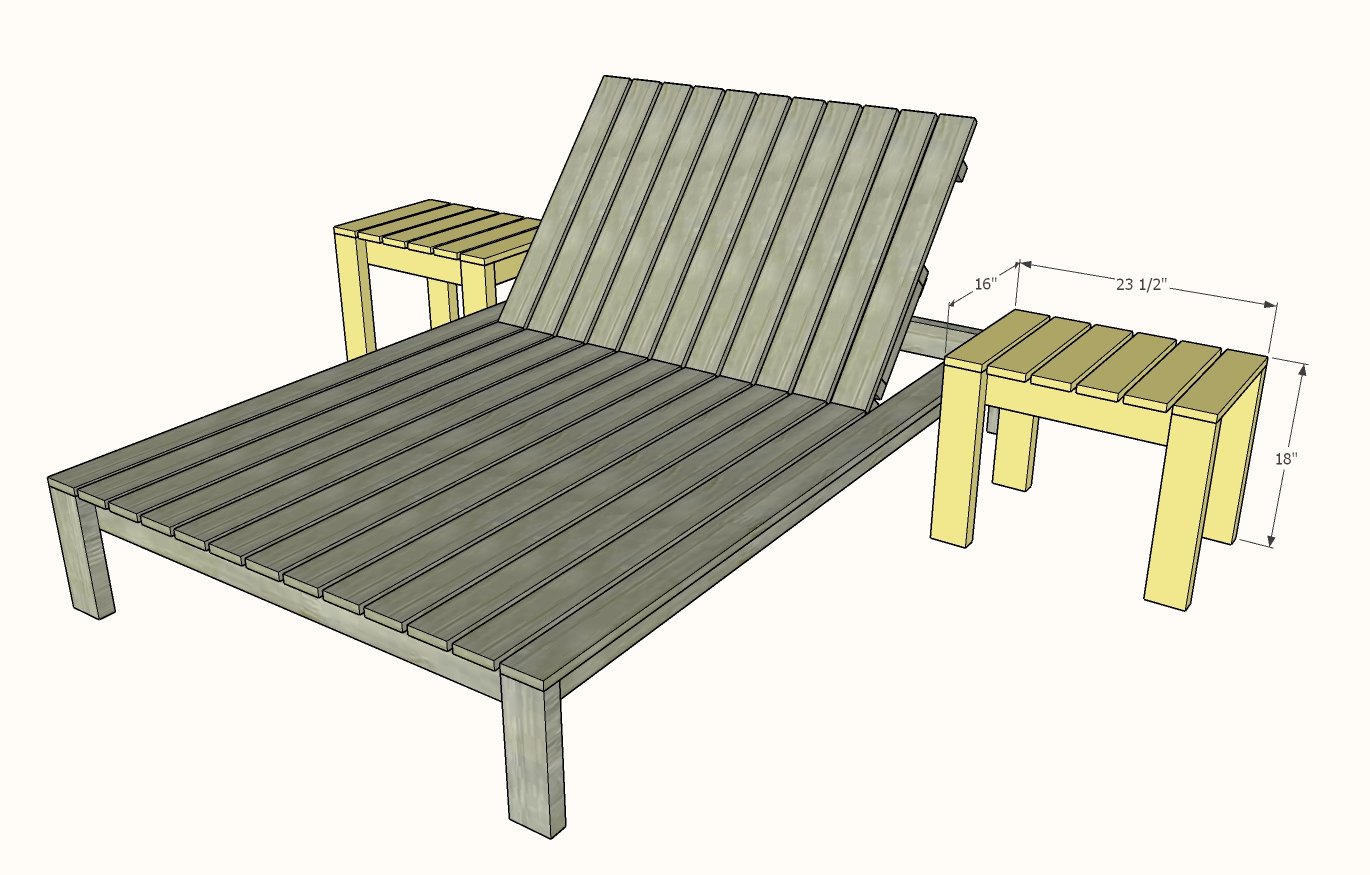
The side table plans are at the bottom of the double chaise lounge plans here (scroll to bottom).
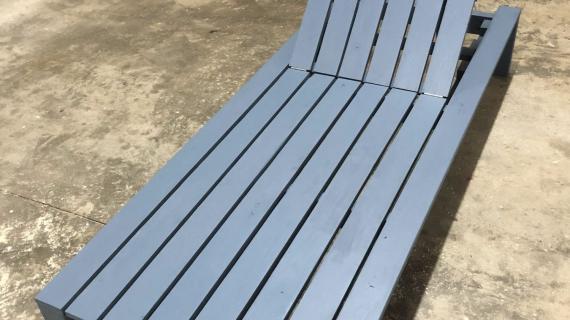
Updated Plans
This plan has been updated to increase the strength of the base (2x4s instead of 1x4s). The overall size changed as well. If you need the old plans, you can find them here.
Here's Some Tips to Build Better Outdoor Furniture
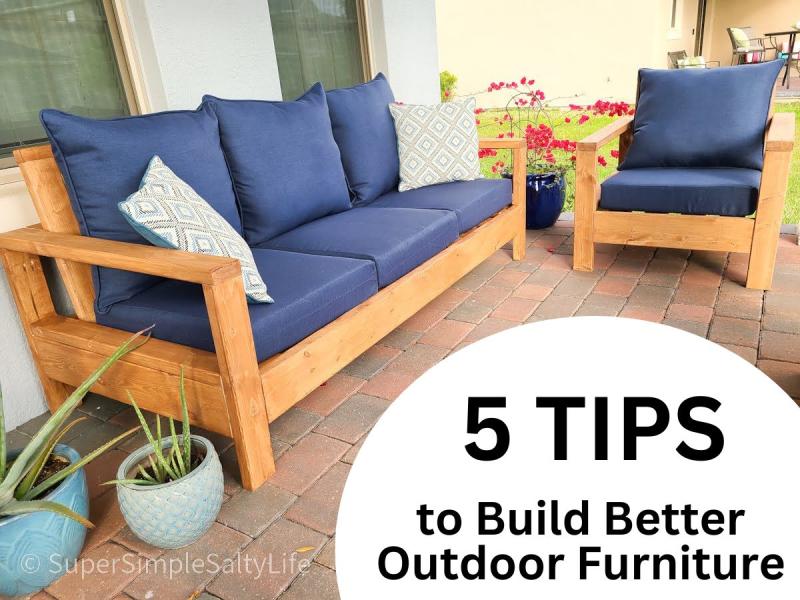
Want to build better outdoor furniture? Over the twenty years I've been building, maintaining, and enjoying my own outdoor furniture, I've learned a few tips that can help build longer lasting furniture.
Preparation
- 3 - 2x4 @ 10 feet long
- 2 - 2x2 @ 8 feet long
- 7 - 1x4 @ 8 feet long
- 2 sets of 3" hinges suitable for exterior use
- 2-1/2" exterior self tapping wood screws
- 2" exterior self tapping wood screws
- Exterior wood glue
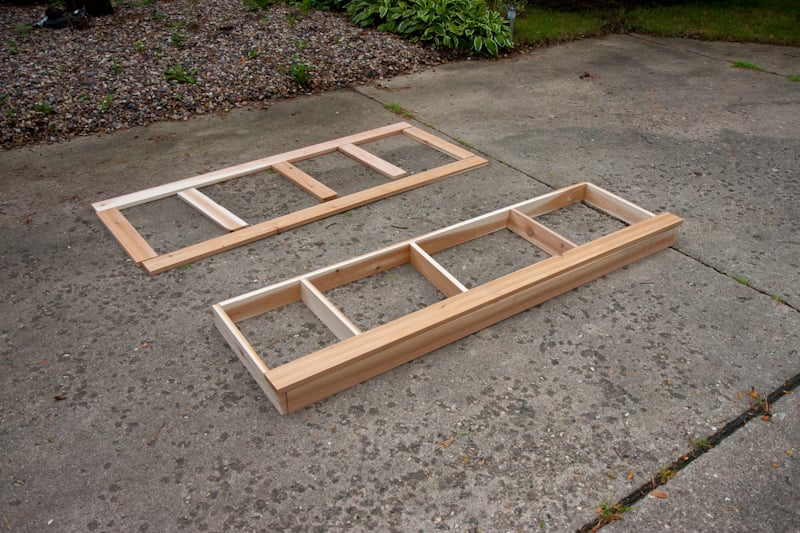
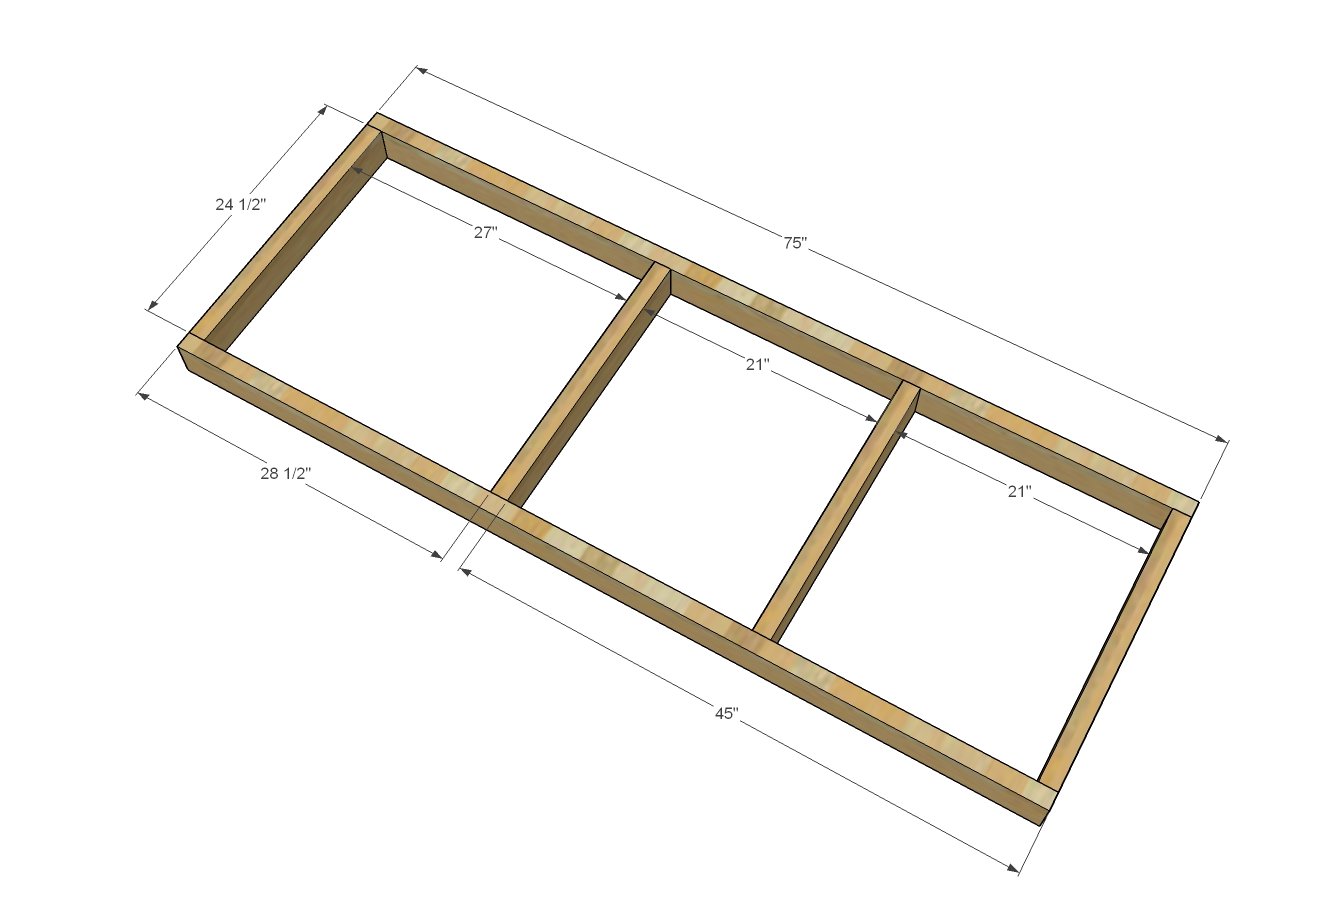
Main Chair
- 2 - 2x4 @ 75" - frame
- 4 - 2x4 @ 24-1/2" - frame
- 4 - 2x4 @ 11-1/4" - legs
- 2 - 2x2 @ 27" - cleats
- 2 - 1x4 @ 78" - side slats
- 6 - 1x4 @ 48" - main slats
- 6 - 2x2 @ 3" - stop blocks
Back
- 6 - 1x4 @ 30" - back slats
- 4 - 2x2 @ 23-1/2" - back supports
- 2 - 2x4 @ 10" - prop supports
Cut all boards using a compound miter saw or circular saw with guide.


Instructions
Step 1
To build this lounger, you can either use the Kreg Jig (pocket hole recommendations shown above) or self tapping wood screws.
Pocket Holes
The advantage of pocket holes is no visible fasteners. If you are using a cushion, this will cover all the fasteners, so this may or may not be as important to you.
When joining 2x to 2x boards, the setting is 1-1/2" with 2-1/2" pocket hole screws. When joining 2x to 1x boards, use the 3/4" setting and 1-1/4" pocket hole screws.
Step 2
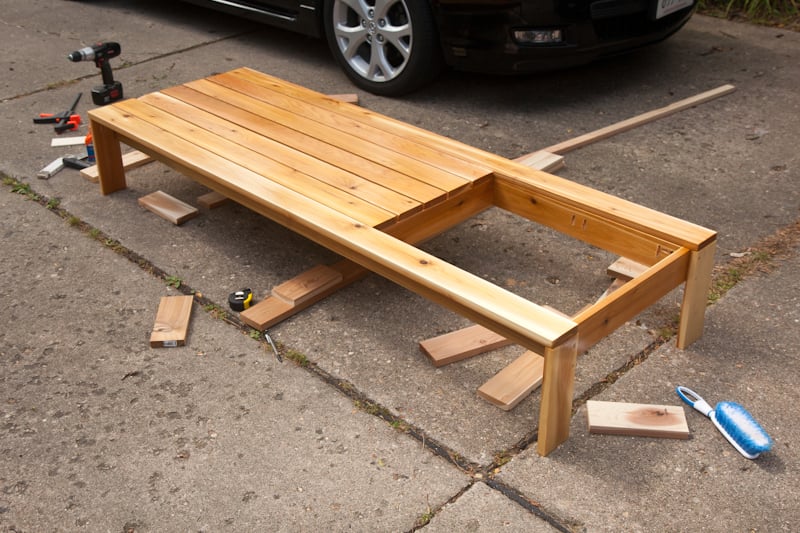
Build the frame, using either 2-1/2" screws or the Kreg Jig. Make sure that the frame is very square.
Step 3
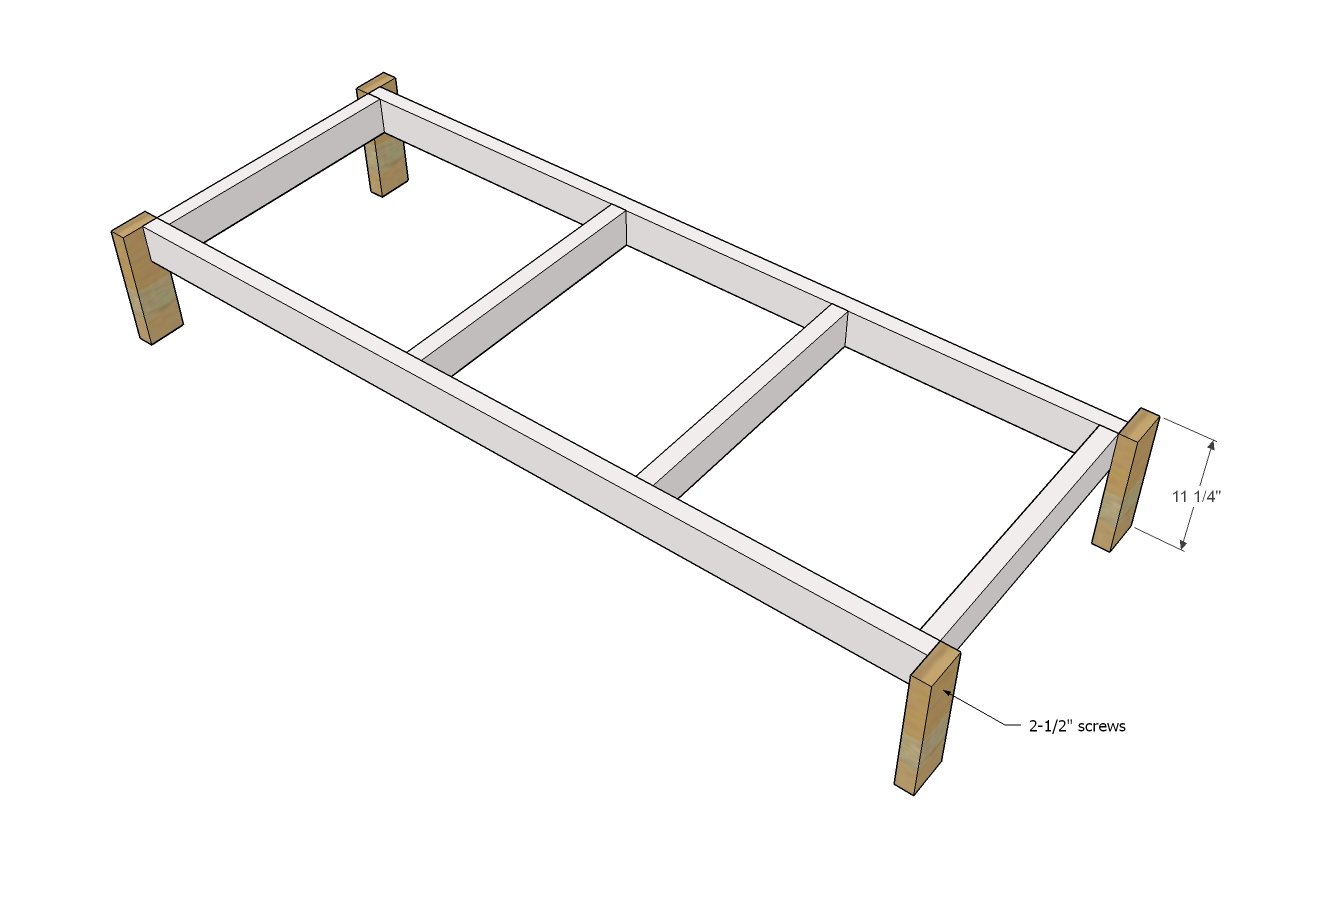
Attach legs to the outside of the frame with 2-1/2" screws.
Step 4
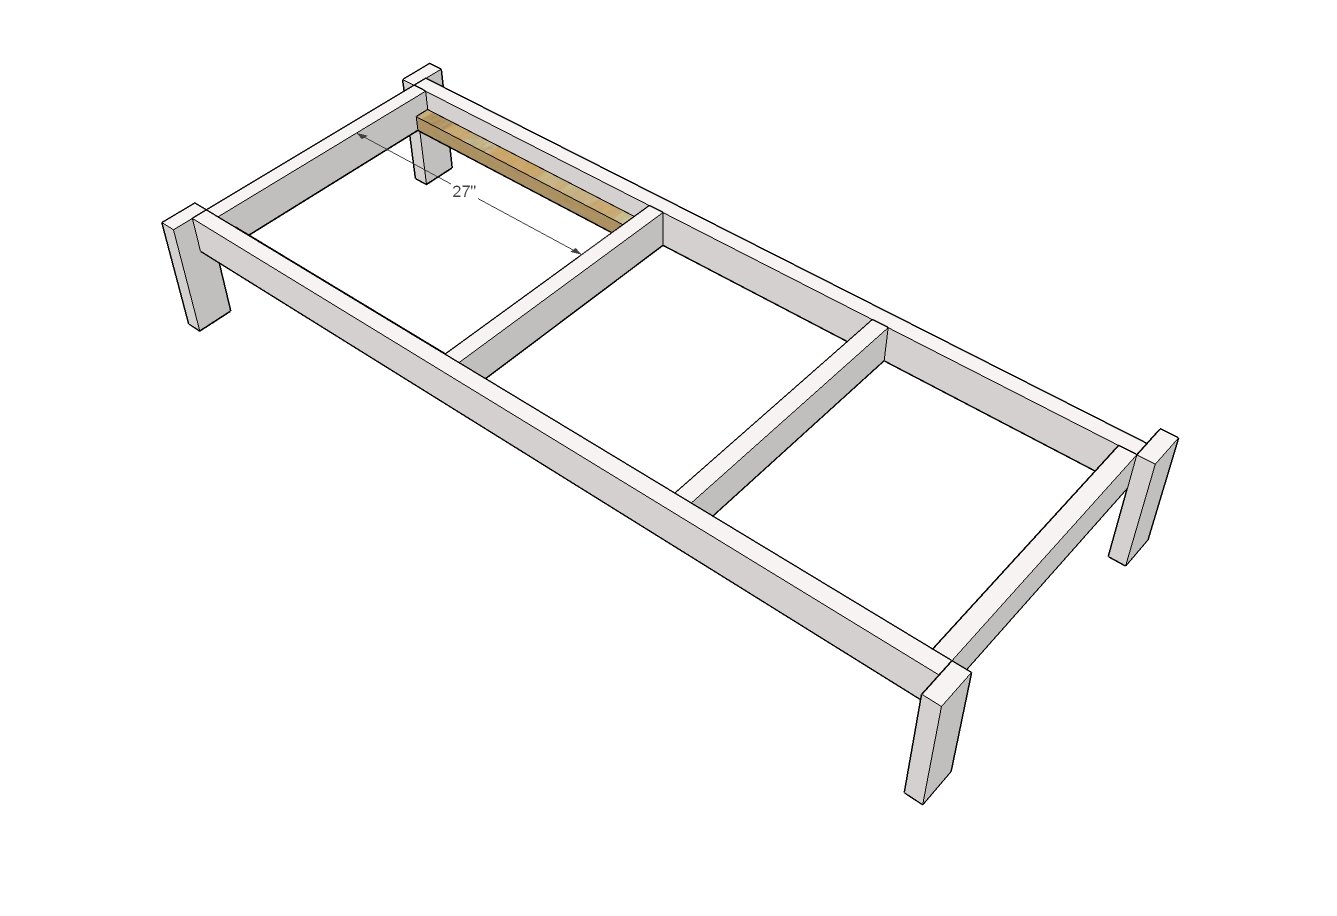
Screw cleats inside the frame, four screws per cleat. 2-1/2" self tapping screws.
Step 5

Attach decking to the top of the chaise lounge with 2" self tapping screws.
Step 6

Build the back piece with 2" screws into the backs of the 2x2s.
Step 7

Build the back support as shown. Make sure the 2x4s are set in 2" from the ends of the 2x2s.
Hinge to the back rest.
Step 8
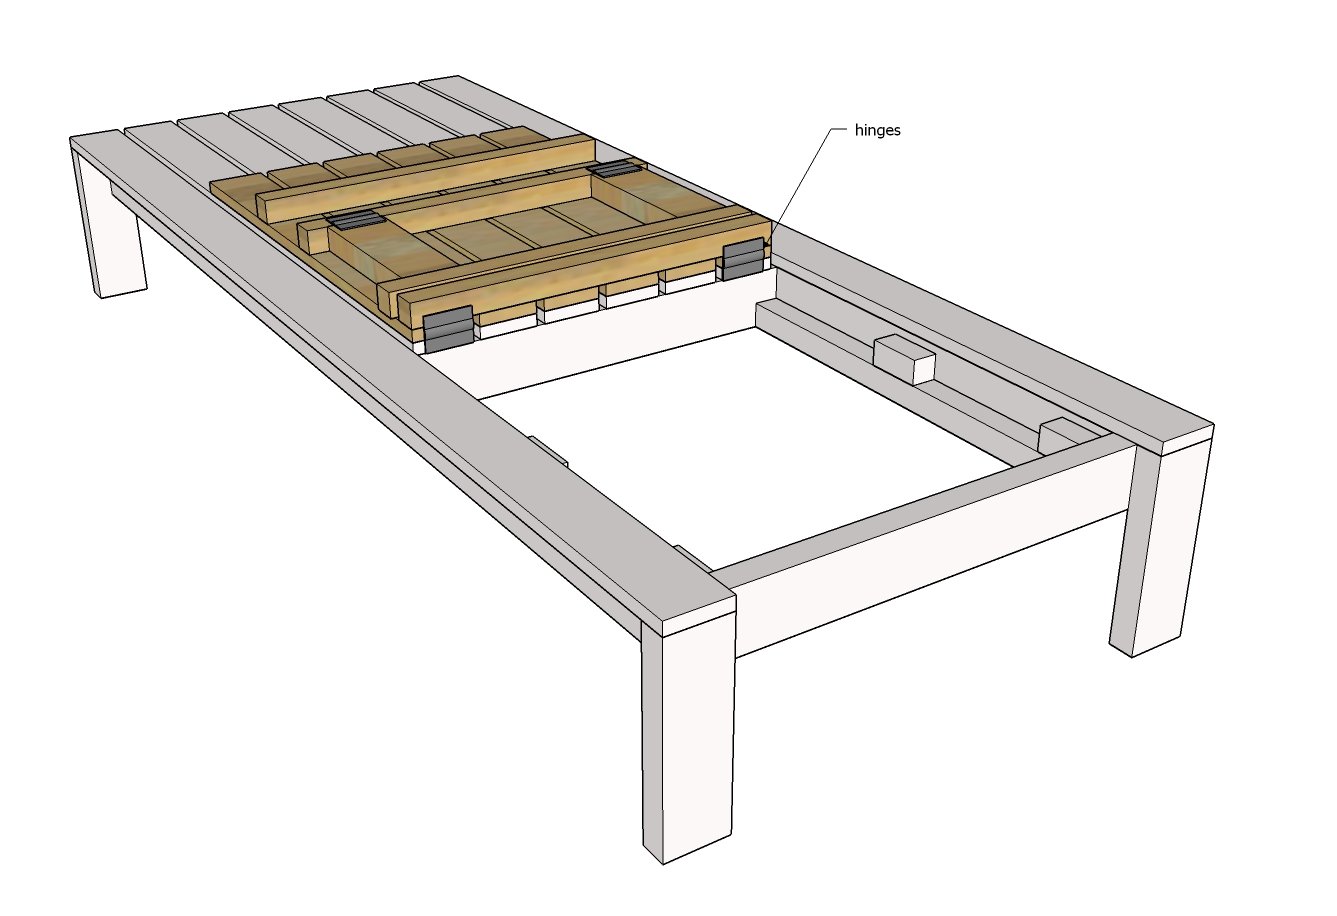
Hinge the entire back piece inside the chaise lounge opening.
Step 9
Install the stop blocks as shown.
You can alter the locations, just make sure the stop blocks don't interfere with the back closing flat.
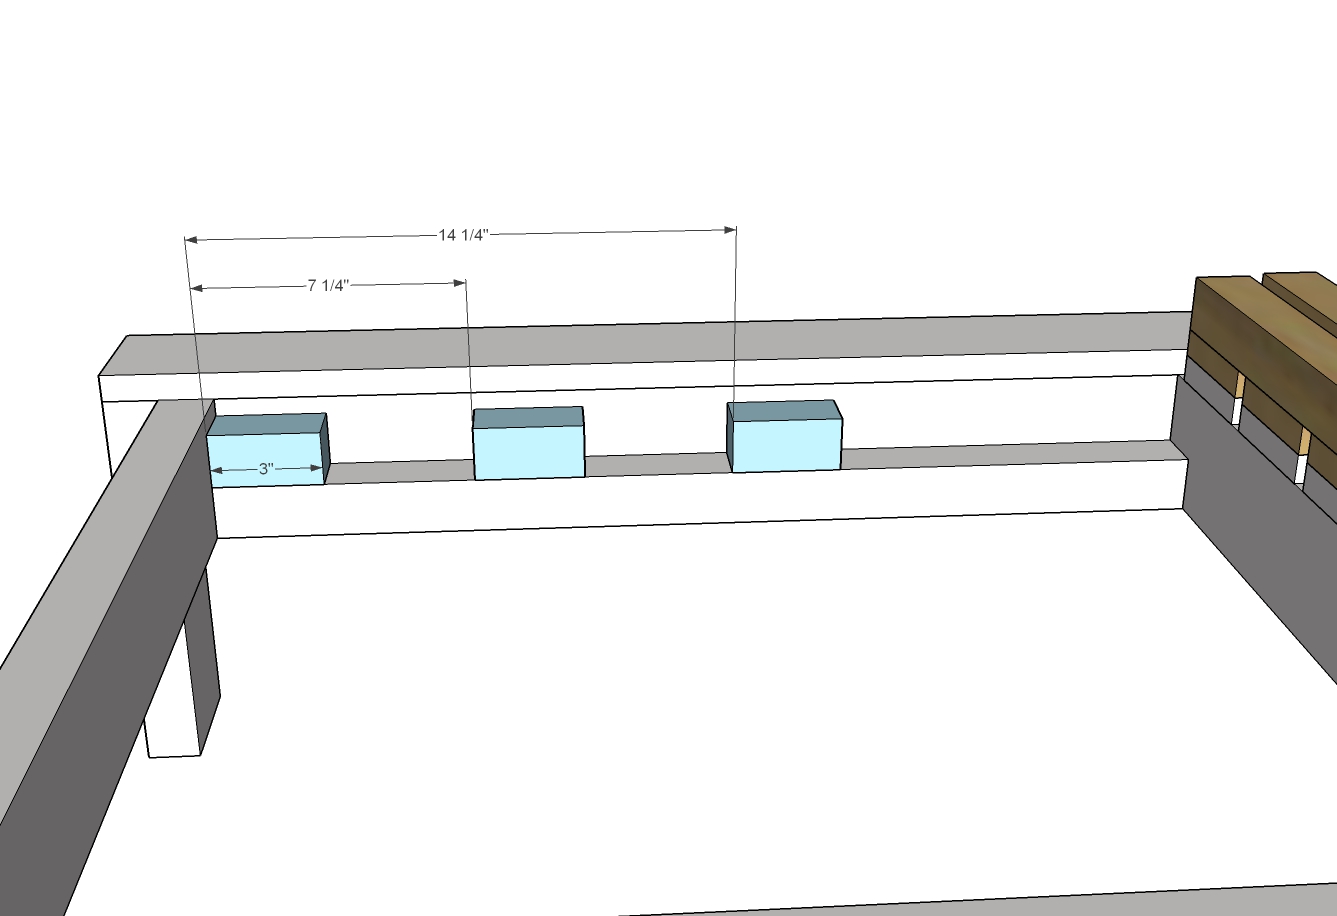
Step 10
Now take some of the 1x2 scraps and create stops as shown above to hold the prop up in place. You can space these at any desired location.

Comments
Wiscousonian (not verified)
Mon, 04/25/2011 - 05:15
YAY thanks for making and
YAY thanks for making and sharing these plans ANA! Glad to see you used my photos too!
In reply to YAY thanks for making and by Wiscousonian (not verified)
Ana White
Mon, 04/25/2011 - 10:45
Thank you for sharing your beautiful photo!
You inspired me! Thank you, your photos are just so beautiful! I love how you kept your boards the same, even on the back rest. Clever and classy.
In reply to Thank you for sharing your beautiful photo! by Ana White
cathybchicago
Tue, 04/26/2011 - 08:06
Single Lounger - adding wheels?
Any suggestions on how we could add wheels to the back of this for ease of maneuverability?
wiscousonian (not verified)
Fri, 04/29/2011 - 07:58
Wheels
Not sure about wheels, it might change how sturdy these are. The legs help ground the chair so that it doesn't flex much. With wheels id be afraid of the legs taking a lot of horizontal stress because the wheels will want to fold back, whereas with legs only they cant move so the weight is forced down...make any sense? Also they are not that heavy that they are not movable if you're following the sunny areas around your yard throughout the day.
Amy @ this DIY life (not verified)
Mon, 04/25/2011 - 10:37
So excited for the return of
So excited for the return of plans for the simple modern outdoor collection! My first chair was from this collection and I'm loving this lounger! Time to break in the Kreg!
Guest (not verified)
Mon, 04/25/2011 - 11:10
Type of wood?
What type of wood did you use on this Single Lounger for the Simple Modern Outdoor Collection? I love the lounger and will build this in the next couple of weeks.
Wiscousonian (not verified)
Mon, 04/25/2011 - 12:34
In the above photos I used
In the above photos I used Cedar that i sanded and polyurethaned very thoroughly with about 4 coats. they are very glossy and smooth!
Darb1001
Mon, 04/11/2016 - 06:51
Lounger Cost
Where did you find the materials for less than $50? Just the wood ran almost $70 and that was rough on one side so I had to run it through my planer a couple of times.
Guest (not verified)
Mon, 04/25/2011 - 16:24
Very nice. Thank you for the details.
I really want to build on soon, I have been saving up some cedar for one of these. The photos are great and it is very helpful to see where the holes are put. Thanks again great photos. Love your pool too!
Guest (not verified)
Mon, 06/27/2011 - 21:48
Wheels
Wheels could be mounted on simple struts that would extend out the back of the legs, so they're off the ground when it's in the 'resting' position, but when you lift the opposite end the angle would put the wheels in contact with the ground. Just a thought.
Guest (not verified)
Wed, 07/06/2011 - 05:31
wheels
rather than a strut at the end you could place the wheel axel towards the back of the leg for the same affect.
Anne Dapore (not verified)
Tue, 08/09/2011 - 12:01
I love these plans! Thank
I love these plans! Thank you! Here is a DIY Lounge Pillow TUTE from Martha. These would be great with your lounger!
http://www.marthastewart.com/273544/custom-made-cushions?backto=true&ba…
Geophyrd@hotmail.com (not verified)
Sun, 08/14/2011 - 07:25
Hi
I went to work on this lounger today. I altered a couple of things on the plan.
1). I rounded edges everywhere someone might grab the lounger as well as between the borders. I know part of the charm is the flatness but I was worried someone might cut themselves on the edges (yep, they were that sharp). I used a quarter bit rounder on my router table to do this.
2). I couldn't figure out where to put the Kreg jig digs on the joists, so I simply did 30 holes across the joist and, when I laid the planks, used some but not all of them. I spaced the digs using the B and C holes in the jig, used the long screw head in B, drilled C, moved over until I'd done all 30. It was approximately 45 mins per joist. NOT fun.
3). When I was cutting down the 2x4 to 1 1/8, I cut 1/4" off each deck plank. Then I cut those to 3/4" and used them as spacers between the planks.
4). I painted a 'Sea Mist' stain on the boards and frame before assembling. Just a first coat. I'll give another one once its fully assembled.
So there I am. The body is put together, the 5 body planks are on. Later, will put on the sides and assemble the top.
geophyrd
Fri, 09/02/2011 - 11:57
A couple of questions
Almost done with the lounger...
A couple of questions:
The back is 25". If the supports are 2x2, separating them by 3.25, 5.25, 12 plus 2 plus 2 plus 2 = 26.5, not 25. Going to leave the bottom one off until I see how its fitting.
Also, because I cut the back support to size (1", I'm going to have to add back to its thickness. Anyone else have this problem?
geophyrd
Sat, 09/03/2011 - 14:49
OK so its finished
Will have a brag blog along presently. For the next person building, consider the following:
The measurements on the back are not precise and following them will lead to trouble. They can work, but I was not able to follow the measurements and have the top close well. Instead, I opted for it to sit half an inch above the rest of the lounger.
Not happy about the hinge mechanism for the top, may have to look for more of a specialty item for that.
All in all, this project was much more challenging than I thought it would be. But it does look great.
Guest (not verified)
Thu, 02/16/2012 - 03:30
Frame width ... A little small
Why make the frame width little small (19")? Which make the deck board side sitting only on the frame very little. Can we just increase this to 23" and add the 4" to the Prop up base? This will make the chair extra rigid so that the leg can also screw into the frame.
For the wheel, just cut 2 45 degree angle pieces and screw it into the back so that the leg and the frame are join.
Great site and the chair plan.
Nikohall
Sat, 06/01/2013 - 13:22
WARNING Measurements incorrect!!
So I just put the base together, all boards cut exactly to size. I didn't double check the math since everyone seemed to build just fine with the above instructions. However, when I laid the deck boards down the over hang by 0.75".
According to Ana's plans, 51" + 24.25" = 74.5"
Obviously this is wrong, and I've already cut the back pieces to 25".
Would you suggest moving the 19" support back, making the distance 23.5" instead of 24.25"? How is this going to affect the back support?
Anyone else have these problems?
Thanks
Nikohall
Sat, 06/01/2013 - 13:43
WOW, ALL measurements off. BUILDER BEWARE
Guess its my fault for not checking the math, but now on the next step and more measurement problems. These plans are worthless, I wasted $100 on lumber and supplies and now have a bunch of expensive firewood.
The deck boards are 4" wide, giving a total width of 20". Add on the (6) 0.25" gaps give you a total width of 21.5". Ana expects this to fit in 19" of space.
As much as I was excited to tackle this project, I must say this was a complete waste of time, energy and money.
Nikohall
Sat, 06/01/2013 - 13:44
WOW, ALL measurements off. BUILDER BEWARE
Guess its my fault for not checking the math, but now on the next step and more measurement problems. These plans are worthless, I wasted $100 on lumber and supplies and now have a bunch of expensive firewood.
The deck boards are 4" wide, giving a total width of 20". Add on the (6) 0.25" gaps give you a total width of 21.5". Ana expects this to fit in 19" of space.
As much as I was excited to tackle this project, I must say this was a complete waste of time, energy and money.
EternalOptimist
Sat, 06/01/2013 - 16:22
Stock lumber
Nikohall, you mentioned that your deck boards are exactly 4", correct? Stock lumber that is labeled __" x 4" actually measures 3.5" - 3.75" in width depending on your area. This information is available on Ana's Getting Started page along with other great information here: http://ana-white.com/2011/03/how-do-i-get-started.
When we understand that she used stock lumber, the math works.
(3.5 x 5) + (0.25 x 6) = 19
I hope this helps, and sorry for the frustrations you've encountered thus far. Don't give up!
JHJackson
Sat, 06/01/2013 - 17:53
or just use one less board
or just use one less board and give a slightly larger gap.
pretty dramatic to say they are worthless.
JHJackson
Sat, 06/01/2013 - 17:56
or just use one less board
or just use one less board and give a slightly larger gap.
pretty dramatic to say they are worthless.
Bandera89
Sat, 04/18/2015 - 10:45
Pool is open
I just found my next project. This will only be my 4th project since I started my new hobby. After the last Ana project, my family thinks I can build anything. How much weight can these 1x4 legs hold? I'm thinking 2x4 legs..
In reply to Pool is open by Bandera89
TLindner
Mon, 04/27/2015 - 05:59
I used the legs as is, but
I used the legs as is, but added another 1x4 to make a corner (so it looks like a 4x4 from the side). It has been sturdy enough for me at 215 lbs.
rochahorses@gm…
Mon, 05/04/2020 - 08:55
Chaise Lounge
Love this plan! It's a beautiful addition to the back porch!
sdlacher
Thu, 05/07/2020 - 17:03
Double wide lounger
has anyone updated this* plan to the double wide? I am mostly interested in what dimensions were used for the frame width....for material use it comes out better at 48" instead of doubling the 2x4@ 24 1/2 to 49".
tizlad
Tue, 06/02/2020 - 03:11
Great Plan Ana - I was…
Great Plan Ana - I was wondering if you had any plans to make a foldable version of this for people with less storage space
Or does anyone know of a way to modify so that it could be folded in half and stored easier
Tbagga
Tue, 06/23/2020 - 15:50
2x4 Shopping List - Is it correct?
What am I missing? How do you get 293 inches of cuts out of 240 inches of 2x4?
AmandaJ64
Sat, 07/11/2020 - 18:53
I thought the same? Did you…
I thought the same? Did you figure it out?
tiffann74
Mon, 02/22/2021 - 09:43
Has anyone replied to this?…
Has anyone replied to this? I’m just starting my cuts and her shopping list is a little short. I have the same question as you! Not enough 2x4 in the shopping list to make the cuts in the cut list smh
AmandaJ64
Sat, 07/11/2020 - 18:52
shopping list??
Is the shopping list correct? I feel like there should be 3 2x4s to get enough of that size?? Am I reading it wrong?
Siweltj
Sat, 08/01/2020 - 18:47
Just finished build. There…
Just finished build. There where a few measurements off a bit but easy fixes. These are well built. Finished with a spar urethane.
ShantaCarroll
Wed, 01/20/2021 - 10:09
Link for Double Chaise Lounge not working
Hi there, I can't seem to able to view the plans for the Double Chaise Lounge, it just links me to the jpg photo of it. Are the plans for the Double Chaise Lounge available somewhere else perhaps? Thanks!! Love your work!
ShantaCarroll
Wed, 01/20/2021 - 10:32
Never mind I found it!
Never mind I found it in another spot on your website :)