

Free pergola plans by ANA-WHITE.com
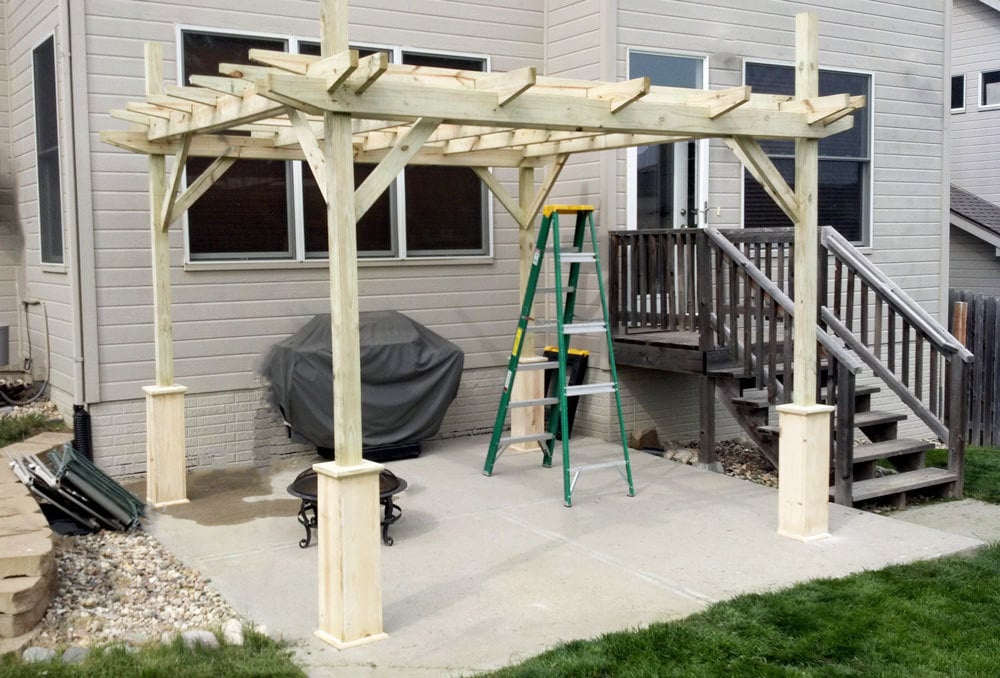
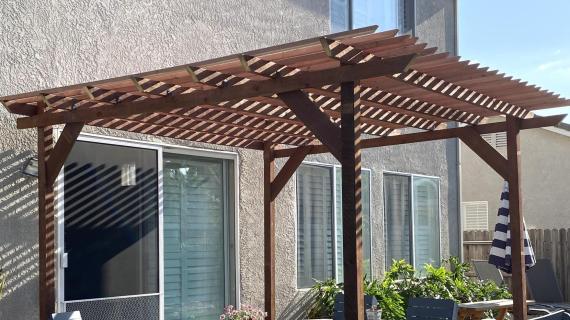
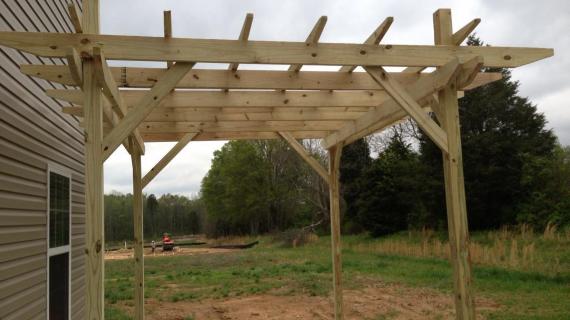
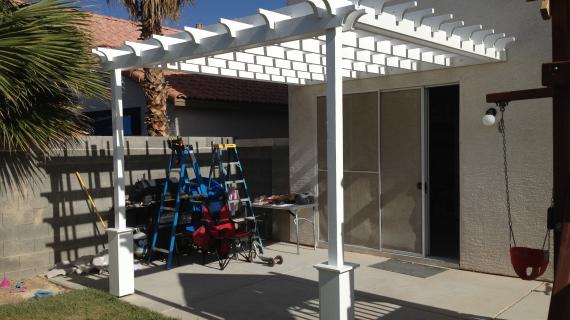
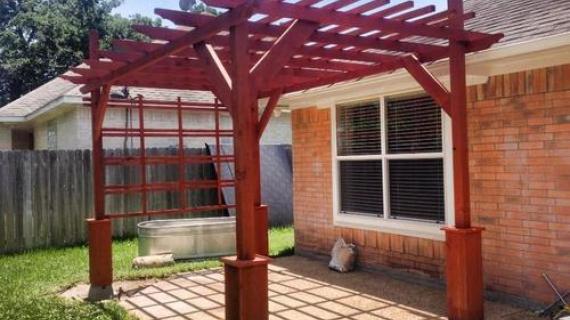
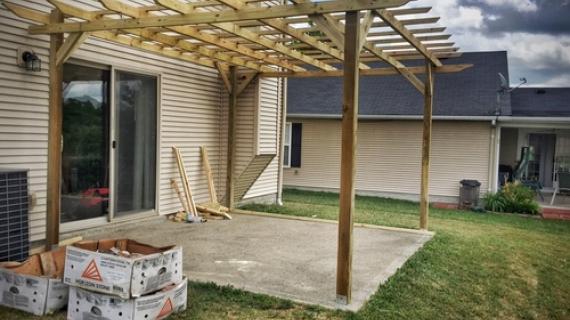
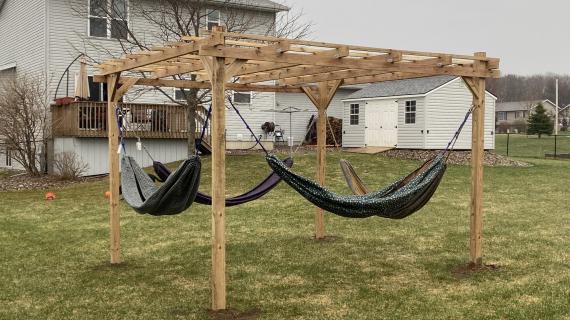
Build your own pergola!

Preparation
4 - 4x4 treated posts - 8-12 feet long (depending on how much of the posts you choose to bury or place in pier blocks)
16 - 2x2 @ 3 1/2" long (short cleats)
It is recommended that you cut boards as you go on this project.


Please read through the entire plan and all comments before beginning this project. It is also advisable to review the Getting Started Section. Take all necessary precautions to build safely and smartly. Work on a clean level surface, free of imperfections or debris. Always use straight boards. Check for square after each step. Always predrill holes before attaching with screws. Use glue with finish nails for a stronger hold. Wipe excess glue off bare wood for stained projects, as dried glue will not take stain. Be safe, have fun, and ask for help if you need it. Good luck!
Instructions
Step 1
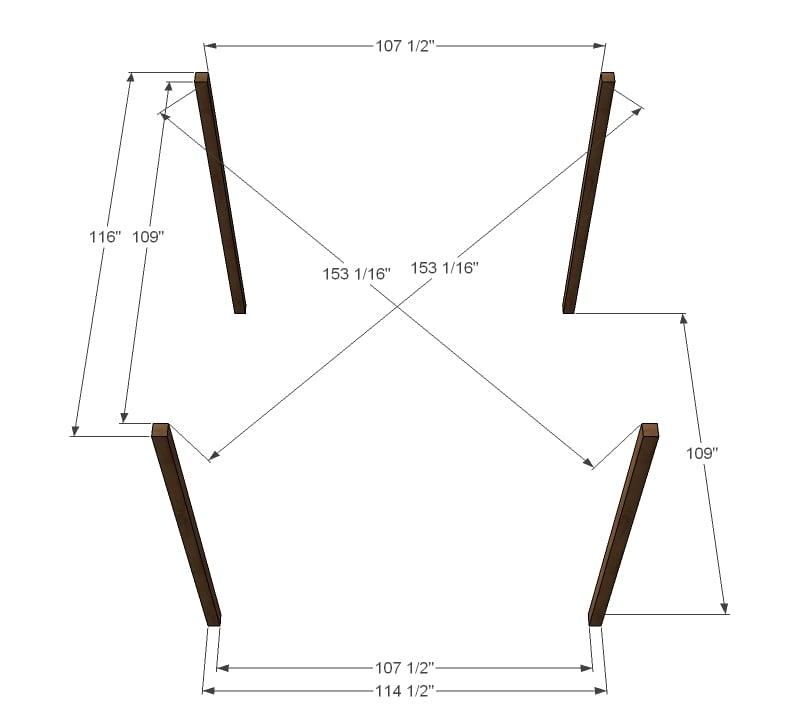
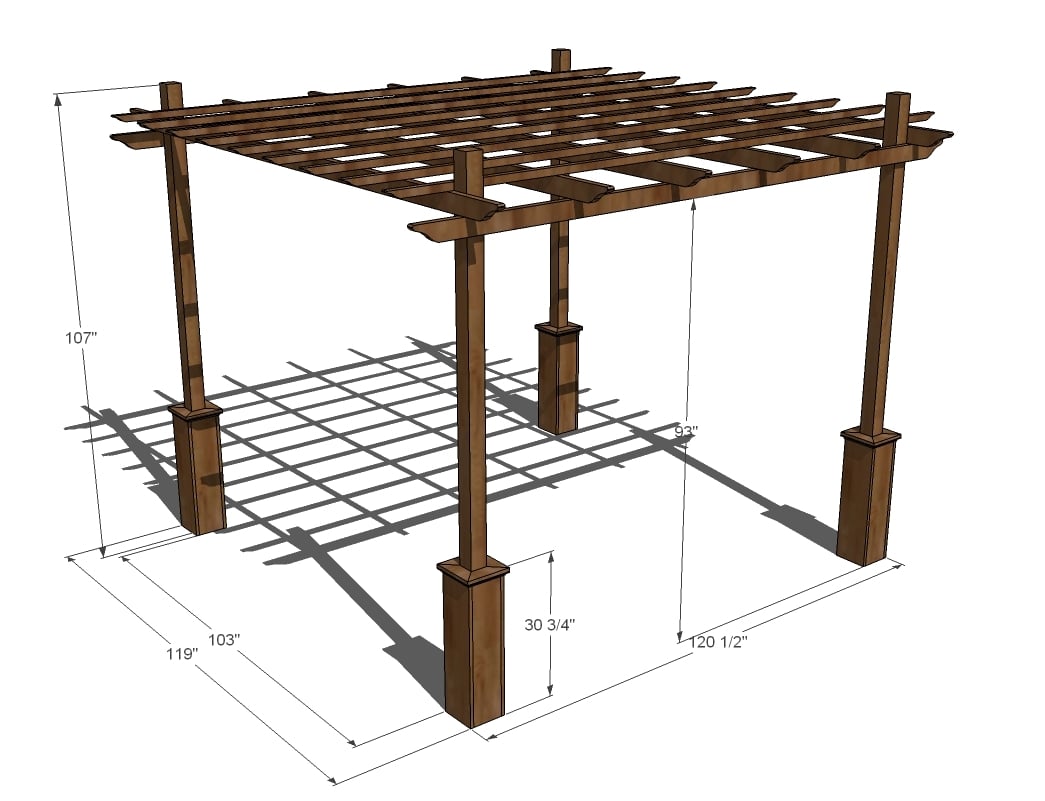
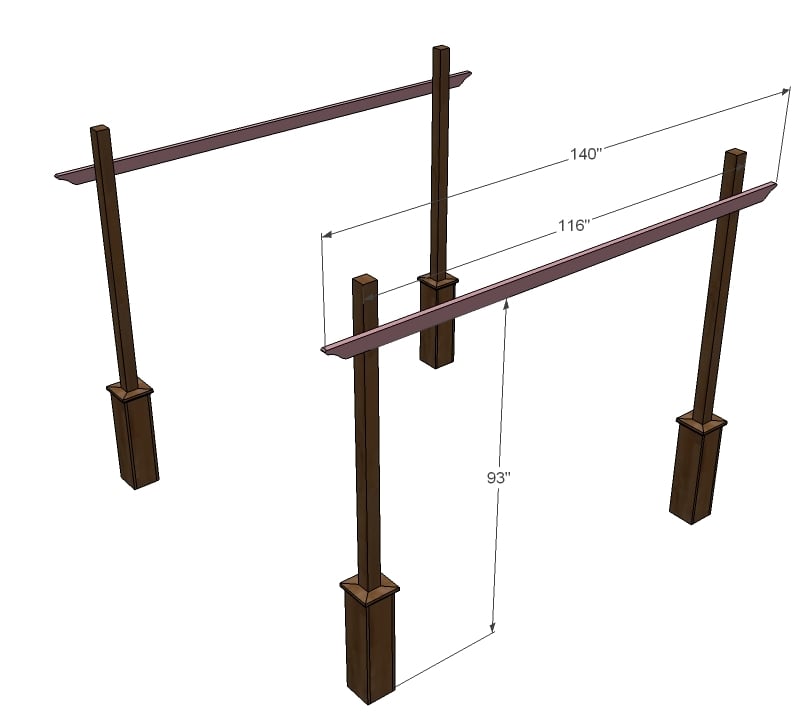
So you first and foremost need to set the posts in the ground. Make sure you space the posts exactly as shown above, and that the posts are square (take diagonals). The posts need to stick out of the ground 107" - but you may need the posts to be longer if for example you are using buried pier blocks.
Step 2
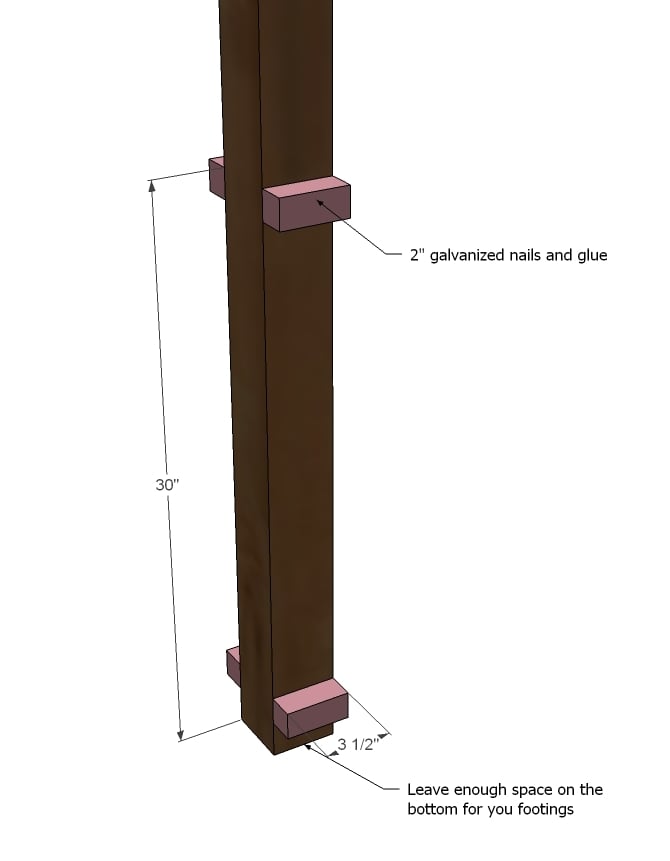
Now on all the posts, attach 2x2 cleats as shown here with 2 1/2" galvanized finish nails and glue. The bottom cleat should sit just above the brackets that hold the posts to the ground.
Step 3
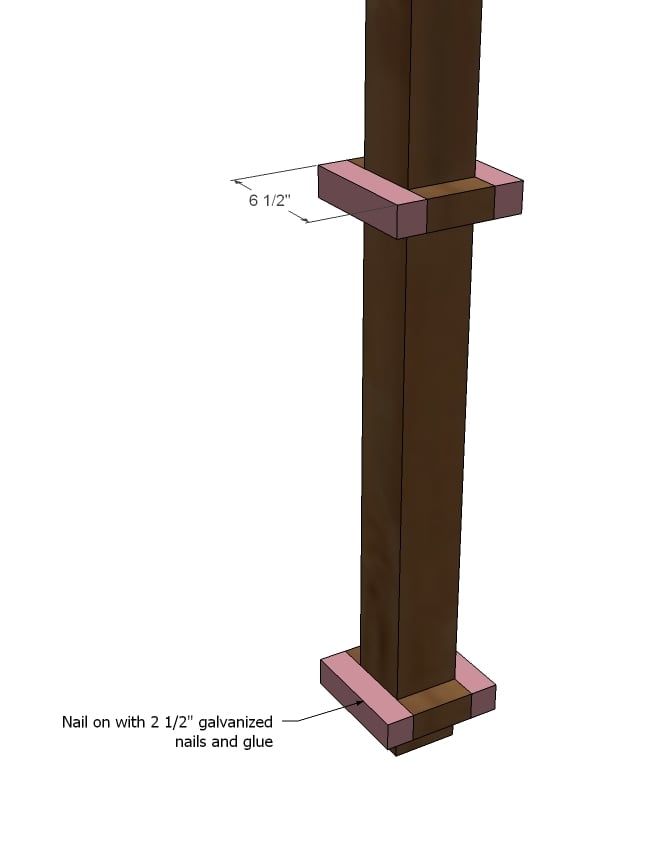
And now simply complete the cleats by adding the other 2x2s as shown above.
Step 4

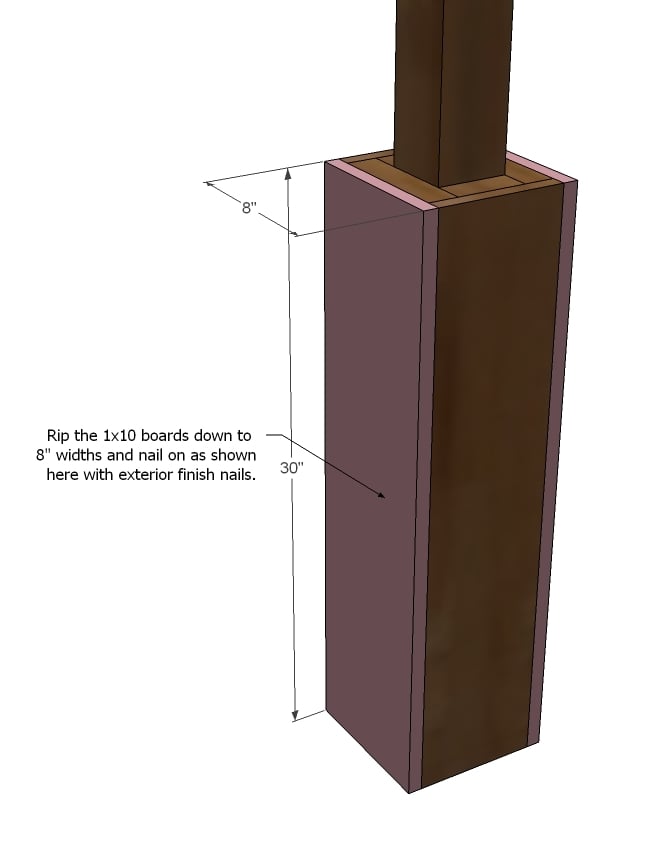
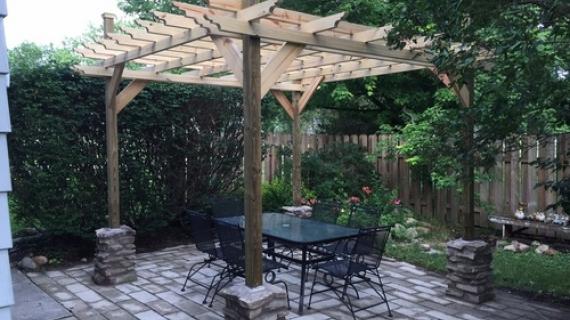
For this plan, you must have a tablesaw to rip boards with nice square edges. Rip your 1x8s down to 6 1/2" widths and use finish nails to attach to the cleats. The trim boards should be cut so that they hide the foundation. You could get extra fancy here and actually cover these posts in stone veneer as well.
Step 5
Step 6
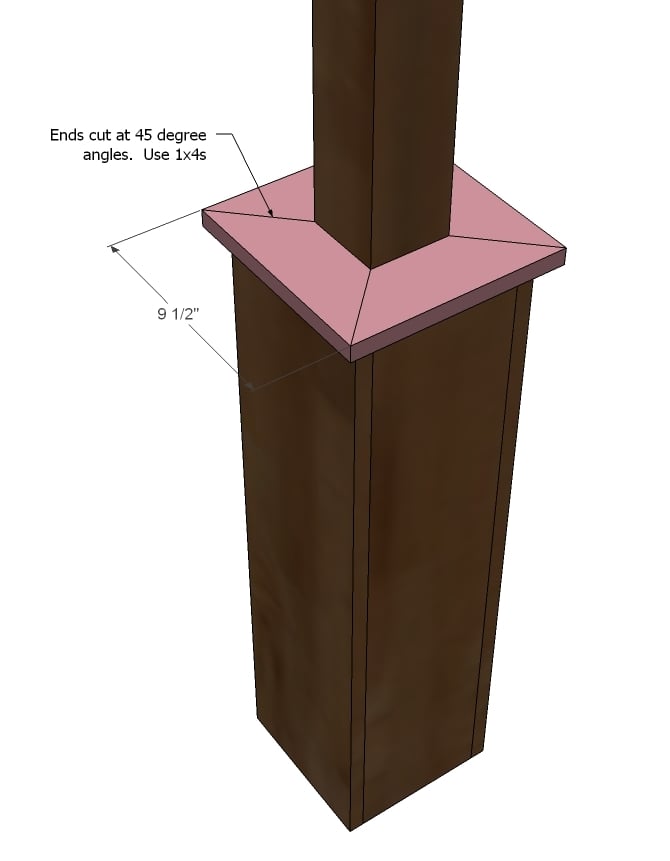
And now a little cap for the posts. Just miter 1x4s at 45 degrees around the bases as shown above. Use finish nails and glue to attach.
Step 7
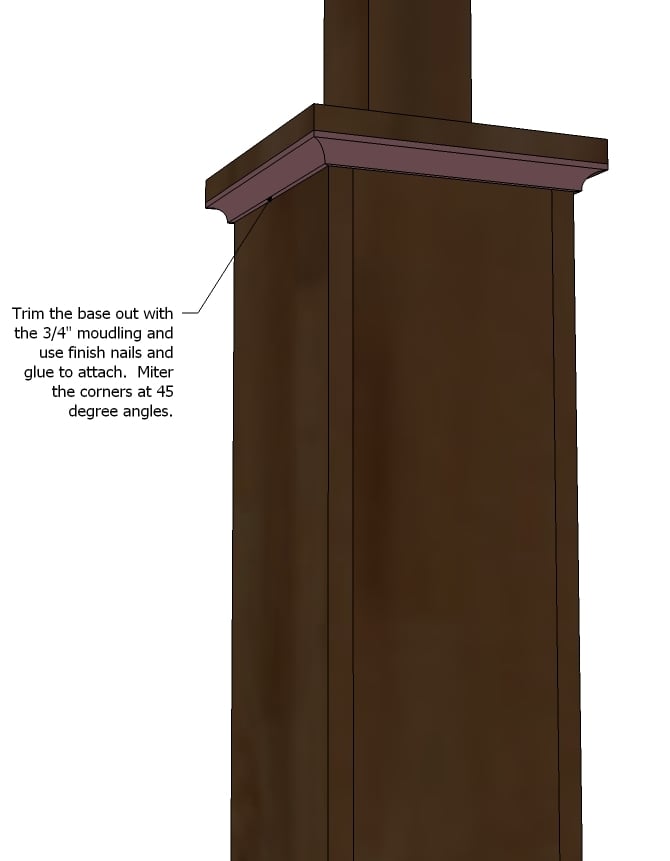
And measure and add the moulding for a little extra touch. Use 1 1/4" finish nails and glue.
Step 8
Okay, now comes the fun part - where we start seeing results. First cut all of your pergola top board ends into a fancy pattern of your choice. Then screw (3" exterior screws) the first boards up as shown above. Use a level to make sure that the boards are level.
Step 9
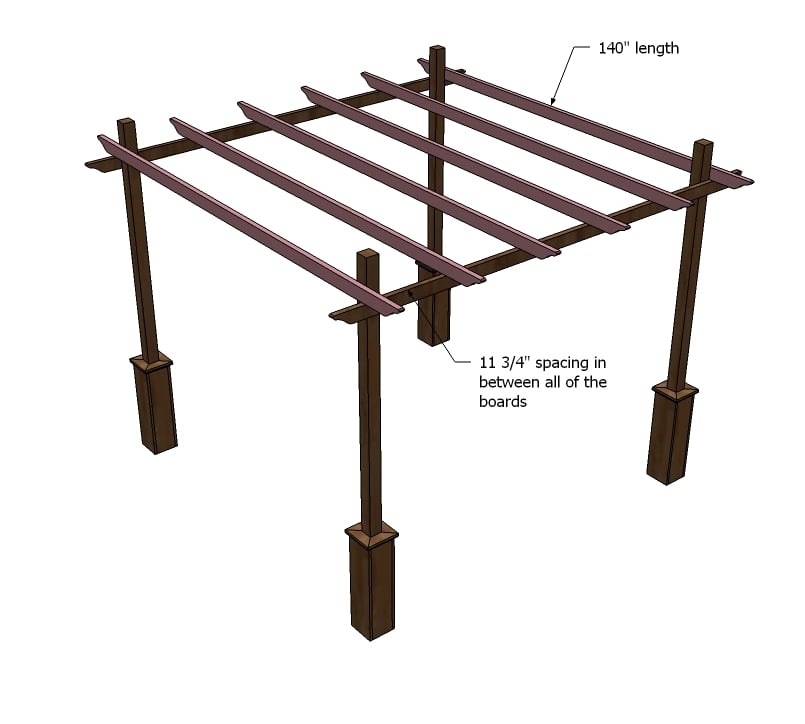
The diagram above should read 22" of spacing between the boards. You will want to take a square of the project here (see step 1). When your diagonals match, rest two more 2x4s on top of the existing 2x4s, to the outsides. Screw to the posts as shown above. Then add the remaining 2x4s spaced 22" apart, using either brackets, pocket hole screws, or long screws carefully predrilled and countersunk from the top.
Step 10

And now the final 2x2s. Space these out and screw to the 2x4s and to the 4x4 post when present with 3" exterior wood screws and glue. Make sure you fasten to all of the 2x4s for the most support.
Step 11
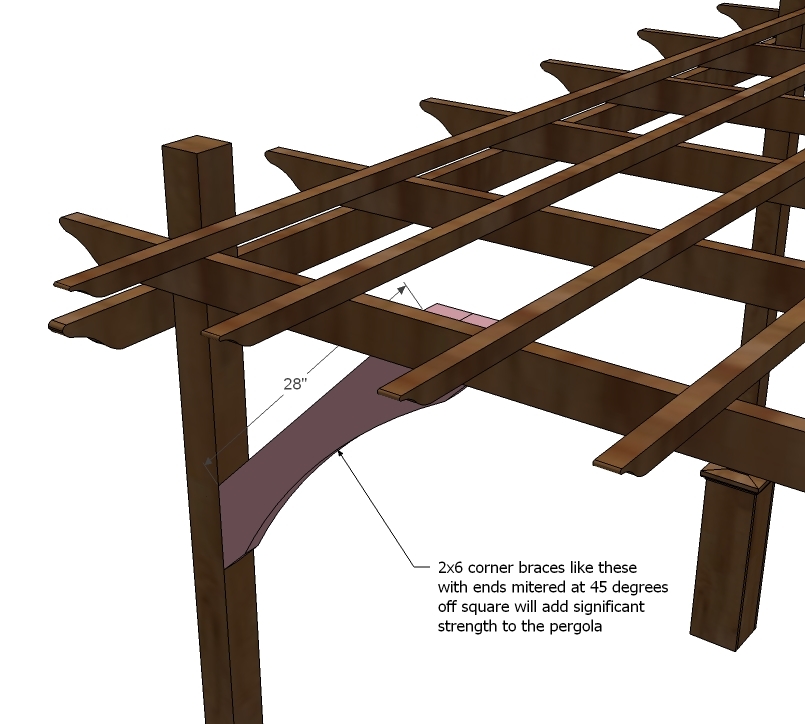
And this isn't what's done with the Pottery Barn one, but I'm a big believer in corner bracing. If you feel your pergola has any wobble or needs a little extra support, you can cut corner braces and screw on - you will be amazed at the difference the corner bracing does. Other means of "beefing up" the pergola (for example, high snow load or high winds) would be to use 2x6s boards instead of 2x4s and to notch out your boards) as done in the link given in the author notes.
It is always recommended to apply a test coat on a hidden area or scrap piece to ensure color evenness and adhesion. Use primer or wood conditioner as needed.

Comments
Nicholez
Sun, 04/10/2011 - 11:53
Perfect!
I love, love, love this! I've wanted a pergola for forever, but wasn't sure how to build it without making it look like a bunch of boards that were just thrown together. I'll be building this for sure... just need to finish a few other projects first!
algdoughty
Sun, 04/10/2011 - 12:06
Wow! we haven't really built
Wow! we haven't really built anything besides a raised garden box, but this is very very lovely! Maybe someday - need to get a few more projects under out belt. Thanks Ana!
jesse (not verified)
Sun, 04/10/2011 - 13:19
You read my mind!
You read my mind! Or maybe you saw that I was searching your site for "pergola" yesterday? Thank you!
JoyofBaking
Sun, 04/10/2011 - 14:07
Ana White!! What the
Ana White!! What the heck?!! How are you reading my mind?? I freaking love you. My family will use this for our new home. We've been searching for weeks for Pergola plans. Thank you so much for helping me and my family make our house a home. We are grateful.
Guest (not verified)
Sun, 04/10/2011 - 14:15
My savior!! My husband and i
My savior!! My husband and i have been searching every where for the perfect out door covering and the pottery barn one always calls my name but not my wallet... We have made several or your projects already and are so excited to start this one! Thanks Ana!
singinggoldielocks
Sun, 04/10/2011 - 14:50
!!!!!!!!!!!!!!
Ditto Ditto, and DITTO!!!! We are getting ready and looking for ideas for a pergola. You're a genius!
ferbit
Sun, 04/10/2011 - 18:03
Covered?
Awesome!!!!!
So out here in the soppy wet Seattle area, covering pergolas to protect everything from the rain is huge... Is it pretty easy to cover this? Like with outdoor fabric/grommets, plywood/shingles, sheets of metal, glass or plastic? Would it need to be built at a slight angle so water can drain properly?
claydowling
Sun, 04/10/2011 - 18:15
A covered pergola
sounds a bit like a vegan steak. Could be done in theory, but misses the point.
It might make more sense to build a frame that can hold the cover you want. As for the covering, there are plenty of good materials, and very few of them are wood. Cedar shakes would be okay, but labor intensive. I've had good luck with the corrugated fiberglass panels, in that they keep off the rain but let in some light. You probably want to make a point of washing it off once or twice a year though. If the dust that naturally settles with the rain builds up too much, it can look tatty.
If you do cover it, the roof needs to fall about one inch for every six feet of run, so if you put up 6' panels, one end needs to be 1" higher than the other. Otherwise you'll get water trapped up there, and a lot of small hungry life breeding.
Guest (not verified)
Sun, 05/01/2011 - 16:01
reply to claydowling
I think corrugated fiberglass would look dreadful. Similar to those 1950's car parks on the side of houses.
Guest (not verified)
Wed, 06/15/2011 - 13:26
No, there is clear corrugated
No, there is clear corrugated Lexan these days that doesn't look anything like the "potty house roofs" of old (actually, I wouldn't mind finding some of the old stuff for free on Craig's List at all).
claydowling
Sun, 04/10/2011 - 18:29
Another foundation option
This is a beautiful plan, but the foundation is going to be the challenging part. I live in the midwest, where we get tornadoes. Tornadoes are very exciting when there are outdoor structures, especially if they are not well anchored. My pergola could easily become my neighbor's pergola. I've seen heavy wooden playscapes relocated.
The last time I needed a good outdoor footing, I found it was worth my while to rent an auger from Orange. Generally takes two people to use, and can be intimidating, but I'd still be digging if I tried to get through the dense roots in my area with a post hole digger.
Orange also sells cardboard tube for concrete forms (get your auger sized to the tubes). U.S. construction code says you actually need to be putting your footings for posts 48" deep, to prevent heaving with frost in my part of the country, so we went nuts, but 24" would probably put you deep enough. We cut our tubes down to size and started mixing concrete.
Orange sells great galvanized steel brackets for setting into this concrete and securing a 4x4. We dropped one of those on top of each of our footings, and came back a couple of days later once the cement was set up. The deck we put on them is rock solid and won't be going anywhere soon. Unlike the one we pulled out, which was on significantly shallower footings and wasn't all that stable any more.
kimber (not verified)
Mon, 04/11/2011 - 07:28
Wow!
This is soooo stinkin' fabulous!!! So excited. Yay. I'll keep in mind the foundation issues...but I love this....maybe not at this house...but I'm making this at our next one! Thanks so much!
Anonymous Coward (not verified)
Mon, 04/11/2011 - 08:15
Vines for that Pergola - Beware
Beware. Be very ware!
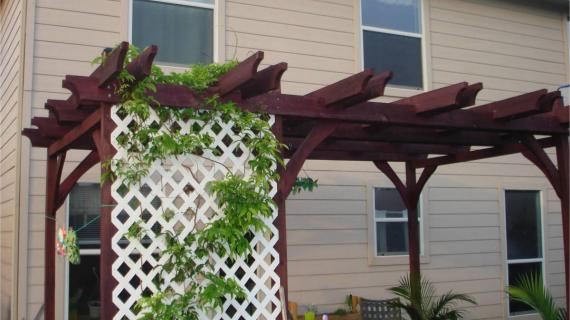
If you plan to grow vines up and over your pergola, you may need to have stronger (or more) posts, better fasteners, and sturdier crosspieces. Any vine that does not die to the roots every year in your climate can develop a weight of stems, trunks and foliage that can rip trellises apart. Look at the description of the vine in a reliable gardening book and look at some established specimens in your area, then decide whether to plant it or not.
Lightweight vines: Sweet peas, scarlet runner beans, "queen's wreath" (Antigonon leptus), many gourds,
Medium vines - Armenian cucumbers, large-fruited squash or pumpkins, some climbing roses
Monster vines - Wisteria, grapes, Arizona cat's claw (Macfadyena unguis-cati), bougainvillea, Algerian ivy, English Ivy, Boston ivy, Lady Banks Rose, many climbing roses)
Aviva (not verified)
Tue, 04/12/2011 - 22:46
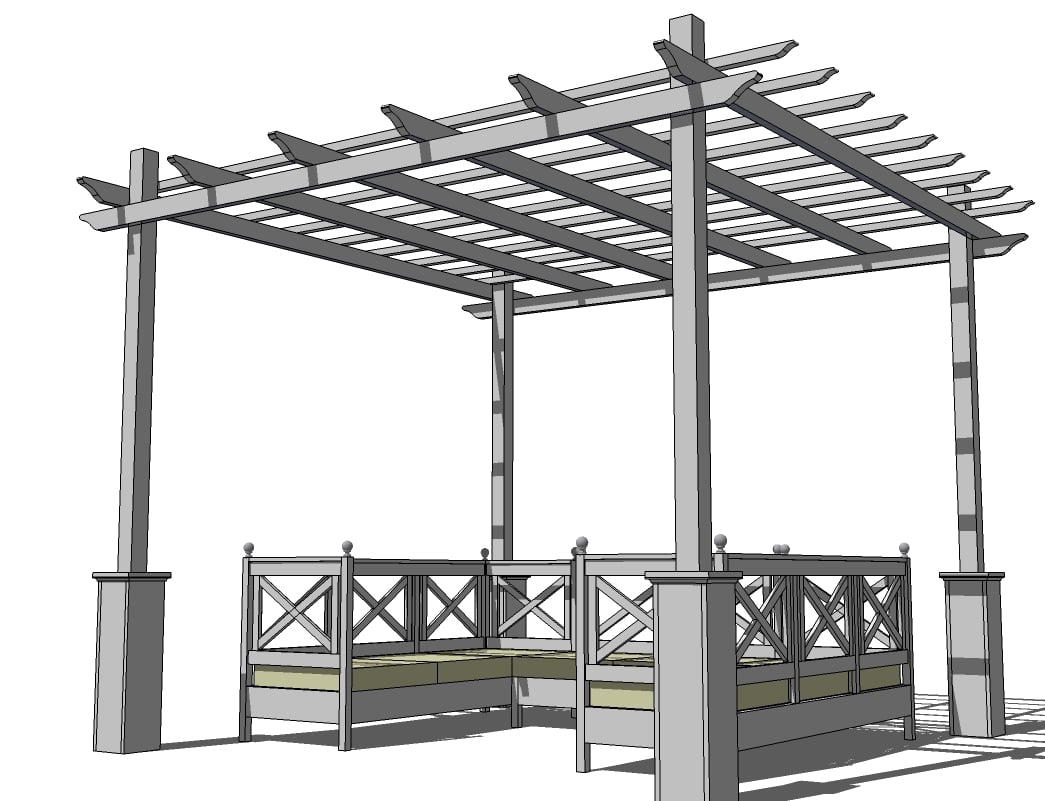
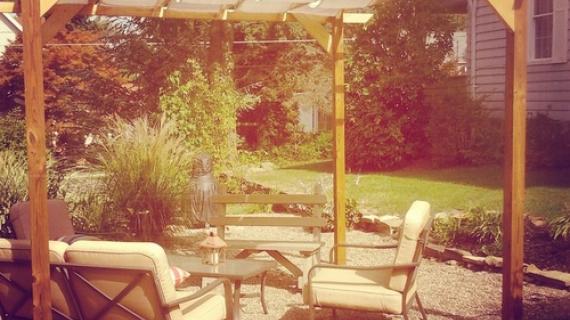
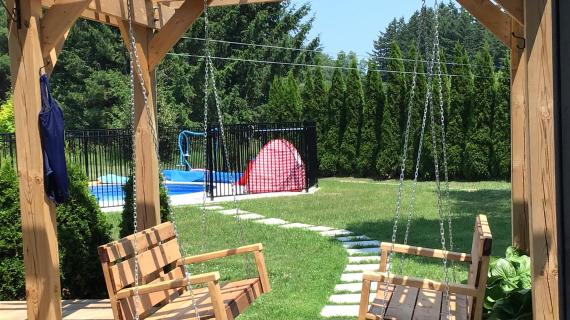
Chairs
Any chance you'll be posting the plans for those chairs that are pictured? They're gorgeous!! :)
Thanks for all you do, Ana!
amanda.leonard
Wed, 04/13/2011 - 15:56
Building Ordinances
Does anyone know if this is considered a permanent structure and need to be behind the building set back line? I am in an urban area with a garden out front that would love this. But we have maxed our building foot-print. If this is considered a temporary structure, then the city can't make me remove it.
Aviva (not verified)
Thu, 04/14/2011 - 13:35
I think that may depend on
I think that may depend on the regulations in your specific area.
Guest (not verified)
Wed, 06/15/2011 - 13:28
Every municipality and even
Every municipality and even county can have completely different codes. I plan to make some trellises, myself, that happen to be set up in a square...
CelesteC
Thu, 04/14/2011 - 14:56
Chair plans
Please put up plans for the seats also? I'm sure I'll be able to figure out how to make comfortable cushions with slip covers for them.
This plan is brilliant beyond words!!!
emi (not verified)
Sat, 04/16/2011 - 10:29
weatherly furniture
Yes, Please do!! I am in love with this set.
molivi311
Thu, 03/28/2013 - 13:15
seats
are there any plans on how to do the seats? I would love to add these.
thanks
Ana White
Sat, 04/16/2011 - 11:58
Just finished the sofa!
Am so tempted to take a nap on the sofa! It's beautiful!
Preston (not verified)
Fri, 04/22/2011 - 13:08
Another option for setting
Another option for setting the post is to use a oz-post. You hammer them into the ground and then attach the post to them. Since that keeps all of the post above the ground you don't need to worry about wood rot that can occur when water sits between the concrete and the post. Plus they sell them at the Big Orange Store.
gnee (not verified)
Wed, 05/11/2011 - 04:34
This Week's Top Hits
Congratulations, your Weatherly Pergola made this week's top hits @ singingwithbirds.com. Thanks for all of the amazing plans posted here. We are currently working on pergolas and will be back for more ideas. You do a great job!
Southern Cal Gal (not verified)
Thu, 05/19/2011 - 22:17
Electricity
How hard would it be to put power (an electrical outlet) into this pergola?
Mandeel (not verified)
Thu, 09/29/2011 - 06:42
sketchup file
Perfect!! It seems that you have done the drawings using Google Sketchup. If yes. could you please send me a copy :)
Mandeel (not verified)
Thu, 09/29/2011 - 06:42
sketchup file
Perfect!! It seems that you have done the drawings using Google Sketchup. If yes. could you please send me a copy :)
hippiemamaof3
Fri, 01/06/2012 - 20:30
so, what is the $ estimate on this project?
I would love to tackle this in the spring.
Colorado Rachael (not verified)
Wed, 03/28/2012 - 06:47
This is probably a dumb
This is probably a dumb question but I want to build this to go on our back patio. Only problem is the concrete is already there--is there anyway to set them in concrete on top of our already existing patio and then maybe hide the concrete footings in the casing you put around the bottom of the legs? Dont want to have to drill through the patio if I can help it. It does get pretty windy here (in Colorado) but no tornados or anything.
TroxeloblL
Tue, 05/14/2013 - 05:03
well thats really nice i
well thats really nice i really like that its really good for us. when i have seen its photos its looking ok its dimension was good.
Locksmith Plymouth
rach5200
Wed, 05/15/2013 - 15:27
Cost
What's the estimated cost of this project? I have been dying to find a cheaper way to spruce up my rural yard and add some privacy instead of a full out privacy fence. I would LOVE to build this pergola and add some outdoor curtains this weekend if I could figure out about how much I'd be spending. Gotta prioritize based on overall cost of all of the projects I want to do!
BTW, I absolutely adore all that you do. You're the ultimate role model for DIY beginners like myself!
johnc510
Sun, 01/17/2016 - 21:51
One error in this plan
Hi Ana,
Thanks for sharing all these cool project plans on your site! I'm currently following your plan for my a 12x10 pergola and the pergola is looking amazing so far. I'm working on lower 30" 8x8 base posts and I think I found a small error in the plan with regards to the 9 1/2" 1x4 used for the cap posts. The plan says to cut the (2) 8' 1x4s into (16) 9 1/2" sections, mitered at 45 degrees. However, with the 1x4's 3 1/2" width, two of those 1x4s nested up to the 3 1/2" thickness of the 4x4 post = 10 1/2". So what I had to do was rip the 1x4 to 3" wide in order to make the (16) 9 1/2" mitered pieces properly fit (3" + 3" + 3 1/2" of the 4x4 = 9 1/2").
Thanks again for all the cool project plans! I'm really looking forward to building some furniture from the plans on your site!