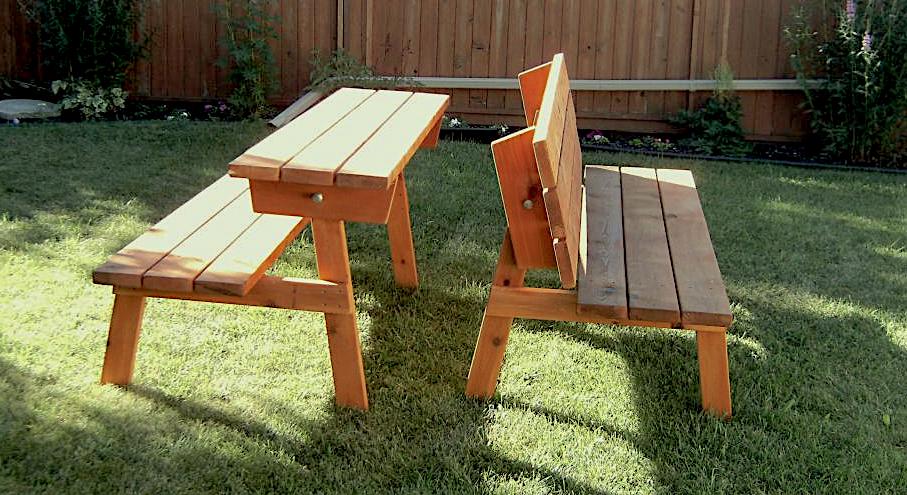


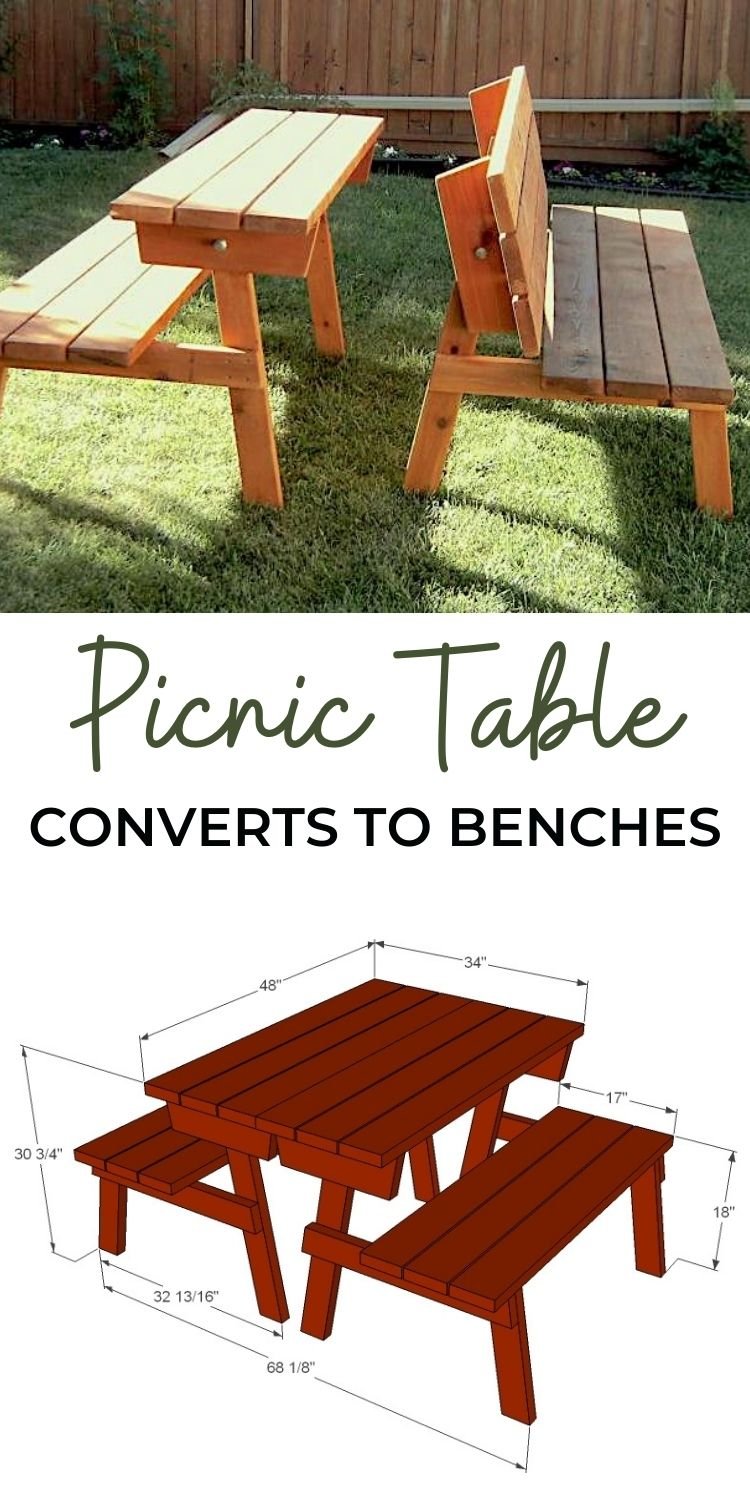
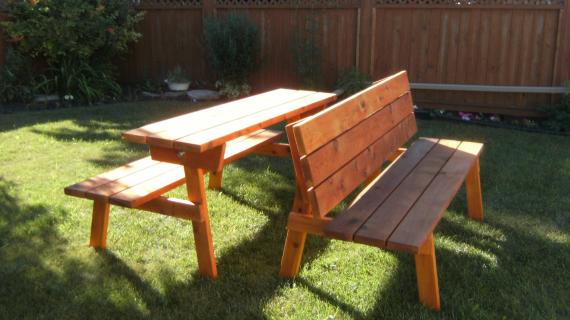
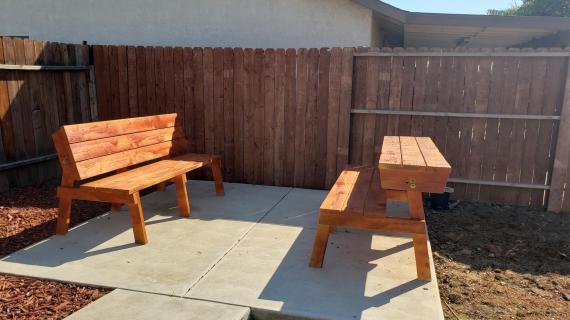
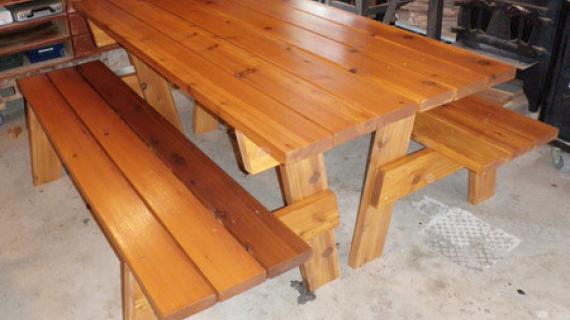
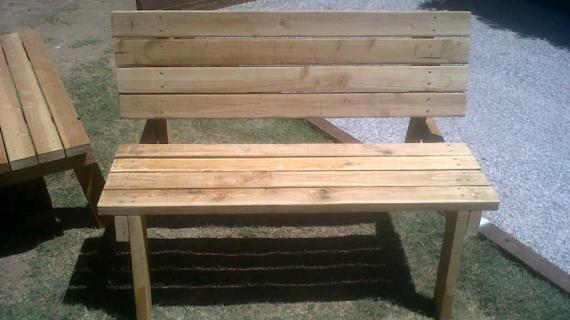
Free step by step plans to build a picnic table that converts easily to two separate benches. The tabletops rotate to form bench backs. Detailed plans give you step by step instruction to build this multi-use outdoor staple for your deck or patio.
Pin For Later!
Preparation
- 7 - 2x6 @ 8 feet long
- 5 - 2x4 @ 8 feet long
- 2 1/2" self tapping exterior deck screws (star bit recommended)
- 8 - 4" long, 1/2 diameter bolts with washers and nuts
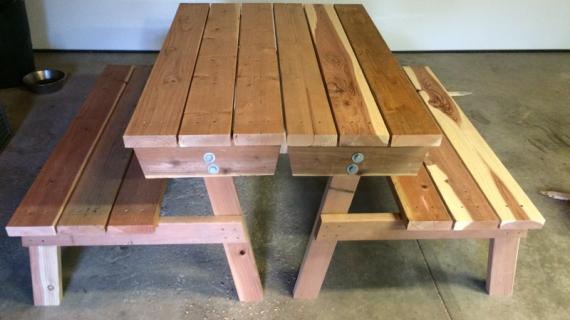
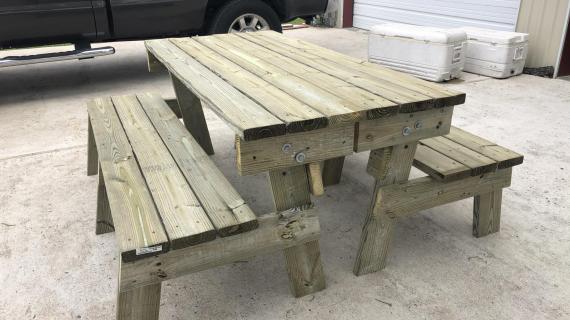
CUT LIST IS FOR 2 BENCHES CONVERTING TO ONE PICNIC TABLE
- 4 - 2x4 @ 28 7/8" (Back Legs - Both ends cut at 10 degrees off square, parallel to each other, long point to short point measurement)
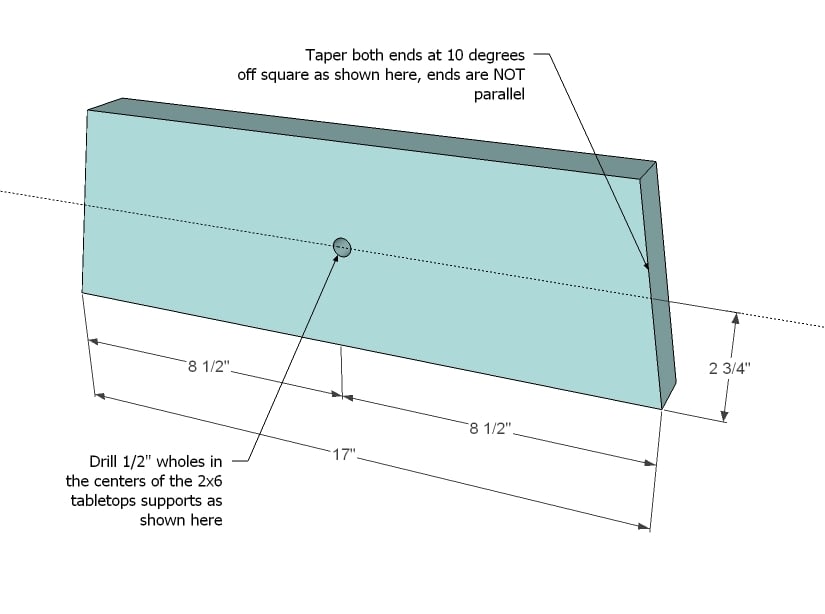
- 4 - 2x4 @ 27" (Seat Support - Short point to short point measurement - both ends cut at 10 degrees off square, NOT parallel to each other)
- 4 - 2x4 @ 16 3/4" (Front Legs - Both ends cut at 10 degrees off square, parallel to each other, long point to short point measurement)
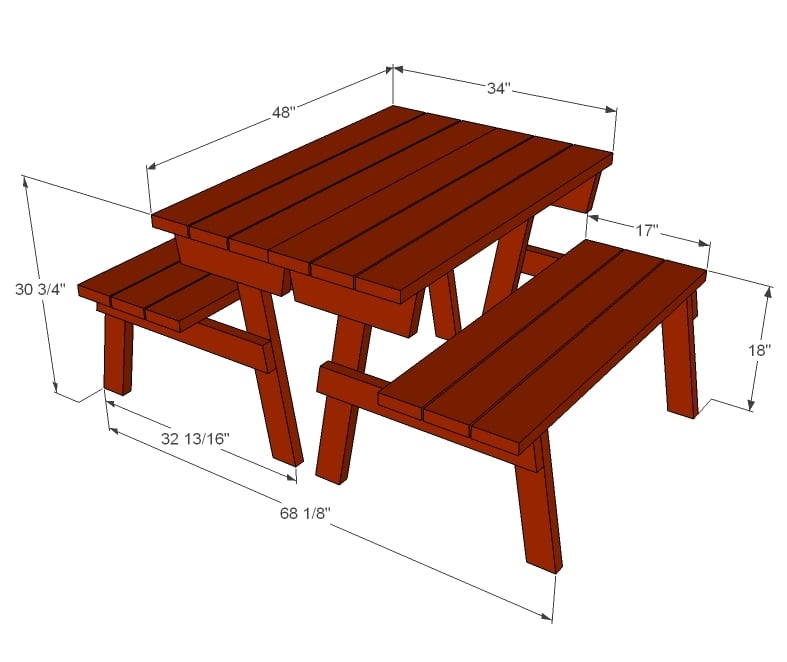
- 12 - 2x6 @ 47 7/8" (Seat and Tabletop boards)
- 4 - 2x6 @ 17" long (Tabletop Supports)
- 2 - 2x4 @ 41" (bottom back support)
Carefully cut all of your boards with a compound miter saw, or mark angles with a protractor and carefully cut with a circular saw.


Please read through the entire plan and all comments before beginning this project. It is also advisable to review the Getting Started Section. Take all necessary precautions to build safely and smartly. Work on a clean level surface, free of imperfections or debris. Always use straight boards. Check for square after each step. Always predrill holes before attaching with screws. Use glue with finish nails for a stronger hold. Wipe excess glue off bare wood for stained projects, as dried glue will not take stain. Be safe, have fun, and ask for help if you need it. Good luck!
Instructions
Step 1
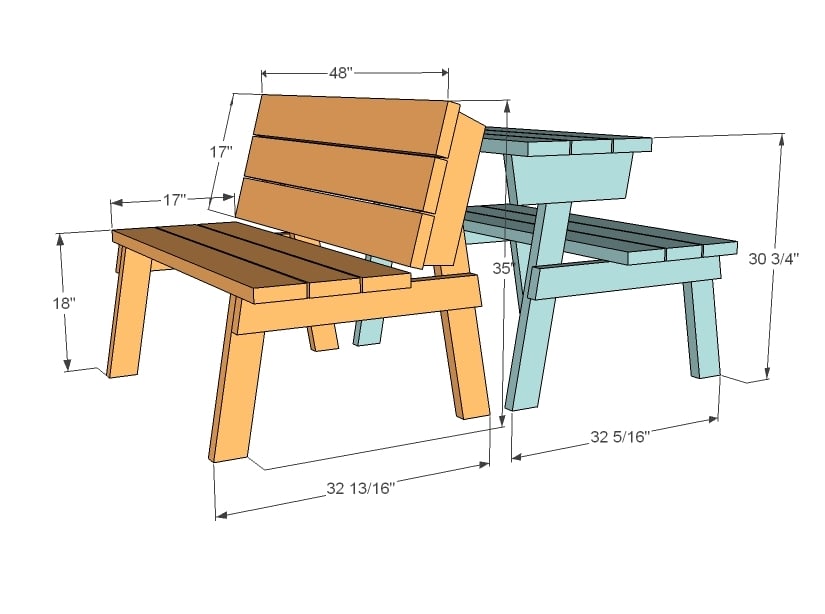
Additional dimensions shown above. We found that this table/bench was most comfortable as a bench. If you are expecting to use the convertible picnic table bench mostly as a picnic table, I suggest you first review our free as always picnic table plans. The wide seat when converted to a picnic table makes for climbing into the seat a tad more difficult than traditional picnic tables - but let me tell you, the wide seat as a bench is quite nice.
Step 2
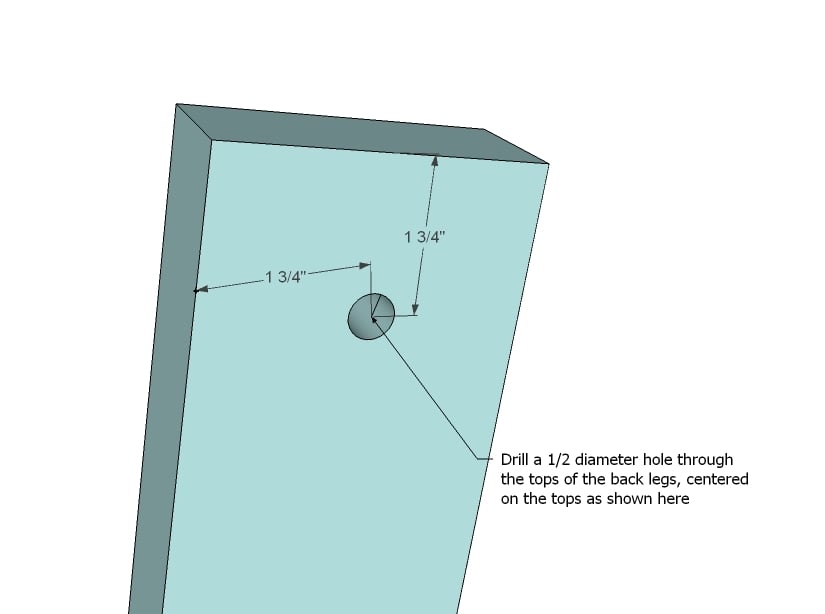
First things first. From your back legs, drill 1/2" diameter holes as shown above, centered on the top. Drill on all four legs.
Step 3
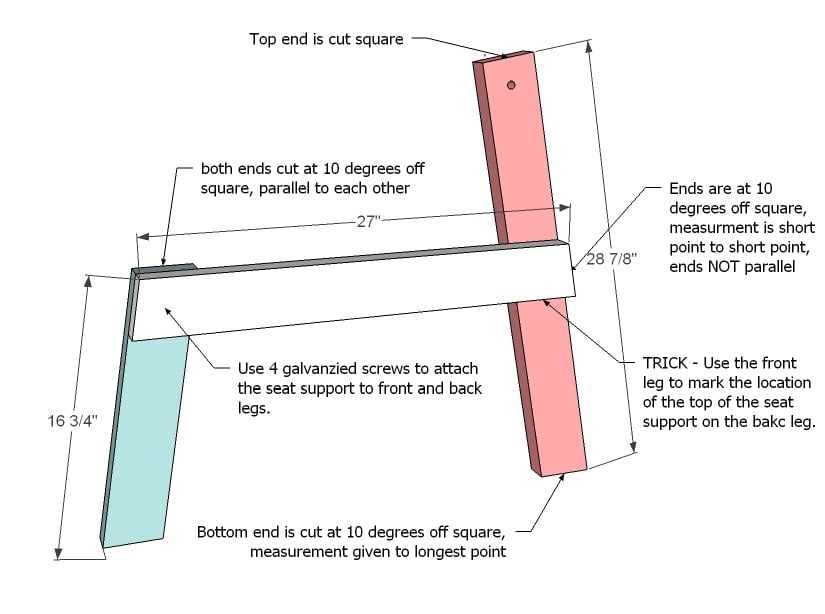
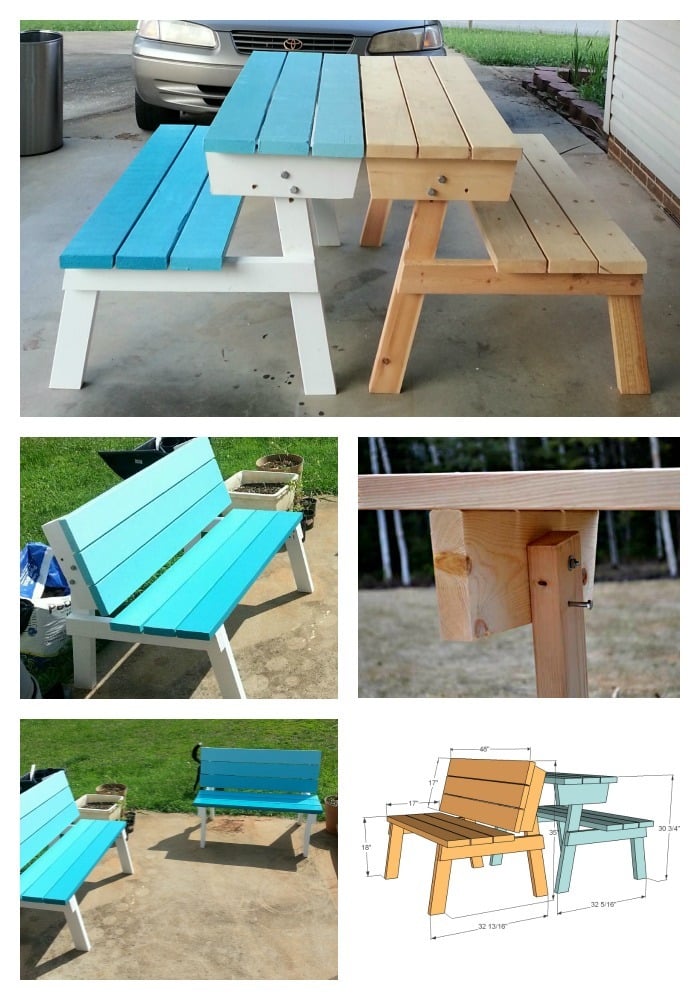
Lay the front leg over the bottom of the back leg, with bottom and outside edges flush. Trace the top edge - this will be the line that you will line your seat support top up with. Lay the seat support on top of the legs as shown above and predrill holes and attach the seat support to the legs with 2 1/2" galvanized screws and wood glue. You will need to make four of these. Make two with the seat support on the right and two with the seat support on the left - it does matter.
Step 4
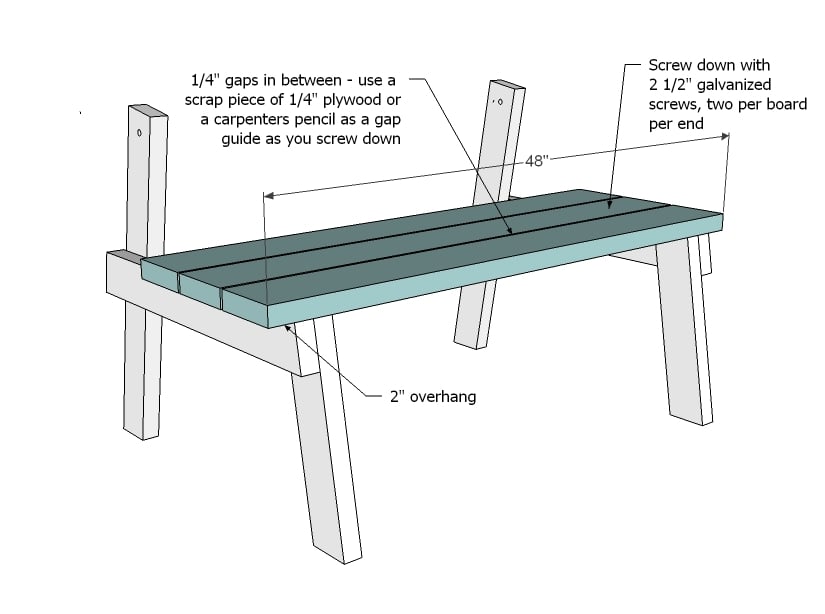
Mark all of the seat boards 2" from the ends. The seat boards overhang the legs by 2" on the outsides. Attach the seat boards to the legs, using 2 1/2" galvanized screws and wood glue. Adjust for square. Leave 1/4" gaps between the seat boards. Use one left and one right leg for each bench as shown above in the diagram.
Step 5
Step 6
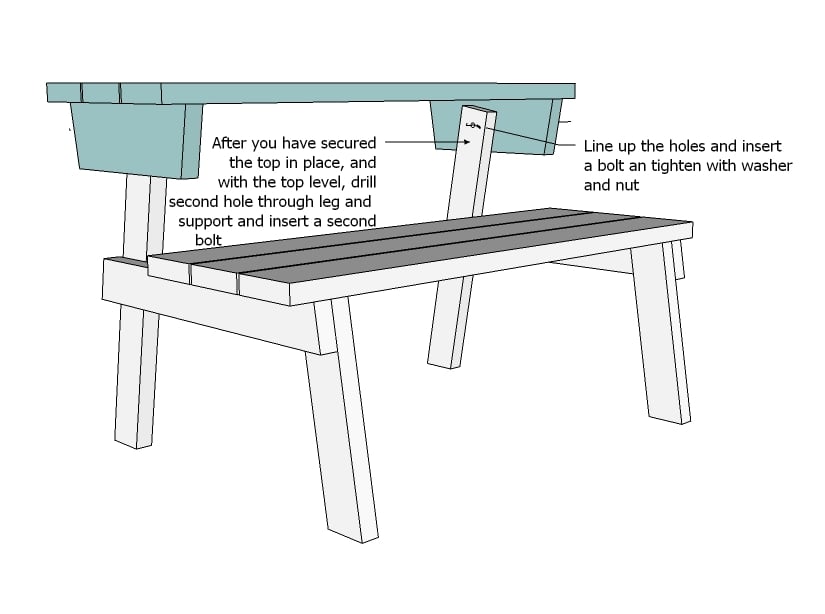
Now that you have constructed the top, line the holes in the back legs up with the holes in the tabletop supports. Thread your 4" bolts through, add washer and nuts, and tighten. Lay a level on top of the table, perpendicular to the tabletop boards. With the tabletop level (use a clamp to hold in place) drill holes through the back legs and the tabletop supports and insert a pin (you can just use another 1/2" bolt). Do this on both sides.
Step 7
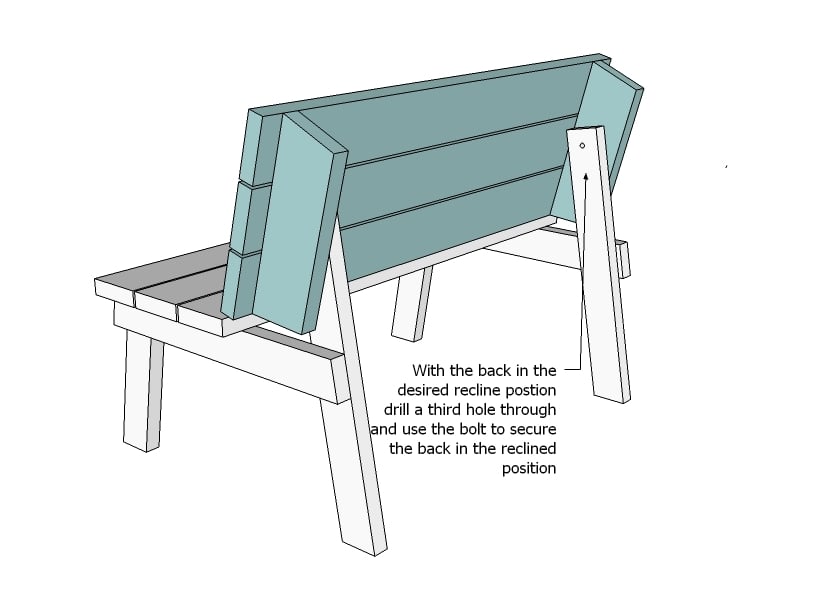
Remove the pins and rotate the tabletop so it becomes a backrest. Sit in the bench, and determine a comfy backrest position. When satisfied, clamp the tabletop supports to the back legs and drill another 1/2" diameter whole. Insert the pin. Do the same on both sides. To convert the benches to picnic tables, simply remove the pins and rotate the backrest to a tabletop, and reinsert the pins in the correct holes.
Step 8
Add the back support piece to the back legs, with two screws per end, 6" from base of legs.
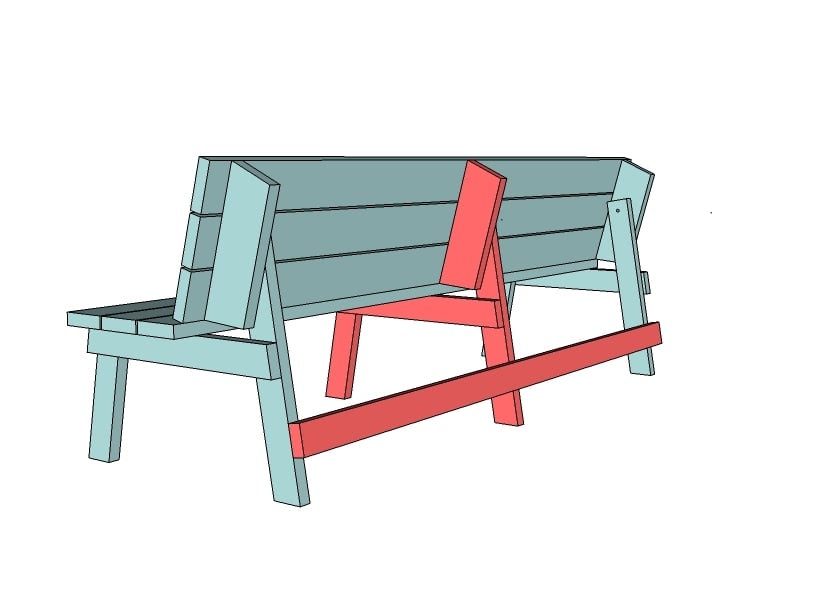
Longer Picnic table: for a longer convertible picnic table bench, above shows how you would use standard eight feet long boards for the tabletops, and simply add an extra leg in the center. You will also need to add a back brace as shown above.
It is always recommended to apply a test coat on a hidden area or scrap piece to ensure color evenness and adhesion. Use primer or wood conditioner as needed.


Comments
loniwolfe
Sun, 05/01/2011 - 20:19
Awesome!!!
This is great! Thank you!
Guest (not verified)
Sun, 05/01/2011 - 20:45
Great plan, just in time for summer
I'm afraid to make one. Everyone I know will want it.
Ana White
Sun, 05/01/2011 - 21:25
Thanks Everyone!
You are going to be shocked at really how easy this table is to build! We are so pleased with it, we are building two more (benches) to surround our firepit!
Jessica Haines (not verified)
Sun, 05/01/2011 - 21:39
Funny Coincidence
The other day I was driving down my street and I saw my neighbor lady building something. I drove back by later and saw she had built some awesome benches that seem to convert to a table....low and behold I open up facebook today and they are your plans! Awesome, I'm gonna have to go make friends with this neighbor and start some building parties! Thanks for all the free plans! You're awesome!
dena-stewart
Sun, 05/01/2011 - 21:41
I searched the internet high
I searched the internet high and low for plans to make these benches, and none were as well laid out as this. Another project on my To Do List!
Ana White
Mon, 05/02/2011 - 09:54
One more note
For an even sturdier picnic table, choose bolts for the joints too, instead of exterior screws.
tracysmith
Mon, 05/02/2011 - 10:37
This is great!
My mom was just asking me if I could whip up some of those neat picnic tables that turn into benches. I laughed and told her that I'm not quite that good ... yet. Now I can make some and really surprise her!! Thanks Ana! That's really awesome!!!!!
Guest (not verified)
Mon, 05/02/2011 - 11:04
picnic table/benches
This design is amazing!
I just wanted to confirm the cut list vs. shopping list. You list 7- 2"x6"@8ft to purchase but the cut list says 12- 2x6@48 7/8 inches (that's 6 2x6@8ft) plus
4- 2x6@8ft for tabletop supports. That doesn't seem to jive with shopping list or the overall size of the table/bench.
I assume they should be 4- 2x6@17 inches- just want to get this right. I really love this plan.
thanks so much
Ana (not verified)
Mon, 05/02/2011 - 12:09
Cut list error
Cut list has an error should be 12 2x6@47 7/8. I am traveling today will fix when I get to my computer. Thanks for catching this. Ana
Guest (not verified)
Tue, 05/03/2011 - 05:58
picnic table/benches
sorry, I put 48 7/8, I meant 47 7/8 which is what you have- that part seems right. I wanted to clarify just the tabletop supports that are listed as 4- 2x6@8ft.
My apologies for making this more confusing by my error.
Guest (not verified)
Tue, 05/03/2011 - 05:58
picnic table/benches
sorry, I put 48 7/8, I meant 47 7/8 which is what you have- that part seems right. I wanted to clarify just the tabletop supports that are listed as 4- 2x6@8ft.
My apologies for making this more confusing by my error.
Ever heard of Euless
Mon, 05/02/2011 - 11:18
possibly the best plan EVER
I'm super excited about this one!
biz_kid1
Mon, 05/02/2011 - 13:38
I was so gonna try and hack something similar!
Thanks for doing it first! =) I can't wait to try this plan, too!
Alisa (not verified)
Mon, 05/02/2011 - 15:59
Already done!
Ana You Are Amazing!!!
I built this today using all scrap lumber that my boyfriend wanted to throw away. All I need to do is get larger bolts and decide on a finish. Yeah! I am obsessed with your website. THANKS!
Alisa
Guest (not verified)
Tue, 05/03/2011 - 10:52
Wow, what a great design! I
Wow, what a great design! I will definitely build this.
KeithBrown (not verified)
Tue, 05/03/2011 - 15:46
4 - 2x6 @ 8 feet long (Tabletop Supports)
On the cut list I believe the following:
4 - 2x6 @ 8 feet long (Tabletop Supports)
Should should be 4 - 2x6 cut ten degree off square not parallel on each end to 17"(long side) (Tabletop Supports)
Auto complete will get you every time hey Ana?
Trish (not verified)
Wed, 05/04/2011 - 13:31
Great fundraiser
My high school's football team mass produced these in shop class, painted them in school colors and sold them as a fund raiser. It was great to see them all out & about the community.
In reply to Great fundraiser by Trish (not verified)
claydowling
Wed, 05/04/2011 - 20:15
Amazing idea
I love that for a fund raiser. It helps get young people involved in woodworking and beautifies the community at the same time. It also helps that I love this design. Wish I'd been clever enough to think of it myself.
Mookie21
Sat, 05/07/2011 - 22:47
Brilliant
I going to try and build this...love it..
Amy Clouser (not verified)
Thu, 05/12/2011 - 08:16
THIS IS GOING TO MAKE A WONDERFUL FATHERS DAY GIFT
So glad I came upon this website, this is an awesome idea. Had one little question, do you use treated wood?
Zocco (not verified)
Wed, 05/25/2011 - 05:44
Step 8 longer convertable table ?
Great stuff here!
Should the horizontal brace shown on the back rest/table side actually be on the seat side of the legs? I'm no expert, but the current way it looks like if the horizontal brace is there and it is converted to a table, wouldn't that hit your feet?
Catherine McIsaac (not verified)
Sun, 06/05/2011 - 09:44
These are almost the Cottage
These are almost the Cottage Life Convertible Picnic Tables from April/May 2002.
The plan for this can be found at http://cottagelife.com/19841/diy/projects/our-top-10-projects - the plans include beautiful color photos of the projects (Bunkie, Outdoor Shower, Treehouse, BBQ prep station, Canoe/Kayak Rack, etc). The plans are free now thanks to Timbrmart.
Cottage Life has also put up a video of the Outdoor Shower with Wayne Lennox the author/builder at http://www.youtube.com/watch?v=mxWUQKLzLaQ - very cool, especially the use of the pocket door.
Efl (not verified)
Wed, 06/15/2011 - 19:56
A little wobbly
We made these recently and I'm a little disappointed. They are somewhat wobbly. We love, love, love the way they function, but were wishing they were a little sturdier. We are planning on adding a brace underneath the seats where the seat meets the legs at an angle (the wood would be cut at 45 degrees on both ends and screwed in the corner). We are hoping this will help big time.
This is our first Ana White project and even though they are a little wobbly, I have a feeling we will be using more of her plans in the future.
Sandra Godsey (not verified)
Tue, 01/10/2012 - 09:23
You give me hope
I have been a fan for awhile....and every project makes me a bit braver to try and make some of these wonderful pieces...I am at the point of buying some tools and starting with a simple project...this bench/table project is the final straw..I need to get over the power tool fear and jump right in! Thanks for taking the time to have this website and give confidence to us dreamers!
hcker2000 (not verified)
Thu, 04/05/2012 - 08:41
Small discrepancy.
I noticed that in the Step 3 Image it says to cut only one side of the back leg and leave the top square.
In the cut list it says to cut both ends at 10 degrees. I think it would be better to leave it square on the end as I cut them both at 10 degrees and the top on hits a tinny bit.
4 - 2x4 @ 28 7/8" (Back Legs - Both ends cut at 10 degrees off square, parallel to each other, long point to short point measurement)
Martin (not verified)
Thu, 04/26/2012 - 16:20
Picnic table/bench project
Hi Ana, great project I had fun building it and as I do eith all my wood build I posted it on my woodworking social sit. Heres th link if you want to check it out, http://lumberjocks.com/projects/65108
Thanks again, great plans.
Martin (not verified)
Thu, 04/26/2012 - 16:24
Picnic table/benches
Hi Ana,
Great build, I had fun with it, as with all my wood projects, I try to post it on my social woodworkers site, here is the link if your interested.
http://lumberjocks.com/projects/65108
Thanks again.
Cayleigh (not verified)
Wed, 05/16/2012 - 06:53
Conversion from plan
I love the idea of this plan. So much so, that I am going to convert it a bit and make only half of it, to use as a kitchen table up against my wall. We have limited space in our kitchen and if I can use something like this for the kids to eat on but also for others to sit at comfortably, then it's a win win situation.
Thanks for the plans ANA
Burntsider (not verified)
Tue, 05/29/2012 - 16:51
convertible picnic table
Per your instructions in Step 3, I attached the seat supports to the four legs using four screws per joint. I spaced the screws as widely as I could without being too close to the members' edges. The result is the joints are all insecure. I'm going to need to gusset them somehow to keep these joints from weakening further through movement over time.
franlewis
Sat, 06/23/2012 - 06:34
Best Father's Day Gift Ever
My husband and I made this table as a Father's Day gift for my dad to use at his lake house and he absolutely loved it. Now we are working on one for ourselves. On the first table we used a weatherproofing outdoor stain all over. Beautiful by the way. We want a little more color for our table so I was thinking...painting, applying a water sealer, distressing, then using the outdoor stain on the distressed areas. Does this sound like the right steps? Suggestions anyone? You rock Ana!!
Jimbond13
Sat, 06/07/2014 - 16:56
Modification
These worked great as benches but not so good as picnic tables. There was just not enough room to get your feet in. We removed the screws of the third 2x4 and then used a simple bolt as a pin from the side so that they can be removed for the picnic tables but replaced for the bench.
kdknowlden
Mon, 09/15/2014 - 12:02
Weight?
Any guess as to overall weight for one unit (half-table)?
Any input as to using 1x lumber instead of 2x - for the purpose of weight reduction and mobility for use as a stage prop?
Thanks,
Keith
Paco43
Fri, 01/30/2015 - 10:48
Help!
I am working in this project. How do I make the 10 degrees angle cuts? I am new on this.
In reply to Help! by Paco43
Lady Goats
Fri, 01/30/2015 - 19:28
10 Degree Cuts
Hi Paco, a 10 degree cut is made on either a miter saw, table saw or with a miter box. Those are easy to set to 10 degrees..
To be honest, I was able to do my first project with a jig saw and a protractor that I printed from online. If you don't have any of the bigger saws available, I'd suggest getting or printing a protractor, marking 10-degrees and cutting slowly along the line. Hope this helps!
Igniscient
Thu, 06/18/2015 - 21:10
Errors
I just finished today. I had to re-cut the back legs because when I tried to attach the tabletop/backrest, there wasn't enough room for it to swing down - it would hit the bench. I double & triple checked my measurements & everything was right. I had to go buy some extra 2x4s to finish.
I also noticed 2 discrepancies between the cut list & the directions. In the cut list, it says to make the back legs long to short, but in the plans it shows it long to square - you need to square the top or the tabletop won't swivel down, it will hit the point. The other discrepancy is the tabletop/backrest supports - the cut list doesn't mention cutting an angle on them, but the directions show an angle. Those ones didn't cause me too much hassle.
Thebear_78
Sun, 07/05/2015 - 16:08
Great project
I just built this and it turned out great. One thing I added is I I bolted a peice of 2x2 to the top of each half that can swing out and lock in the two tops to remove the wobble.
http://i9.photobucket.com/albums/a54/Thebear_78/FullSizeRender-5_zps8cb…
bignreel
Tue, 03/01/2016 - 05:07
Search is over!
I had seen this or another similar plan a few years back and had planned on making it for several of my family members. I never got the "plans" and lost the link to it...WOW!!! Now my year is gonna get busy!!! I'm planning on making 4 sets of these at VERY least! THANKS SOOOO MUCH!!!!
wayneout
Tue, 09/06/2016 - 10:34
Understand how to make the cut
Hello, I am retired and just getting into working on wood projects. Found this site and has some great plans.
I am going to buy a miter saw to work on this picnic table, but I don't understand the cuts. I looked up how to do a 10 degree cut with a speed square but I am not sure of how to measure. It says length is 28 7/8" from long to short. Do I cut the board to that length and then cut off 10 degrees. It is the wording of "from long to short or short to long that has me confused. Remember I am a novice at this. Thanks.
ecasey11
Tue, 07/14/2020 - 12:08
Swivel / bolt question
Hi - is the top of the bench/table supposed to be able to be adjusted by hand by unscrewing the bolts and moving it to the other position? Or is a socket wrench always required? I'm not familiar working with bolts so wanted to confirm.