
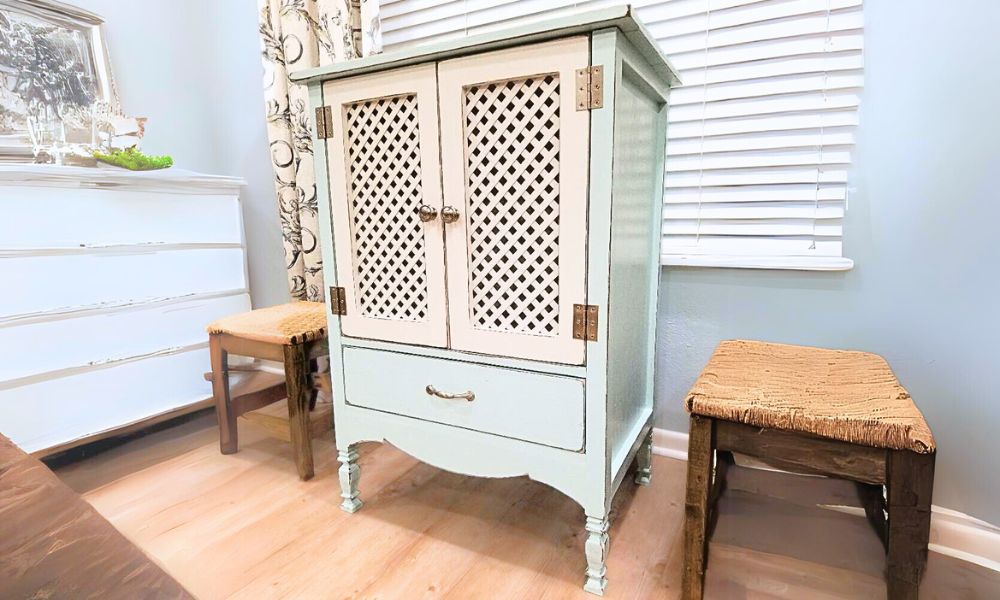

Free easy plans to build a DIY cabinet, inspired by Pottery Barn's Avery Cabinet. Simple vintage styling, pretty turned legs. Step by step plans include a cut list, shopping list, and detailed diagrams.
Preparation
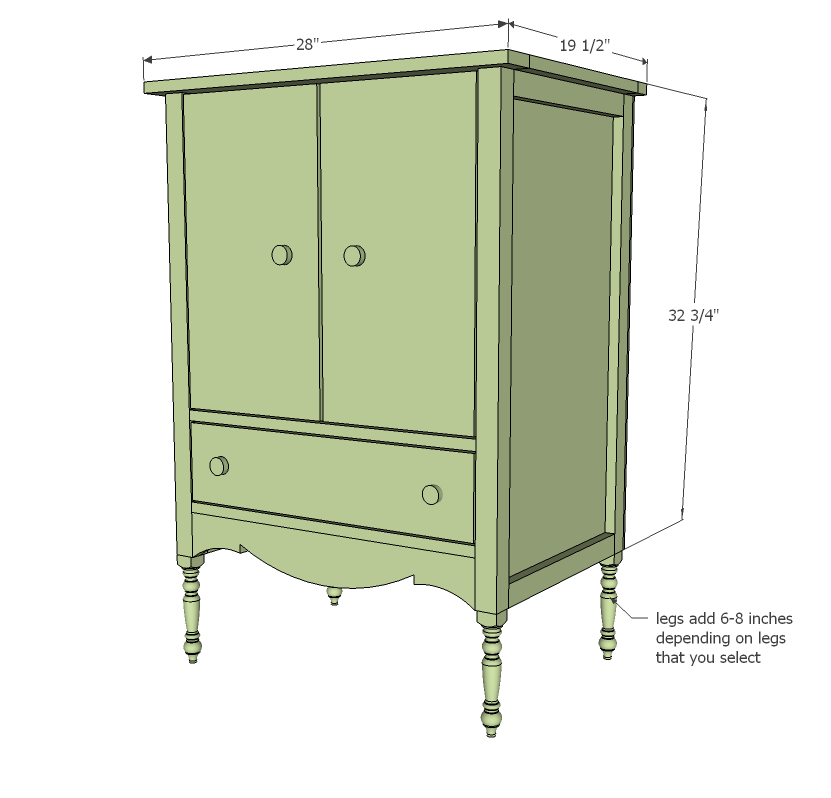
- 4 - Turned Feet, 6-8" in length (or extend
- 2 sets of Euro Style Inset Hinges (see step 9)
- 1 - set 16" Drawer Slides (see step 8)
- 4 - Knobs or handles
- 1 - full sheet 3/4" plywood
- 1 - half sheet of 1/4" plywood
- 1 - 1x6 @ 24" long
- 1 - 1x12 @ 48" long
- 2 - 2x2 @ 8 feet long
- 1 - 1x4 @ 8 feet long
- 1 - 1x3 @ 4 feet long
- 3 - 1x2 @ 8 feet long
- 2 - 1x16 @ 32" (side panels)
- 4 - 1x2 @ 15 1/2" (width of side panels above)
- 4 - 2x2 @ 32" (Legs)
- 1 - 1x16 @ 23" (Shelf)
- 1 - 1x16 @ 28" (Top)
- 3 - 1x2 @ 23" (Shelf Trim)
- 1 - 1x2 @ 28" (Top Trim)
- 1 - 1x3 @ 28" (Top Trim)
- 1 - 1/4" plywood or beadboard @ 32 3/4" x 26" (Back)
- 1 - 1x4 @ 23" Drawers
- 1 - 1x6 @ 22 3/4" (Face)
- 2 - 1x4 @ 16" (Sides)
- 1 - 1x4 @ 22" (Back)
- 1 - 1/4" Plywood @ 16 3/4" x 22" Doors
- 2 - 1x12 @ 21 1/4"
To get 1x16 boards, simply cut the plywood into strips 15 1/2" wide by 8 feet long.
Don't want to use plywood? You can also use 1x12s for the sides, but your cabinet will be 4" narrower. You will then need to use 12" drawer slides instead of 16".


Please read through the entire plan and all comments before beginning this project. It is also advisable to review the Getting Started Section. Take all necessary precautions to build safely and smartly. Work on a clean level surface, free of imperfections or debris. Always use straight boards. Check for square after each step. Always predrill holes before attaching with screws. Use glue with finish nails for a stronger hold. Wipe excess glue off bare wood for stained projects, as dried glue will not take stain. Be safe, have fun, and ask for help if you need it. Good luck!
Instructions
Step 1

Nail the 1x2 trim to the tops and bottoms of the side panels.
Step 2

Now add the 2x2 legs to the side panels as shown above. Pocket hole screws set for 3/4" stock, 1 1/4" screws would be best, from the inside. If you don't have a pocket hole jig, carefully glue and screw in place as shown in diagram.
Step 3

Once the sides are done, attach top in place, in line with the 1x16 side panels. Nail down with 2" finish nails and wood glue. Then mark 9 3/4" up from the bottom of the legs. Attach the shelf, above this mark (so there is a 9 3/4" gap BELOW the bottom shelf). You can use pocket holes, nails or screws and glue. IMPORTANT: Width of cabinet is designed to use 1x12s that measure 11 1/4" wide for the doors. If your 1x12s are not 11 1/4" wide, you will need to adjust the width of the cabinet. Here's the math - each 1x12 is 11 1/4" wide plus 1/8" clearance on both sides to equal 11 1/2". 11 1/2" x 2 = 23". Adjust these measurements to fit your 1x12 widths. You will need to adjust all horizontal boards if you do make an adjustment.
Step 4

Attach top trim to top, glue and clamp in place for an even joint between the top board and trim. Do the same for the shelf trim. Measure down 5 3/4" from the shelf trim and attach the last trim board. We'll be adding support to this guy in a bit. IMPORTANT: This measurement assumes that your drawer face 1x6 is 5 1/2" wide, with a total of 1/4" clearance to equal 5 3/4". If your drawer faces are "off" adjust accordingly.
Step 5

Step 6

I find attaching first, and then cutting is easiest for me. Attach in place - should strengthen up that last trim board quite a bit - and then mark a pattern and cut out with a jigsaw.
Step 7

Now things are getting fun! Attach the legs per instructions with the feet.
Step 8

Build the drawer as shown above. The bottom is 1/4" plywood, sides are 1x4s and face is 1x6. The face overhangs sides by 3/8" and drawer face conceals the entire drawer box. Adjust for square. Once drawer is complete, attach to cabinet using 16" drawer slides like these:

Step 9

Doors - per step three, should fit nice, with an even 1/8" gap on all sides. Attach with hinges like these:

It is always recommended to apply a test coat on a hidden area or scrap piece to ensure color evenness and adhesion. Use primer or wood conditioner as needed.

Comments
Lady Goats
Tue, 06/14/2011 - 12:01
OMG
I want this! Don't know where I'd put it, but I want it!
mandylynn523
Tue, 06/14/2011 - 12:06
OOOO I Love this!!!
Great Plan Ana! I will put this on my to-do list when I get back from Deployment! Who needs R&R when I am dying to get home to build LOL!!!!
Mandy
In reply to OOOO I Love this!!! by mandylynn523
Jami H
Tue, 06/14/2011 - 15:56
Thank you...
I humbly thank you for your service, Mandy! Stay safe and come back home and build!!
In reply to Thank you... by Jami H
mandylynn523
Tue, 06/14/2011 - 23:56
: )
Thank you so much Jami! It truly means a lot to me. I defiantly will. My husband has already made sure we put a weekend aside and build lol! It will feel so great to be go home and do it as a family project for once! Have a blessed day!
Michelle L. (not verified)
Tue, 06/14/2011 - 12:17
Love!
I love this one! Where did you get the feet? At one of the big box stores because I can't find any that short online? They're either bun feet or table length legs. Thanks! :)
In reply to Love! by Michelle L. (not verified)
mandylynn523
Tue, 06/14/2011 - 12:43
@ Michelle L. Here is a 6" leg @ Blue
http://www.lowes.com/pd_43511-1380-2406_0__?productId=3041993&Ntt=legs&…
the plan says 6-8" according to the legs you chose. :) hope this helps.
Michelle L. (not verified)
Tue, 06/14/2011 - 13:21
yes it does, thank you very
yes it does, thank you very much! :)
Guest (not verified)
Tue, 06/14/2011 - 15:05
I definitely want to try
I definitely want to try this! It might be my imagination but I think you may have missed the 2x2s on the cut list??
In reply to I definitely want to try by Guest (not verified)
Ana White
Wed, 06/15/2011 - 00:17
I sure did! Thank you for
I sure did! Thank you for letting me know, really appreciate it! Ana
rindymae
Wed, 06/15/2011 - 07:28
Drooling
I love this so much I could pee myself. I have hundreds of pictures ripped out of magazines of this exact style. Thank you thank you thank you!
rindymae
Wed, 06/15/2011 - 07:29
Drooling
I love this so much I could pee myself. I have hundreds of pictures ripped out of magazines of this exact style. Thank you thank you thank you!
redhead_61
Wed, 06/15/2011 - 20:40
Thank Thank you for adding
Thank Thank you for adding "girly" plans. My daughters room has a sophisticated girly feel and she desperately needs a new something for storage. Awesome.
Ayla (not verified)
Wed, 12/28/2011 - 08:31
The Ayla Cabinet?
It's official! I need this cabinet! Why? Because my name is Ayla! Ack!
Janettx
Wed, 12/19/2012 - 18:28
BRAG POST
I submitted a brag post for this piece but it is showing above no brag posts have been submitted. But here is the brag post if you want to see what my Ayla Cabinet looks like: http://ana-white.com/2012/12/my-ayla-cabinet#comment-50322
[email protected]
Mon, 04/20/2015 - 11:44
Could you add extra drawers to this?
I love this, and I need a small linen closet in my bathroom. I really want something that has 3 or 4 drawers. Do you think it would be possible to add more drawers? If so what extra dimensions would i need?