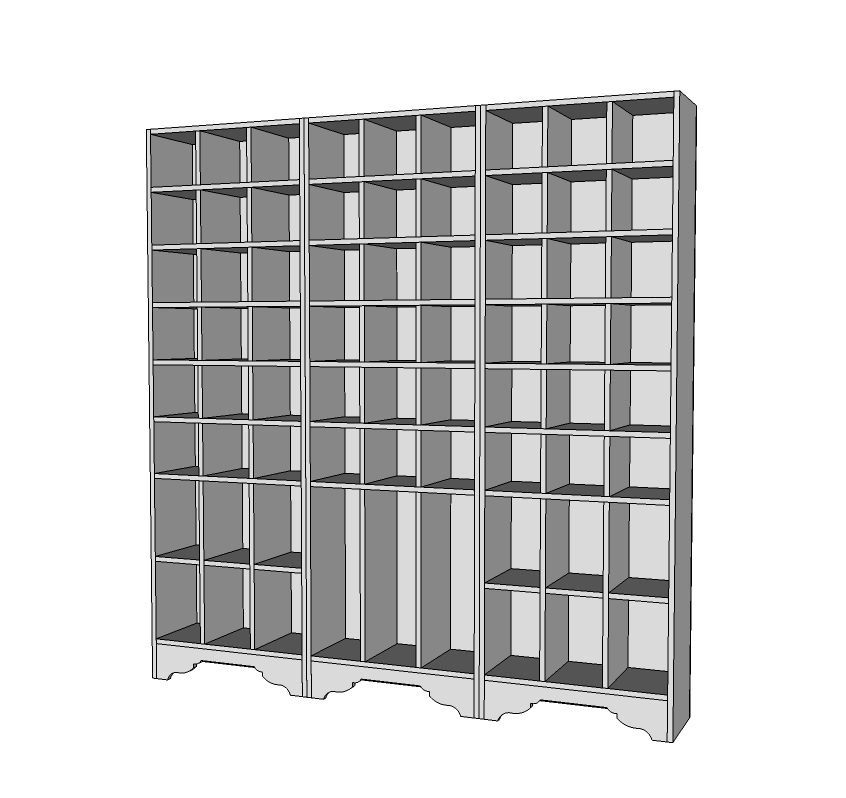


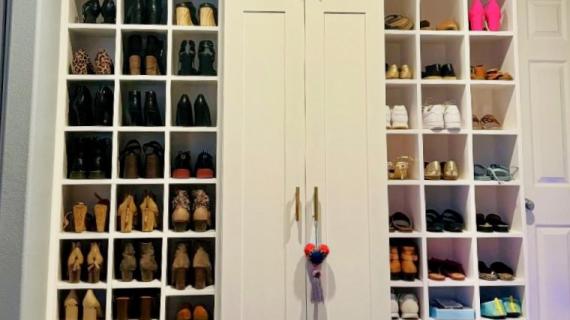
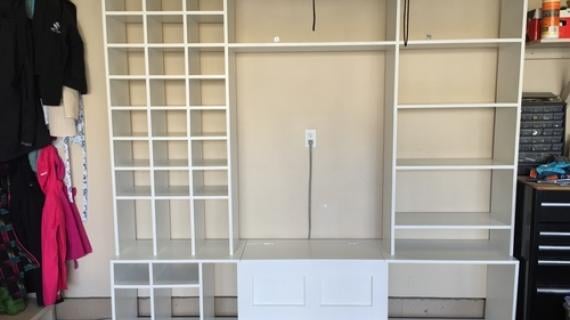
Free, simple, easy, DIY, step by step plans to build the ultimate shoe storage cabinet. Inspired by Ballard Design's Sarah Storage Tower, you can think beyond the boots and shoes and handbags - this beautiful storage cabinet would work anywhere from the Nursery to the office, the entryway to the dining room.
Preparation
6 - 1x12 @ 8 feet long
1 - 1x6 @ 4 feet long
1 - sheet 1/4" plywood
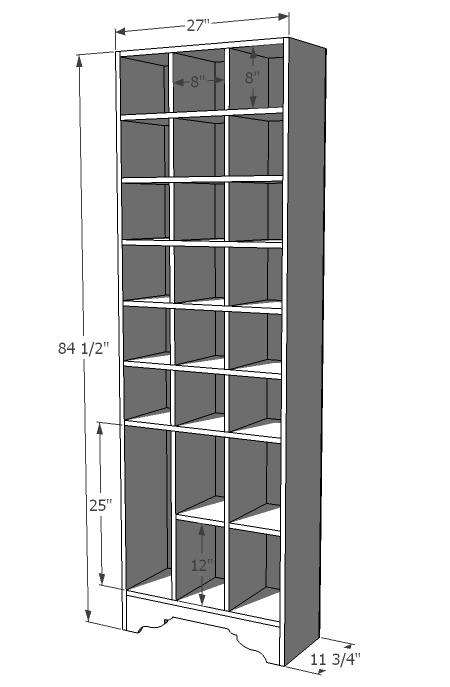
8 - 1x12 @ 25 1/2" (Shelves)
2 - 1x12 @ 84 1/2" (Sides)
12 - 1x12 @ 8" (Small Dividers)
2 - 1x12 @ 25" (Large Dividers)
1 - 1x6 @ 25 1/2" (Footer)
3 - 1x12 @ 8" (Optional Shelves, Boot Cubbies - see last step)
1 - 1/4" plywood @ 27" x 84 1/2" (Back)


Please read through the entire plan and all comments before beginning this project. It is also advisable to review the Getting Started Section. Take all necessary precautions to build safely and smartly. Work on a clean level surface, free of imperfections or debris. Always use straight boards. Check for square after each step. Always predrill holes before attaching with screws. Use glue with finish nails for a stronger hold. Wipe excess glue off bare wood for stained projects, as dried glue will not take stain. Be safe, have fun, and ask for help if you need it. Good luck!
Instructions
Step 1
The trickiest part about building this shoe storage cabinet is going to be getting the joints done when there is limited clearance. You will need a Kreg Jig to join some of your shelves. Start by drilling pocket holes as shown in diagrams along the top edge of your dividers. Then attach two short dividers to the top shelf as shown above.
Step 2

Now you won't be able to get a regular drill in there to do pocket holes along the bottom edge of the dividers. Apply glue, mark joints, and attach with either 2" finish nails or screws from the underside as shown above.
Step 3

Now you can add another row of dividers, this time you will have to use the pocket holes. A word to the wise, don't eyeball the location of your dividers - measure and mark 8" from the outsides and place, if you eyeball, over the course of several rows of shelves, you might just start to notice you are getting "off".
Step 4
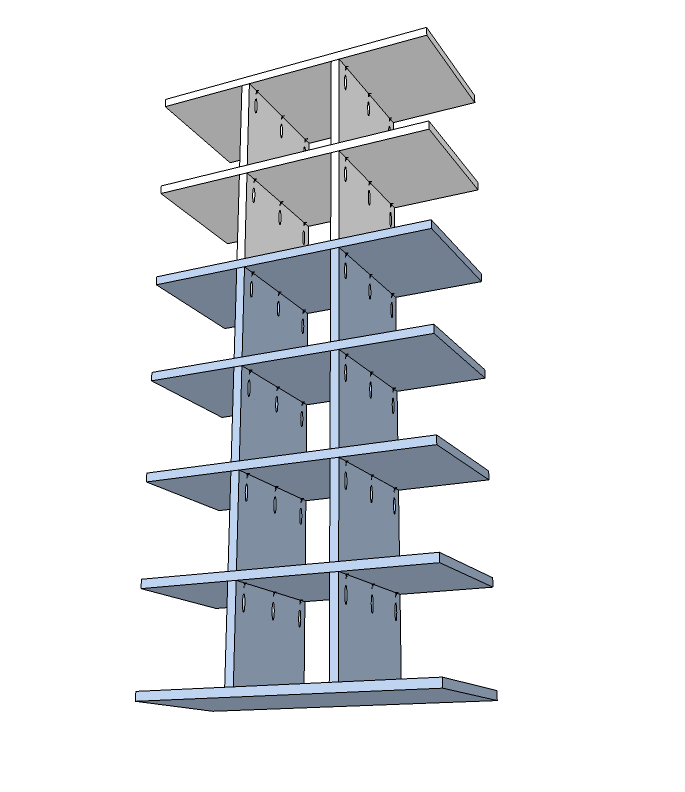
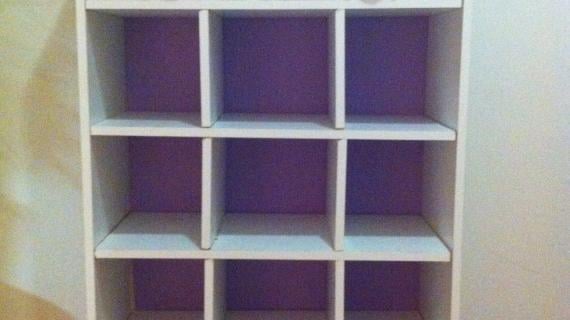
Continue alternating adding dividers and shelves until you are out of the short dividers.
Step 5

Step 6
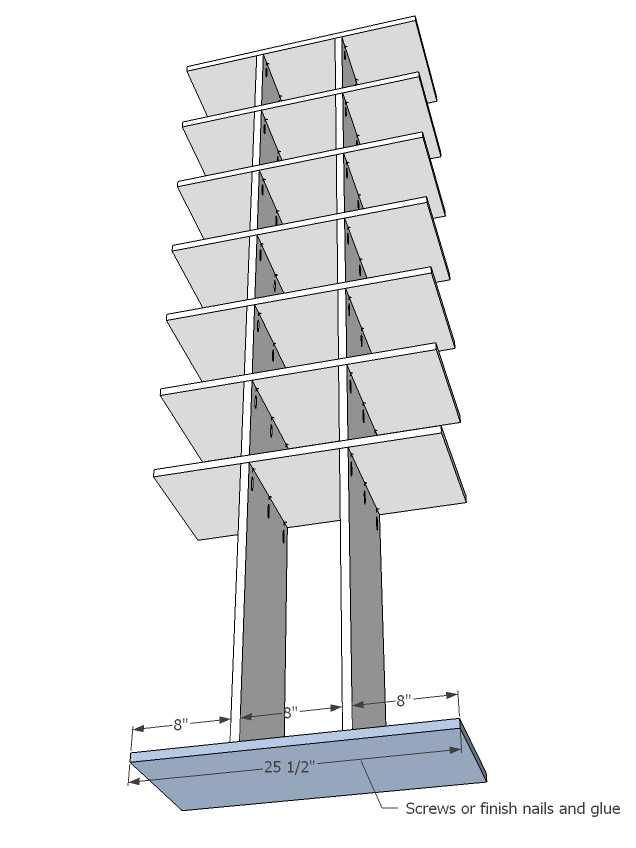
And finally the bottom.
Step 7
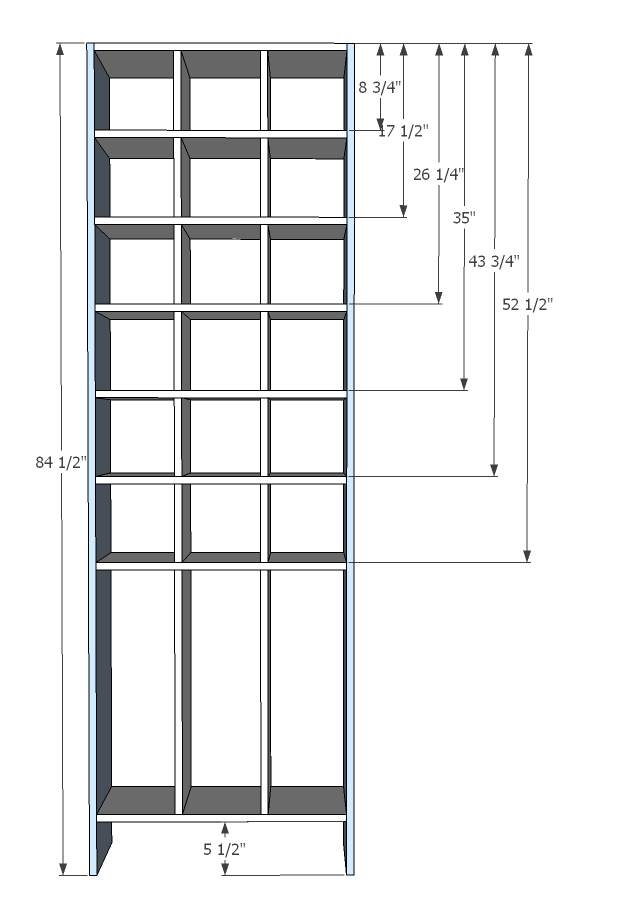
Measure and mark your sides as shown above, marking the location of each shelf. Measurements shown are to the tops fo the shelves. Line sides up with shelves and attach, using 2" finish nails and glue.
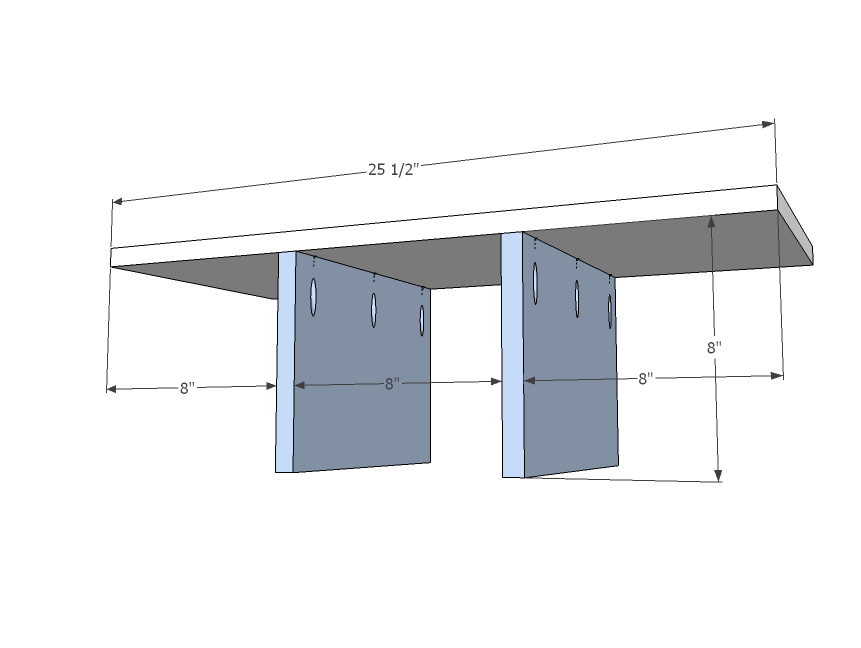
Step 8

Attach footer as shown above, with 2" finish nails and wood glue. Use the measurements above to help you draw a pattern. Cut pattern out carefully with a jigsaw.
Step 9
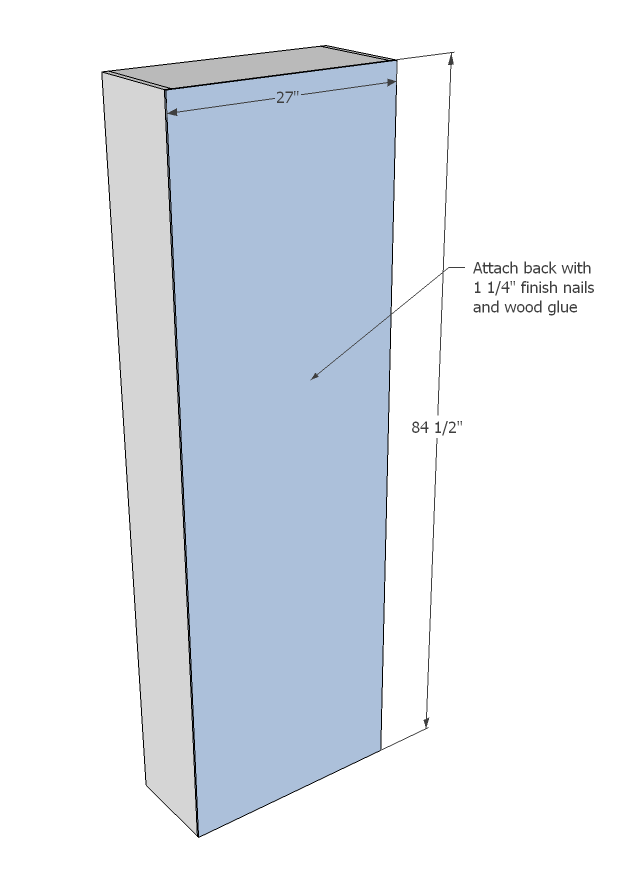
Adjust cabinet for square and attach back with 1 1/4" finish nails and wood glue.
Step 10
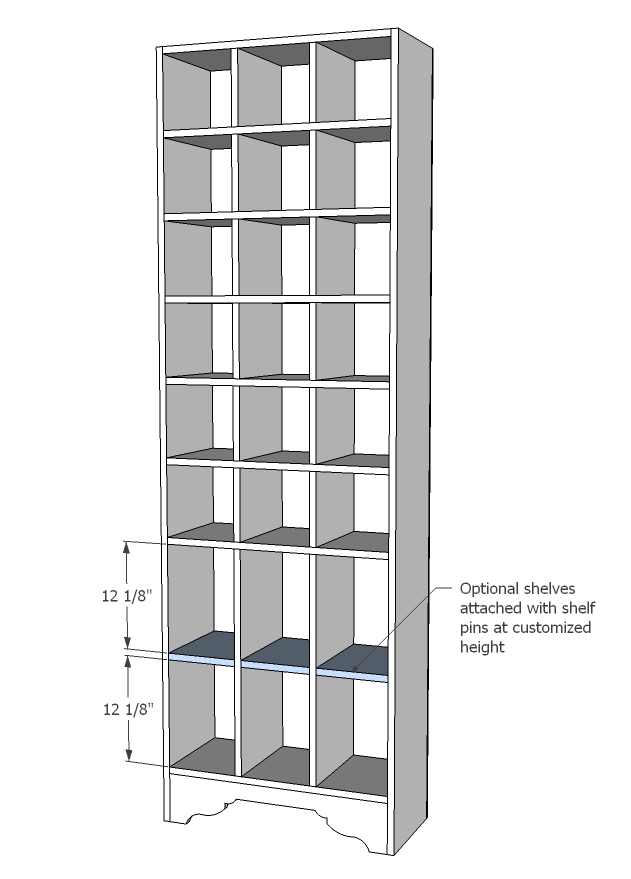
These shelves as done by Ballard Designs on their Sarah Storage Tower are adjustable. Use shelf pins to place shelves.
It is always recommended to apply a test coat on a hidden area or scrap piece to ensure color evenness and adhesion. Use primer or wood conditioner as needed.


Comments
Ana White
Fri, 06/17/2011 - 17:39
Make sure you secure this guy
Make sure you secure this guy to the wall!
annalea
Fri, 06/17/2011 - 21:27
Could all shelves be adjustable?
Could this be made up with EVERY shelf on shelf pins? Talk about adjustability to the max . . . and maybe a little easier to build? (i.e. no Kreg jig required...)
In reply to Could all shelves be adjustable? by annalea
mandylynn523
Fri, 06/17/2011 - 22:41
I like this Idea...
to get the holes all to match up you would just have to put all the 84 1/2 boards together and and drill through except your two outer boards so you don't see the holes. I am not really handy with the Kreg in fact i don't own one yet but it looks intimidating lol but i am willing to give it a shot lol.
Guest (not verified)
Sat, 06/18/2011 - 10:12
Haha! What an awesome name
Haha! What an awesome name given to a shoe shelf. You are right, it could look like a shrine :D
ACraftyCauldron
Sat, 06/18/2011 - 17:02
Over the Moon
I am over the moon for this! Thank you so much, Ana!!! Hope you have a great weekend!
Guest (not verified)
Mon, 06/20/2011 - 20:54
Just a note that if you are
Just a note that if you are considering using shelf pins for every shelf I would recommend screwing the top, middle and bottom shelf to the outsides. This would prevent the sides from bowing out under it's own weight.
In reply to Just a note that if you are by Guest (not verified)
annalea
Wed, 06/22/2011 - 11:50
Thanks for the tip...
I can totally see why those stationary shelves would be vital. Thanks!
Guest (not verified)
Tue, 06/21/2011 - 17:12
I need this in my garage!!
I need this in my garage!! The shoes are starting to take over!
Guest (not verified)
Mon, 09/19/2011 - 07:48
Dimensions
Are the shelf dividers, listed as 1x12, 1" by 12"? Wouldn't the width of the shelves be 26" with 3 shelves of 8" and 2 dividers of 1"? Or are the dividers 3/4" thick for the 25 1/2" length shown?
I assume there's no worries about using 3/4 pureblond plywood for this similar to the smiling mudroom if they're going to be in the same room. I also assume that this can be done with no plywood backing as long as it's attached to some blocking...
Rgds
Misslizzy
Sun, 10/02/2011 - 19:33
Can't wait to start
I just designed this to fit my closet. I can't wait to start building!
laurakc181
Sun, 12/25/2011 - 15:46
Would be cool if.....
This would be cool if you slapped some doors on it that made it "look like" an apothecary cabinet so that the shoes, purses and boots were hidden in the entry way of the house. I might just do that :)
Sara (not verified)
Thu, 01/05/2012 - 09:29
Sideways alternate?
Ana do you think this plan could be easily adapted to lay sideways instead of standing tall? I've been looking for something like this but would rather have it long and low...and this would be my first build :) Any tips?
Guest (not verified)
Wed, 01/18/2012 - 23:16
Can't wait to build this. My
Can't wait to build this. My shoe collection is taking over my closet so this would be perfect!
Wynne (not verified)
Wed, 01/23/2013 - 06:26
Shoe shrine into craft storage
I might alter this plan to be suitable for craft storage and to hang on the wall; I have tons of little bottles of alcohol ink, metallic powders, small tools, etc for working with polymer clay so I need some storage that I can hang on the wall as well. It'll thus be easily accessible as well as pretty! I think a whitewash finish or natural-stained wood.
I'd make it half as deep for starters, and consider adding in a dowel at the bottom from which to hang s-hooks for tools I use frequently.
jwillo
Sun, 08/02/2015 - 11:48
Question regarding materials
This project looks great, and I saw that some people in the brag posts used cabinet grade plywood. Could you use Purebond plywood here as well?