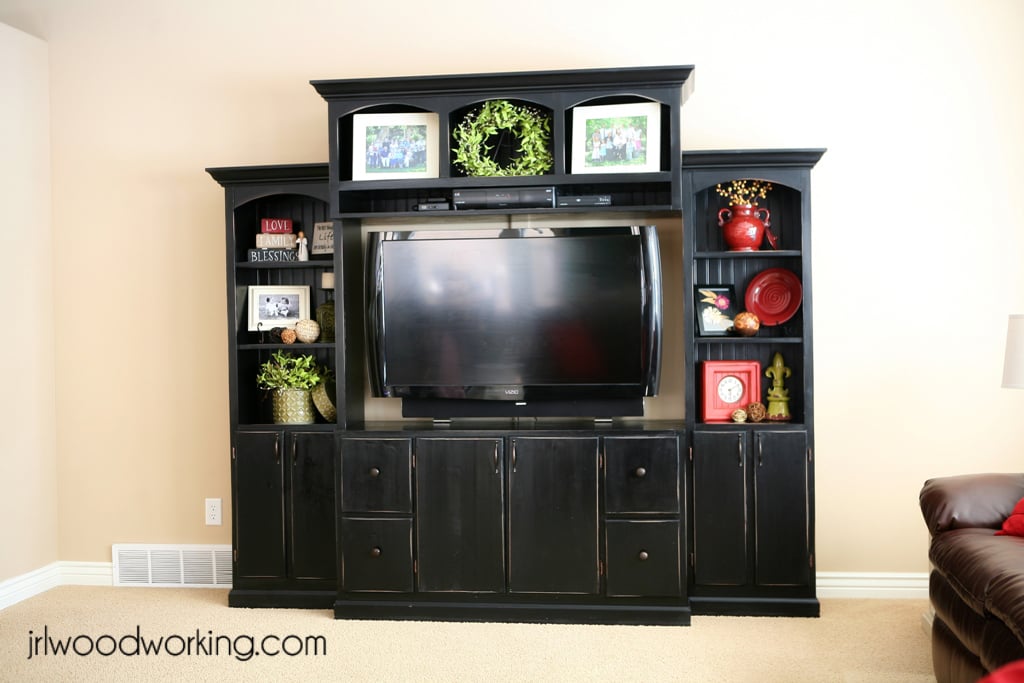
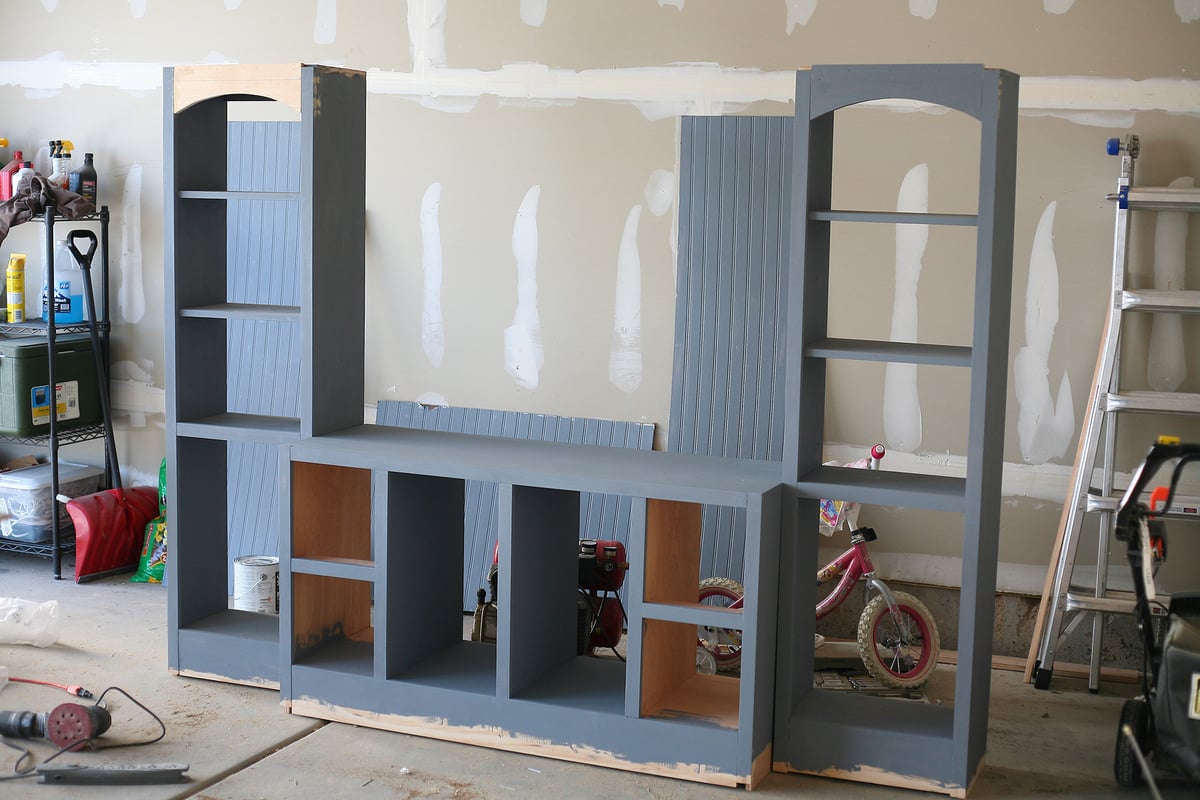
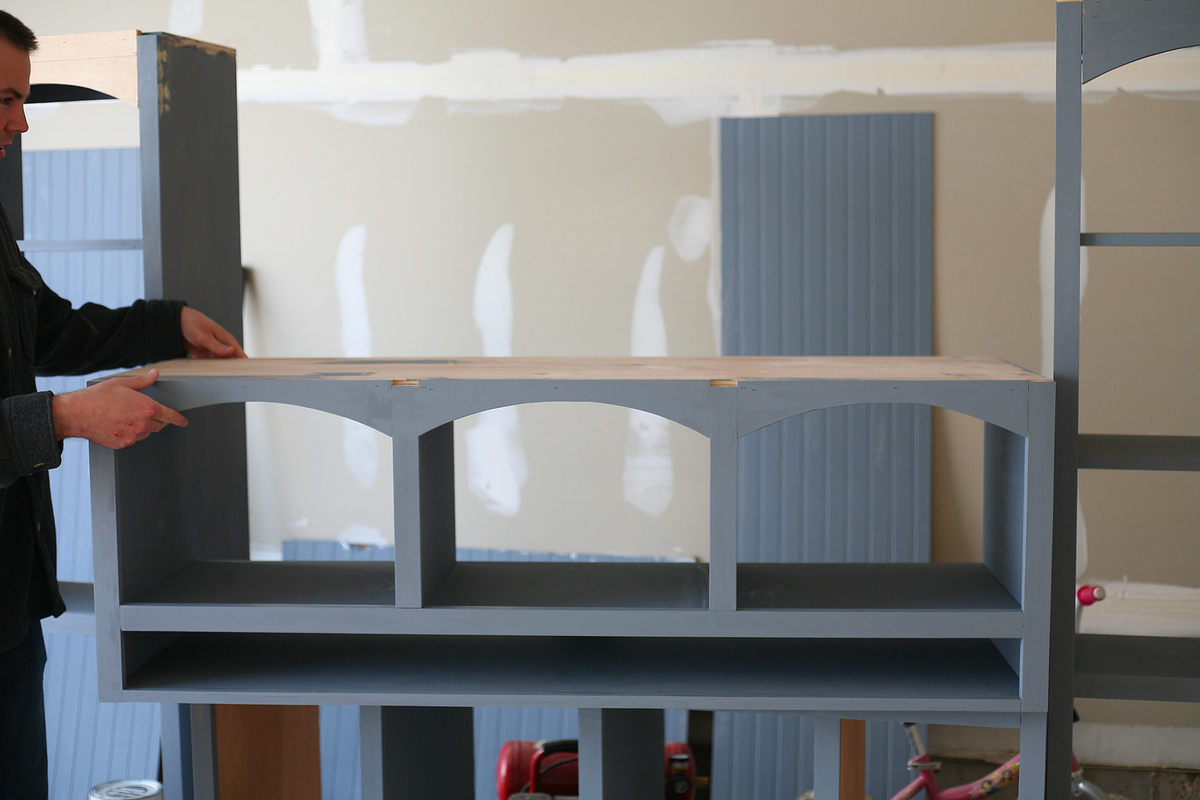
We purchased our first LCD TV, which meant we needed a new entertainment center to put it on. We looked at quite a few furniture stores and couldn't believe the price tag on the big centers. I wanted more than just a TV stand, so I convinced my husband to help me build an entertainment center ourselves. I looked at a lot of different entertainment centers, even a few on this site, and then I drew up a picture of what I was envisioning, tweeking things here and there (I have three little kids so I needed to make sure the center piece was high enough to keep little fingers off my expensive TV, and I also knew I wanted all Satellite Receivers and DVD players out of reach), and we went to work figuring out dimensions. We designed the TV opening around the exact dimensions of our new TV (it's a 46" tv, if that helps you imagine the opening size) and then figured out the rest of the dimensions after that. Once we had the dimensions figured out, my husband went to work calculating what materials we would need. Then we got to work. We built the center in four different pieces (two side shelf units, the middle bottom stand, and the middle top piece). We spent every night for the next week working in the garage to build the entertainment center, and it turned out absolutely beautiful! And the best part? The price, of course. In total, we spent $546.00. That includes wood, trim pieces, paint, primer, hardware (knobs and hinges). Not too bad for a beautiful entertainment center made of real hardwood!


Comments
whitney_smith
Wed, 07/27/2011 - 14:10
Perfect!
What a great project! This is exactly what I want when we fianlly give in and buy a new T.V.
In reply to Perfect! by whitney_smith
kristenlotz
Mon, 08/08/2011 - 12:13
Thank you!
Thank you!
Lori E (not verified)
Wed, 07/27/2011 - 14:18
Wow! This is absolutely
Wow! This is absolutely beautiful .... great job!!
In reply to Wow! This is absolutely by Lori E (not verified)
kristenlotz
Mon, 08/08/2011 - 12:14
Thanks!
Thanks!
Diana (not verified)
Thu, 07/28/2011 - 09:38
This is beautiful! Do you
This is beautiful! Do you have any tips on cutting and getting the crown moulding to fit right?
In reply to This is beautiful! Do you by Diana (not verified)
kristenlotz
Thu, 07/28/2011 - 16:17
Crown Moulding
I was worried the crown and bottom moulding would be tricky, but it wasn't too bad. To make sure it all lined up perfectly, we screwed together all the pieces (the top center piece to the two side shelving pieces and then both the side shelving pieces to the bottom center piece) first. We had it all put together just as it would be in the house and THEN we measured and cut the crown and base moulding. I had painted all the moulding first and then just touched it up after we put it on the entertainment center. I think we wouldn't have been able to get it to line up perfect if we hadn't screwed it together first, screwing it together get it a nice snug fit.
kaytrishjr
Mon, 08/08/2011 - 07:16
Beautiful!
If I didn't actually see the building process of the entertainment center, I wouldn't have believe you built it yourself!
In reply to Beautiful! by kaytrishjr
kristenlotz
Mon, 08/08/2011 - 12:13
Thank you!
I wouldn't believe it either, if I hadn't been the one spending so many hours in the garage building and painting! Thank you! :)
sdking1981
Wed, 08/10/2011 - 13:59
Fabulous!!!
This is exactly what I need! Happen to have the dimensions? I know I could modify it to fit our TV but I'm really wondering how deep your side bookcases are. Thanks!!
Kristen Lotz (not verified)
Wed, 08/10/2011 - 14:16
Dimensions
Thank you! The dimensions are as follows:
Side Bookcases:
19.5" Wide
12" Deep
72" Tall
Center Piece:
54" Wide
19" Deep
84" Tall
Hope that helps!
sdking1981
Wed, 08/10/2011 - 14:35
Thank you!!
I appreciate your quick response and help!! We're in the process of planning this one right now! :)
In reply to Fabulous!!! by sdking1981
kristenlotz
Thu, 01/03/2013 - 10:23
We finally got cracking and
We finally got cracking and put together formal plans to build this piece. Go to our website to see them, here's the link:
http://www.jrlwoodworking.com/2012/12/furniture-plans-custom-entertainm…
Good luck! Let us know if you build it!
Guest (not verified)
Wed, 08/31/2011 - 23:53
Height of TV Ledge
Wow! Your entertainment center is beautiful and seems wonderfully functional! Just wondering what the height is of the ledge for the TV in the center console. We have little ones too and need TV and componenets to be out of reach! Also, would you mind sharing which plans you used as inspirations for each part? I think it is the Basic Collection for the bookcases and the Tommy for the center? Is that correct?
In reply to Height of TV Ledge by Guest (not verified)
kristenlotz
Wed, 01/18/2012 - 14:19
Hi, sorry for the slow reply!
Hi, sorry for the slow reply! I am not 100% sure (I can't find my tape measure!) but I think the TV ledge is either 30 or 36 inches high. I wanted it high enough that it wouldn't be hard to watch the TV while sitting, but enough that it would be hard for little fingers to touch the TV.
spiceylg
Thu, 09/01/2011 - 08:01
Fab
You both did an amazing job!
azca33 (not verified)
Mon, 11/21/2011 - 16:24
Wonderful/Question
Hey Kristen,
Your entertainment center looks beautiful!
Did you use Pine wood for the entire project or did you use plywood for the top of the side book cases and the top part of the Media center. Did the paint cover up all the knots?
In reply to Wonderful/Question by azca33 (not verified)
kristenlotz
Wed, 01/18/2012 - 10:59
Thank you! We used plywood
Thank you! We used plywood on part of it, mostly for the center pieces. If I were going to do it again, we would have used plywood more because it was knot free and much straighter. The paint did a good job covering up the knots, and I am overall really happy with it!
In reply to Wonderful/Question by azca33 (not verified)
kristenlotz
Wed, 01/18/2012 - 11:00
Thank you! We used plywood
Thank you! We used plywood on part of it, mostly for the center pieces. If I were going to do it again, we would have used plywood more because it was knot free and much straighter. The paint did a good job covering up the knots, and I am overall really happy with it!
Guest (not verified)
Fri, 12/30/2011 - 14:44
entertainment hutch
entertainment hutch
JennieB (not verified)
Sun, 01/01/2012 - 16:27
Doors, etc.
My husband was sure we wouldn't be able to tackle building an entertainment center until we saw your photos. We are excited to take on this project. Yours turned out beautifully! Can you fill us in on the finishing that took place after this blog ends: doors, etc.?
In reply to Doors, etc. by JennieB (not verified)
kristenlotz
Wed, 01/18/2012 - 14:22
Thank you, we love it! And
Thank you, we love it! And we loved building it ourselves and saving a ton of money while we were at it. Sorry for the slow reply on this as well. We cut and measured the doors, gave them a simple finish by routering the edges, and hung them. For the drawers, we build a basic box, added the runners, and then finish nailed the drawer front onto the box. They work perfectly! I distressed all the edges once everything was completely finished and hung.
Chris Manitz (not verified)
Wed, 01/18/2012 - 06:52
Entertainment Center/ Apothecary Center
What is the style/ color of knobs and pulls you used on this project. I am in process of building this. ALso, what is the cherry stain? Did you use that on the distressed parts of the center??
Thanks for your help!
Chris
In reply to Entertainment Center/ Apothecary Center by Chris Manitz (not verified)
kristenlotz
Wed, 01/18/2012 - 14:27
Congrats on building the
Congrats on building the entertainment center! You will love it! I ended up using brushed bronze knobs and hinges (similar to this: http://www.handlesets.com/rusticware-950-1-1-4-modern-mushroom-knob-fro…). They turned out perfect with the black paint. They stand out enough, but not too much to distract. As far as the stain, I just used a Minwax Cherry gel stain. I would wipe it on the areas I had distressed (around the drawers, cabinet doors, edges, etc.) then let it sit for awhile and then I wiped it back off. It gave the distressed areas enough color to not look raw, but it still stands out. I hope that answered your questions!
Chrism (not verified)
Thu, 01/19/2012 - 07:00
Thanks so much for your
Thanks so much for your help!!!
Chrism (not verified)
Thu, 01/19/2012 - 07:00
Thanks so much for your
Thanks so much for your help!!!
Jeff (not verified)
Sat, 01/28/2012 - 22:29
Plans
Are there plans for this?
In reply to Plans by Jeff (not verified)
kristenlotz
Thu, 01/03/2013 - 18:35
Plans
Okay, the plans are now posted here:
http://www.jrlwoodworking.com/2012/12/furniture-plans-custom-entertainm…
Hope that helps you out!
In reply to Plans by Jeff (not verified)
kristenlotz
Thu, 01/03/2013 - 10:23
Plans
We finally got cracking and put together formal plans to build this piece. Go to our website to see them, here's the link:
http://www.jrlwoodworking.com/2012/12/furniture-plans-custom-entertainm…
Good luck! Let us know if you build it!
Brandi Vancott (not verified)
Tue, 02/21/2012 - 10:25
entertainment center
Hi I love this do you have plans for it??
In reply to entertainment center by Brandi Vancott (not verified)
kristenlotz
Thu, 03/01/2012 - 18:56
No Plans
No, sorry, there are no official plans for this. I just drew a picture of what I wanted and my husband calculated everything out from the picture. The general dimensions are listed above, though, if that's any help!
Carey (not verified)
Mon, 02/27/2012 - 17:05
Love this
I really love this too.. is there any plans for it?
In reply to Love this by Carey (not verified)
kristenlotz
Tue, 02/25/2014 - 13:36
JRL Woodworking
Yes, you can find the plans at http://www.jrlwoodworking.com. Best of luck!
Guest (not verified)
Thu, 03/01/2012 - 18:50
wow I love it
wow I love it
Cheramie (not verified)
Fri, 03/02/2012 - 16:40
You guys did a beautiful job!
You guys did a beautiful job! I am so glad to see someone built almost the exact unit I was picturing. :) Ana's inspiration strikes again!!! I didn't see one, so wanted to ask if you blogged this elsewhere so I can read more details about the process. Thanks!
In reply to You guys did a beautiful job! by Cheramie (not verified)
kristenlotz
Thu, 01/03/2013 - 10:24
Plans
We finally got cracking and put together formal plans to build this piece. Go to our website to see them, here's the link:
http://www.jrlwoodworking.com/2012/12/furniture-plans-custom-entertainm…
Good luck! Let us know if you build it!
Dbarnes (not verified)
Mon, 03/05/2012 - 06:06
How did you cut the arches?
How did you cut the arches?
claydowling
Mon, 03/05/2012 - 07:20
Jigsaw
Those arches are most easily cut with a jig saw. You can clean up with a curved rasp and file, or a spokeshave.
kristenlotz
Mon, 12/31/2012 - 13:40
Plans
Okay, I finally posted (actually, my husband did) plans for our entertainment center. They can be found on our woodworking blog here: http://www.jrlwoodworking.com/2012/12/furniture-plans-custom-entertainm…
Please take a look at them and let me know if you have any questions. Hopefully this will help other to build their own similar projects.
ktambascio
Sat, 03/16/2013 - 15:53
Looks great
I love the the shelf above the TV. If you make that shelf about 6 inches tall, you would have enough room for a center channel speaker, or for an XBox Kinect.