Hello! I’m Ana, a mother and homemaker from Alaska.
Skeching
100’s of FREE plans!!
You can make ANYTHING!
stick
img
sticks
img

Building Forms

July 25, 2011 |

Missed a Momplex Post?

We are DIYing our moms a Duplex in Alaska! Check out our progress so far as we owner build a home, step by step. Read the Momplex blog here.

posted by Ana White

Momplex Stats

Money Spent So Far: 
$10000 + Cost of Property
Time Spent So Far: 
220 Hours of Site + Planning

Today's task?


Build a perfectly level box 44 feet long and 44 feet wide on not so even ground.  Think of it as the most giant of raised garden beds.  Or you could just think of them as footers for the Momplex.


We rented a compactor for $100.  It's about the size of a lawnmower with a flip up handle.  You run the compactor over wet ground and it compacts the soil.  That way when you build your footers and pour concrete, the footers don't sink in the soil due to lack of compacting.  


All the way around, and we are ready to start building the footer forms.


You guessed it . . . each corner gets and X to mark where the corners of the footers will go.

But we will need to be more exact this time with the location of the footers.  The spray painted lines are a good three inches wide, and our footers cannot be three inches off.


So up goes what's called batter boards on the outsides of the Xs on each corner.  Three concrete stakes are pounded into the ground, and then boards nailed to the stakes, followed by string lines tied to the boards to create a perfectly square box, telling you where the footers need to go.  Remember, we are going 44 feet . . . it's hard to find 8 feet of straight boards, let alone 44 feet of joined boards, so these string lines are very necessary.


Ever wonder why the heck some nails have two heads?  You use duplex nails to attach the boards to the concrete stakes.  The double heads allow for easy extraction of the nails after the concrete is poured and set.

And these are concrete stakes, running about four bucks a piece.  But I tell you, last week when we came up short fifty stakes and couldn't round up one within 100 miles . . . we would have paid twice that.  These stakes are the ticket to building the footers, and cost the Ram a day of driving to pick some up.


Now it's time to build that huge box.  We consulted with our local engineer on the size of the footers and rebar requirements.  These footer forms are made from 2x12 boards (oh the plans I have for them once the concrete cures and we can remove and reuse them!).  We built a box, using the string lines to guide us.


Giant box I tell ya!


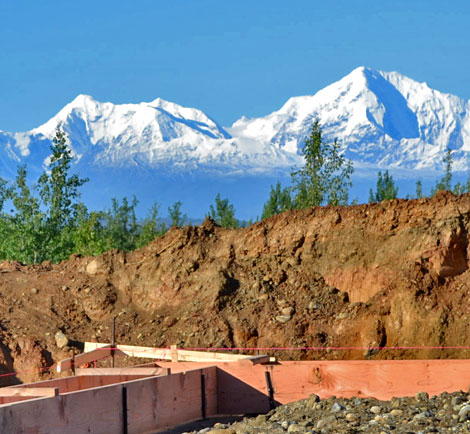
We spliced the 2x12 boards with pieces of plywood to make the 44 feet.  Everything is better with a pretty view, isn't it?  In contrast to building our home, I find myself very much appreciating working up on this hill. It's good to have a pretty office!


And of course we have to build a second box, inside the first, to create the footers.


Everybody get's some rebar.


And then the rebar gets a chair.

The rebar chairs elevate the rebar and keep them in place for the concrete pour.  For footers, rebar has to be carefully spaced and these chairs are designed for just that.  


Just in case you are wondering who is babysitting Grace  :)  Dirt hills are amazing babysitters . . . until you start doing laundry.


Or you can just put them to work bending rebar.


Then the rebar gets tied with tie wire.


And then concrete stakes are pounded into the ground along the edges of the footer forms.


And the boss shows up to make sure it's all level.


Using the laser level, the height of the forms is either brought up (or down) using a pry bar, and when level, nails are pounded through the concrete stakes into the forms.  This is done all the way around.


Up . . . up . . up . . .  right there!  


We are now ready for concrete!

Wow. I laughed so hard at the

Wow. I laughed so hard at the part about who was babysitting Grace... LOL... great job!

posted by Guest (not verified) | on Mon, 2011-07-25 13:13
clips

OMG LOOK AT ALL THAT WOOD!!!

I am so jealous of all that wood you are going to reclaim. If you run out of room to store it, you can always send some across the country to Connecticut!!!

posted by Laura Fama | on Mon, 2011-07-25 13:26

Just a note on the compaction

Just a note on the compaction process - It's important to start with undisturbed ground - IE, you dig your trench down to soil that hasn't been moved in years (preferably never), if you are in a built-up area.

If you try to build on ground that has been dug and filled, there is a big chance that it will shift around and crack or move your foundation and walls.

There are ways to address this, but they are - you can guess this next bit - expensive.

So you dig to undisturbed ground, then you compact that ground to make sure you have no hidden surprises. Then you start your form work.

Since you have so many folks following along, if I can add industry (arch/construction) notes as you go along, I will.

Full disclosure: I'm no expert, only a CAD jockey drawing what others tell me. When in doubt, always hire a consultant.

posted by Jenn (not verified) | on Mon, 2011-07-25 13:34
clips
Ana White's picture

Thanks Jenn for catching this

Thanks Jenn for catching this - yes, we dug down to gravel on virgin ground, so no need for heavy compaction equipment at the Momplex site.

posted by Ana White | on Mon, 2011-07-25 13:44

Wow!

Loving that beautiful view!!

posted by Guest (not verified) | on Mon, 2011-07-25 13:41
clips
natsmom's picture

Babysitter

I must admit, I have many fond memories or "helping" my parents build our house. I numbered boards, moved dirt, and did all kinds of "helpful" things. I'm glad Grace seems to be enjoying it too!

posted by natsmom | on Mon, 2011-07-25 13:52

from furniture to houses

Ana you continue to amaze me, I know you already built your house but us readers missed out on that process until now, seriously amazing how you start from dirt to footers and soon walls! Makes all my furniture builds look like toothpicks! I'm enjoying the process (as I'm on a building hiatus with 3 kids home for summer) through your posts and can't wait to get back in the garage come Sept. Wish I could be there to help you with that gorgeous view, Momplex will be amazing.

posted by Jaime (not verified) | on Mon, 2011-07-25 14:31

Footing Depth

Just a quick question, shouldn't those footings be located below the local frost line, which in your area has to be at least 54 or 60" below grade.

posted by Lee Buescher (not verified) | on Mon, 2011-07-25 14:36
clips
Ana White's picture

Hi Lee, you are absolutely

Hi Lee, you are absolutely correct. We dug out the hill 60" below grade for the footings, and the base of the footings are at 60" below grade. We'll be building walls out of ICFs here shortly to get us out of the ground, and then backfilling.

posted by Ana White | on Mon, 2011-07-25 14:53
clips
Ana White's picture

On the front where the drive

On the front where the drive under garages are located, we'll be adding 4" foam insulation to protect the footers per recommendations from our local building engineer.

posted by Ana White | on Mon, 2011-07-25 14:55

Amazing Ana, and that view...

Amazing Ana, and that view... i'm about ready to pull up stumps and join the Mums!

posted by Virginia (not verified) | on Mon, 2011-07-25 17:44

Amazing to watch this step by

Amazing to watch this step by step.

posted by Guest (not verified) | on Mon, 2011-07-25 18:10

So great!

Once again, it's so neat to read about the process and your progress. Is the RAM a contractor? Is that the reason he knows how to build houses? Not sure if you've mentioned his profession and I've just missed it.

posted by Sheela (not verified) | on Mon, 2011-07-25 18:42
clips
Ana White's picture

Thank you everyone! I have

Thank you everyone! I have to tell you, when we built our house, we only have ONE photo of the entire process! Blogging is such a blessing, it gives us an opportunity to look back at the process too! So thank you so much!

@ Sheela, my husband is by trade and electrical technician, but he knows tons about building, and this is our fourth build, so we are not new to this process. We also have on hand my husband's father and uncle, who are also very knowledgeable and experienced. And we do consult with our local engineer about some things to make sure we are building everything correctly.

posted by Ana White | on Mon, 2011-07-25 19:27

How neat that he has such a

How neat that he has such a vast knowledge of building! Thanks for replying!

posted by Sheela (not verified) | on Thu, 2011-07-28 18:30

question

How long did you spend actually building the forms? with how many people?
Love that you explain things like the 2-headed nails and concrete stakes and rebar chairs- who knew?? lol

posted by Guest (not verified) | on Mon, 2011-07-25 21:51
clips
ACraftyCauldron's picture

Beautiful Office

Beuatiful Office with a GORGEOUS little office assistant! (Although I would NOT want to be responsible for her laundry! LOL)

I'm SO loving this project, Ana. I'm learning so much. THANK YOU FOR EVERYTHING!!!

The road to success is always under construction.

posted by ACraftyCauldron | on Tue, 2011-07-26 07:56
clips

getting dirty

Thank you so much for going through this all with us.

I was just indulging in a little thought... thinking how I would like to get in and get dirty to help. Then imagining all the hands that would show up to work if distance and security weren't issues in our modern world. You are well loved~

I grew up visiting constructions sites with my grandfather and parents. Tell Grace to dig some dirt tunnels for me. or a mud castle. or a fort! ahh memories ;)


posted by Leah | on Tue, 2011-07-26 09:15

Cool

Thank you for taking me on this journey. Have enjoyed being part of the process.

P.S. Wish we could have some of your cool weather. It's just amazing that it is 97 here, and you are all wearing coats and hats.

posted by Guest (not verified) | on Tue, 2011-07-26 09:52
clips

Grace the Wild Child.

That's a perfect picture of your wild child. She looks blissfully happy in her personal dirt pile.

But my feet ache with cold just looking at her.

posted by Tsu Dho Nimh | on Tue, 2011-07-26 10:18

Recent comments

Social

Let's Connect

Tweets

  •  

User login

Not Much >>

What's going on up here in Alaska.

Momplex Cam >>

Momplex Cam >>

We are DIYing our moms a Duplex in Alaska! Check out our progress so far as we owner build a home, step by step. Read the Momplex blog here.