


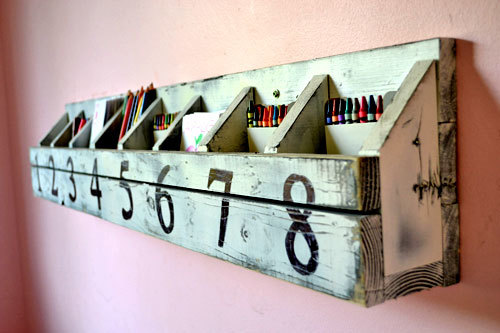
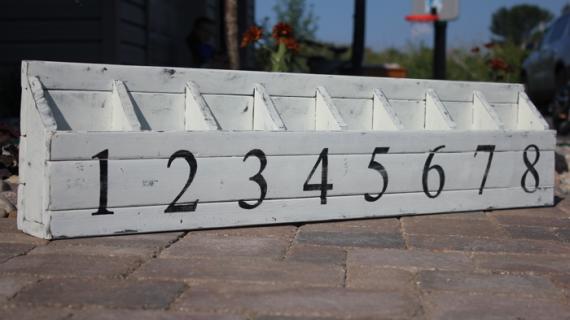
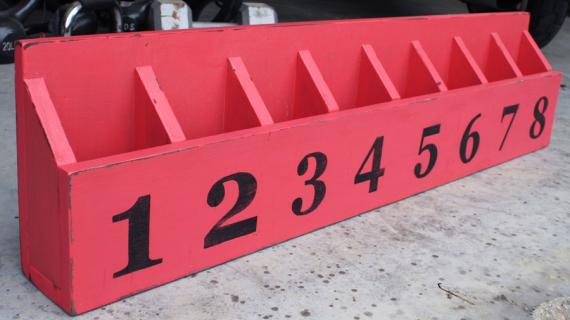
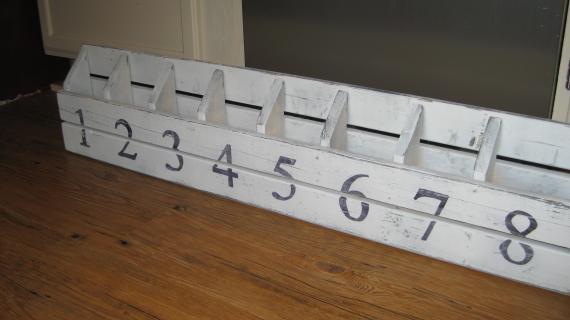
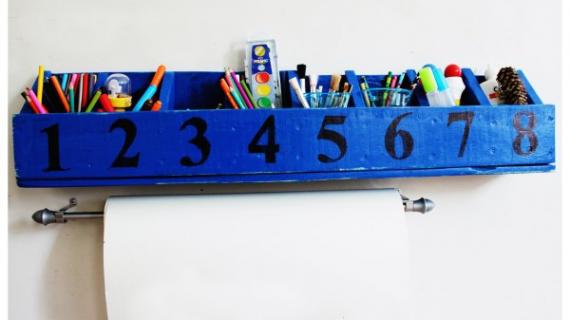
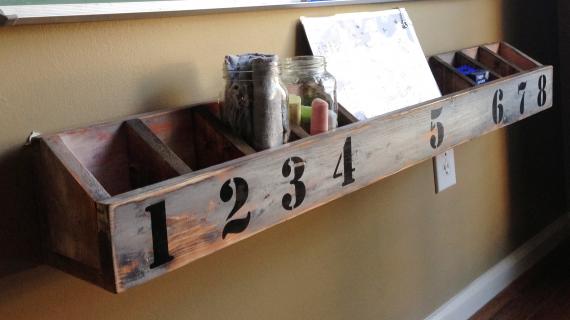
Plans to build a Pottery Barn Kids inspired Number Cubby Shelf. This shelf features eight small cubbies in a vintage paint finish. Free simple step by step plans use standard lumber and simple tools. Build this Number Cubby Shelf for under $10.


Preparation
3 - 1x3 @ 8 feet long
1 - 1x2 @ 8 feet long
4 - 1x3 @ 38 3/4"
2 - 1x2 @ 38 3/4"
9 - 1x3 @ 7 1/4" (One end cut at 45 degrees off square, long point measurement)


Please read through the entire plan and all comments before beginning this project. It is also advisable to review the Getting Started Section. Take all necessary precautions to build safely and smartly. Work on a clean level surface, free of imperfections or debris. Always use straight boards. Check for square after each step. Always predrill holes before attaching with screws. Use glue with finish nails for a stronger hold. Wipe excess glue off bare wood for stained projects, as dried glue will not take stain. Be safe, have fun, and ask for help if you need it. Good luck!
Instructions
Step 1

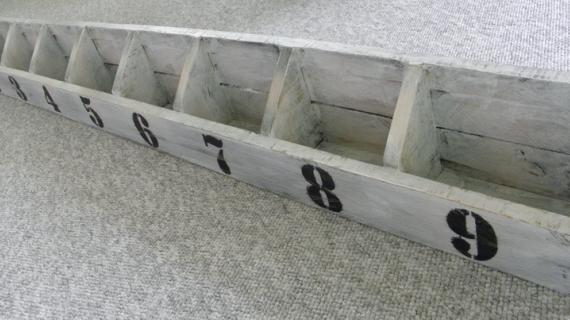
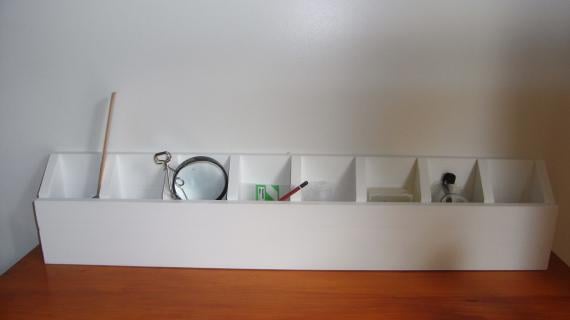
I cut a scrap 1x3 to 4" length and used it as a block to help me space the dividers. Then I nailed the dividers to the bottom, spaced 4" apart. This part was a bit tricky, because my nailer requires me to push really hard (it's battery powered) so you may just want to mark screw holes, predrill, and attach with screws. Don't forget your glue.
Step 2

Now you still want to make sure the back is 4" spaced at the top. Attach the back boards to the cubby dividers and bottom with 2" finish nails and glue. As you near the top, use 1 1/4" finish nails because the miter cut will not give you enough clearance for the 2" nails.
Step 3

And now nail the front boards on, again, using the 4" block as a guide.
It is always recommended to apply a test coat on a hidden area or scrap piece to ensure color evenness and adhesion. Use primer or wood conditioner as needed.

Comments
debandtom25
Tue, 07/26/2011 - 03:48
LOVE LOVE
So damned cute!!!! I will build one, with no use in sight, just yet! Great job!
angela r j (not verified)
Tue, 07/26/2011 - 07:01
I like it much better than
I like it much better than Pottery Barn's. Thanks for the plans!
whitney_smith
Tue, 07/26/2011 - 07:38
Hello Cuteness!
This is such a great finish! And the cubbies are great!
Cherie Heltne (not verified)
Tue, 07/26/2011 - 07:39
Perfect
I have been looking for something to organize my 5 kids homework supplies. This is perfect and will look great no matter what room I hang it in. Thank you for the instructions on the finish, it makes the piece. I agree that the planks fit the project better than the solid boards.
Lori E (not verified)
Tue, 07/26/2011 - 07:43
Soooo cute!! Thanks for the
Soooo cute!! Thanks for the plans!
marlaandwilliam
Tue, 07/26/2011 - 09:43
Modify?
Hi Ana - this would be PERFECT for my classroom for supplies!! Can you tell me how to modify it and what the shopping/cut list would need to be to make it have 13 cubbies instead of 8?
In reply to Modify? by marlaandwilliam
Ana White
Tue, 07/26/2011 - 10:11
62 1/2" :) You'd need to
62 1/2" :)
You'd need to almost double all the boards because you can only get one 62 1/2" out of an 8 foot stick. But these boards are about a buck each.
rbigbus (not verified)
Tue, 07/26/2011 - 10:16
I love this. I have 11 kids 8
I love this. I have 11 kids 8 still at home and this is perfect for the new school year. Great for homework supplies and enough spots too...
Amy Parnell (not verified)
Tue, 07/26/2011 - 10:36
Love it!
I agree, this is way cuter than PB's. I will be making this very soon! Thank you Ana!
Meg :) (not verified)
Tue, 07/26/2011 - 10:44
Ooh! Super cute! Looks easy
Ooh! Super cute! Looks easy to build! :)
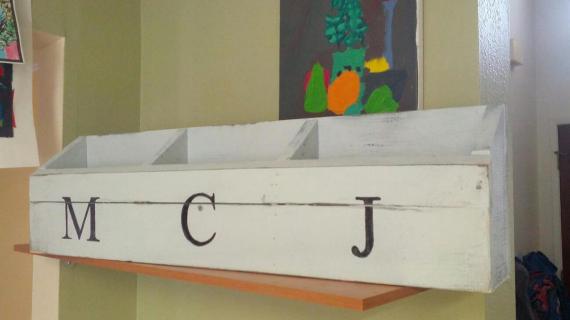
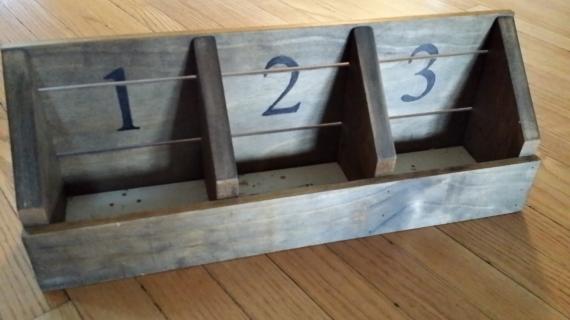
This could easily be modified to be smaller, or larger. I'm even imagining First Initials instead of numbers and a longer back panel so I could hang coat hooks on the bottom. Hats & Mittens up top, Coat down below!
It's a great shelf as it is, or with some changes!! :)
The Quaint Cottage
Tue, 07/26/2011 - 10:52
Love the finish.
Nice job on the finish. I will need to add this to my list. Thanks for sharing.
Karen
lugnutgirl
Tue, 07/26/2011 - 11:09
Wood conditioner
Hi, Ana -- Found your blog a couple of weeks ago and I'm HOOKED! Thanks so much for your wonderful projects -- I have a couple of projects of my own started, based on some of your plans, and I can't wait to see how they turn out!
I see you include wood conditioner on your list of supplies. I have heard other designers (mostly on DIY Network) also say you can use water, since it also is supposed to open the pores of soft wood. What do you think?
Suzzi (not verified)
Tue, 07/26/2011 - 17:13
I'm curious about this too. (Wood conditioner)
Love the blog! I have been a lurker as well - so can wait to start with a project like this.
baklund
Tue, 07/26/2011 - 11:24
Love it!
Can't wait to make this for my son's room - it is so cute! Want to go get my lumber right now but I promised my husband I'd finish a few projects before I start another. I'm good at starting, not at finishing!
ikissedatoad
Tue, 07/26/2011 - 12:46
i will be making this for my
i will be making this for my sewing room! i usually have the next 5-6 projects laid out across my floor- but this way i can stuff coordinating fabrics into each bin and clear up my floor space! i'm so stinkin' excited!
Sydney (not verified)
Tue, 07/26/2011 - 14:05
It never ceases to amaze me
It never ceases to amaze me how expensive stuff is at Pottery Barn! I like your version better, Ana.
Guest (not verified)
Tue, 07/26/2011 - 18:42
LOVE IT....
Sewing room, office, son's room for video games and the list goes on. Ana this is a really cleaver design. I love the numbers and the finish too.
Spring
Tue, 07/26/2011 - 19:18
I love it!
I love it. So cute with so many uses. This is moving to the top icky to do list.
Spring
Tue, 07/26/2011 - 19:21
Sorry IPad thinks it's smart then I am
Last comment was suppose to say I was moving this project to the top of my list.
Guest (not verified)
Tue, 07/26/2011 - 20:02
Much nicer than the PB
Much nicer than the PB inspiration. Good job!
Ana White
Wed, 07/27/2011 - 12:15
Thanks everyone! Such a fun
Thanks everyone! Such a fun project, can't wait to see brag posts!
For those of you questioning the wood conditioner, it was an error on my part. All fixed.
Sunny E (not verified)
Wed, 08/03/2011 - 15:12
Just built it!
Love this project. I'm going to make a "writing center" for my girls, and this will be great. I modified a bit. I cut the 8' boards in half, so that I have room for 10 cubbies with 4' spacer like you did. Measurements worked perfectly!
I will number mine 0-9 because we homeschool math with the Math-U-See books, and they stress counting from 0-9 rather than 1-10.
Don't know if the boards are smaller in Texas, but I couldn't get a good fit with the 7.5 inch boards as the uprights. My two 1x3 and one 1x2 didn't come up high enough in the back to make a full 8". So I moved the 1x2 to the front for a taller box, then used a spare 1x4 on the back to make the back taller. So my back is 1x4, 1x3, 1x3 and front is 1x2, 1x3, 1x2. Will post when I get it painted. Next time I will cut the upright boards smaller so that crayons will fit better.
ajcajj
Tue, 08/09/2011 - 12:59
I'm hooked! I'm building my
I'm hooked! I'm building my 5th cubbie shelf right now!
Guest (not verified)
Tue, 08/16/2011 - 09:43
Great project. I built it
Great project.
I built it last night. One comment though, I cut the divider boards at 7-1/4 inches, but this didn't seem to work out with the width of the front and back boards. The back calls for 2 3" and one 2" board (6-1/2 total width 2-1/2 + 2-1/2 + 1-1/2). the total height of the back is 8" including the bottom. Should the boards have been spaced apart 3/4"? Or should the dividers been cut different?
rainiemills
Mon, 09/19/2011 - 11:13
Easy Project
I built this project but noticed some differences in the plan.
I needed an extra 1/2 for the back otherwise there was a huge gap, and the measurements for the insides of the blocks were a little bigger than noted in the plan. Both were easy fixes and I love how my shelf turned out!
soniathebuilder
Tue, 11/15/2011 - 08:58
Thank you Ana!
Ana,
It's really nice of you to post your work. It's super helpful for a novice like me.
I have yet to build my first project, but I am pretty confident that I can do it!
Thanks a lot.
I really appreciate your hard work.
God bless you.
birdsandsoap
Sat, 07/28/2012 - 22:34
Just the ticket!
Ana, I love your site so much! I know this plan has been up for a while, but that is the beauty of anawhite.com. It has just been waiting here for me to discover a use for it. My oldest girl is turning five this fall, and we are "officially" kicking off her first year of homeschooling. I'm going to modify this to make it large enough to store books and activities for each subject (like one giant magazine storage box). Can you say organized? Woot! If I ever finish my other projects, that is!
Jesi (not verified)
Fri, 10/12/2012 - 08:47
BETTER!
Ana, yours are SO much better than Pottery Barn's!