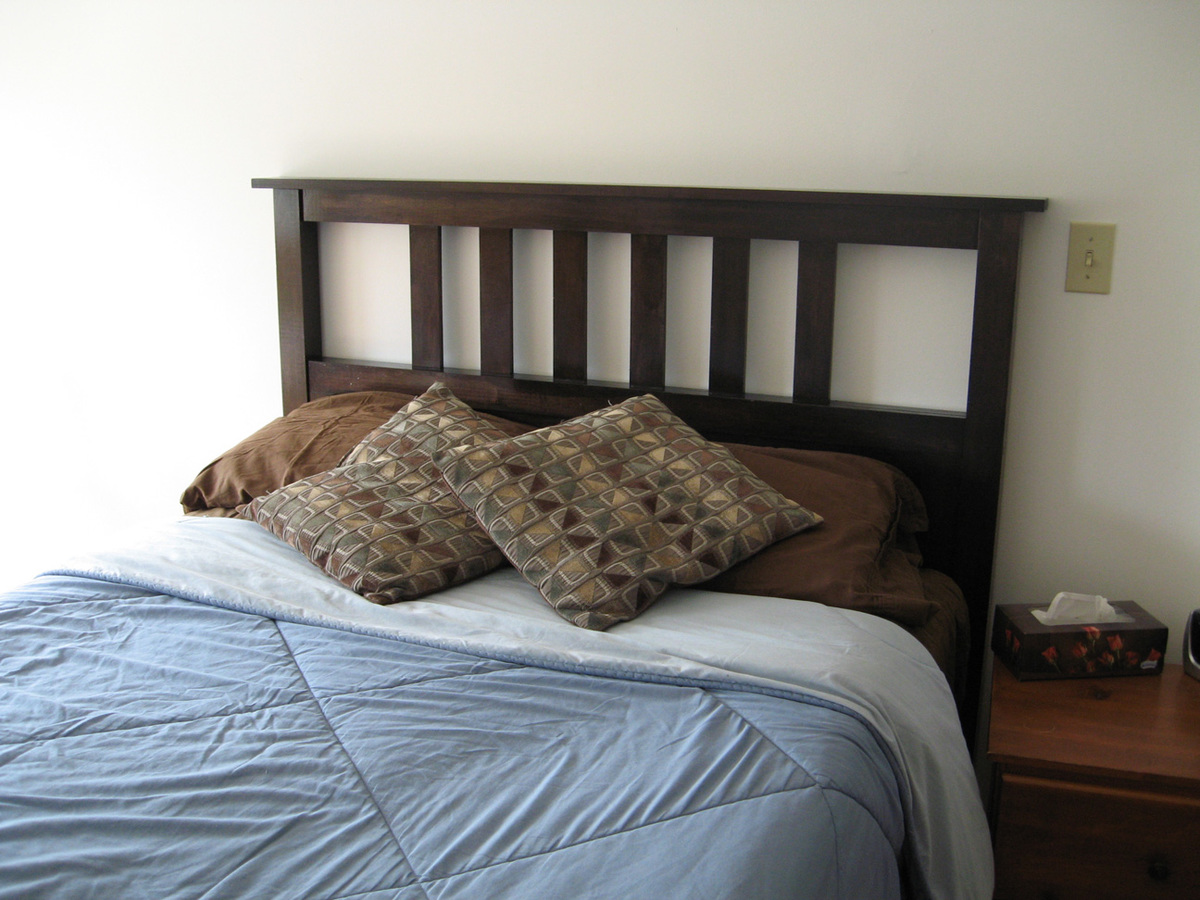


I wanted a headboard that was simple, easy to build from stock, and made from hardwood. Problem is, I had a really hard time figuring out what style I even liked, let alone a particular design.
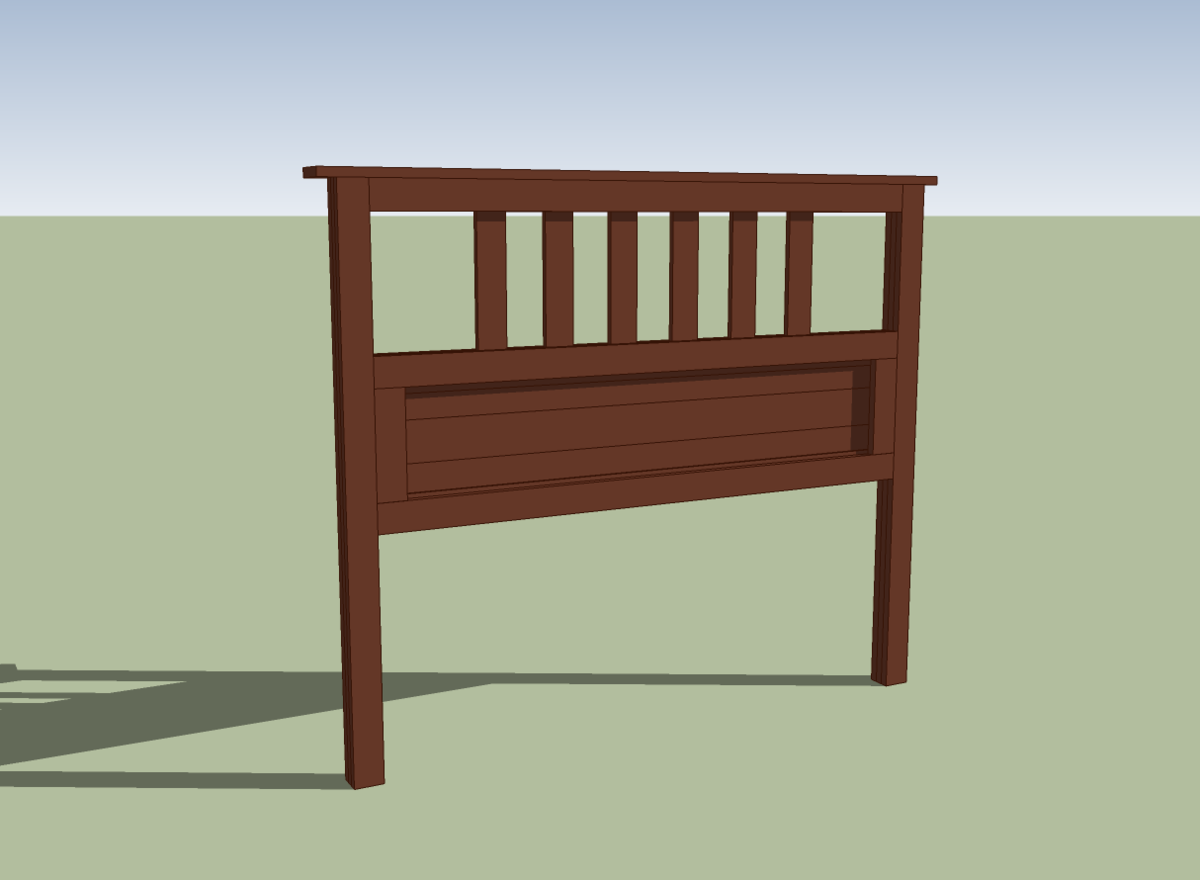
So I poured though a bunch of pictures of home makeover bedrooms online to try to figure out what I did like. I knew what style I like for kids rooms, so I browsed those to see what I could adapt into my room. I got some ideas, from desgins sites, furntiture catalogs and kid's Ikea. I found that mainly that I wanted a handful of slats in the center, but not slat overkill, and started sketching up my plan. Then I headed out of Ikea's kid's site just to glance at the grownup headboards for inspiration, and Voila! I found one just like what I was thinking. Awesome.
This plan is a little shorter than many headboards, but I think short fits the design better (plus and it's more cost effective). Those adapting to a queen or king headboard, may want to make it taller, so it still looks proportional.
I used maple, which put the cost of the project around $140. Pine would be a lot cheaper and comes in the same stock sizes, but I really wanted something that won't dent easily and would last. This was a my first project using hardwood and I absolutely loved working with it. So smooth! I'm planning on making a bed frame (storage maybe?) later on, but just wanted to be able to hook this up to the metal frame I have right now.
Thanks for looking!
Have fun!
Preparation
I used a miter box and hand saw. You'll likely want to use something else (I never want to) but you can figure that out yourself :)
2 1/2 Inch Screws
(various small screws and or nails depending on your method/ wood choice)
Pocket Hole Guide & 1 1/4" screws or 4 metal L-Brackets
Wood Glue
Sandpaper
I recommend maple, but pine would work too.
(6) 3" x 3/4" x 4' - Posts
(6) 3" x 3/4" x 6' - Crossbars (or just (5) if you're being cheap)
(3) 3" x 1/2" x 2' (or (2) 3" x 1/2" x 4') - Slats
(3) 4" x 1/4" x 4' and (2) 1 1/2" x 1/4" x 4' - Paneling
( or use (3) 4" x 1/2" x 4' )
(3) 1" x 1/2" x 4' - Filler & Support
(1) 4" x 3/4" x 8' - Top
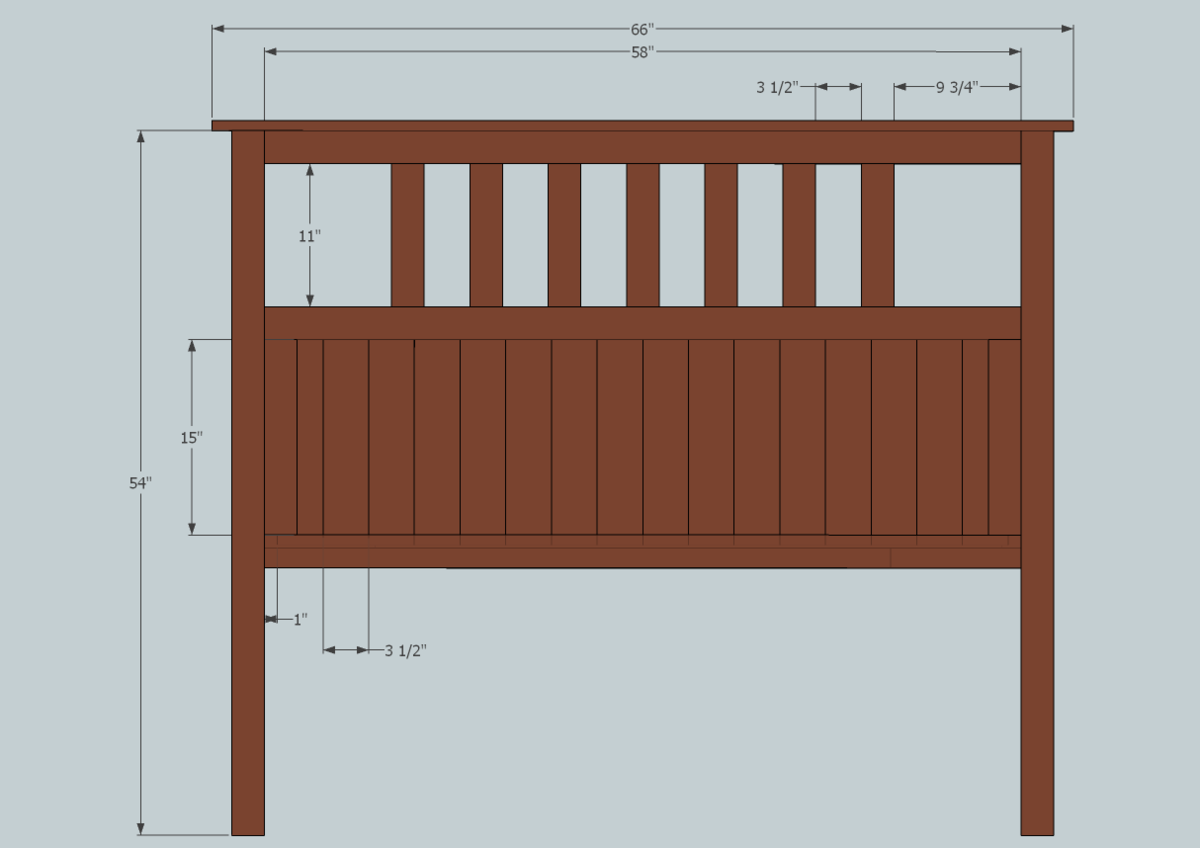
6 - 3" x 3/4" @ 51" (Crossbars)
4 - 3" x 3/4" @ 9" (Panel Frame)
6 - 3" x 1/2" @ 12" (Slats)
1 - 4" x 3/4" @ 59" (Top)
5 - 1" x 1/2" @ 3 1/2" (Spacers)
2 - 1" x 1/2" @ 9 1/4" (Spacers)
I would recommend cutting the spacers to size, just a little short of the gap size (to leave room for wood expansion).
Also, cut the post boards to the same length after they are are assembled.
Please read through the entire plan and all comments before beginning this project. It is also advisable to review the Getting Started Section. Take all necessary precautions to build safely and smartly. Work on a clean level surface, free of imperfections or debris. Always use straight boards. Check for square after each step. Always predrill holes before attaching with screws. Use glue with finish nails for a stronger hold. Wipe excess glue off bare wood for stained projects, as dried glue will not take stain. Be safe, have fun, and ask for help if you need it. Good luck!
Instructions
Step 1
Sand all edges now that will exposed later and leave the matings edges as square as you can. In this plan that means sand the the sides of all the boards except for the pieces for the posts & panels, which would be sanded after they are assembled.
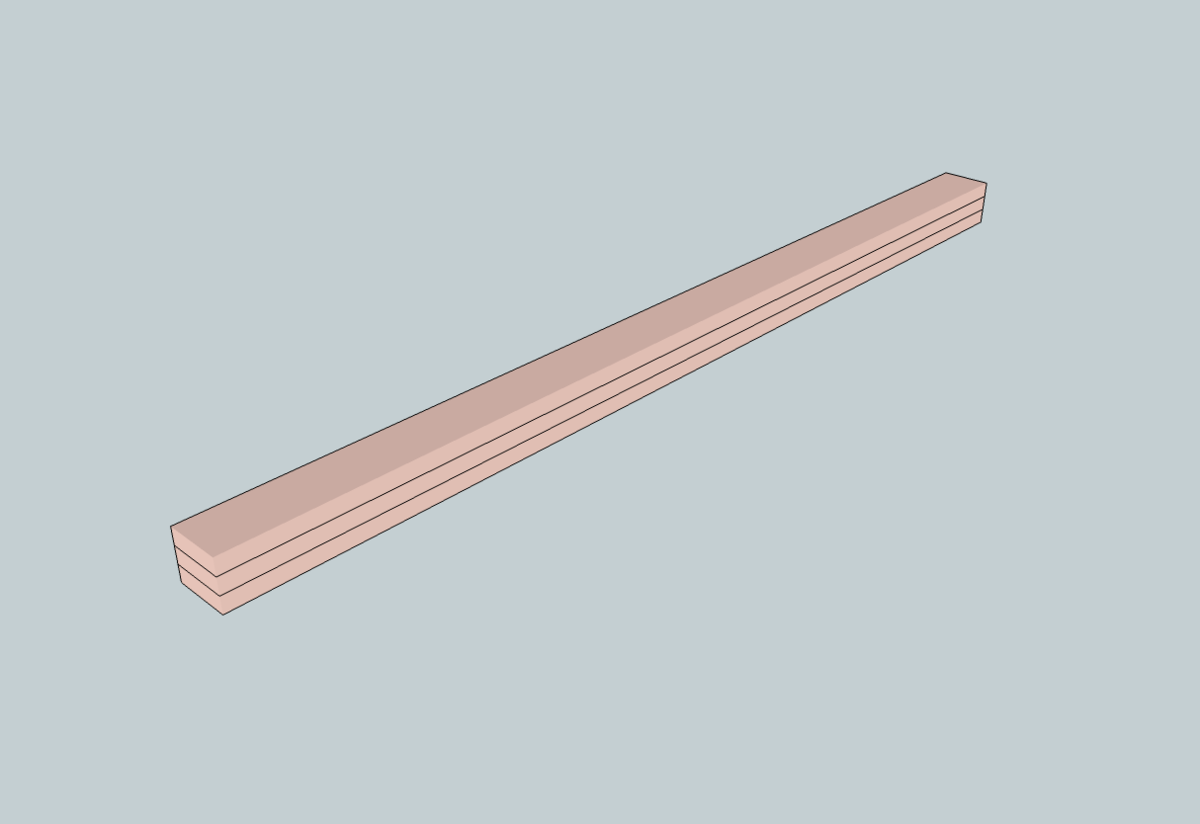
Glue, clamp and screw the post together using (3) 3" x 3/4" x 48" boards. Countersinking isn't necessary since the screws will be on the back. Keep the sides aligned to be flush with each other, but don't worry too much about the tops or bottoms. Once glued, saw a little off each post so that the board are level and the same height.
I used 3x3(ish)wide and 4' tall posts. (Alternatively you can cut 56" long posts to be more like the standard. You would also want to increase the length of the slats and add in another paneling to make up for the extra height)
Step 2
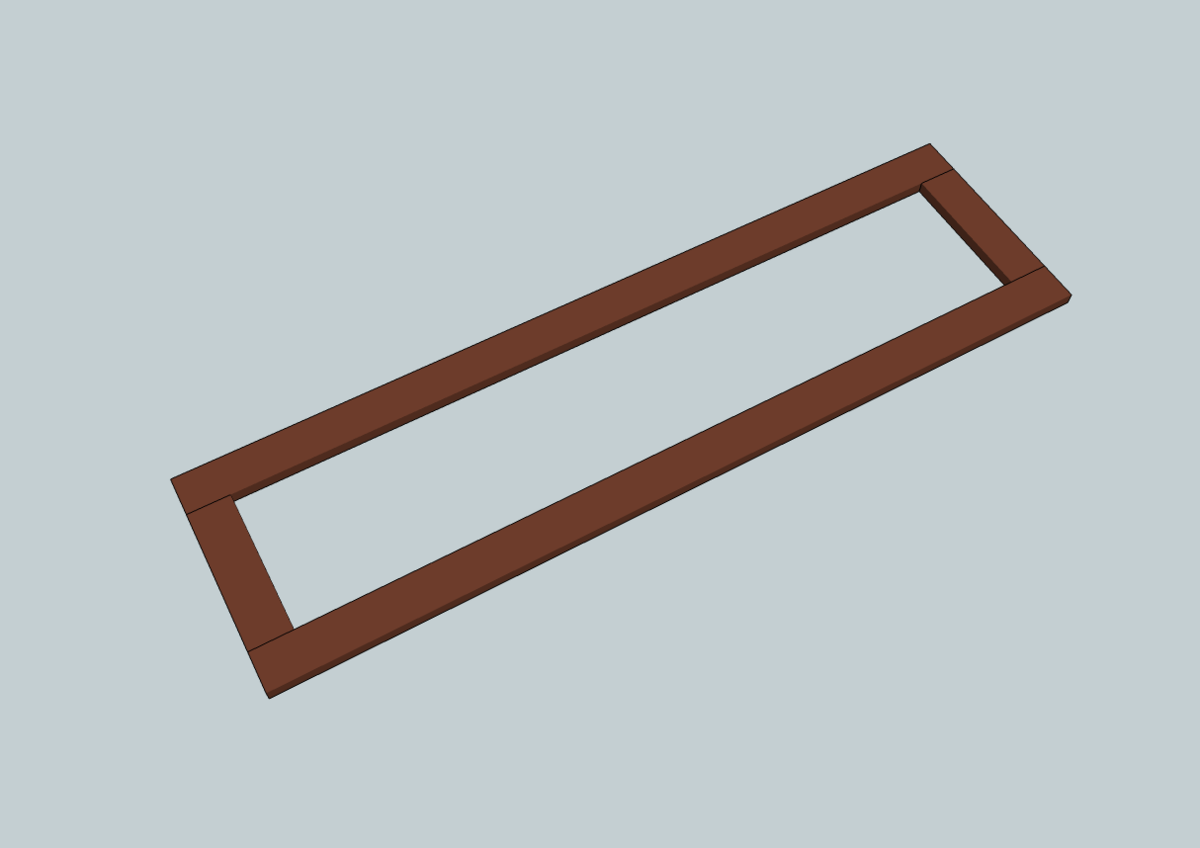
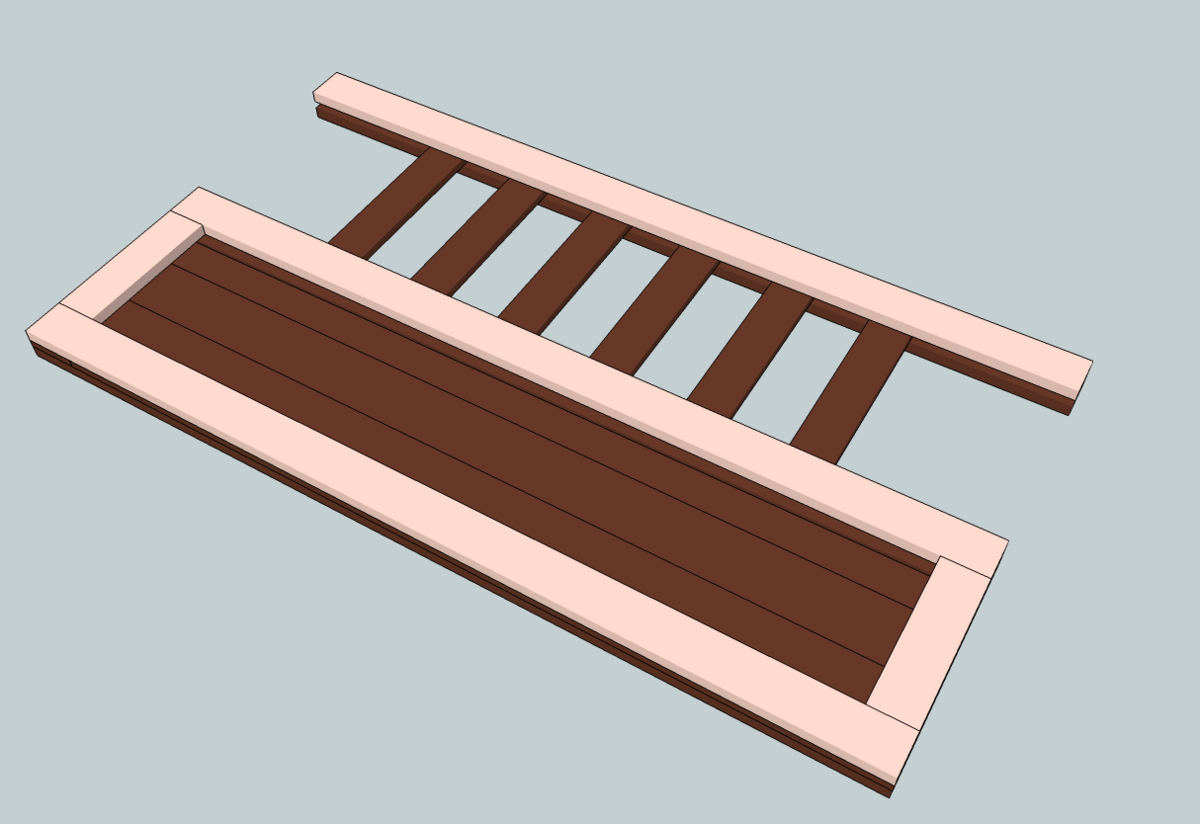
Either use a pocket jig or (4) metal L-brackets to frame the panel. Take care to keep the unmarred side flush and the frame square.
Step 3
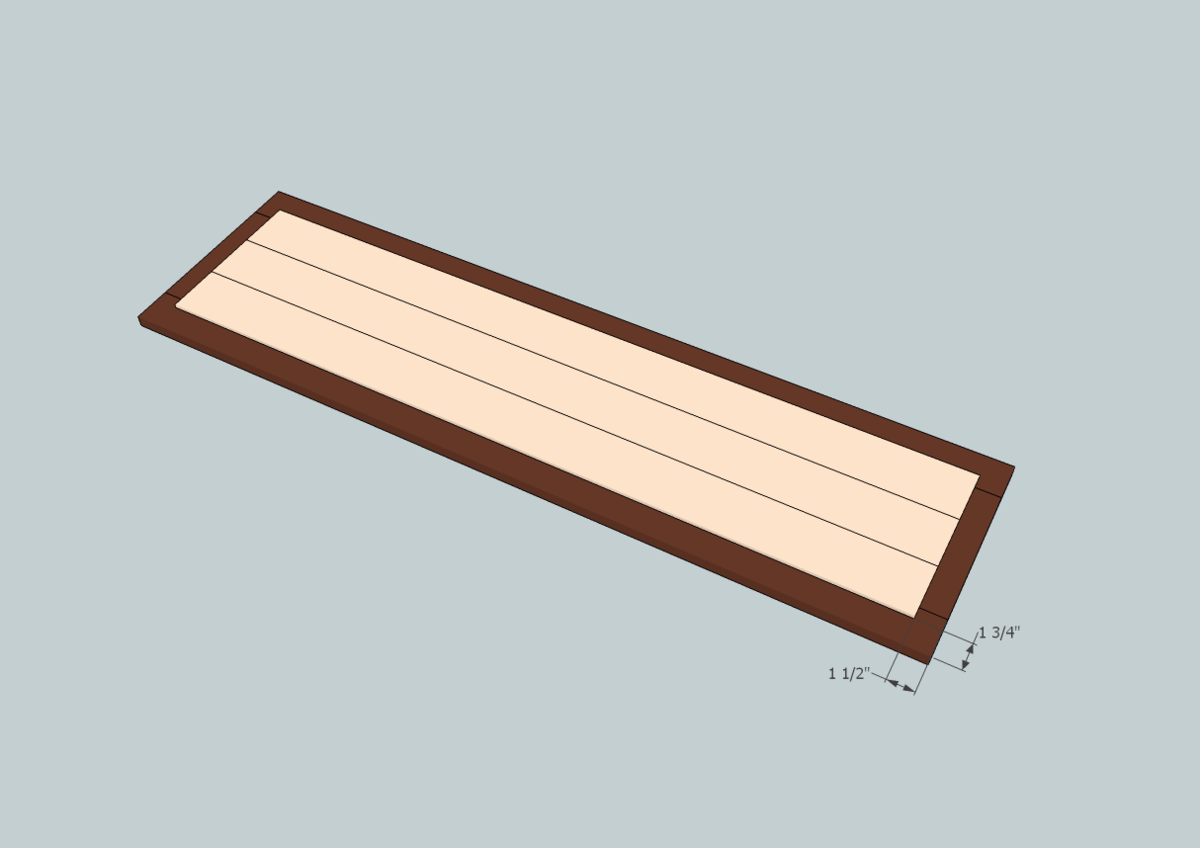
Screw the paneling to the frame and glue in between the panels. Be sure to wipe off the excess glue on the front side before it dries. Placing some 1/2" scrap wood under the frame will help keep the panels level. Use the brads in between screws. (If you have a flat area to work, it may be easier to glue the panel separately... I didn't though.)
A support may be placed screwed to center/back to keep the panels aligned. Take care not to screw through to the front of the thin paneling.
(Using the thicker 1/2" wood here would make this part easier, as you could use use a pocket jig, but depending on the wood, could up the cost considerably)
Step 4
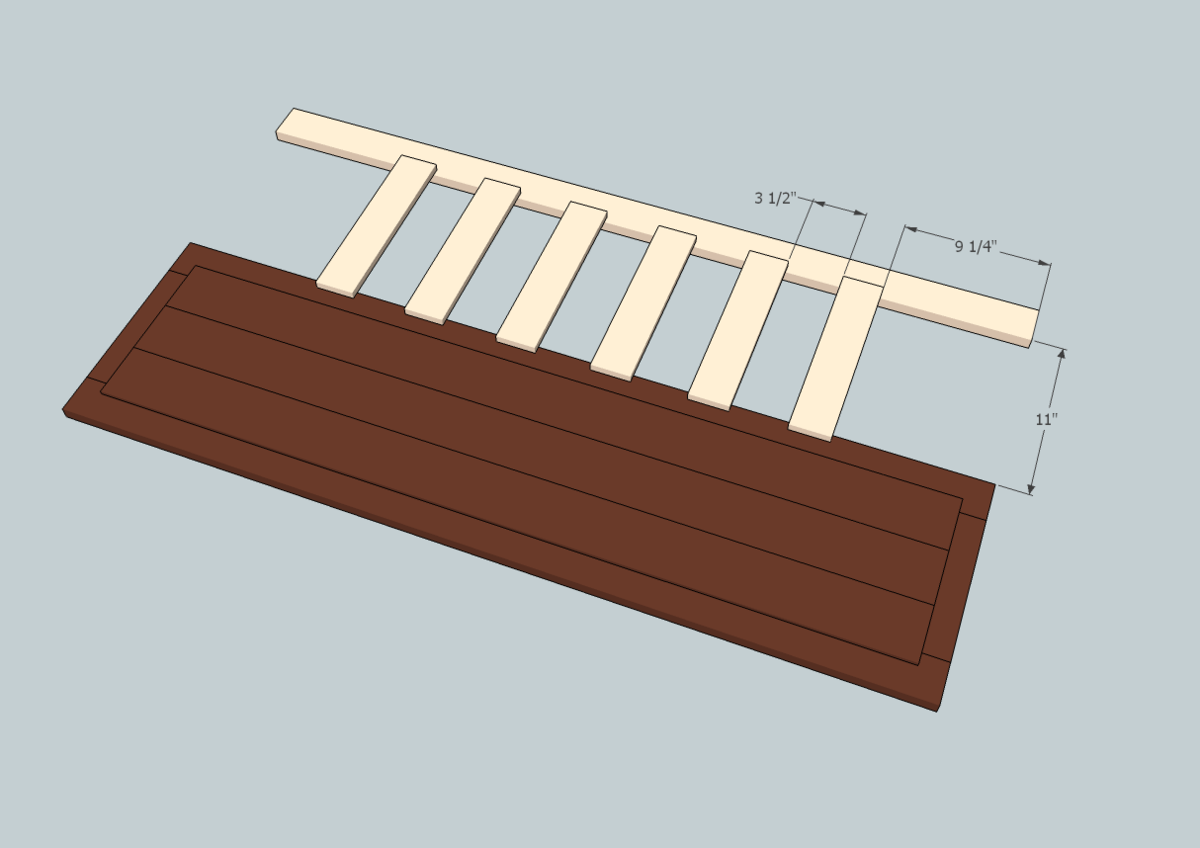
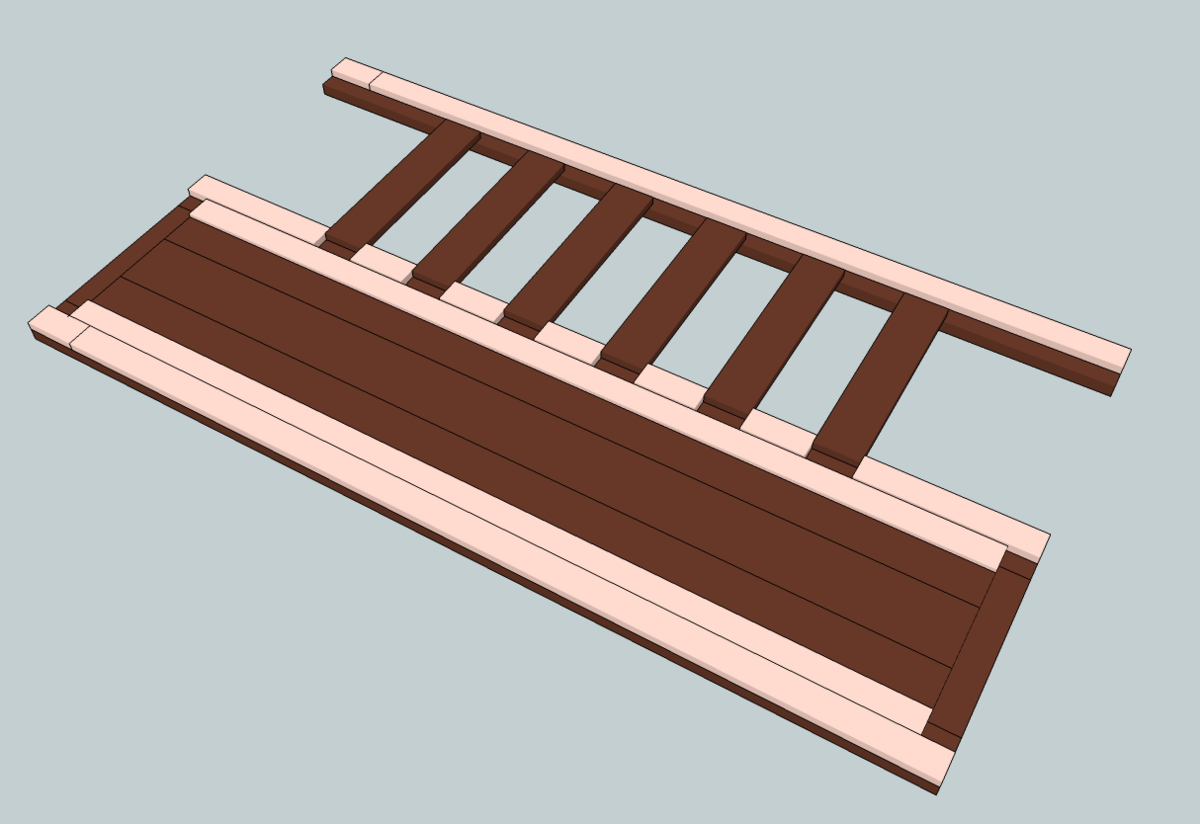
Glue down the slats to the frame and the top crossbar. I lined up the top and middle crossbars together and used a quick-square to draw a line straight across both to align the slats. Again, take care to keep the sides square and flush.
If you're worried about wood expansion, wait to fasten the slats. If you're not, then a couple nails will help hold the boards in place.
Step 5
Step 6
Screw/glue the 3 cross supports in. The wood on the sides of the panel is optional, but again, gives you something else to fasten into.
Screw the already glued slats in. For those accounting for wood expansion, use only 1 screw in the center of the top/bottom of each slat.
To save money you can buy only 5 crossbars, as noted, and use scrap pieces for the lowest crossbar.
Step 7

Predrill the holes and countersink, to about half of the post's width. You will want to put in some wood plugs later, since the screws on the side will be showing.
Screw & glue the posts on. Keep the back side of the posts flush with the back side of the crossbars.
I made 5 pocket holes on the back to screw on the top board. If you can't make pocket holes you could also countersink a couple screws from the top, nail some finishing nails in between and fill the holes later.
Step 8
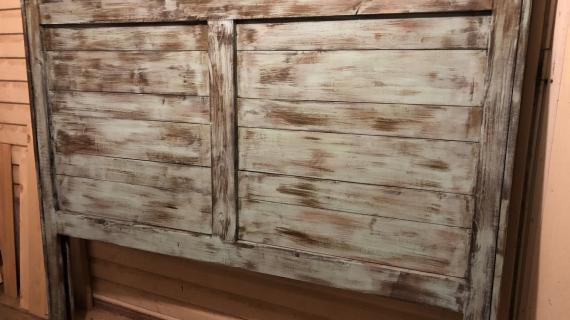
Now plug your holes, make sure everything is sanded to your liking and brush off the dust. Finish as desired!
It is always recommended to apply a test coat on a hidden area or scrap piece to ensure color evenness and adhesion. Use primer or wood conditioner as needed.
Comments
J (not verified)
Sun, 08/28/2011 - 18:30
Queen size frame
I love this plan, do you have the dimensions/instructions for a queen size frame?
In reply to Queen size frame by J (not verified)
CassieD
Sun, 09/04/2011 - 08:43
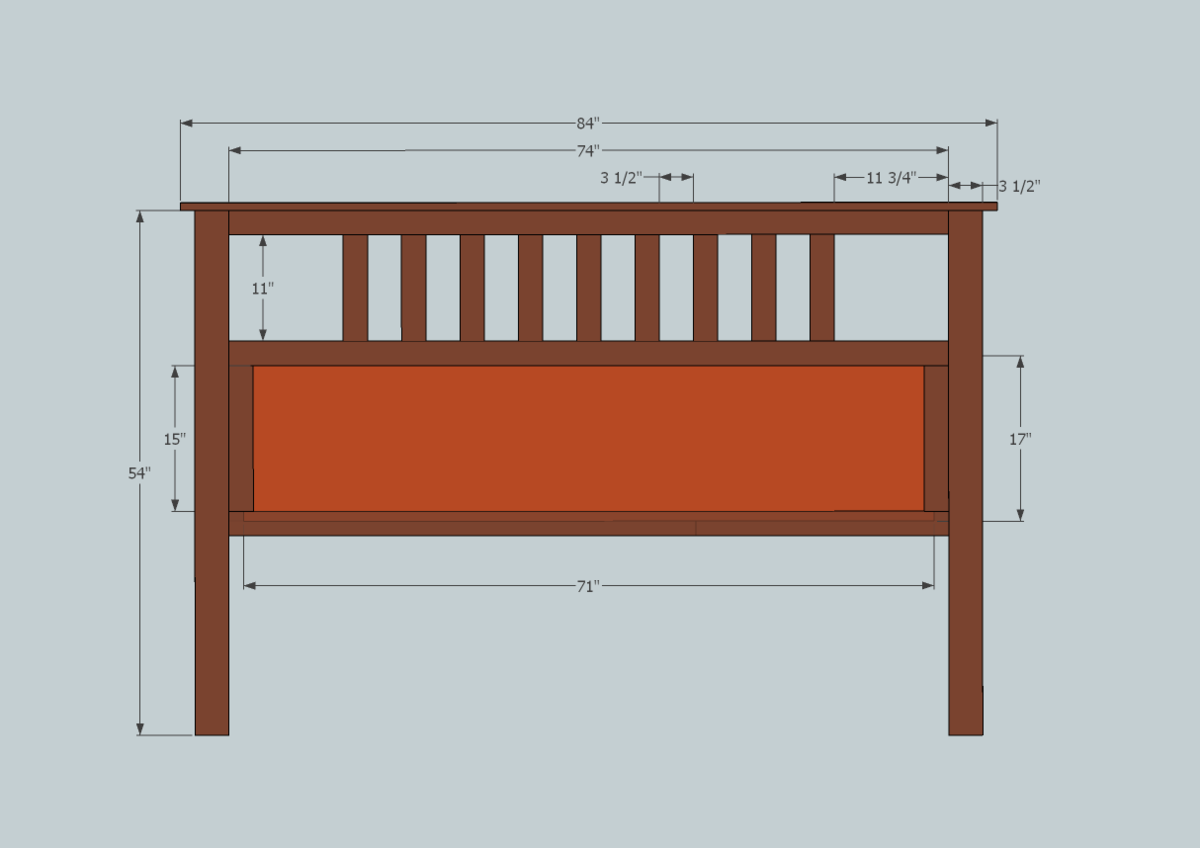
Added queen sized plan image
I put an image for queen size dimensions. For the same height frame as the original, the materials are the same except for the panels. The method I used originally won't work, as 1/4" or 1/2" board aren't usually sold longer than 48". Either you can cut the boards so they run vertically (I forgot to dimension the length of those boards are 16.5"), or use pre-made paneling, plywood or MDF.
I also made the queen size plans taller to show how I would adjust it for height. Either you can buy longer boards for the post, or still use the 48" long posts and stagger 6" long boards into it. I would recommend going with the taller plan if you like to have a lot of pillows stacked up on your bed, but I like the clean look of a couple flat pillows. HTH!
balloongal247
Tue, 08/11/2015 - 06:45
1/4" ply
So, if you use 1/4" ply for the headboard center, would the best way to fasten be to add more 1x3s or 1x2s as trim on top of it and nail/screw from the back into the trim? Since it can't be kreg'd?
Justin N (not verified)
Thu, 09/01/2011 - 17:00
Thanks for the helpful design
Thanks for the helpful design and commentary. I agree, it can be difficult to find a simple slotted, but well made headboard at a reasonable price.
I like that you used hardwood, as like you said, they can last so much longer and still look like new.
Francoise
Sun, 09/04/2011 - 17:19
Good design
That is both beautiful and graceful. I've been looking at Mission style headboards but they do go into "slat overkill". I also think the inset (did I see that right) is a good touch. Thanks!
Eric W (not verified)
Fri, 09/16/2011 - 10:33
King Size?
I am thinking of making this for our new Tempur-Pedic bed, but we bought a king size. Any suggestions on dimensions or do you have plans for a king size.
KariQ (not verified)
Wed, 09/21/2011 - 18:14
Looking for King size also...
I'd also love to see dimensions on this design for a king size bed. Came here looking specifically for that. A friend showed me your site and I've bookmarked it! :-)
CassieD
Fri, 09/30/2011 - 16:30
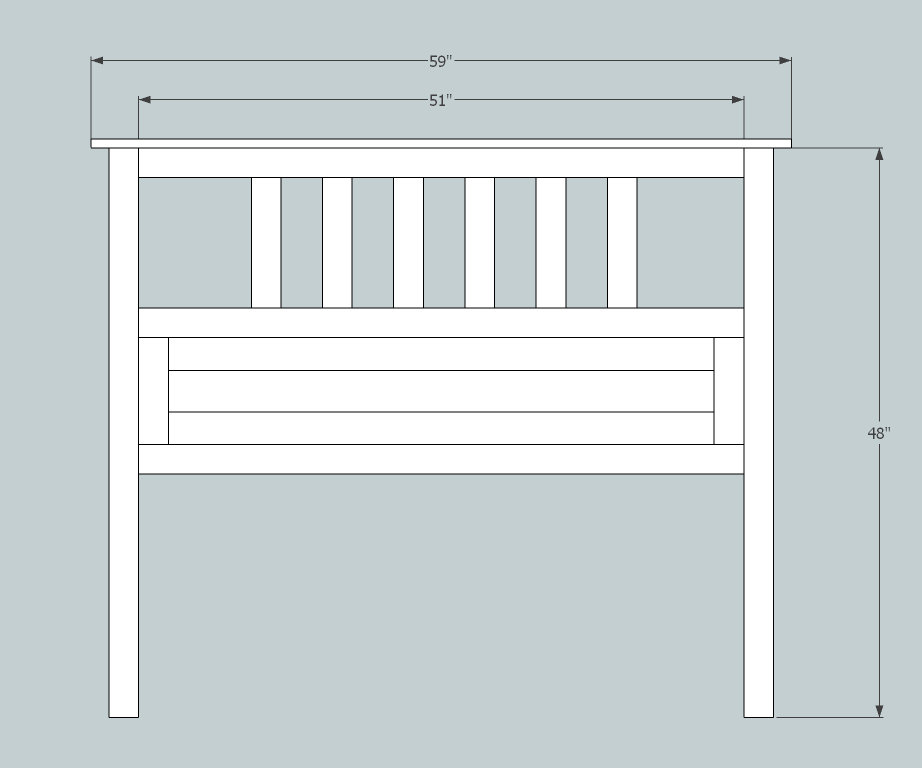
King Size Plans
I posted a picture at the bottom for the King Size plans. I would definitely go with the taller design for king size, as described in the queen size comments above. Also, I would recommend using 1/4" Plywood for the paneling for simplicity's sake, but you can do it as shown in the queen size plan. You will need to buy 8' long boards for the crossbars. I also upped the post width to 3 1/2" wide, as this headboard will be heavier than the other boards. If you're using pine, you may want to use standard 4"x4" and rip down the edges a little so they look more crisp, instead of piecing the posts together.
Make sure you secure & glue everything well, since the load in the middle of this headboard will be greater than full or queen.
Guest (not verified)
Tue, 03/13/2012 - 11:40
Can you give me an idea of
Can you give me an idea of how much the headboard weighs in king size? Thanks!
Roger Schlemmer (not verified)
Sat, 09/22/2012 - 12:58
cut list problem
you have this for the cut list for the frame for the panel.
4 - 3" x 3/4" @ 9" (Panel Frame)
If I am not mistaken that would result in an almost perfect square.
james35146
Thu, 06/11/2015 - 13:09
Thank you
Looking fwd to giving this a try :)