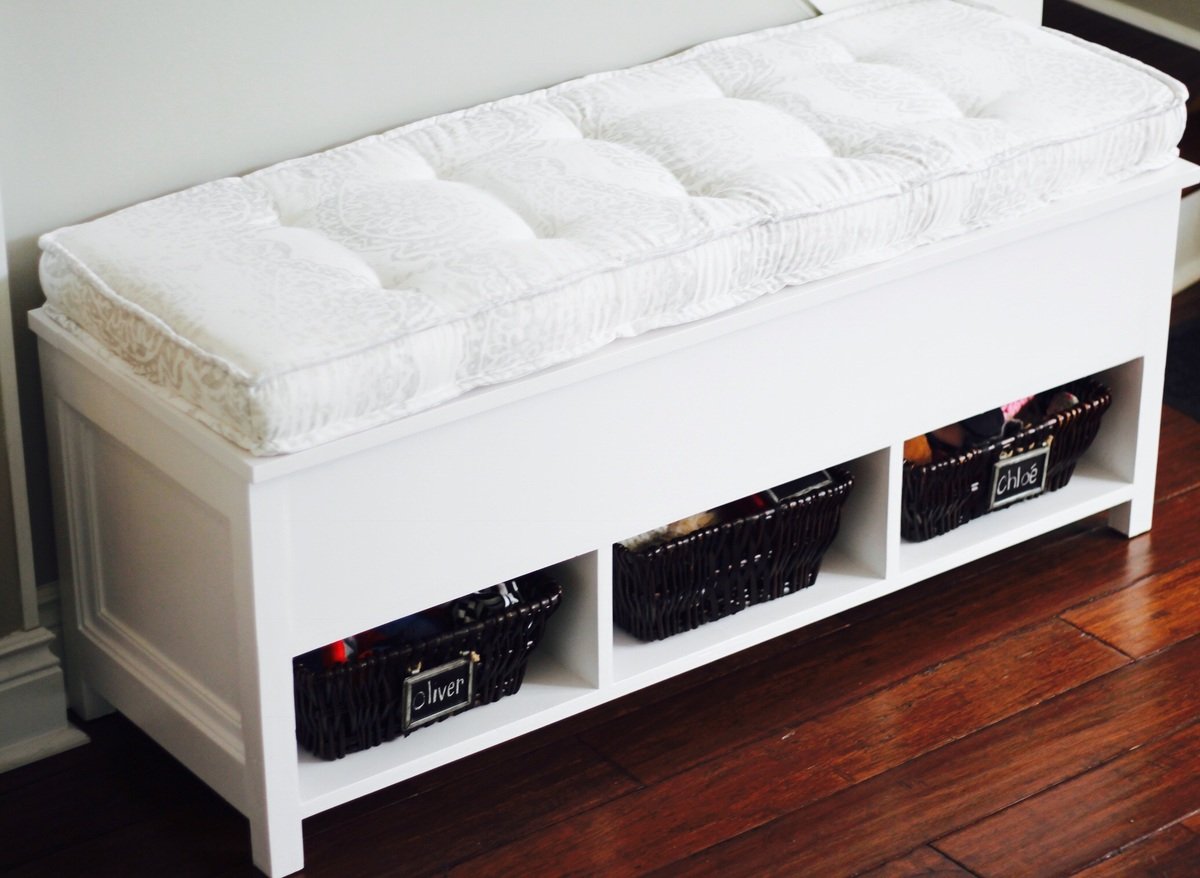


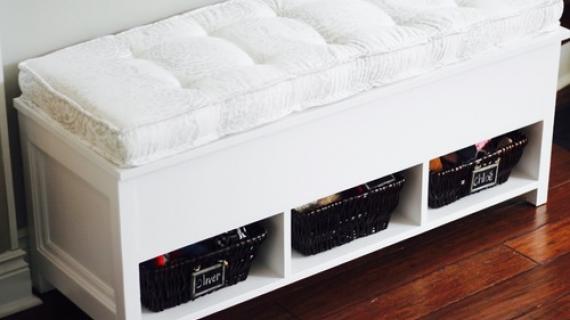
I was looking for a storage bench for our playroom that had a flip top lid, but wasn't going to be a bottomless pit for tiny pieces of toys...been there done that! Then I saw just what I was looking for! The top flips up, but the bottom is storage shelves - perfect for baskets or shoes.
Step by step woodworking plans with diagrams, shopping and cut lists.
I plan to top mine with a long seat cushion and some toss pillows.
Preparation
- 1- 2x2, 6ft
- 1- 1x3, 8ft
- 1- 4x8 plywood - this plan was designed for plywood that actually measures 3/4in
- hinges for lid
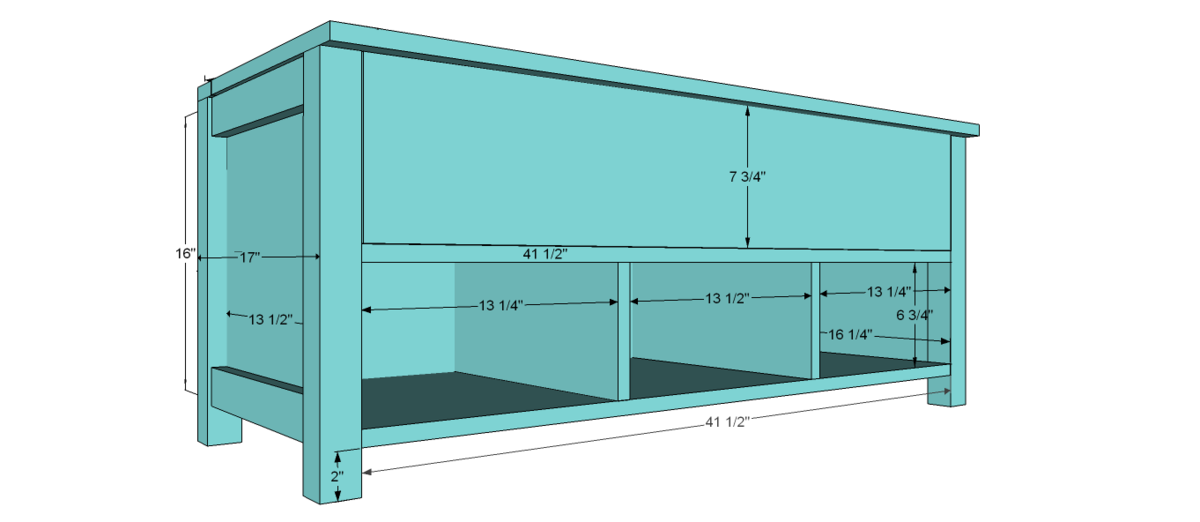
Sides
2 - 3/4" plywood @- 13.5" x 16"
4 - 2x2 @ 18"
4 - 1x3 @ 13.5"
Back
1 - 3/4" plywood @ 41.5" x 16"
Bottom and Shelf
2 - 3/4" plywood @ 41.5" x 16.25"
Front
1 - 3/4" plywood @ 41 1/2 x 7 3/4
Divider (you could do 1 or 2)
1 - 3/4" plywood @ 16.25" x 6.75"
Lid
1 -1x3 @ 45" (measure to fit)
1 - 3/4" plywood @ 45" x 14.75" (you might want to cut this last to measure for perfect fit)
Sorry I planned this for 3/4 in pieces, but i realized later that if you are using plywood its going to be slightly off, but it should only be off for the lid.


Please read through the entire plan and all comments before beginning this project. It is also advisable to review the Getting Started Section. Take all necessary precautions to build safely and smartly. Work on a clean level surface, free of imperfections or debris. Always use straight boards. Check for square after each step. Always predrill holes before attaching with screws. Use glue with finish nails for a stronger hold. Wipe excess glue off bare wood for stained projects, as dried glue will not take stain. Be safe, have fun, and ask for help if you need it. Good luck!
Instructions
Step 1

Make all your plywood cuts (see diagram)
I'm planning to get my plywood cut in-store into 2 4'x4' pieces.
Step 2

Assemble Sides using glue and 2" nails
Step 3

Add the 1x3 trim at top and bottom. Secure with glue and 1 1/4" finishing nails
Step 4

Once you have completed both sides, attach the back piece with glue and 2" nails
Make sure top edges are flush and check for square
Step 5

Step 6
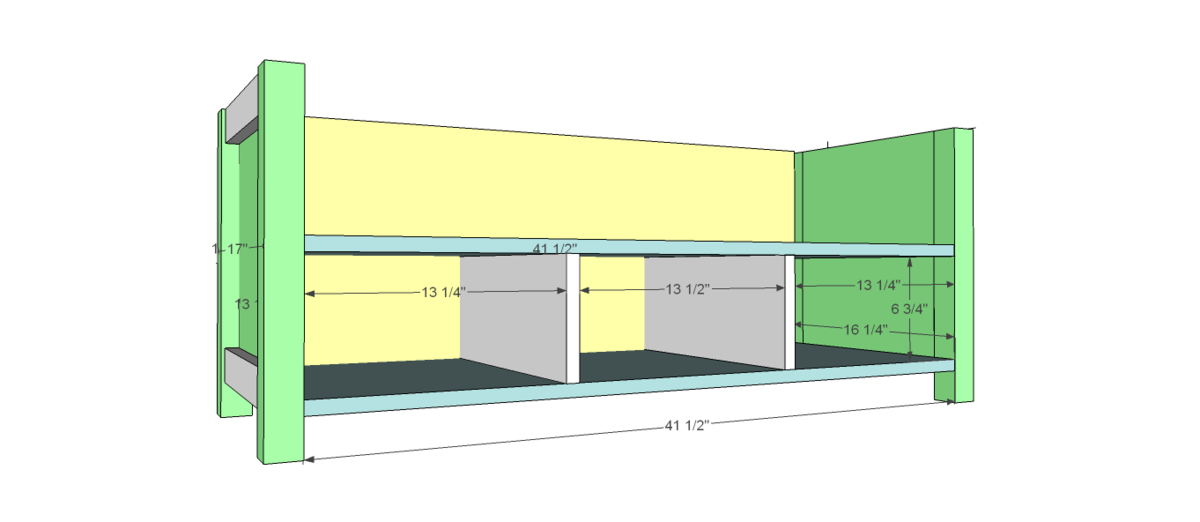
Add the dividers
Step 7
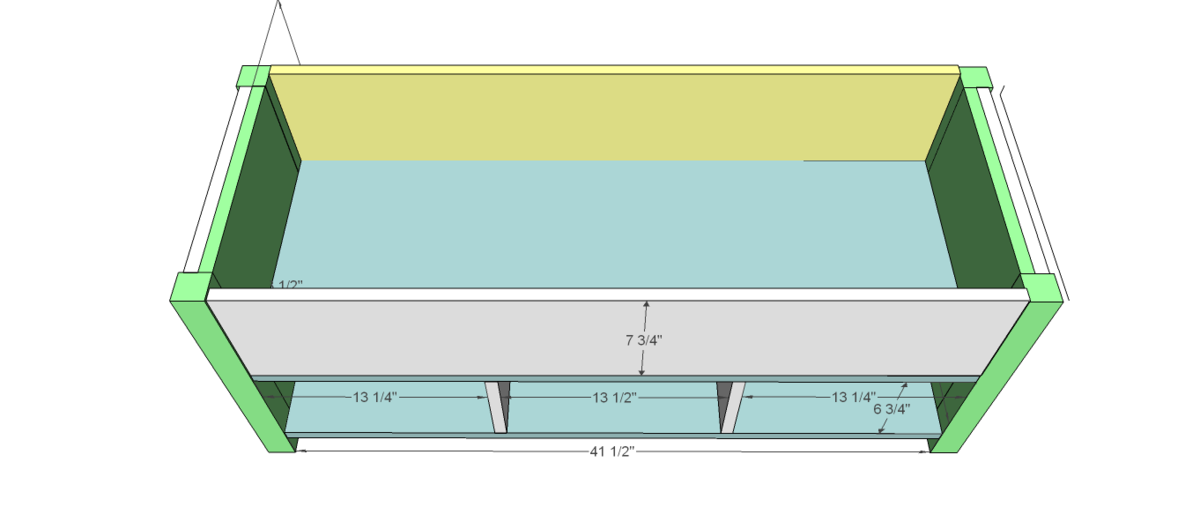
add the front
Don't forget to nail from the underside of that shelf!
Step 8

Now add that 45" 1x3
Measure to fit
Step 9
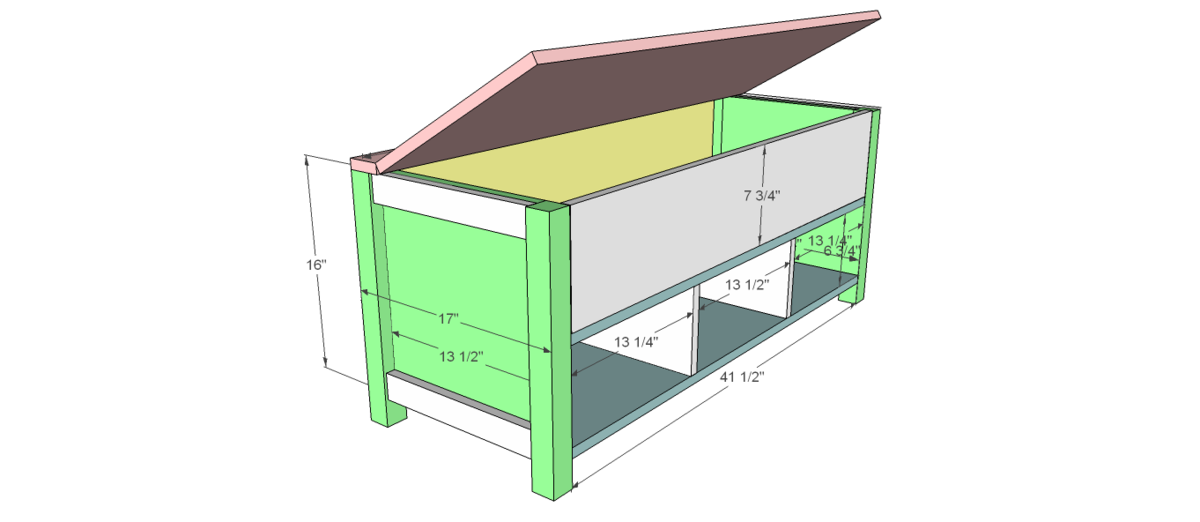
ok so i think my graphic shows the lid as 14.5 wide, that was before it dawned on me that you need a little overhang to lift the lid...duh.
So it should be 14 3/4 or 15
Add the lid using whatever hinge hardware you decide upon.
It is always recommended to apply a test coat on a hidden area or scrap piece to ensure color evenness and adhesion. Use primer or wood conditioner as needed.
Comments
Mrs. Mary D. Santos
Fri, 08/05/2011 - 14:23
Wow!
I love this plan! Thanks for sharing!
Ana White
Sat, 08/06/2011 - 13:43
What a great idea to put the
What a great idea to put the shelf under the toybox! We've got a bottomless pit of toys :) and it's no fun! Thank you for sharing, really nice plan!
stayck77
Sun, 08/07/2011 - 07:06
Any finished pics?
Do you have any pictures of this finished project? I love it and am working on it now as my first build on my own! Thanks for the inspiration!
biz_kid1
Thu, 08/11/2011 - 19:59
I think we'll use this as our son's "train table"!
Adding this to my "To-do" list! Thanks for sharing!
flydoos
Sun, 08/14/2011 - 15:26
This is exactly what we need!
This is exactly what we are needing in our playroom, possibly for the entryway as well. Thank you so much!
Hilary @ Katri… (not verified)
Thu, 10/27/2011 - 06:57
turn into landing solution?
Ana, would it take a lot of structural work to extend the back of this up to add a hutch for coat hooks? We have a split-level entry, and need a behind-the-door solution for shoes, coats, and storage that doesn't require bolting to the wall or ceiling (halfway up the landing "wall" it turns into open railings around the top level living room). This storage bench would be perfect (shoe bin cubbies plus hinged storage lid), if only it had a higher back on it for coat hooks. No heavy shelves on top, just a back. Kind of like this concept (not necessarily this design): http://www.amazon.com/Treasure-Hall-Storage-Hx39-75-CHERRY/dp/B002644UB…
Thanks!
Guest (not verified)
Tue, 01/17/2012 - 11:11
Look at her other lockers,
Look at her other lockers, entry way and mudroom pieces. I'm pretty sure I remember seeing one that had the top cubbies, coat hooks, a storage bench AND shoe space.
If not, just extending the rear legs and the back piece up higher, and framing it across the top with 1x something boards for the place to screw the coathooks.
The lift top on the bench would have to be notched around the rear supports instead of resting over them, or (easier) you could use a 2x4 across the inside of the upper box at seat height to make a place to attach hinges.
Guest (not verified)
Tue, 01/17/2012 - 10:53
could this be used for seating?
I'm wondering how much weight this could hold. I would love something like this for our eat in kitchen bench but I'm not sure if it could hold up two people?
Guest (not verified)
Tue, 01/17/2012 - 10:59
It's made of 3.4 inch plywood
It's made of 3.4 inch plywood and 2x4s ... that box on top provides plenty of support for 2 adults.
Scot (not verified)
Wed, 11/14/2012 - 13:17
Oops
Couple issues/questions:
I like the design and am going to use it with minor changes. thinking about using Trofast Ikea toy bins in cubbies, so going to resize to fit the combination i want.
anyway, Step 2 you have 13.5" for side but overall dimension is 17". now a 2x2 is the nominal size and the actual is more like 1.5x1.5 so how are you getting 17" over all in either scenario?
Another problem is that you are cutting the Shelf and bottom to 16.5". Now if the overall width is 17" and the back wall is .75" then the Bottom and Shelf would need to be 16.25". Or 15.75" if you were wrong in step 2. You did cut your dividers 16.25" so i can assume you meant to cut the others that width as well.
Am i wrong? Sorry for the corrections. Just worry people will follow to the 'T' and find they are way off and have to buy another 50 dollar piece of plywood and recut.
Margy Mercer (not verified)
Mon, 12/31/2012 - 07:26
I believe a 2x2's dimensions
I believe a 2x2's dimensions are 1.75", so 13.5+1.75+1.75 = 16.
As for the shelf and bottom, 17"- 3/4 (the back panel of plywood) = 16.25" for the bottom and shelf to be flush with the front legs.
Does that make sense? Maybe I am wrong...?
vonburgenstein
Mon, 05/11/2020 - 05:43
Correct. 2x2 actual…
Correct. 2x2 actual measurements are 1.5x1.5, so the sides actually measure 16.5" (not 17"). Assuming the plywood actually measures 3/4" in thickness, then your bottom/shelf/divider cuts should all be 15.75", not 16.5" or 16.25".
deannaw08
Thu, 03/17/2016 - 06:05
Finished?
Has anyone made this? id love to see finished pictures
ash4383
Wed, 08/31/2016 - 18:54
2x2 = 1.5"!!!
Beware, the dimensions in this plan are incorrect. A 2x2 is actually 1.5", meaning the width for the sides is not 17" but rather 16.5". We are having to recut all the pieces now as everything is off. The length of the top is incorrect also, not 45". So frustrating, and I guess we learned our lesson to always double check someone else's math :(
bostonrs8
Sat, 01/11/2020 - 06:22
Correct dimensions
If this is the case can someone provide the correct dimensions??
vonburgenstein
Mon, 05/11/2020 - 05:46
Assuming your 2x2s actually…
Assuming your 2x2s actually measure 1.5x1.5, the bottom and shelf should be 41.5" x 15.75" (assuming your plywood is 3/4" in thickness). The dividers should be 6.75" x 15.75".
vonburgenstein
Mon, 05/11/2020 - 05:48
And the length of the top…
And the length of the top will measure at 44.5" total (41.5" + 1.5"(x2)). I'm in process of building this now, and plan to make my cuts for the top pieces last, after everything else is cut and assembled, to measure out exactly how I want them to look on the top. I may want some overhang on the sides (in addition to the front), but haven't decided yet.