


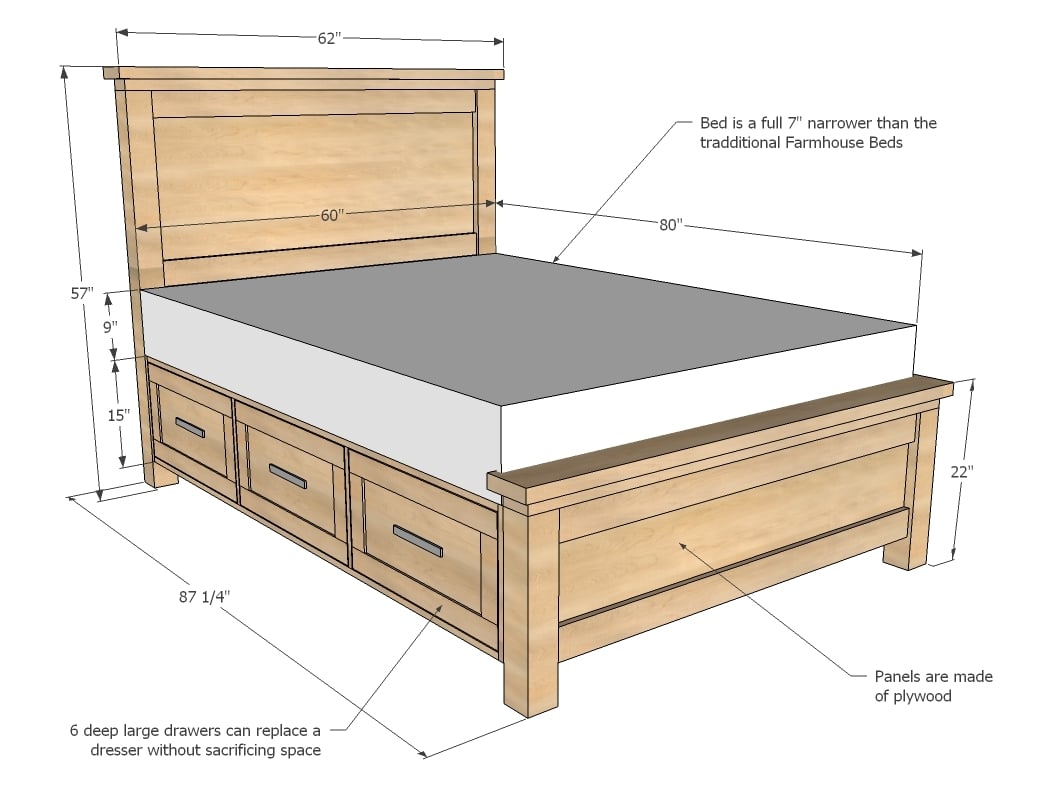
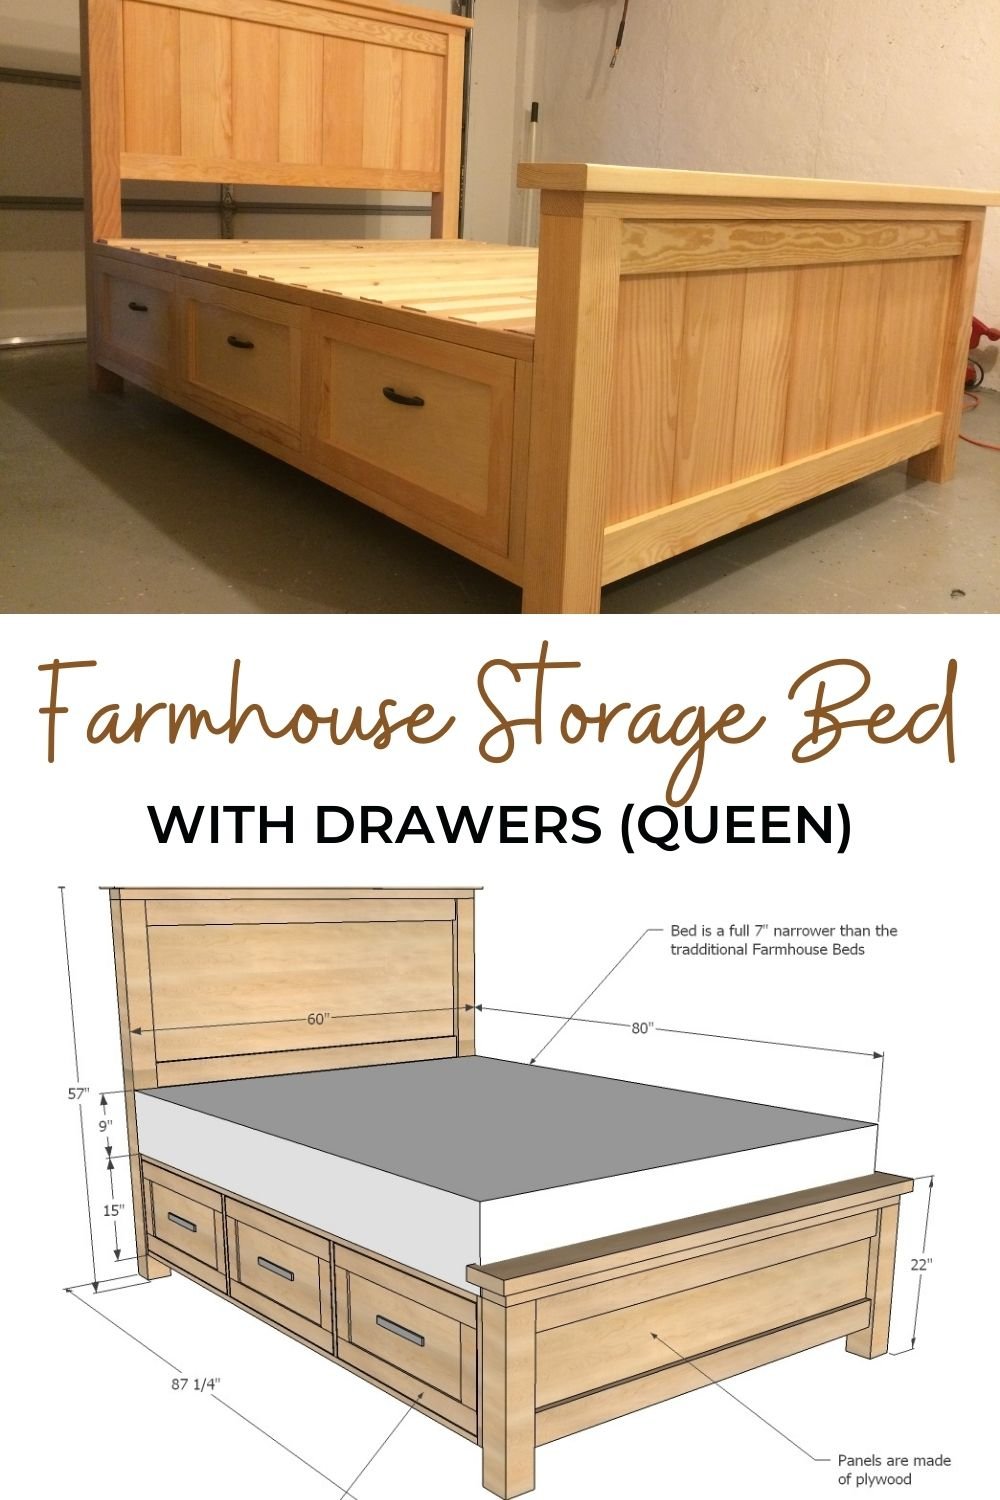
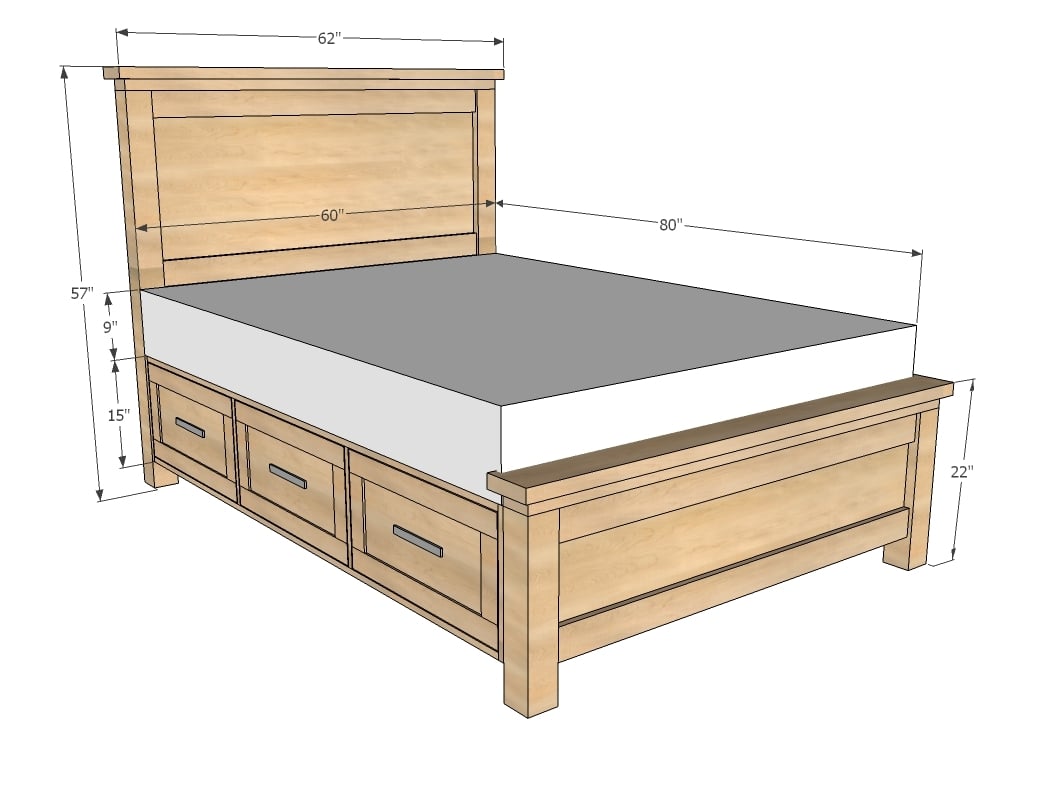
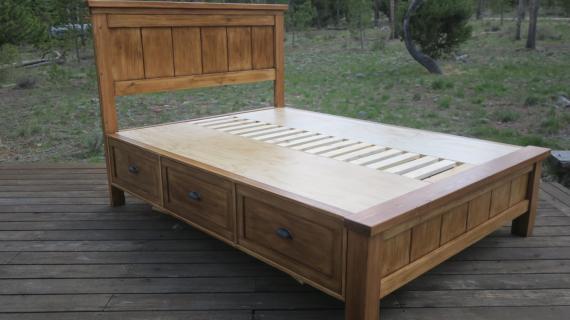
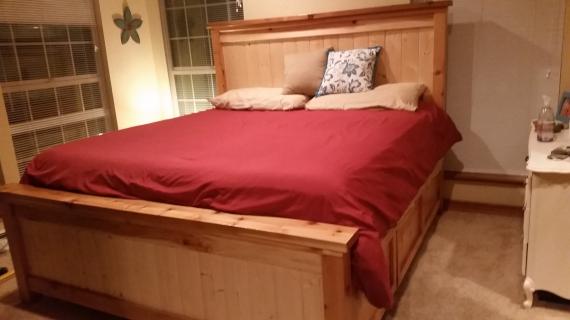
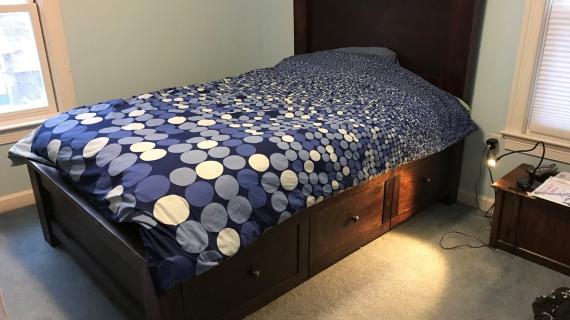
Farmhouse Bed plans for a small space! This bed packs lots of storage in a more compact profile. Detailed step by step plans to help you build your own DIY Farmhouse Bed in queen size.
Also check out our Full and Twin Farmhouse Storage Bed plans.
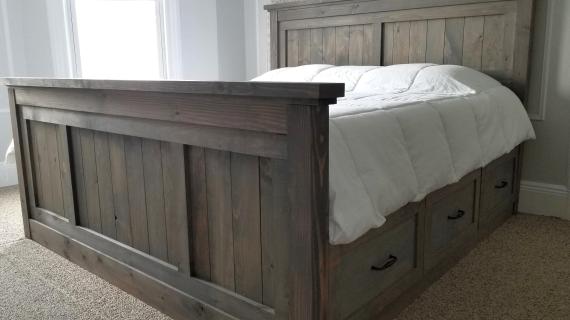
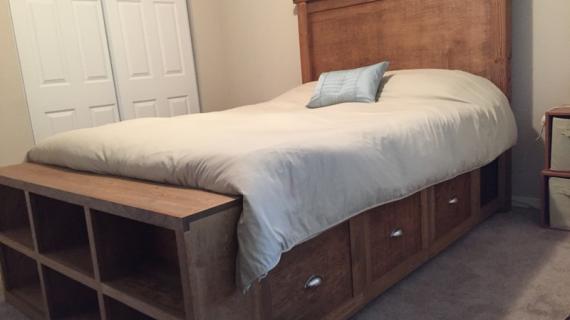
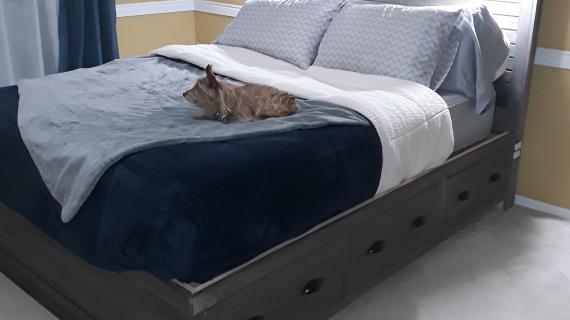
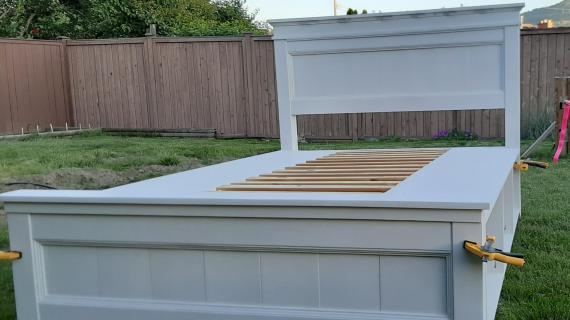
Reader submitted photo by BEEKEEPER has some modifications from plans
So excited to add this plan to the Farmhouse Bed Collection! Thank you for requesting!

Pin For Later!
Preparation
- 3 - Sheets 3/4" Plywood or other sheet goods
- 1 1/2 - Sheets 1/4" Plywood or other sheet goods
- 2 - 4x4 post, 7 feet long
- 2 - 1x4 @ 10 feet long
- 3 - 2x4 @ 10 feet long (cut longest first!)
- 5 - 1x10 @ 8 feet long (OR 1 sheet of 3/4" plywood cut into 5 strips 9 1/4" wide)
- 6 - Euro Style Drawer Slides (the cheapo white ones) 14" long, medium to heavy duty rating
- 2 - 2x6 @ 6 feet long
- 3 - 2x2 @ 8 feet long
- 9 - 1x3 @ 8 feet long
- 5 - 1/4" hobby stock, 2 1/2" wide @ 8 feet long (OR 1/4" plywood cut into strips 2 1/2" wide)
- 4" Screws (if you are not using a pocket hole jig and will be attaching 4x4 legs to panels with screws)
- 6 Knobs or handles
NOTE: Drawers are optional - can be added later or just used as storage shelves. The shopping list DOES include materials for the drawers, so if not building drawers, please adjust shopping list accordingly
HEADBOARD
- 1 - 3/4" Plywood @ 26" x 53" (Can substitute planked wood for panel to create a more authentic "farmhouse" look)
- 2 - 1x4 @ 53"
- 2 - 4x4 @ 54"
- 2 - 2x4 @ 53"
- 1 - 2x4 @ 60"
- 1 - 2x6 @ 62"
FOOTBOARD
- 1 - 3/4" Plywood @ 15" x 53" (Can substitute planked wood for panel to create a more authentic "farmhouse" look)
- 2 - 1x4 @ 53"
- 2 - 4x4 @ 19"
- 2 - 2x4 @ 53"
- 1 - 2x4 @ 60"
- 1 - 2x6 @ 62"
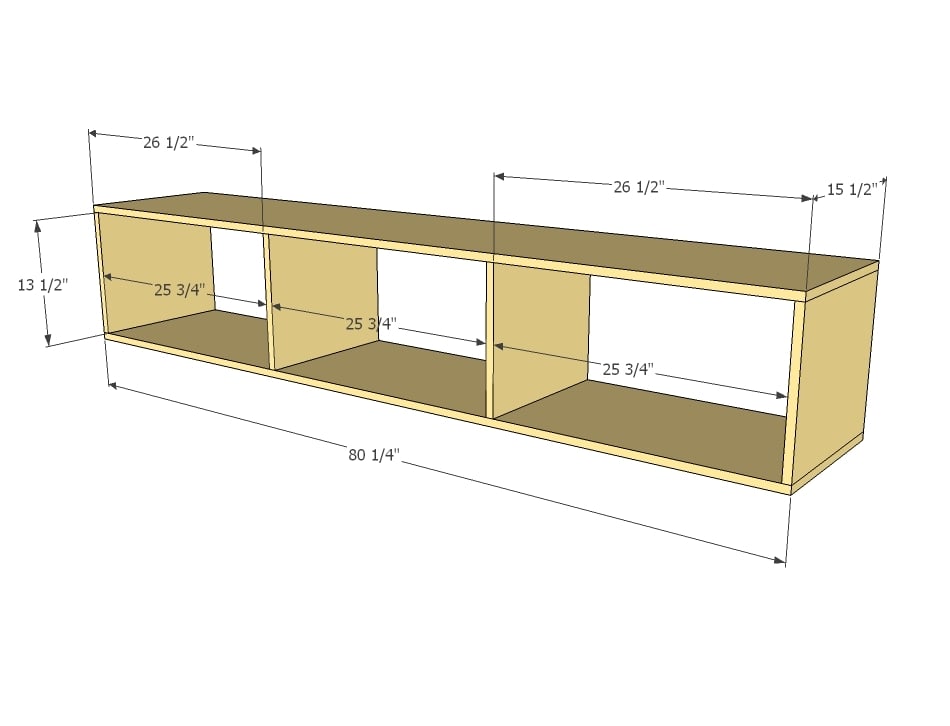
STORAGE BOXES
- 4 - 3/4" Plywood @ 15 1/2" x 80 1/4"
- 8 - 3/4" Plywood @ 15 1/2" x 13 1/2"
- 2 - 1/4" Plywood @ 80-1/4" x 15"
SUPPORT & CENTER
- 2 - 2x2 @ 80 1/4"
- 4 - 2x2 @ 16 3/4"
- 18 - 1x3 @ 28 1/2" (Slats to mattress specs)
OPTIONAL DRAWER BOXES
- 12 - 1x10* @ 23 1/4"
- 12 - 1x10* @ 14"
- 6 - 1/4" Plywood @ 24 3/4" x 14"
*Plywood cut into 9 1/4" strips can be substituted for 1x10s, use at least 1/2" thick plywood; for direct conversion to cut list use 3/4" thick plywood
OPTIONAL DRAWER FACES
- 6 - 3/4" Plywood @ 25 1/2" x 13 1/4"
- 12 - 1/4" hobby stock, 2 1/2" wide @ 8 1/4"
- 12 - 1/4" hobby stock, 2 1/2" wide @ 25 1/2"


Please read through the entire plan and all comments before beginning this project. It is also advisable to review the Getting Started Section. Take all necessary precautions to build safely and smartly. Work on a clean level surface, free of imperfections or debris. Always use straight boards. Check for square after each step. Always predrill holes before attaching with screws. Use glue with finish nails for a stronger hold. Wipe excess glue off bare wood for stained projects, as dried glue will not take stain. Be safe, have fun, and ask for help if you need it. Good luck!
Instructions
Step 1

Have your hardware store rip the first piece into three equal sized strips, 15 1/2" wide. Then all you have to do is make the cross cuts at home. These cuts are from the 3/4" thick plywood.
NOTE: Measurement should be 15-1/2" x 13-1/2" NOT 13-1/4" - please check with cut list
Step 2
From another sheet of 3/4" plywood, have your hardware store rip into two 15 1/2" strips and one 13 1/4" strip. From these strips cut the following pieces.
NOTE: Measurement should be 15-1/2" x 13-1/2" NOT 13-1/4" - please check with cut list
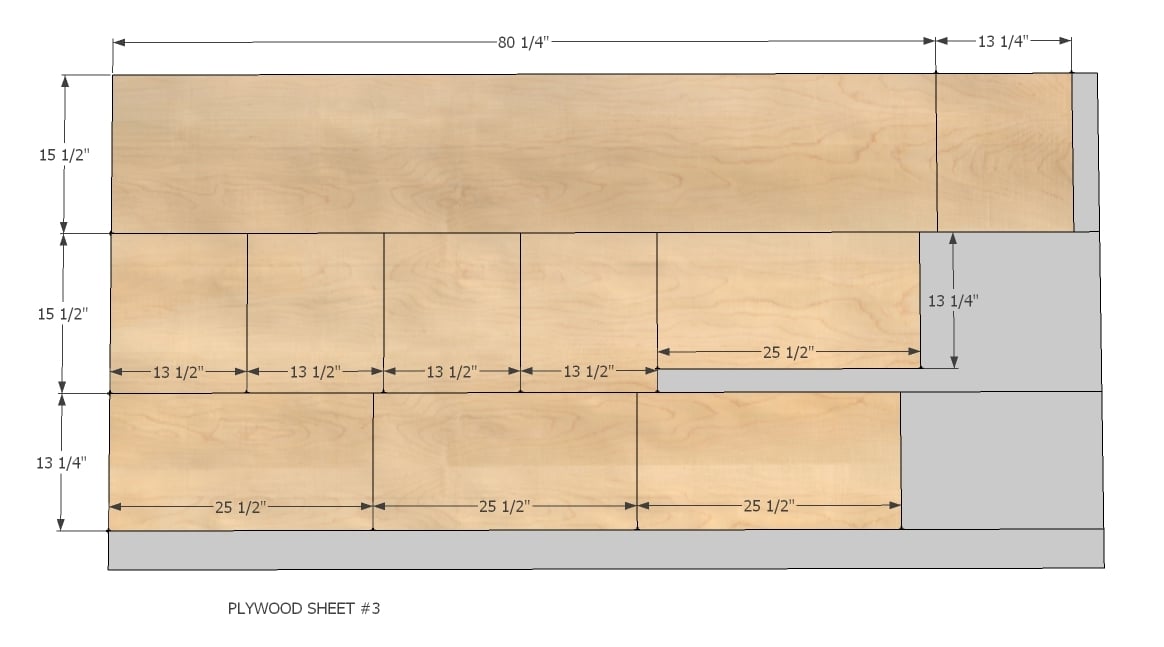
Step 3

From the final 3/4" piece of plywood, cut it cross wise as noted in the diagram, and then cut your headboard and footboard panel from the larger half. From the remaining pieces, cut your remaining drawer faces as shown above.
Step 4
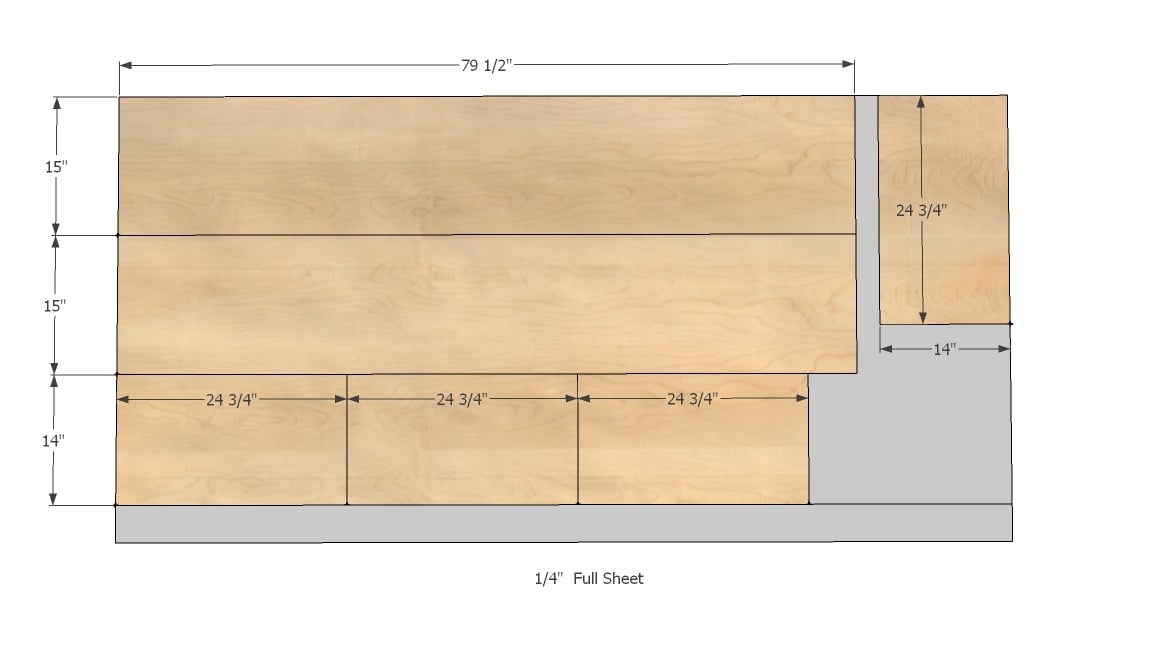
From the 1/4" plywood, cut the following pieces. You will need to either purchase an additional 1/2 sheet of plywood for the two remaining drawer bottoms, or you could use leftover 3/4" stock for the remaining two drawer bottoms.
Step 5

The largest cuts on this diagram should be 80-1/4" long, NOT 79-1/2".
Step 6

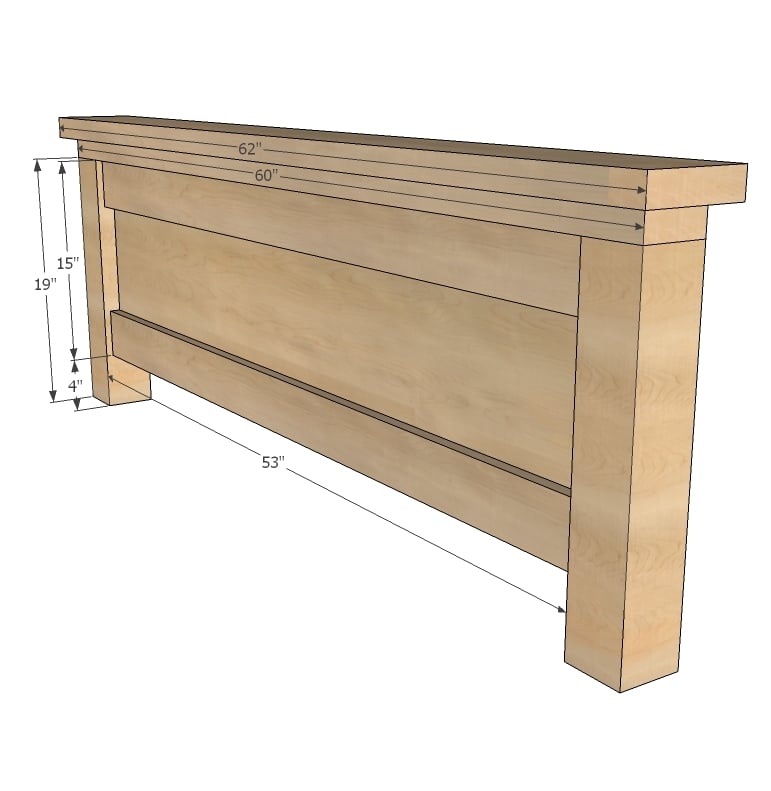
This is a relatively easy task if you have a Kreg Jig - simply drill 3/4" pocket holes along sides of panel and attach to legs. Make sure you are leaving 1 1/2" to the back of the panel as shown above (Very important with footboard).
Step 7

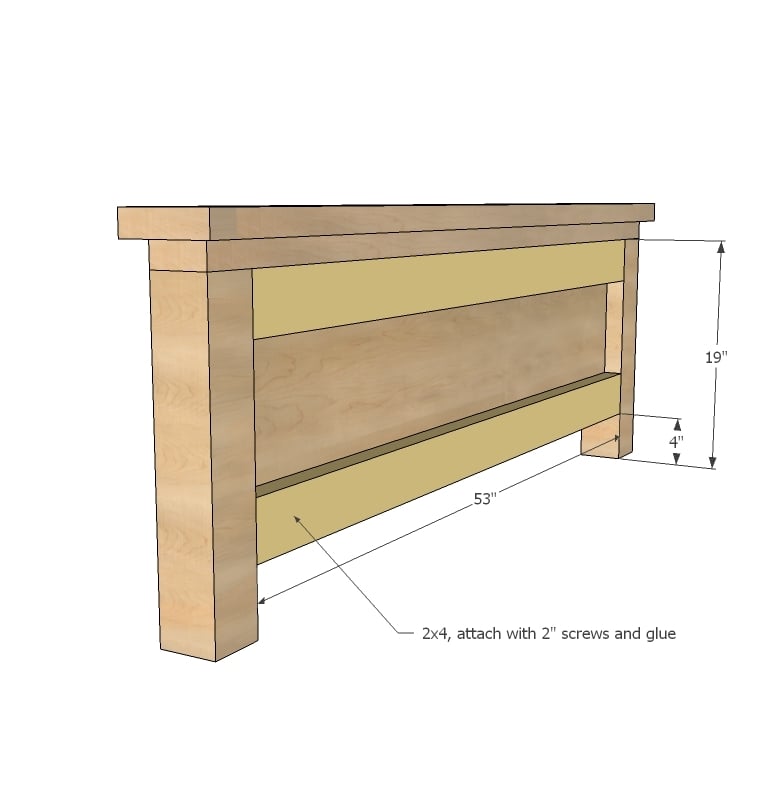
Attach the bottom supports in the same manner as the panel, carefully locating as shown in diagram.
Step 8

Hooray, an easy step! Attach as shown above.
Step 9
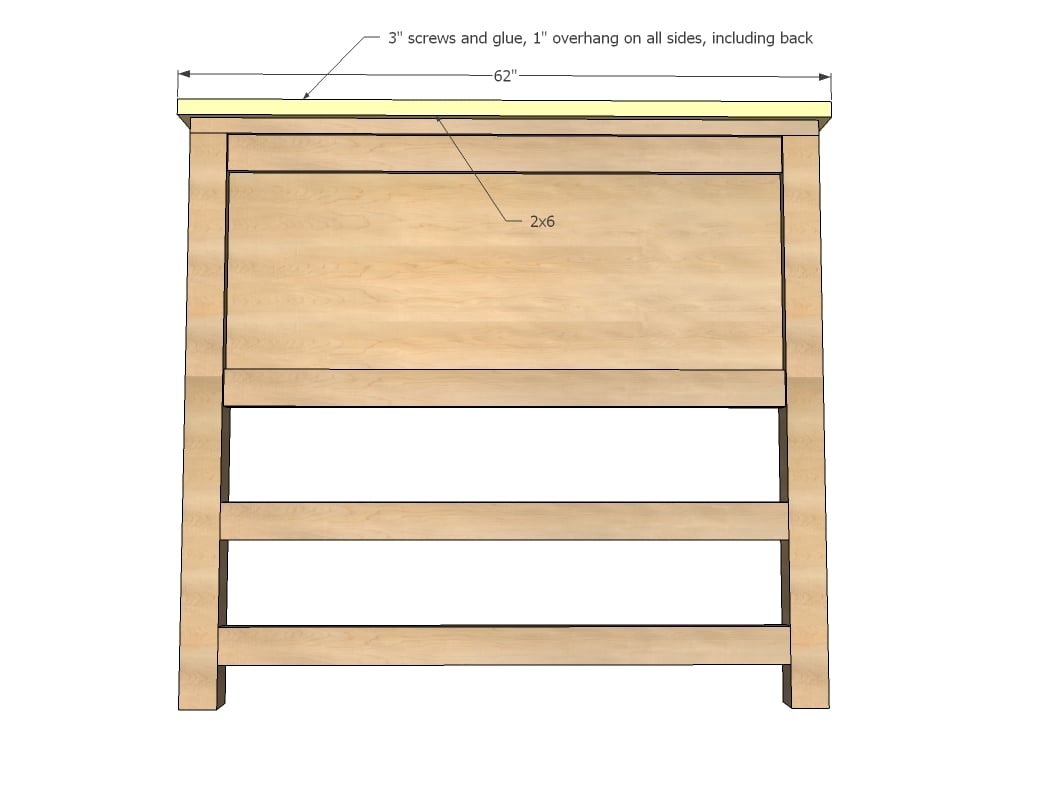
Finally the crown. I'd screw on myself to minimize any gaps.
Step 10
The footboard is built just like the headboard - make sure you leave 1 1/2" to the back of the panel - see next step ...
Step 11
This is so your 2x4 spacers fit just right in the backs. Attach with screws and glue.
Step 12
You can build these with either a pocket hole jig or traditional screws. Build square if you are using drawers or your drawers will not slide right.
Step 13
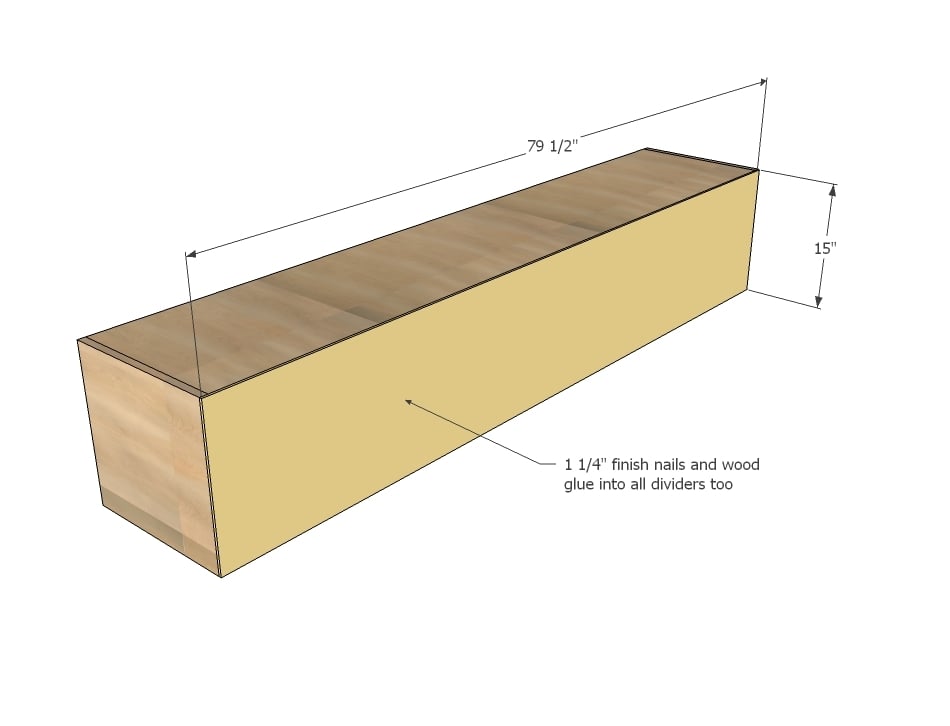
Attach back to the boxes with finish nails and glue. Make sure you nail into all center dividers too. The back will help keep things straight and minimize sagging.
Step 14
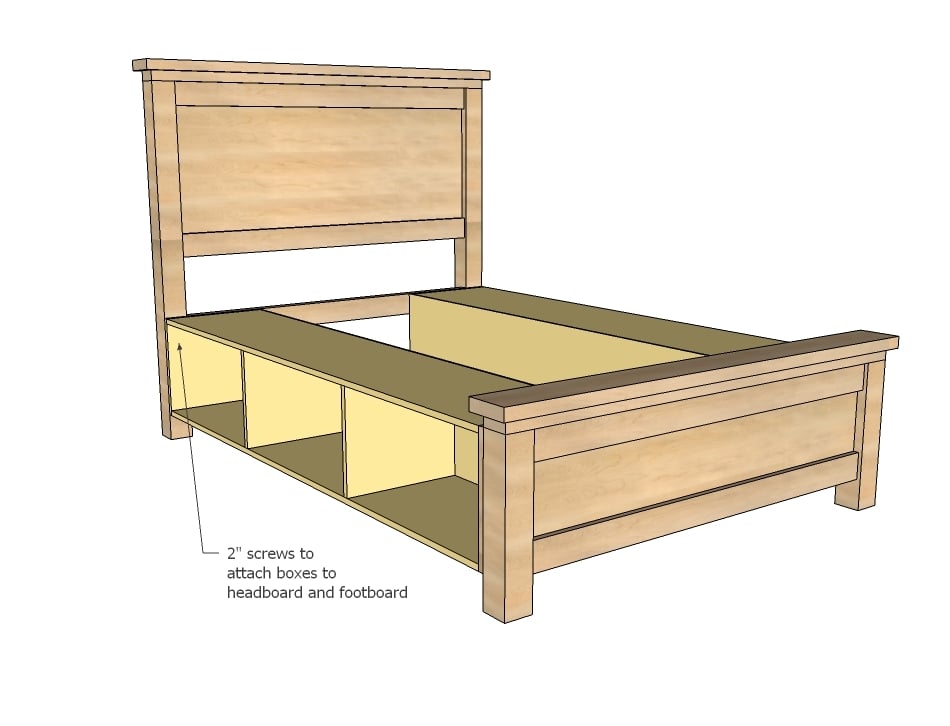
Now this is where things get fun! Take a minute and cut some leftover 4x4s or 2x4s 4" long and use them as blocking to hold the boxes up as you screw to the headboard and footboard. Screw from the inside of the boxes into the legs and supports.
Step 15
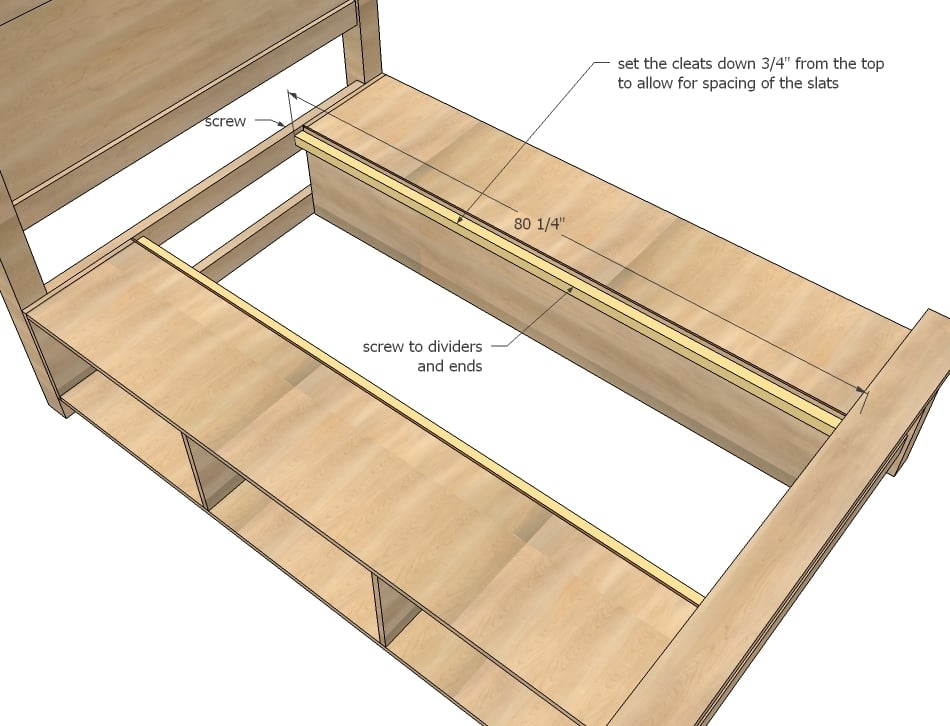
Attach the cleats to the back side of the boxes, leaving 3/4" gap to the top.
Step 16
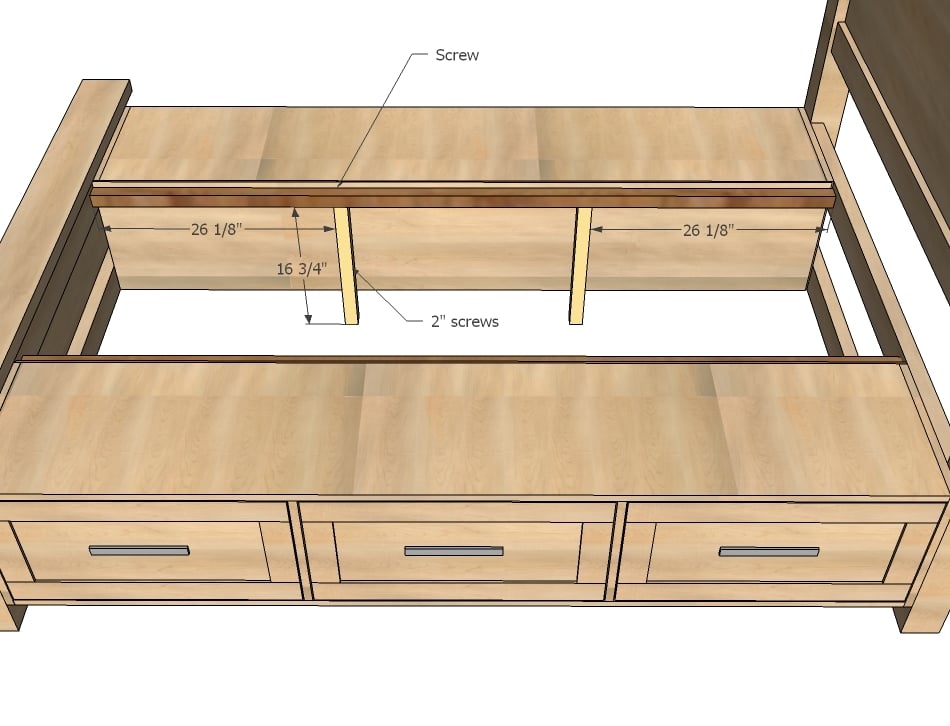
Especially if you move up to a king, you will need to add some support to the center. Some 2x2s "legs" as shown above will never be seen, but add a tremendous amount of support to the bed.
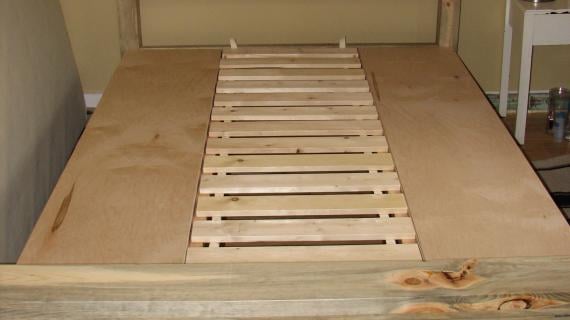
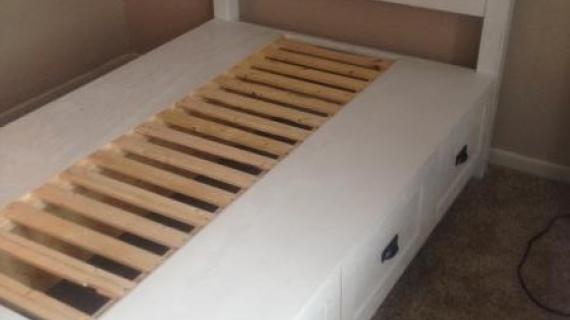
Step 17
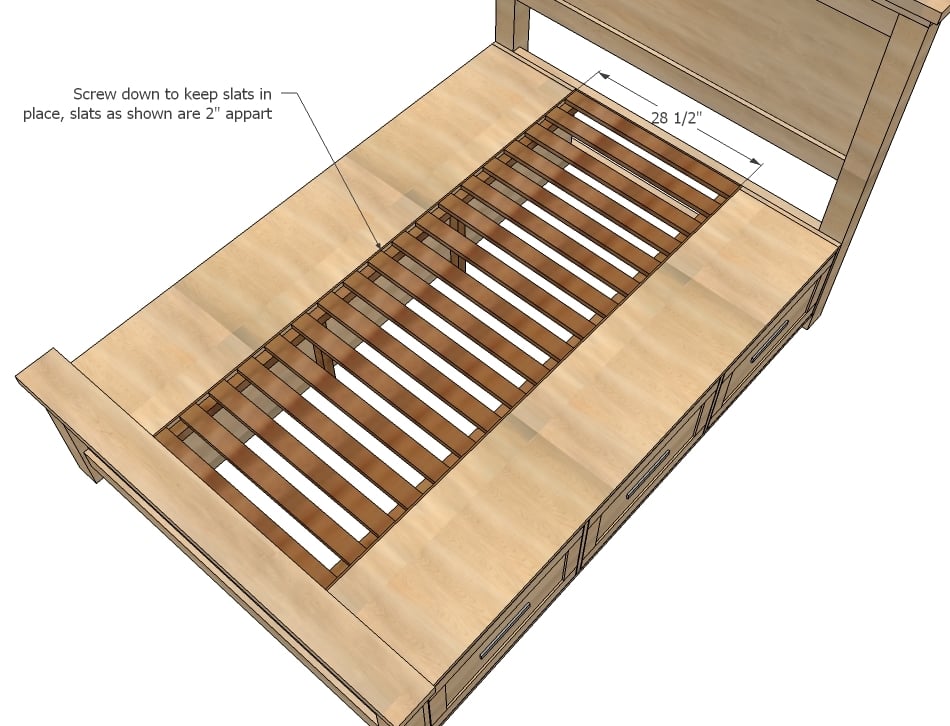
Finally, lay the slats. Per your mattress recommendation, you may need more (or can get away with less) slats.
Step 18

Build six drawers as shown above. Your drawers must be perfectly square to slide properly into the bed. Remember, your drawer should be exactly 1" less than the overall width of the opening, and 1" less deep as well.
Step 19
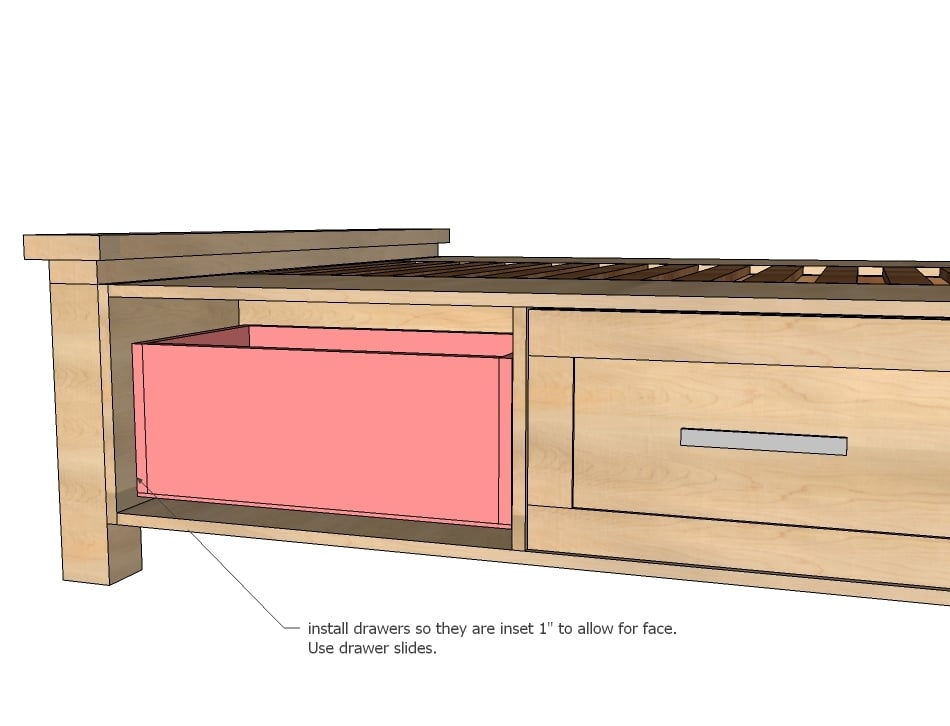
Install drawers into bed as shown in diagram, using the white euro style drawer slides that cup the bottom corners of the drawers. Make sure drawer sits inset 1" from outside of box to allow for drawer face. Adjust drawer slides until you are satisfied with how the drawer opens/closes.
Step 20
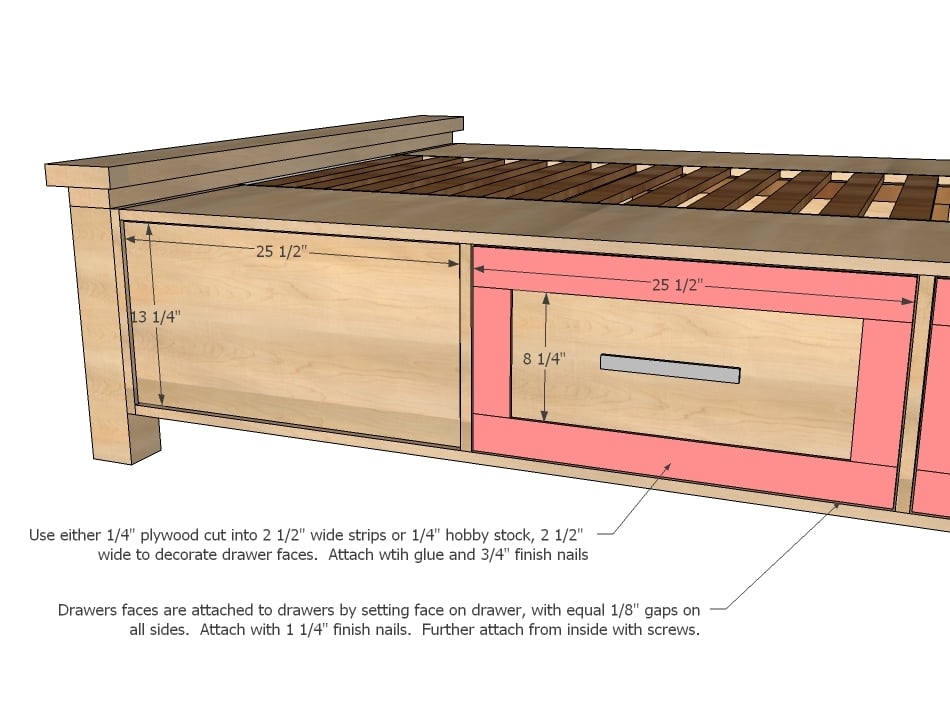
Build the drawer faces by attaching 1/4" hobby stock (or other moulding) to the faces with 3/4" finish nails and glue. Place drawer face on installed drawers, with an 1/8" gap on all sides of drawer face. Attach with 1 1/4" finish nails and wood glue.
It is always recommended to apply a test coat on a hidden area or scrap piece to ensure color evenness and adhesion. Use primer or wood conditioner as needed.


Comments
birdsandsoap
Mon, 09/26/2011 - 01:20
Woot!
Loving the drawers!
Krisina (not verified)
Mon, 09/26/2011 - 03:48
Love it!
We have been looking for a bed with storage and a headboard. Any chance you will be upsizing the plans to show what they would be for a King mattress?
Charity (not verified)
Thu, 03/01/2012 - 08:24
I want this for my king size
I want this for my king size bed too! :)
Bpat45
Tue, 12/02/2014 - 21:50
I would also love to make
I would also love to make this bed as a king size.
dananryan
Mon, 09/26/2011 - 07:19
Thank you!
Off to orange to get the supplies...this is the best of both worlds!
Guest (not verified)
Mon, 09/26/2011 - 08:12
Just what I was looking for
Thank you, thank you. My husband and I were just looking at your Farmhouse King bed plans, that I printed a few weeks ago, trying to figure out how we could add storage drawers. You have answered our questions. Now to convert for a king bed. Thank you- love your creativity, functionality, and main stream living designs for everyday people. Can't wait to see what you come up with next, keep up the great work!
Ana White
Mon, 09/26/2011 - 09:32
King Size
Thank you everyone, very excited to finish this plan and happy with how it turned out! It's a complicated one, so make sure you read through everything before building.
To go up to a king, you would need to add width depending on your King bed size. I would highly recommend adding additional support to the center too - either framing up a 2x4 box for the center and laying plywood on it or running a center support down the center, with "legs" running off of it.
Good luck and thank you!
Ana
zannej
Tue, 08/27/2013 - 03:12
Extra support in middle
Could you do a diagram of this please?. I *think* I know what you are describing, but I want to be certain. I want to build this in Full size for my brother-- who weighs over 360lbs and is "the breaker of box springs". I want to add extra support in the middle to make sure it won't collapse under him.
boettg33
Mon, 07/15/2019 - 01:28
Cali King Plans
Hi Ana
Did you ever put together a King or Cali King design for this bed? We have a sleep number on an older metal frame that is starting to fail, and I would like to build this. Reading your comments makes sense, but the cut list will change for our Cali King. Plus I'll need to add the additional framing you are recommending above.
Maybe I need to print it out and start putting the revised the numbers to overall length and width to give myself an idea of the changes to the cutlets as well as the modifications to the center to boost the support.
Should you have the plans for a Cali King already, we would greatly appreciate it.
Thank you
Jason from RI
1988ashlo
Mon, 10/21/2019 - 07:24
King Size Farmhouse bed with drawers
Hello! Can you give me the drawer dimensions and Height for this bed plan? I want the farmhouse bed with drawers in standard king size. Thank you!
Bryan_fastar
Mon, 12/16/2019 - 06:34
T-Slats
I'm new here and just seen this. Check out the T-Slats this guy made.
https://www.youtube.com/watch?v=bdNcmLRMKgQ
Guest (not verified)
Mon, 09/26/2011 - 09:45
What I wouldn't give for you
What I wouldn't give for you to simply build this for me! I live in Fairbanks, let's make a deal. lol.
Guest (not verified)
Mon, 09/26/2011 - 09:49
How I wish I had the tools
This would bring a ton of room to my bedroom!! I wish I had the tools and space to make this bed!!
I am assuming this if for a queen sized bed...
Thank you for all you do!!!
therese (not verified)
Mon, 09/26/2011 - 10:18
box springs
Dh will want box springs. Can they be used? Will the bed end up too high? Thanks. I love this bed!
dee
Mon, 09/26/2011 - 18:19
a couple of variations on this theme
I love this plan! Several months back, I modified the previous storage bed plans to do something pretty close to this in a King size. One of the differences is that I made the back-most drawers (the ones closest to the headboard) only 16" wide and made the remaining 2 drawers on each side wider, since those back drawers will normally be blocked by nightstands. So those are for not-often-needed items, and I get the rest of the length for easy access storage.
It's been mentioned that these types of platform beds can foster mold growth on mattresses in high-humidity areas, and I'm in north FL so it's a concern for me. I added more breathe-ability to mine by using 2X4 slats across the entire width, instead of making the center support as shown in these plans. I just added a molding board along the sides to cover the 2X4 edges.
I got busy with other stuff and haven't finished the headboard and footboard, but we've been sleeping on it for months and it's been fantastic. Have to get back to this project soon, and now I know I'll be using these plans for the headboard and footboard!
dananryan
Mon, 09/26/2011 - 18:22
slats
I would love to see your variation with the slats across the entire width. Would you mind posting a picture? Thanks, Serena
dee
Mon, 09/26/2011 - 18:58
re: slats
Sure, I'm not sure if there's a way to embed photos here in a comment, but here are links to 2 pics:
http://i828.photobucket.com/albums/zz208/dee850/Storage%20Bed/IMG_4269…
http://i828.photobucket.com/albums/zz208/dee850/Storage%20Bed/IMG_4267…
These are in-progress photos. We wanted to make the bed really easy to disassemble for potential moving in the future, so we also glued/nailed spacers in between each slat, cut from 2X4 scraps. The big side boxes are 24" deep, so the center space is only 28" across.
Zanne (not verified)
Thu, 06/14/2012 - 22:48
Drawer widths
I know this is an old thread, but I just found it recently. You said you made the drawers near the nightstand only 16 inches, but exactly how wide did you make each of the other drawers?
Were they evenly sized or did you have one larger than the other?
Would the width of the drawers be the same on a queen as on a king?
Thank you for sharing the information! After I practice on some other projects I think I will attempt a variation of this. I'm a bit rusty on my woodworking and I won't have any help this time around.
zannej
Tue, 08/27/2013 - 03:22
Dee's modifications
Hi, Dee!
Your idea to make the cubbies closer to the headboard is a great idea. I was actually trying to sketch something like that out. I would think that instead of having an actual drawer in the part obscured by night stands, there could be a shelf in the middle-- although that might make it hard to get to stuff on the bottom shelf-- I'm not sure. Maybe some decorative trim could be put on the edge to give it the illusion of having a drawer and the rest will be hidden from view by the night stand.
I've been reading that a rug mat (to keep rugs from slipping) can be placed underneath to prevent mold.
Memory foam mattresses supposedly don't grow mold. I got a 14" one from Overstock for under $500 with free shipping. It weighs 90lbs though. It comes with all of the air pushed out and is rolled up and put in a sack. You have to find a place to lay it out for it to puff up before using it. I think that takes about 48 hours.
When you decreased the opening to 16" for the nighstand area space, what size did you make the other spaces?
tracysmith
Wed, 09/28/2011 - 23:34
PDF Link not working
I tried to download the PDF and the link isn't working for this plan. Just thought I'd let you know.
LOVE this bed. I had planned to build a Farmhouse bed for my husband and I but then I saw this and I LOVE it so much more! We always are griping about needing more storage - kills two birds with one stone!
Guest (not verified)
Mon, 10/03/2011 - 11:11
Is there a way to modify this
Is there a way to modify this so you are able to use box springs? It would be a queen size mattress & box springs.
Thank you.
Guest (not verified)
Mon, 10/17/2011 - 20:33
The point of this type of bed
The point of this type of bed is to get a firm, quiet bed without box springs. The idea is to lose the wasted space of the springs for the useful drawers. You could just put the box spring on, but it would be really high.
Edith (not verified)
Mon, 10/10/2011 - 23:38
Awesome Bed
This is so aewsome! I was feeling lonely there for a while because I didn't see any other women interested in wood wroking. This is great! The bed looks a little complicated (because it looks heavy) but doable with a little time a bit of elbow grease, and a little help wouldn't hurt eitther.
nicq10
Mon, 10/17/2011 - 12:03
Building this week - need PDF!
I'm going to attempt this before Saturday as we are getting a new King sized mattress delivered. Unfortunately, the PDF link doesn't seem to be working :-/
Ginger (not verified)
Fri, 10/21/2011 - 06:26
I absolutely love this bed
Where can I purchase the exact bed already made?
geophyrd
Sat, 10/22/2011 - 08:37
Hi all!
I'm going to try to build this! Has anyone else tried? Where's the tough spots? I know Ana identified a few in the directions, has anyone else hit any problem areas?
Guest (not verified)
Wed, 11/02/2011 - 20:06
Any recommendations to make
Any recommendations to make this bed more portable? I live in a NYC apartment and need a bed that disassembles. Love the design though.
In reply to Any recommendations to make by Guest (not verified)
sebringvillemum
Sun, 11/06/2011 - 20:15
Bolts!
I'm thinking this will be the "big boy bed" for my son... and I plan on bolting the pieces together, as Ana has mentioned in other farmhouse bed plans. That was you can just undo the bolts and have the two drawer units, and the header and footer to move seperately. The slats could still be screwed and just unscrewed for transport too.
Guest (not verified)
Tue, 11/15/2011 - 21:40
Can you cheat??
Would it be possible to cheat and use your old headboard and footboard, thus skipping a few steps and will only have to build the storage drawers and will save you time on making the headboard and footboard.
Zanne (not verified)
Thu, 06/14/2012 - 22:53
Re: Can You Cheat??
I think that you probably could. That is what I plan to do. I really like my existing headboard (my bed does not have a footboard). I think you just have to measure the thickness of your headboard and make adjustments based on that.
meersck (not verified)
Sat, 12/10/2011 - 19:18
I love the look of this bed
I love the look of this bed and am wanting to build something similar for my son I am looking for plans for a double bed with a twin trundle bed under it instead of drawers. If you get a chance to draw something like that up I would LOVE it! I have been looking for a double with a trundle under it and they are very hard to come by. THANKS!
Guest (not verified)
Tue, 12/13/2011 - 19:37
farmhouse bed and ready-made
we are going to build this bed as soon as we go and get the materials. MUST use wood from a sustainable source, better for the environment. and someone asked where you could by this bed... well WOOD YOU, an unfinished wood store has one very similar to this... its over $1400. can't wait to have this one made though! makes it a bit more special! thanks!!!
Guest (not verified)
Thu, 12/22/2011 - 17:43
Wood for making bed
I really like the plans for the bed however I have a question about wood because of my inexperience. It appears that by using plywood you are assuming that the bed will be painted because there is no discussion about covering the edges of the plywood for the boxes that hold the drawers. I would like to make this bed and stain it, any suggestions on wood. What type of wood is used for wood not marked plywood or hobby stock.
Thanks for your help!
CarolBJ (not verified)
Thu, 05/31/2012 - 14:49
Wood for making bed
You can use the less expensive wood for the parts you don't see, and good, furniture grade wood (oak, maple, etc) for the parts you do see. Good luck!
Brian (not verified)
Sat, 01/07/2012 - 19:04
Farmhouse Storage Bed
I am wanting to build this bed for my son. However, a queen is more bed than he needs right now. Is there any way to get this plan with "full" dimensions?
toddr
Sun, 03/02/2014 - 22:09
Resizing for full
Just take the difference from the two sizes and subtract that from the pieces that go from one side to the other. Full mattresses tend to be shorter than queen so you would have to decrease that amount in length. This will in turn change the dimensions of the drawers.
Emil
Fri, 01/13/2012 - 20:22
Stain issue
Hello Ana, I am finishing with the Headboard. I was using oak plywood and 1x4 and 1x6 oak pieces. The posts a 4x4 untreated wood from Home depot. My question is, Because I want to stain it and the 4x4 posts a not oak, "How will the stain look?" will staining be a mistake. I will use wood conditioner, also thinking to use wood reinforcement for posts (to strengthen wood fibers). Will I do something wrong. Please take a look at my pictures, attached with link. I added a 1x1 piece on the back panel because headboard is very heavy and the a got the gap between. I plan to use some wood filler. If anyone have experience with staining the 4x4 post please reply.
jeremychristina
Sat, 01/14/2012 - 14:12
Is this for a queen? I'm
Is this for a queen? I'm currently doing the drawing for a Full and will post the pics once I have built it, so everyone can see it. Can't wait to get this started!
SaraJane (not verified)
Wed, 02/29/2012 - 18:33
Farmhouse storage in full size
Did you ever get the plans for this bed in the full size done? I would be very interested in seeing it!
Anniegirl
Tue, 01/17/2012 - 11:16
Twin
Is there plans to make this for a twin size bed?
Lindsay (not verified)
Thu, 01/19/2012 - 07:23
I am also looking to build
I am also looking to build this bed in a twin size version. Are their any plans? Also, has any one built this who can give me an idea of material costs? I will probably use knotty pine since I will be painting it white.
mikehc05
Wed, 01/25/2012 - 15:25
Confused
I'm a bit confused by the plans. It seems in this case that to make the storage boxes calls for 8 - 15 1/2 x 13 1/2 3/4in plywood, but the cut diagram in step 1 and 2 results in 4 15 1/2 x 13 1/2 and 4 15 1/2 x 13 1/4. Am I missing something?
Mary Corcoran
Sat, 10/25/2014 - 18:14
The Farm house bed with drawers
Hi,
I've all my wood cut to the cut diagrams to find the same issue as you and wondered the same thing ...how did you get on with finding answers. I'd love to hear and do not want to start putting it together without figuring this out..
Mary Corcoran
Sat, 10/25/2014 - 18:15
The Farm house bed with drawers
Hi,
I've all my wood cut to the cut diagrams to find the same issue as you and wondered the same thing ...how did you get on with finding answers. I'd love to hear and do not want to start putting it together without figuring this out..
Guest (not verified)
Wed, 04/04/2012 - 17:07
PDF not working -- would be nice
I notice others have mentioned the PDF link is not working. It still seems to have a broken link. Any help here would be much appreciated.
Thanks,
HH
Wife of Richard (not verified)
Thu, 04/05/2012 - 10:21
Gonna attempt our own version this weekend.
I love this plan! I was looking for a platform bed for my 9 year old's room and refuse to pay for a particle board piece of garbage. We will be modifying this plan for a twin and I want my husband to skip the head board and make 2 foot-boards instead (we live in a house built in the 1800's his room is really small)...I will post pic's when we're done, wish us luck!
Kk_nashville (not verified)
Fri, 06/08/2012 - 10:05
Did you finish?
Hi Wife of Richard! did you guys finish the bed? Was hoping to see pics! :)
Guest123 (not verified)
Thu, 06/21/2012 - 11:27
Roll out bed
What about making like a bed that rolls out and it has drawers because my friends daughter has it and when my daughter spends the night she says it's really cool because it's a pull out bed but with drawers so there is two beds and a dresser! Perfect for my daughters friends! But I don't want to buy it and so I want my husband to build it with my daughter but he has to work all the time! Even on the weekends! So I wanted something like that and fast…is it too much to ask…?
Thank you Ana!
Guest123 (not verified)
Thu, 06/21/2012 - 11:30
Twin size
Also can u make it. Twin sized?
maggiemaeRN
Wed, 07/25/2012 - 09:00
Full Size Plan
My husband and I are really wanting to build this bed for our 9 year old daughter. The only problem is her room is not big enough for a queen we need a full. Do you have any full size plans for this bed??? Thank you so much for all of your neat tutorials and plans.