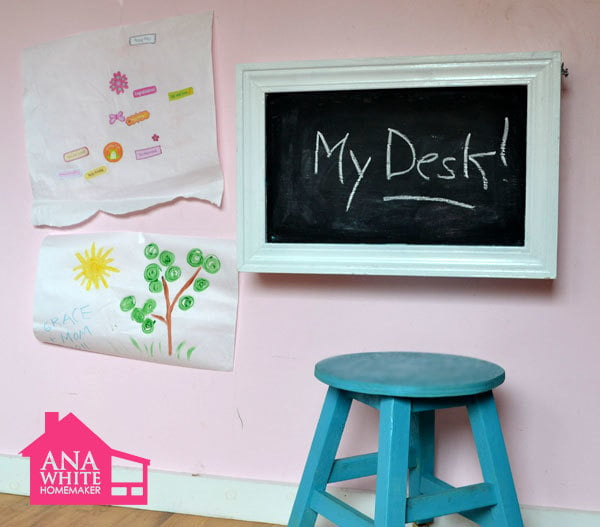


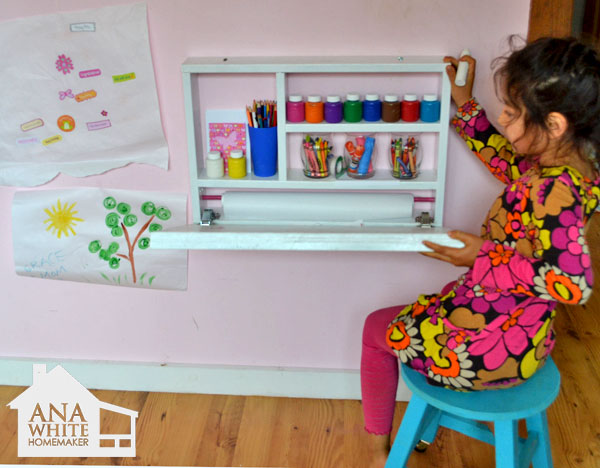
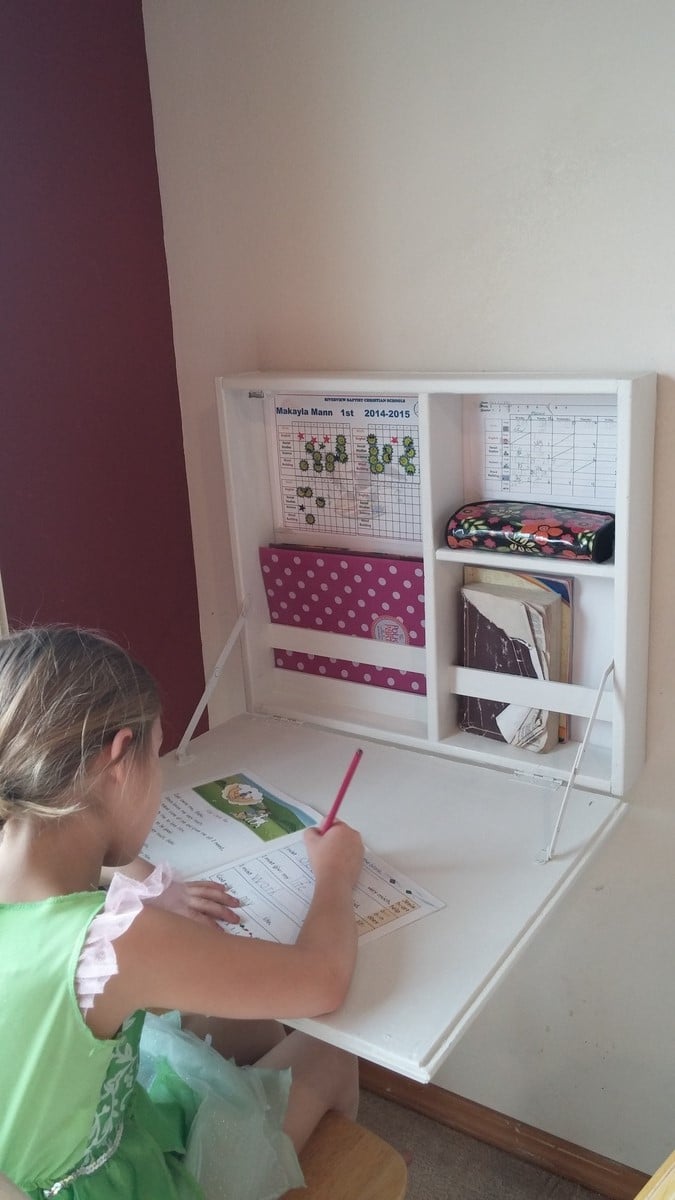
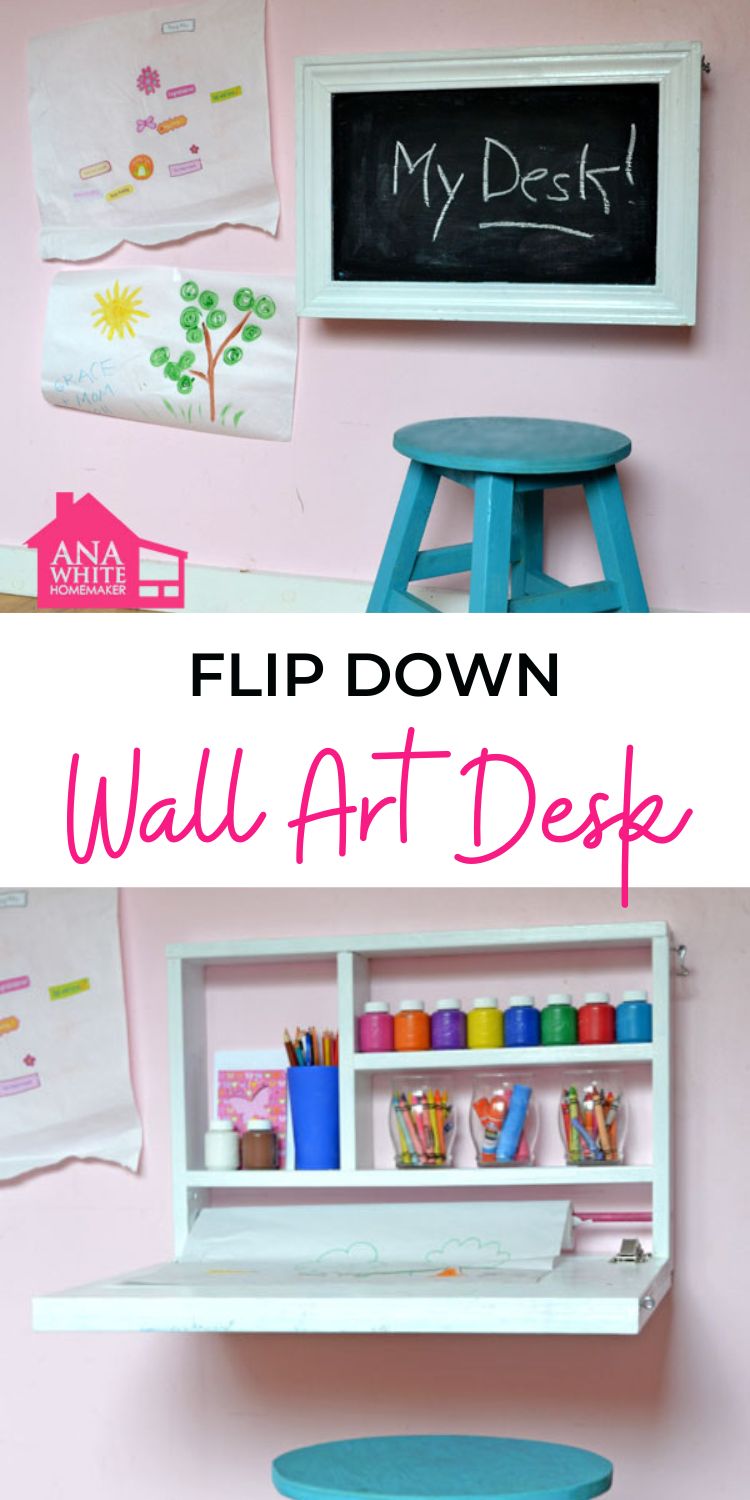
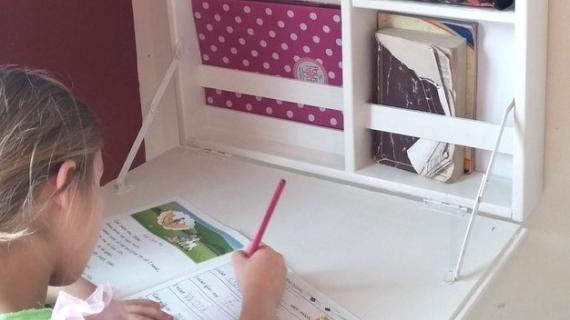
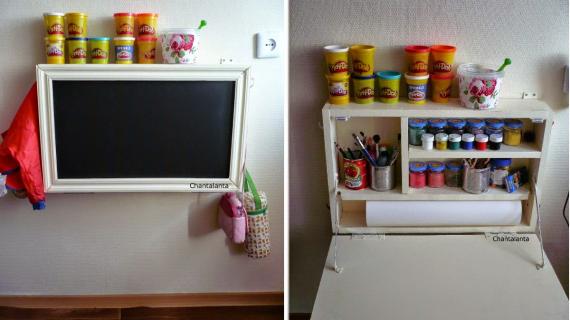
This do it yourself kids desk folds up to become a wall chalkboard! Stores art supplies and even a paper roll holder! Super easy step by step instructions to DIY your own!
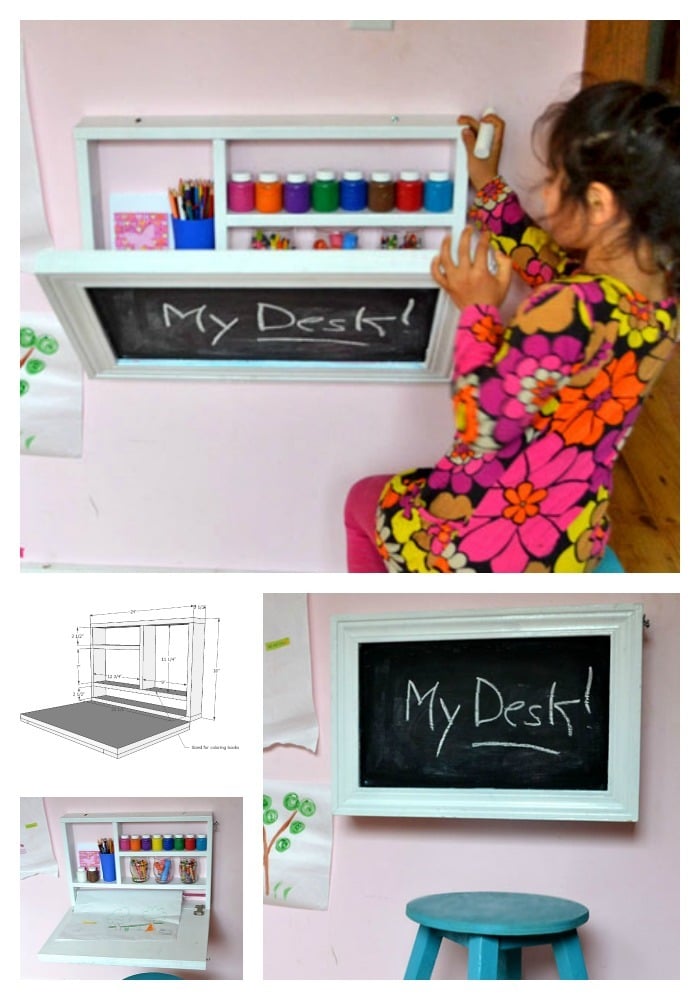

Perfect for an Kid's Art Desk
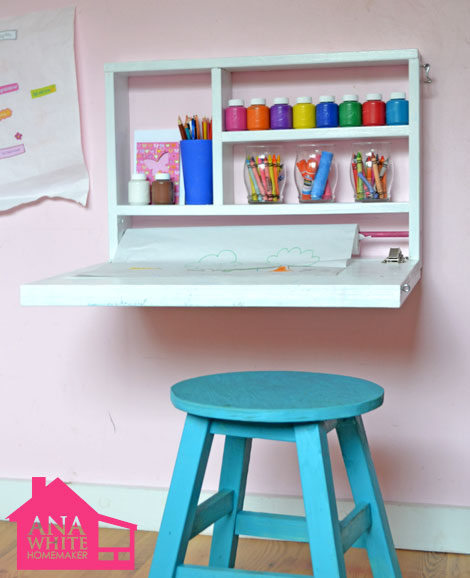
It's just right in size for an art station! I love that art supplies are all kept right where they are used.
Tiny Space Solution
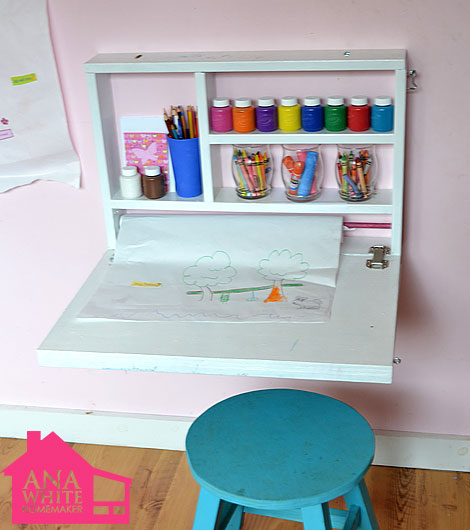
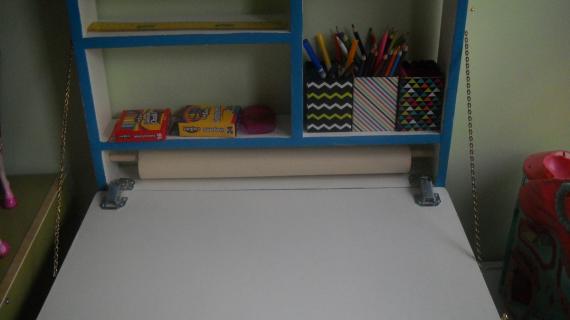
Storage Too!

Easy Systems

Mount at Any Height
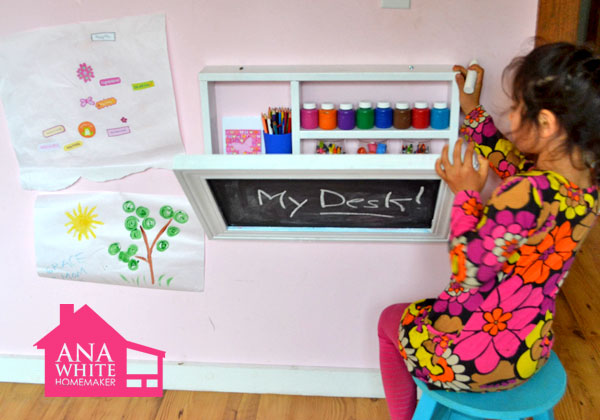
Easy to Use
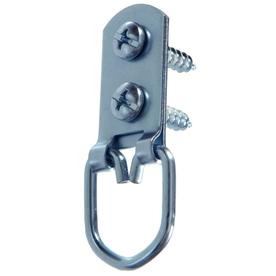
Support Brackets
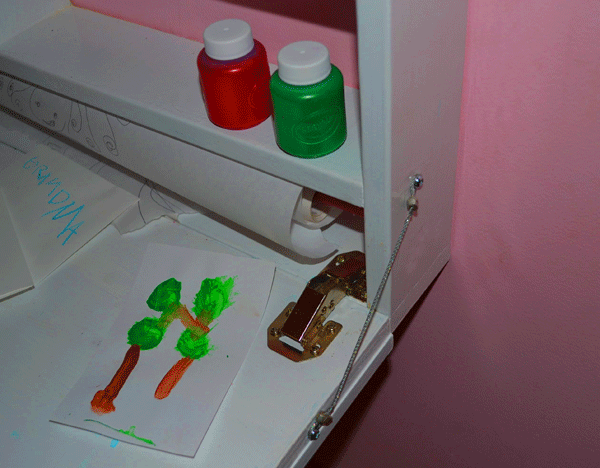
You can use a wire and chain as a support (as I did) mounted on the exterior, or you can use a support hinge bracket as done below. NOTE: You may need to adjust the shelving inside the cabinet to give room for the support hinge to close. I suggest purchasing your hardware BEFORE building and adjusting your shelf locations to fit.
Pin For Later!
Preparation
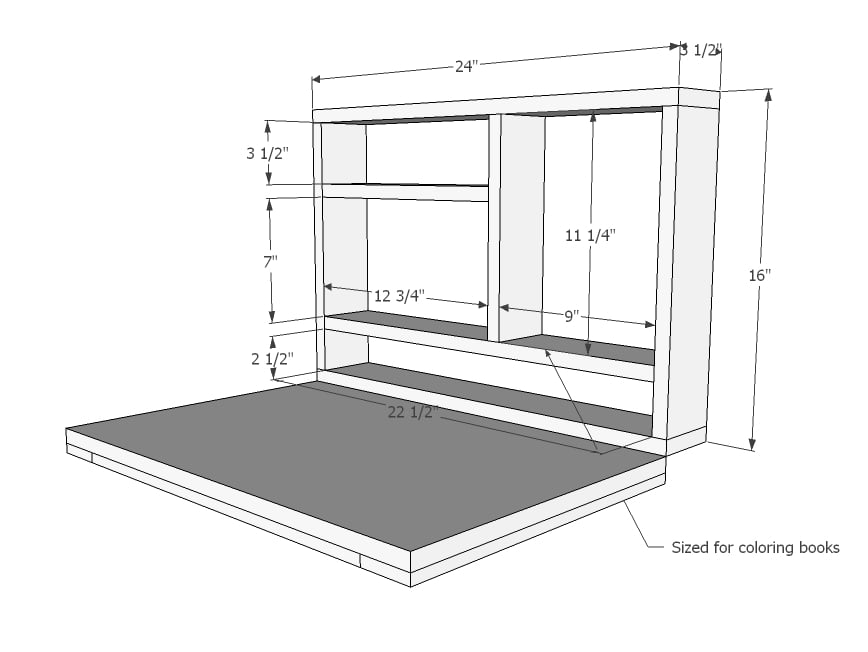
- 1 - piece 3/4" plywood 16" x 24"
- 1 - 1x4 @ 10 feet long
- 1 set hinge supports or wire or chain (see comments)
- 1 set basic hinges
- 3 D ring hangers
- Chalkboard paint (optional)
- Moulding or trim (optional)
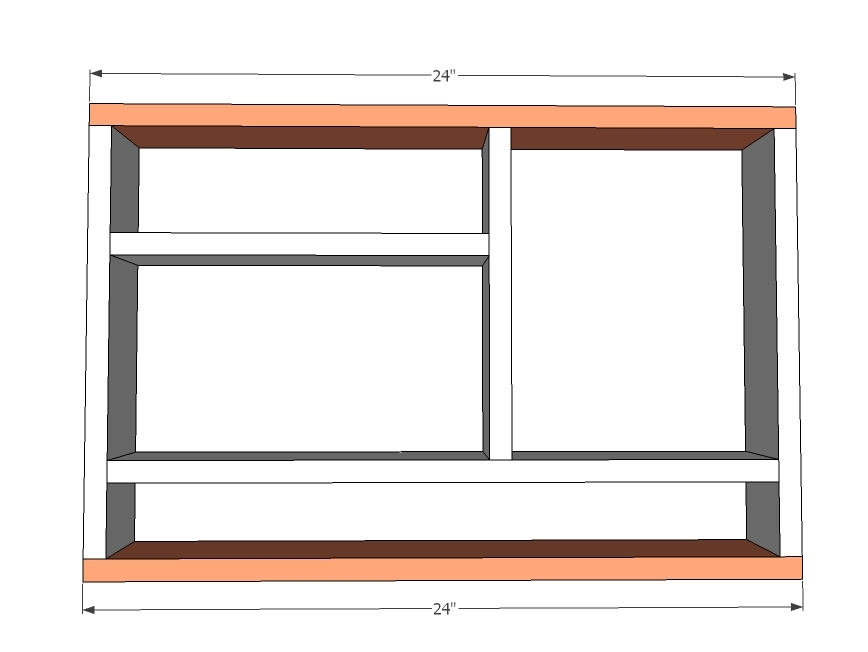
1 - 1x4 @ 11 1/4"
1 - 1x4 @ 12 3/4"
2 - 1x4 @ 14 1/2"
2 - 1x4 @ 24"
1 - 3/4" Plywood @ 24" x 16"
1/2" dowel, 30" long (optional for the paper roll)


Please read through the entire plan and all comments before beginning this project. It is also advisable to review the Getting Started Section. Take all necessary precautions to build safely and smartly. Work on a clean level surface, free of imperfections or debris. Always use straight boards. Check for square after each step. Always predrill holes before attaching with screws. Use glue with finish nails for a stronger hold. Wipe excess glue off bare wood for stained projects, as dried glue will not take stain. Be safe, have fun, and ask for help if you need it. Good luck!
Instructions
Step 1
I built this project with 2" finish nails, but you can also use screws or the Kreg Jig.
Please read all comments when installing the hinge supports - per reader comments, depending on your hinge supports, you may need to add extra clearance for the supports.
Step 2

Mark joints and attach in place.
Step 3
Now the top and bottom. Drill 1/2" diameter holes for paper roll here. Leave dowel long so you can roll the outside ends to roll up the craft roll.
Step 4

You do not have to put the trim on, I did because my chalkboard edges were so ugly! I used window casing, but you can use anything. Attach the top with simple hinges on the bottom.
Step 5
Step 6
It is always recommended to apply a test coat on a hidden area or scrap piece to ensure color evenness and adhesion. Use primer or wood conditioner as needed.


Comments
Guest (not verified)
Mon, 09/19/2011 - 14:50
so clever
Ana, could you be any more clever! This could be adapted to many uses. I think i'll make one for the kitchen area to store random papers or a bill paying station. Thank you for the inspiration!
spiceylg
Mon, 09/19/2011 - 16:06
Genuis!
Love this!
loniwolfe
Mon, 09/19/2011 - 16:38
This is great!
I've been trying to figure out where I could put a desk for Maddie (6y/o) to do homework and coloring in our tiny 930 square foot home. Thank you so much! Now I can put it in her room!
DirtSquirt
Mon, 09/19/2011 - 17:25
I love it!
The hinges in the pictures of the one that you built look different than the one specified in the instructions. Are they? Are the ones from your actual pictures strong enough? I would prefer them to the ones that would hang on the sides and get in the way of arms.
In reply to I love it! by DirtSquirt
Ana White
Mon, 09/19/2011 - 20:59
Hi Dirt Squirt, thank you!
Hi Dirt Squirt, thank you! The hinges are different - I used the Euro style ones - but the better installation is the simple hinge and hinge support. We live 100 miles from a Home Depot or Lowes, so I am waiting for my next shopping trip to pick up the hinge supports, and only had on hand the Euro style ones. The euro style hinges do work, but not for a high weight load without the supports. Since the Euro Style hinges are more expensive and harder to install, I recommended the simple hinges on the underside. Hope this makes sense! Best luck! Ana
alaskamom (not verified)
Mon, 09/19/2011 - 19:06
wall desk
I want to point out that this desk is also good for the development of young children. When children cross the mid-line of the body it allows for better brain development and specifically the ability to learn to read. Also children with developmental delays seem to be helped by standing vs. sitting (IE: using the chalk board or an easel.
Sandi (not verified)
Mon, 09/19/2011 - 19:42
I was just discussing an idea
I was just discussing an idea like this for a "fold out" sewing station. I love this idea, but do you think it could handle a sewing machine? I'm thinking I might be out of luck. Love this idea, though, and will likely implement in our girls' rooms.
In reply to I was just discussing an idea by Sandi (not verified)
Ana White
Mon, 09/19/2011 - 21:01
Hi Sandi, what a great idea,
Hi Sandi, what a great idea, a fold out sewing center! Not sure if the support would be there with my plan, but there are certainly ways of "beefing" up everything!
We really love it in Grace's room - so far, she's put everything away when done, and folded it shut! Here's hoping that continues!
Guest (not verified)
Tue, 12/20/2011 - 07:14
Beefing it up
It may sound odd, but one way to get the added support is to add fold up legs to the bottom(or sides?) of the table. Unfold them, lock them into place, and then bring down the table. Or Unfold the table, then the legs if the table/wall is strong enough to support the legs. Obvious the desk would need to be larger and better attached to the wall for this idea. Just my thoughts on beefing things up. :)
Dana Jacobs (not verified)
Tue, 02/21/2012 - 20:49
Beefing it up...
As mentioned by another commenter in response to this idea, adding folding legs is another way to add extra support. Here is a link to a similar desk with legs, for inspiration's sake: http://www.homedecorators.com/detail.php?parentid=0100300&aid=google.pu…
Ana White
Mon, 09/19/2011 - 21:05
Thank you everyone for
Thank you everyone for commenting and reading this post - we really enjoy this desk and I hope you build it! We love it!
redhead_61
Mon, 09/19/2011 - 21:08
LOVE IT
This is just so fun.
Pittsburgh mom… (not verified)
Tue, 09/20/2011 - 04:21
I'll take 92 more hours a year!
I think the best part of this plan was the time savings picking up crayons. I spend a good portion of my day cleaning up the art supplies! Wondering if there would be a way to either add or have free-standing legs you could set up to support a longer version of this for a fold-down desktop for three kids?? Any ideas?
In reply to I'll take 92 more hours a year! by Pittsburgh mom… (not verified)
Ana White
Tue, 09/20/2011 - 10:15
It's crazy how these small
It's crazy how these small daily tasks just add up, don't they!!! Before you know it, you are 92 hours into picking up crayons.
I'm proud to say we are several days into this craft desk and I have not picked up or put away a single craft item (and we have a 2, 4 and 7 year old here regularly!). The system is working for us!
There would be no issue of going wider, I actually initially designed the desk 4 feet wide. But I scrapped that design because I wanted the kids to be able to open and close the desk independent of me. But certainly possible.
Going longer would be very beneficial because it would give you a taller chalkboard (or whiteboard or pinboard), but would make the storage cubbies harder for the little ones to access. You certainly could though - just make the frame (or part of the frame) fold out as a leg base.
Guest (not verified)
Tue, 09/20/2011 - 08:27
An Idea
LOVE this! this would be perfect for older kids too! Just wanted to add an idea- why not screw down a strip of metal alond the bottom? Not a sharp piece but something that the end of the paper can slide underneath to hold the paper down and then you can use that piece of metal to tear the paper off the roll. Make sense?
In reply to An Idea by Guest (not verified)
Ana White
Tue, 09/20/2011 - 10:06
Makes perfect sense! You
Makes perfect sense! You know what might be cute would be a ruler with a metal edge or metal ruler, then the ruler could be used as a measuring device as well!
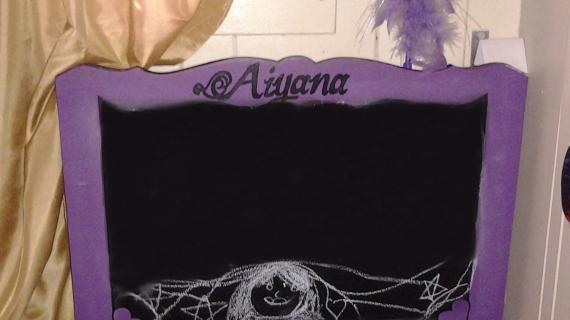
The paper roll is actually backwards in the photo - couldn't get the kids to stop painting long enough to change it! and should actually roll under, perfect for a tear strip. Great idea!
cdmccreary
Sun, 12/11/2011 - 13:28
How to cut paper
Use a hacksaw blade (fine teeth for metal cutting & longest one) at the rear end of the table and screw it down on top of 1/8" spacers (washers will work) feed the paper underneath. Pull paper out and tape like drafters use to do. When done with art, hold the roll and tear the sheet up against blade for straight cut.
Guest (not verified)
Tue, 09/20/2011 - 09:44
This is brilliant. I love
This is brilliant. I love this plan and want to build two side by side for my little girls sharing a room. Love it!
UlrikeDG
Tue, 09/20/2011 - 11:04
I've been wanting something
I've been wanting something like this for DD's room for a while now, but I haven't had time to sit down and really think through the mechanics. I love your design! Can't wait to find time to bang it out. (I need to finish a loft bed first.)
lianatempera
Tue, 09/20/2011 - 11:53
attacthing to the wall
I love this! For more support, you could hinge the frame at the top to the chalk board so that it forms legs when you open the desk.
I'm completely confused about the hangers, though. How do those hangers work? Have you had any problems with the desk coming away from the wall? I'd be worried about that, then the supplies falling out the back.
Ana White
Tue, 09/20/2011 - 14:26
Thanks! About the hangers, I
Thanks! About the hangers, I only have them on the top, and using the desk actually pushes down on the back, keeping everything in place, rather than pulling it outward. That said, it would be a good idea to put the hangers on the top AND bottom (4 total) with at least one on top and one on bottom into a stud in the wall. Good point!
Ashleigh (not verified)
Thu, 09/22/2011 - 12:00
Would 1/2 inch plywood work?
That's what I have on hand. I am all about this, I am going to do it this weekend with my little boy!
DieselMonkey (not verified)
Thu, 09/22/2011 - 12:44
When I first saw this (on
When I first saw this (on ohdeedoh) I thought the front was a cabinet door. It might make an even easier project and it would have hinges (or spots for hinges) already.
I'm just wonder how much wt this would hold. I could see my guy leaning on it and breaking it off
Thanks for the awesome idea.
In reply to When I first saw this (on by DieselMonkey (not verified)
Ana White
Thu, 09/22/2011 - 13:31
What a great idea to use a
What a great idea to use a cabinet door!
As shown in the photos, I do not yet have my support hinges in place (we live 100 miles from a Home Depot or Lowes and I just haven't made the trip yet). The support hinges will greatly increase the strength of the flip down - depending on the type you get and the screws you use, the weight limit could be very very heavy.
I think the part we are loving the most about this desk (we are a week into using it with three very crafty girls) is the accessible storage of supplies. It's so convenient to put the crayons and paints back and close it up!
Best luck everyone and thank you!
Camerons_Mom
Thu, 09/22/2011 - 14:43
Wonderful Idea!
Anna you are so creative! This will be perfect for my sons room. I was contemplating building a desk but his room is so small that a desk would literally leave him with no room. We have a 4 bedroom house and only 1600 square foot and each room is limited to how much furniture can go in it. This will work perfectly! Thanks so much Anna!!
loniwolfe
Tue, 09/27/2011 - 16:36
I just thought about
I just thought about something. Istead of having the external support brackets (that could get caught and yanked by clothing walking, or running, by). Could we instead attach chains to the top corners of the shelves and the fold down shelf to hold it in place?
Crystal907
Sat, 10/01/2011 - 09:19
Support Hinges
Just built this desk. I love it. Putting on the support hinges to keep the desk level was difficult for this beginner. Had to cut a notch in the top interior shelf for the hinge to fold into. It would have been much easier to do BEFORE assembling the desk. Don't forget to think about where those support hinges will go.
Catherine in Texas (not verified)
Sun, 10/23/2011 - 05:19
moulding
Hi-
We're about to start this project (beginners.) We think the moulding makes the project, but aren't sure how much to buy or how to cut it or put it together. Is there another tutorial somewhere that explains moulding, or is that just something we need to figure out on our own?
Thanks! We are in 1000 sq ft and our kids are going to LOVE this!
Guest (not verified)
Sun, 10/23/2011 - 13:21
Whats the 1 - 1x2 @ 22 1/2"
Whats the 1 - 1x2 @ 22 1/2" for? I dont see that in the one in the picture. The hinge supports will not close with the 22.5" peice across at the bottom. I removed the 22.5" peice and the hinge supports still dont seem to work because there is not enough depth when closed.
Ana White
Sun, 10/23/2011 - 20:41
The 1x2 @ 22 1/2" was
The 1x2 @ 22 1/2" was originally meant to be put at the top, inset to the back, giving you something to screw the entire unit to the wall. This is an error on my part - when I hung mine and found the unit to be secure without the 1x2, I decided it wasn't entirely necessary for the plans. I will update the plans to reflect this error, and I thank you for writing to let me know. Much appreciated.
For the hinge supports, depending on the type of hinge support, you may be able to place to the outside. Or if your hinge supports are particularly long, you could flip the unit over so your paper roll sits to the top, and then you would have more room for the hinge supports. Another option is to use chain and threaded eye hooks.
Hope this works for you - Ana
Becky Smith (not verified)
Thu, 01/19/2012 - 06:13
1x4 @ 22 1/2
I just finished building this darling desk. I just have to paint it and then I'll post pictures. Thank you for another winner, Ana!
I am a total amateur so I feel a little silly correcting anything in your plans but I just wanted to note that there seems to be one cut missing from the cut list. According to the plans there is a 1x4 @ 22 1/2 to make the shelf above the paper holder dowel but that doesn't appear on the cut list.
Thanks again!
Becky
artsymom23 (not verified)
Thu, 11/17/2011 - 13:58
Cute but Complicated
although a very cute idea ~my husband a skilled carpenter~ made this per specs and it does not close nor do the side brackets fit without quite a bit of notching etc. and one of the cuts are listed wrong. Best if you use the euro brackets vs side that the directions call for because the desk will not close properly, if at all.
Jonathan M. (not verified)
Mon, 12/05/2011 - 21:07
AWESOME
This is a fantastic project! I am going to customize it to be a computer desk-- with two computer screens flush-mounted on the wall inside the case (flip up the desk and voila- no computer)! Also working in a slide-in wireless keyboard hide-away and mouse cubby... I will send pics when done. I am so excited.
Thanks for the idea-- love the site. We are looking at building a house of our own from the ground up soon and love your momplex blog! Thanks again!!!
Guest (not verified)
Tue, 12/06/2011 - 12:50
What a great idea! We are
What a great idea! We are going to be building this for our daughter to put in her "art corner" we are making in the corner of the kitchen.
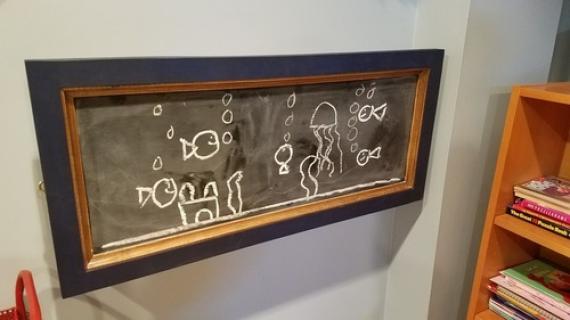
I do have one question regarding the front panel where you have a chalkboard; do you have any other ideas for what to do with that area? We already have a large chalkboard right next to where this will go and I am having a hard time coming up with an idea of how to "decorate" the front of this. Don't want to do the chalkboard or dry erase and she is too little for a pin board, don't want her to have tacks or anything like that. I was thinking of putting a fun cute fabric? Any ideas would be helpful. Thanks!
Charity (not verified)
Sat, 02/11/2012 - 16:11
Front decoration
What about one of those message boards with a cute fabric and a coordinating ribbon that makes several diamond patterns? Then your little one could still showcase her items, but without the use of pins.
Guest (not verified)
Sun, 12/11/2011 - 17:06
Wall Desk
make for Pae
dale pankratz (not verified)
Fri, 12/30/2011 - 09:36
Lid Supports
Hardware Tree sells a hinge/support for drop front secretaries that would work well for the wall desk. It combines both the hinge and support in compact unit, and they are only $6.35 each.
Guest (not verified)
Tue, 01/03/2012 - 12:40
Price to make
Just wondering about how much you spent on all of the materials? There is a similar desk at Ikea (59.99) and I was just trying to figure out which is more cost effective.
Although I do like the make it yourself idea better:)
Thanks,
Anne
Guest (not verified)
Fri, 01/27/2012 - 18:52
Came here looking for an
Came here looking for an alternative to the IKEA laptop desk. We just drove to LA to buy 2 and were told they are discontinued :(
Guest (not verified)
Wed, 01/18/2012 - 12:25
Flip Down Wall Art Desk --> Flip Down Changing Table?
Hi Ana,
Your blog is such an inspiration! Wondering what your thoughts are on creating a flip down changing table? Good idea/bad idea? How would I alter your plans to support the weight and a cushion/pad instead of the shelves?
Thanks!
Stacy (not verified)
Tue, 01/24/2012 - 12:47
I would love to build this
I would love to build this for my daughter but she is 11 so would need it bigger. What do you recommend the measurements should be?
Lou (not verified)
Sun, 03/11/2012 - 23:53
I love these. We had one a
I love these. We had one a LONG time ago that was built in the 70's that after the user grew out of crayons (it was deeper) it was used for hair curlers and perfume! We are building a new one into a built in bookshelf in our current home and my husband could not remember what it looked like inside; we have a photo of the outside but that didn't cut it. Thanks for sharing. He's a visual guy and the internet and posts like yours save us from killing each other sometimes!
Christy Panzarella (not verified)
Wed, 05/09/2012 - 13:15
Perfect for a mobile home ;)
Ana, Since moving out of our house into an apt Ive been at a standstill on building. And now, im looking at buying a mobile home out in the country, but the bedrooms are teenie! ( My duaghter is not big enough for a loft bed yet! )This is perfect, I could mount it above my daughters bed, or even in the hallway! Thanks for posting another awesome plan! Love it.
Jeri (not verified)
Sat, 06/23/2012 - 22:40
Love this!
My husband and I made 2 of these for our grandkids (2 & 3yrs old). We love having them visit but hated when they just wanted to watch T.V. We wanted them to learn and use their imagination and these desks did just that. They spend lots of time coloring, painting, drawing and writing on the chalkboard. Just wanted to thank you for the inspiration and to let you know that it was just as easy as you said it would be! Thanks again!!
Rebecca Davis5 (not verified)
Tue, 06/26/2012 - 06:23
perfect for teachers!
This is going to make my classroom a different place next year! I just hope a beginner isn't getting too carried away to imagine building several of these as centers around my room! Maybe even one for me! I can't wait to try! Thanks you wonderful woman!
Kjseadler (not verified)
Tue, 07/03/2012 - 08:24
Possible Cutting table ??
I do large scale sewing projects (tall draperies, bed spreads, etc). I have been dreaming up how to convert my guest room with a queen size bed into my work space without getting rid of the bed - for the occasional guest! I'm thinking the storage day bed idea combined with a DIY headboard, which will drop down (&maybe unfold?) that can be used as a cutting table for fabrics. Because of the length:width it would probably need fold out leg supports that drop on either side of the far end of the bed. I can dream it,, just not design it!! Lol. Any suggestions?
ademasters
Tue, 07/31/2012 - 09:58
Adorable and functional!!
I can't wai't to do this in my daughters room!
Bethany66 (not verified)
Mon, 12/03/2012 - 15:32
Increasing the size of the flip down art desk
I would like to use this as a wrapping station as you mentioned earlier. I would like to increase the width to a gift wrap roll size, but I would like to increase the height as well. I know you mentioned not to increase the depth, but would increasing both the height and width cause an issue? I am a rookie who wants all my ducks in a row before I beg my husband to construct this for me!!
Jen Cooper (not verified)
Mon, 01/07/2013 - 14:23
Convert into baby change table
I love this.... how could you make if more sturdy to use as a baby change table ? or would it need to be sturdier?
Jen
elm (not verified)
Tue, 01/08/2013 - 12:55
missing in list?
It seems that you are missing from the cut list 1 - 1x4 @ 22.5" - this increases the 1x4 length required to finish the project from 101" to 123.5".
A question about mounting - how would you recommend attaching a much larger (8' wide by 40" tall) version of this to a studded wall? Any other modifications required? (i.e. hinges or other support mechanisms)
Thanks!