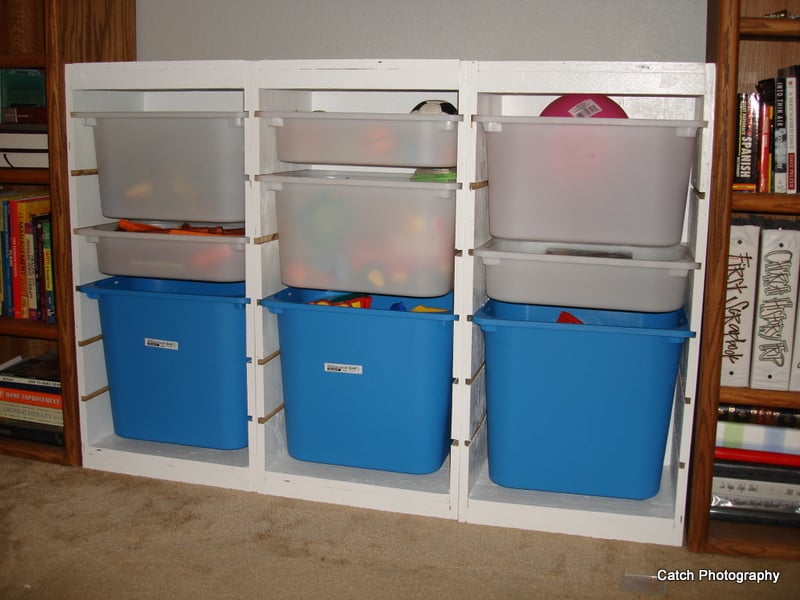


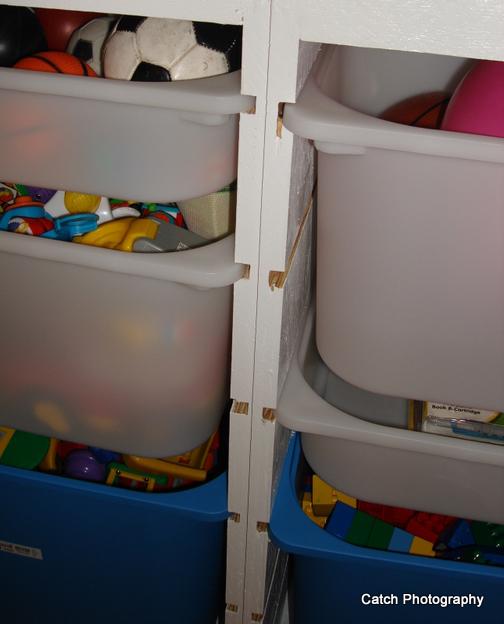
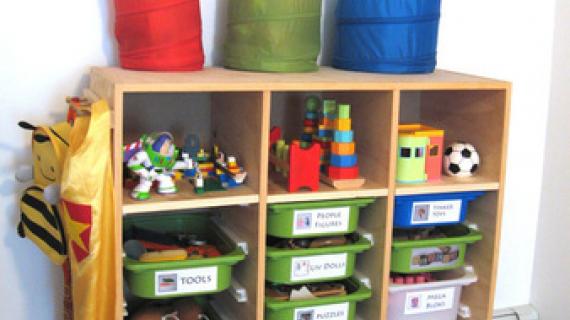
I got this idea to turn my den into a playroom and get all the toys out of my living room. So this was my first project tackled. I love the idea of the IKEA Trofast storage bins and was ready to just buy them outright (Ikea not too expensive ya know) until I drew up the plans and decided that I could STILL build it for cheaper, like three times cheaper. So these are the exact same measurements to fit the trofast bins bought from their store. I built three of these for $30! YEA!!
This is basically the same idea as Ana's laundry dresser, just with grooves routed in to the wood instead of a tract.
The awesome thing is too, that it is such a simple design, that when I am done using it like this, I can throw shelves in there and it is an automatic bookcase.
Preparation
1 sheet 3/4" plywood, MDF, or melomine
1 sheet 1/4" plywood
1 1x2
1 sheet 3/4" plywood into 4 11 3/4" strips
1 sheet1/4" plywood into 17 3/8 strips
2 1x2 @ 15 7/8"


Please read through the entire plan and all comments before beginning this project. It is also advisable to review the Getting Started Section. Take all necessary precautions to build safely and smartly. Work on a clean level surface, free of imperfections or debris. Always use straight boards. Check for square after each step. Always predrill holes before attaching with screws. Use glue with finish nails for a stronger hold. Wipe excess glue off bare wood for stained projects, as dried glue will not take stain. Be safe, have fun, and ask for help if you need it. Good luck!
Instructions
Step 1
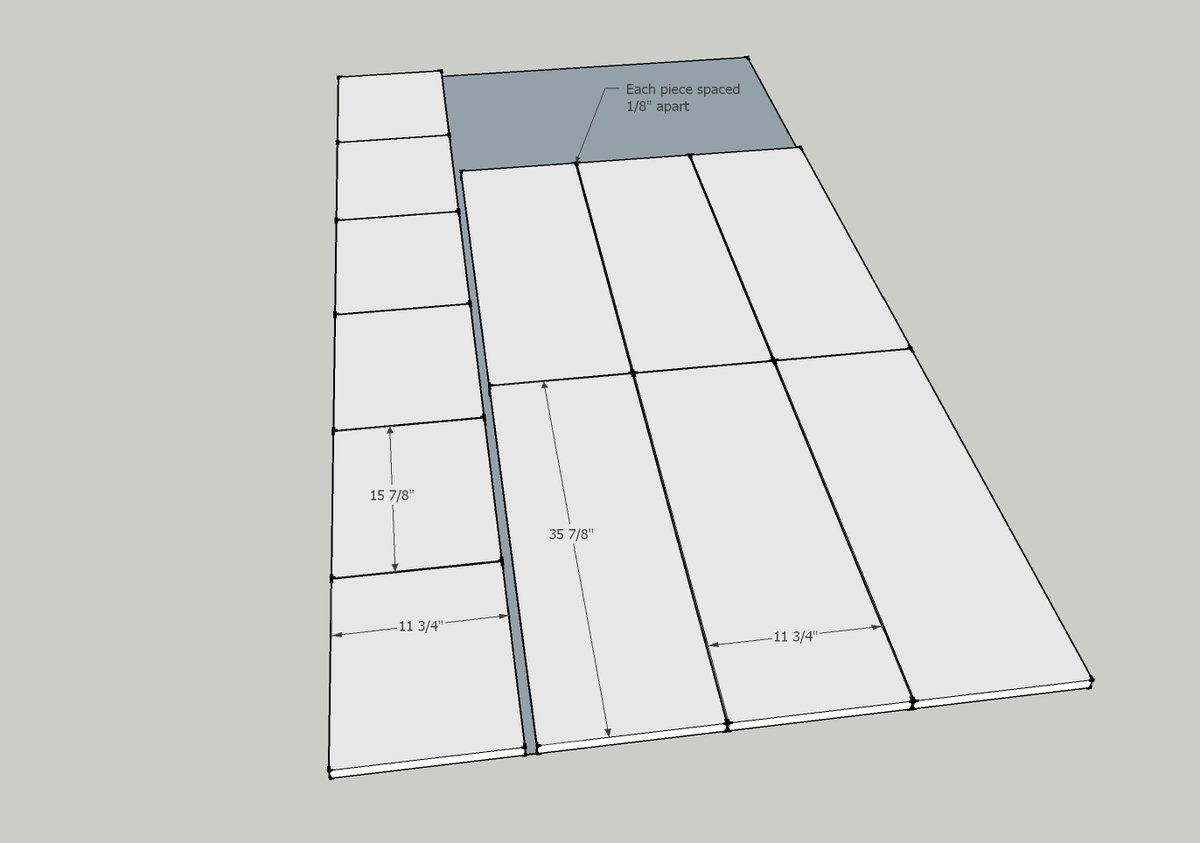
Here is your cut list for your 3/4" plywood
Step 2
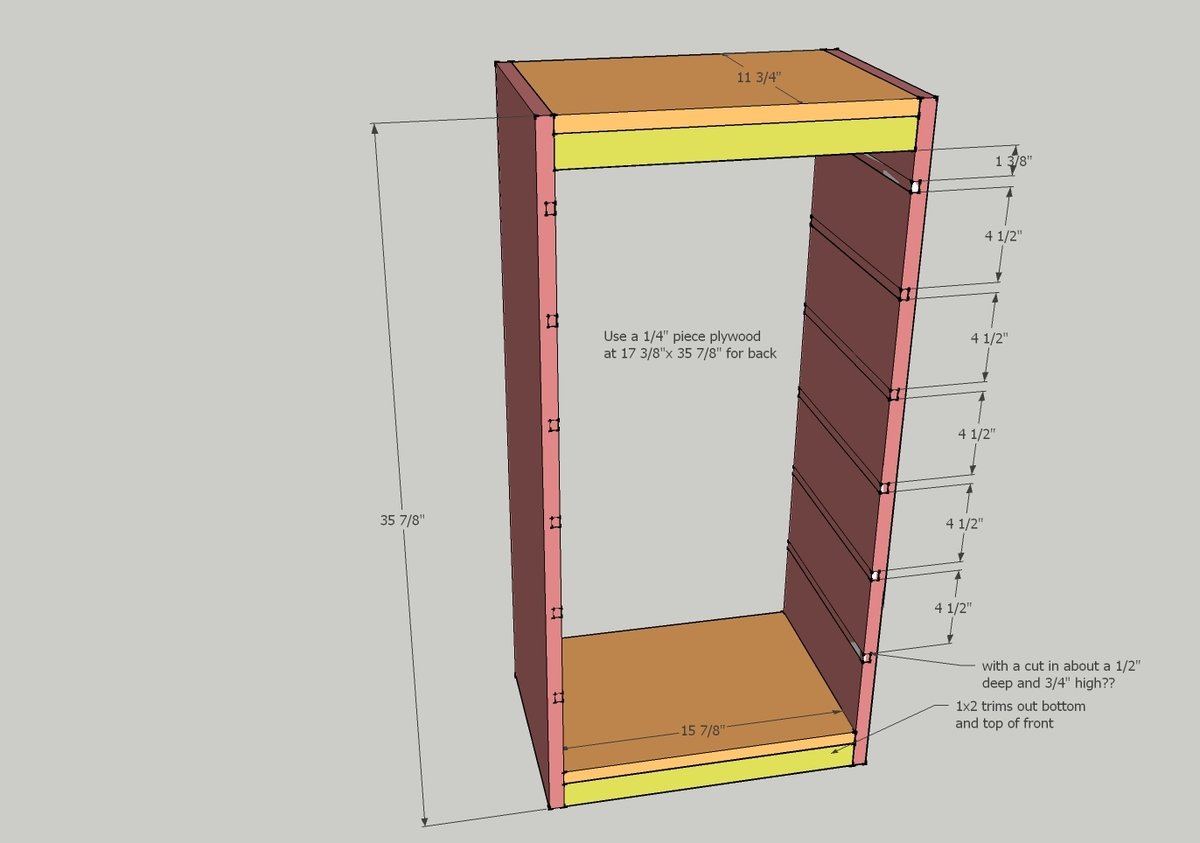
I used a router to cut in the groves to a 1/2" depth with a 1/2" flat bottom bit.
Step 3
Step 4

Next up, repaint those bookshelves!
It is always recommended to apply a test coat on a hidden area or scrap piece to ensure color evenness and adhesion. Use primer or wood conditioner as needed.
Comments
Jema (not verified)
Tue, 09/20/2011 - 09:58
Better than my idea!
Awesome! I was going to jerry-rig the laundry hamper dresser into fitting some toy bins, this is even better! I plan to make one and glue Lego sheets to it for a Lego table with sorting bins.
Guest (not verified)
Tue, 09/20/2011 - 10:03
Alternative to router?
I LOVE this! This would be AWESOME in our playroom! BUT I don't ahve a router so any suggestions for making the groves without one??
TYG83
Tue, 09/20/2011 - 10:47
Dado Blade
You can use a dado blade in a table saw, or you can make several careful passes with a circular saw. Alternatively, if you have a radial arm saw and can adjust the fence to allow you enough space you could also use that (This is what I tend to do, but not many people have a radial arm saw) Obviously all of these options require depth adjustments so you do not cut through the entire piece. If you have to use a circular saw it may be easier with a guide such as this:
http://www.popularmechanics.com/home/reviews/4283497
Hope this helps!
Tsu Dho Nimh
Tue, 09/20/2011 - 15:35
Make an outie, not an innie :)
Use small molding or 1x2s, glued and nailed to the insides, to make a lip for the bins.
Amy R. (not verified)
Tue, 09/20/2011 - 10:06
LOVE THIS!! Thanks so much!
LOVE THIS!! Thanks so much! I was looking to buy this shelving from IKEA soon, but making it myself will be even better. Plus I do not have an IKEA near me.
Where can I buy the bins for these shelves?
redhead_61
Thu, 09/22/2011 - 08:23
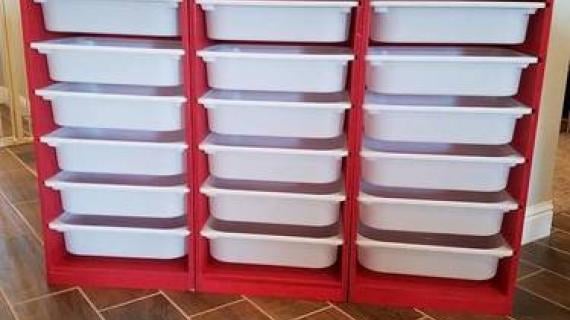
These are the ikea Trofast
These are the ikea Trofast bins meant for this very purpose. This is exactly what their design looks like. They will ship these bins to you just not sure how much. They are just about the cheapest option I have found and they are super sturdy!
As far as getting this without using a router, I would recommend the dado blade. That is how we made these cuts in my wood working class. You could technically make the cut without one, it would just take you about 4 passes moving your blade measurement in an 1/8" each time.
They have a melamine option that has glides on it, but I chose to do this so I could get exactly three out of one sheet of plywood.
taslytoo
Wed, 08/01/2012 - 16:15
Thanks
I was going to ask the same thing about the bins. Thanks for sharing your project! I love Ikea and had looked at buying that same system. Might just build one ;)
Guest (not verified)
Sat, 10/01/2011 - 17:25
Alternative Bins
Hi... great project! I absolutely have to build this. I've been wanting this system but there isn't an IKEA anywhere near me. So that presents a problem as far as bins, since I can't just go to IKEA and pick some up. They are not available online either (and the shipping would be crazy anyway). Does anyone have a suggestion for alternative bins? I was thinking any type of plastic storage container but then I noticed the edges on the IKEA bins are pretty prominent. I don't think a standard Rubbermaid (or other brand) container would hang or slide as well. Thanks!
In reply to Alternative Bins by Guest (not verified)
CassieD
Tue, 10/04/2011 - 19:26
I don't think are many good
I don't think are many good alternatives to the ikea bins, but someone correct me if I'm wrong. Ikea bins are made a of a really nice quality plastic. They're sturdy, yet slightly flexible, and I don't have any fear of the kids cracking them, even when abused.
The typical walmart Steralite bins are close to the size of these ikea bins (but quality is poor, I've broken several of those on my own). The shoebox size is about the size of the dark (not light) blue bins, the 'double shoebox' is about the same and the green/white bins, the (standard Trofast size) and the next size up Sterilite bins are about the same as the red/white one. That's actually how I figured out what size Trofast system & bins I wanted. I 'measured' my kids toys with those cheap ones first and then brought the list with me on the 1.5 hour trek to Ikea.
My advice is to spend the extra $$ and try buy the bins. You could check on ebay or hit up a friend or relative in a city to mail them to you. Or perhaps you can build your own bins out of wood or make just make shelves to slide and put the Sterilite bins on the. Hth!
In reply to Alternative Bins by Guest (not verified)
redhead_61
Wed, 10/05/2011 - 08:43
bins
I would just keep your eyes open. You can use whatever you want. You probably aren't going to find exactly the same measurements. And if you are cutting into the wood as the "slides" your measurements need to be the exact width. So you would have to adjust your plans
SummerND
Sat, 10/08/2011 - 11:53
Bins Alternatives
This takes some hacking from your dimensions, but I decided on using dish pans. We homeschool, so I was using them for art supplies, school work, puzzles and teaching tools, etc.
Dishpans are really sturdy but flexible and nearly indestructible, come in different sizes and colors and are super cheap ($1-4 each), plus they have handles at either end and are a manageable size for toddlers. Sterlite and Rubbermaid make them - http://www.sterilite.com/SelectProduct.html?id=344
Our local Wal-Mart has them in white, black, red, bisque and blue. The 12 qts are 15 5/8"L x 12 3/8"W x 6"H and the 18 qts are 17 3/8"L x 14 1/8"W x 7"H. But I picked up many white ones at the Dollar Tree for $1.
In reply to Bins Alternatives by SummerND
birdsandsoap
Thu, 10/13/2011 - 21:04
genius!
I was thinking the same thing: dishpans! I know right now all of the "dorm supplies" are clearanced out everywhere...Target and Walmart usually sell them in fun colors. I think I'm headed there next!
In reply to genius! by birdsandsoap
birdsandsoap
Thu, 10/13/2011 - 21:37
and restaurant supply stores!
and restaurant supply stores! I forgot about that. They have all kinds of sizes for food prep and storage.
In reply to Bins Alternatives by SummerND
CassieD
Sun, 10/16/2011 - 20:15
Good Idea
I know what you're thinking of and that sounds like it will fit the bill nicely! Good Idea!
taslytoo
Wed, 08/01/2012 - 16:18
Homeschool too
We homeschool too and that's exactly what I was looking at these for! I thought about the dishpans and wasn't sure how that would hold up. Thanks a bunch for sharing your measurements and idea!
Guest (not verified)
Wed, 01/18/2012 - 17:20
are there more details?
Where do the pocket holes go? What is the measurement from the bottom of the sides to the first routing bevel?
Guest (not verified)
Wed, 01/18/2012 - 17:39
are there more details?
Where do the pocket holes go? What is the measurement from the bottom of the sides to the first routing bevel?
lbs715
Mon, 01/30/2012 - 07:23
We have some of these from
We have some of these from Ikea and I was going to buy more but now think I will try to build them instead. My idea is that I want to take two of these and then attach a piece of wood to make a table top at a kids table height in between the two and make it a lego table!! Then my boys have storage on either side of them and a place to build! One thing about the Ikea storage bins..we have at least 20 of these and they are sturdy but for some reason the white ones seem weaker...we have broken a few of the white ones....I am sure they were very abused but the white ones do seem to not be as strong.
BenS (not verified)
Fri, 12/14/2012 - 16:33
Sketch-up File?
These are great plans! But I am going to need to adjust them in order to allow the smaller bins to go in the deep way rather than the wide way.
I noticed elsewhere on your site that you said you are a fan of using Sketch-up for doing your design work (as am I). Would you happen to have a Sketch-up file for this and be willing to share it so I don't have to start from scratch? I would be happy to provide my alternate design once it is complete.
Thanks!
Pengy88
Sat, 02/16/2013 - 09:56
adjustments?
how would you make the stepped one using a guide rail system instead of the routed grooves? I want to use them as steps to work in conjunction with the Kura style bed. I plan on building both pieces and the only power tool I have is a drill.
April0108
Mon, 09/02/2013 - 13:24
Plywood Size
What size is the Sheet of plywood? All I can find is 2'x4'
denogirl
Sat, 09/07/2013 - 08:31
Modified plans
I love this system, but the wall I have needs to hold toys and clothes and it's not very wide. There is however plenty of depth, so I wanted to design these so that the bins slide in the deep way instead of the wide way (so that the 11 1/2 in side is front to back) but I am so bad with figuring out the math! I also want to us square dowels on the inside instead of routing as I know these are going to get banged around and the cuts would weaken the end result.
My "plan" was to get some 3/4s plywood ripped into 16 inch pieces, and build my boxes. The interior width of each box would be 12 inches... that makes the outside 13.5 right? and since the depth would only be just shy of 16, I was going to put them all together on the wall, and use 1x2s to face the boxes, which should add just enough extra depth to keep the bins flush with the units. Then I just cut the 1/2 inch square dowels into 16 in pieces and place them 4 1/2 inches apart (I'd probably put the bins in and measure that way)
Alternately, to save on wood, could I just make one long unit with only 1 piece of wood for each wall? So that each "unit" shared box walls, with the dowels on either side? Or do you think that wouldn't be sturdy enough? I wish I could figure out how sketch-up worked.
Clemsontiger
Tue, 05/26/2015 - 13:16
Did you include the cost of
Did you include the cost of the ikea bins in your estimated cost of the project? It does not appear you did, so you're not really saving as much as you lead one to believe since I think the ikea storage bin units include the bins if you buy them direct from ikea...
In reply to Did you include the cost of by Clemsontiger
Ana White
Tue, 05/26/2015 - 18:30
Bins would not be included in
Bins would not be included in the cost of the project
jessicahallstr…
Fri, 01/08/2016 - 21:39
To buy three of this sized
To buy three of this sized trofast frame with bins included direct from ikea would cost between $108-$132 depending on if you chose the melamine type material or wood...yet you can build all three frames for $30 and spend another $30 or less to buy the bins to fill all three bringing the DIY version to $60 TOTAL or less...so its kind of a moot point that she didn't include the bin price in her $30 total cuz ikea doesn't give the bins away free with the purchase of the frames either you get charged the same whether u buy them as a set or individuallly...
qponqueen512
Mon, 12/30/2019 - 10:03
Trofast bins on sale
The Trofast bins are on sale currently (12/30/19) and you are saving money because just the 37"x20" storage shelf costs $60 for the plain plywood one.
Fantastic Furn…
Mon, 09/07/2015 - 06:17
Great project here! Detailed
Great project here! Detailed and simple.
flomaster
Fri, 05/20/2016 - 18:32
steps missing from plans
Ana White, it seems we are missing some assebly steps for this project. I built one of these a couple years ago and cut all the pieces to build a second one and now im trying to assemble the second one, but I don't see how everything attaches.
-=Jason=-
LD
Tue, 06/09/2020 - 20:14
Bin - Opaque vs Clear?
Hello,
Does anyone know if the white TROFAST bins from IKEA are clear or opaque? They look semi-clear in Ana's photo...which is great for seeing the items inside! However, on the IKEA website, the white TROFAST bins look very opaque - can you see anything through them?
Grateful for any help or advice!
Thank you,
LD
leahjones3
Sun, 12/13/2020 - 10:25
Just built these & added 3/4…
Just built these & added 3/4” iron-on veneer to the raw edges of the plywood. It really looks nice and disguises the fact that this was an inexpensive build! I also shortened it up by one 4.5” section to fit it under my son’s low loft bed. I also modified the plan to become an art desk for my visually impaired nephew. My sister is going to put clear bins so he can see his supplies. 2 of these “towers” will be the sides with a 2’x4’ desktop.