
For a few weeks now, the Ram has been saying, "When it comes time to pour the slab at the Momplex, I'm just going to hire someone."

<h1>Screed Boards</h1><div>When you pour a slab 44 feet wide, you can't just buy a 44 foot long 2x4 and screed the top of your slab after the pour. So in preparation for the pour, screed boards are placed with concrete stakes at the height of the finished slab. The screed boards are checked for level using a laser level. Then when you pour, you use the screed boards to determine level for the mud. Concrete is not like water, it will set up with high and low points if not properly finished.</div>

<h1>Openings </h1><div>Doorways and the garage openings are covered with blocking to keep the concrete slab inside the perimeter of the Momplex. We will later pour an apron in front of the garages, but that's a totally different day.</div>

<h1>Pump Truck</h1>And despite the great expense of a pump truck, we all concluded that it would be very necessary to pouring this slab. Remember, there is 12 feet of walls around the Momplex, and a concrete truck chute would not make it to the back of the Momplex. <div><br></div><div>The Ram was okay with wheel-barrowing to save some cash, but considering all the things that could go wrong, and that we appreciate our families help (and don't want to break their backs), we decided to spend the $165 an hour. Ouch, I know. But probably not as painful as a disastrous and stressful pour, wheelbarrow full by wheelbarrow full.</div><div><br></div><div>The pump truck showed up early in the morning. </div>

<h1>Here Comes the Mud!!! </h1><div>Now don't I know quite a few handsome men? That's my brother-in-law Jared, the Ram's cousin, Justin, and you know Uncle Bill and Grandpa Tim already. </div><div><br></div><div>The concrete is on it's way!</div><div><br></div><div>Grandpa Tim holds the hose and pours the concrete, Uncle Bill spreads the concrete out, and Justin and Jared are screeding the concrete. </div>

<h1>Easy Screedy</h1><div>With the screed boards in place, we can work in sections, screeding one third of the slab at a time. Can you imagine trying to screed 44 feet and keep it all level? </div>

<h1>Bull Floating</h1><div>Once the concrete is all poured and screeded, a tool called a bull float is immediately used to force down the aggregate and raise the cream. It's made of magnesium and you will want to bull float in the opposite direction of screeding.</div>

<h1>Jitterbug</h1><div>The jitterbug or concrete tamper used to further push the aggregate downward and ensures the slab is properly consolidated. </div>

Using the jitterbug and bull float, the concrete is worked until smooth on top. Remember, this is going to be a floor for the garage and bonus room.

<h1>Poured! </h1><div>We were very thankful for an overcast cool day, giving everyone more time to work on the slab. Around noon, the slab was poured and ready to be finished.</div>

<h1>Finishing Edges</h1><div>On a normal pour, finishing edges would be as simple as <a href="http://ana-white.com/2011/07/momplex/mud-footers" title="" target="_blank">the footers we poured </a>- where you just walk around the outside edges and finish them. But with the Momplex enclosed inside the ARXX blocks, by hand the Ram finished the edges.</div>

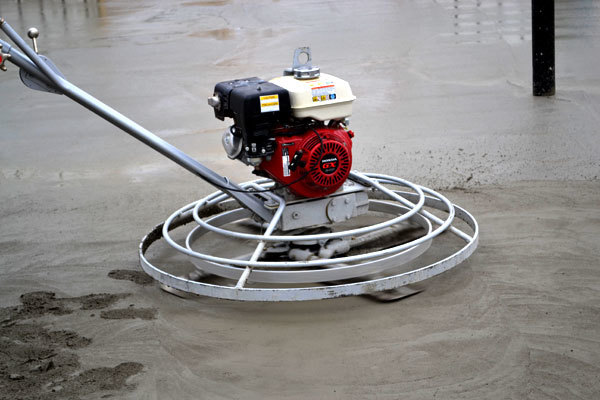
<h1>Power Screed</h1><div>Once the edges are all finished, it's time to finish the inside of the slab. A power screed is basically a giant fan that sits face first on the concrete, always pulling away from you. The more the concrete sets up, the more difficult using the power screed becomes.</div>

The power screed is what sometimes gives finished concrete the huge circular patterns.

Beats footprints.

The Ram power screeded all day. <div><br></div><div><img src="http://ana-white.com/sites/default/files/monolithic-slab-pour-1.jpg " width="470px" alt="" align="none"></div><div><br></div><div>He was pretty tired by the end of the day.</div><div><br></div>

And slowly, the finished slab become more, footprints less. And to our great relief, the slab is done, and done well. Special thanks to the help of our family.<div><br></div><div><img src="http://ana-white.com/sites/default/files/monolithic-slab-pour-19.jpg " width="470px" alt="" align="none"></div><div><br></div><h1>Gray Lining</h1><h1><span class="Apple-style-span" style="color: rgb(61, 50, 45); font-family: Arial; font-size: 13px; ">While concrete pours are the most stressful and expensive days at the Momplex, they also mean we get a few days off from working afterwards. Because you can't work on the slab when it's still curing. I guess even concrete has a silver - or at least gray - lining.</span></h1><div><br></div><div>PS - does anyone else think this photo looks like the Momplex without walls? Just the freshly poured slab? </div><div><br></div><div>Not even close. </div><div><br></div><div><br></div><div>There's no competing with nature.</div><div><br></div><div><br></div>
Comments
Pam the Goatherd
Wed, 09/21/2011 - 07:43
My muscles ache in empathy
mystique cream (not verified)
Sat, 01/05/2013 - 12:11
Reply to comment | Ana White
k g (not verified)
Wed, 09/21/2011 - 08:02
I'm soooo excited for you!
Jillian (not verified)
Wed, 09/21/2011 - 08:09
WOW!!!!!
Molly (not verified)
Wed, 09/21/2011 - 08:13
I was so looking forward to a
S J (not verified)
Wed, 09/21/2011 - 08:52
I must admit it. I am
Cindy from Indiana (not verified)
Wed, 09/21/2011 - 09:11
Great job!
LaurenWeiss (not verified)
Wed, 09/21/2011 - 10:28
foundation questions (lots of them. sorry!)
In reply to foundation questions (lots of them. sorry!) by LaurenWeiss (not verified)
Ana White
Wed, 09/21/2011 - 11:02
Hi Lauren thank you! I'm
LaurenWeiss (not verified)
Thu, 09/22/2011 - 08:37
Thank you so much for the
emmarosemc
Wed, 09/21/2011 - 10:45
Oooh i was waiting for this
Melody Wright (not verified)
Wed, 09/21/2011 - 13:28
Congratulations
Melody Wright (not verified)
Wed, 09/21/2011 - 13:28
Congratulations
Jess1777 (not verified)
Wed, 09/21/2011 - 18:42
Speaking of men in your family
Tsu Dho Nimh
Wed, 09/21/2011 - 20:10
No expansion joints?
In reply to No expansion joints? by Tsu Dho Nimh
Ana White
Wed, 09/21/2011 - 22:23
Hi Tsu, you don't miss
Kathy Krnak (not verified)
Wed, 09/21/2011 - 20:47
MomPlex
Maren (not verified)
Fri, 09/23/2011 - 08:22
A note to the future
birdsandsoap
Mon, 09/26/2011 - 01:18
can't get enough of the view!