


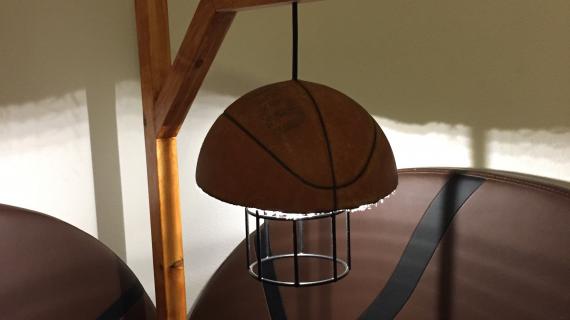
Quick and easy modern lamp plans that you can build for under $10 and with only 2 boards. Based off of the CB2 L MP pool floor lamp.
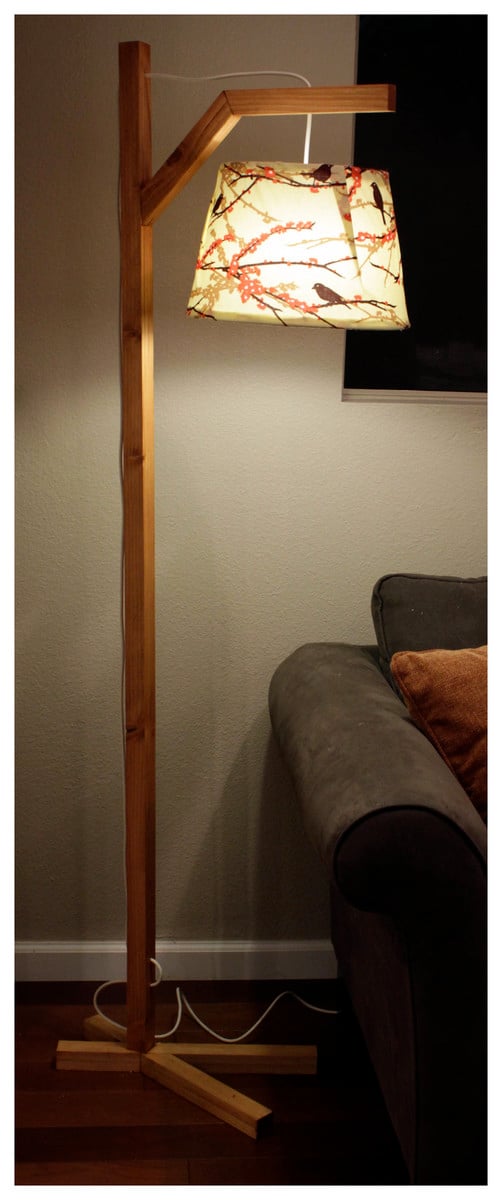
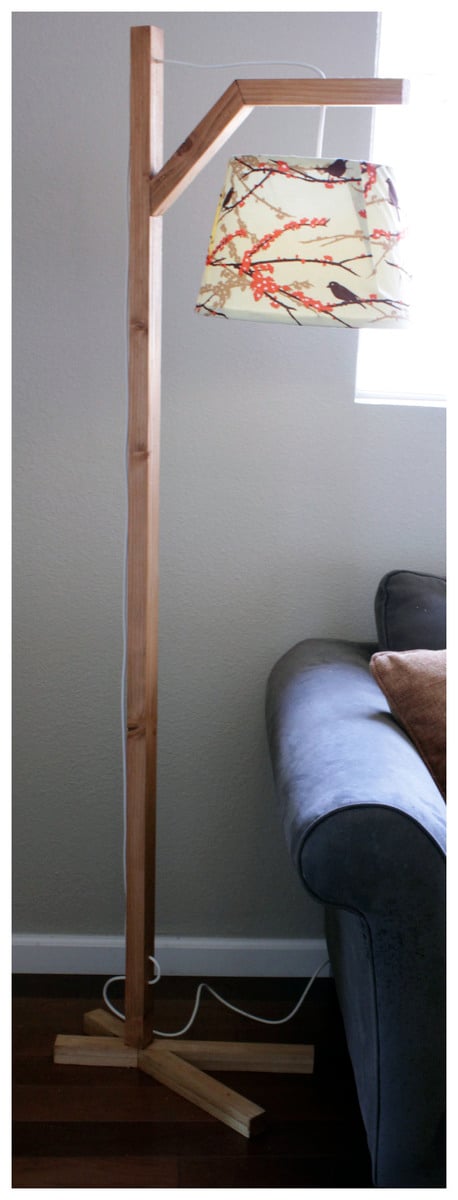
I fell in love with the L_MP Pool Floor Lamp from CB2, but definitely did not want to spend $200 to purchase it! I went to the store with my measuring tape and took down all of the dimensions and drew up some quick plans. I was thrilled to realize that I could make the entire thing with just two boards - and furring strips at that! So, with about $4 in lumber, a $4 light kit from ikea, a $2 replacement plug, and a lamp shade, I built my lamp. I loved the results so much that I wanted to share the plan with you guys so that you too could have this lamp at literally 5% of retail cost. Happy building!
Preparation
1 - 1x2 @ 8ft
1 - 2x2 @ 8ft
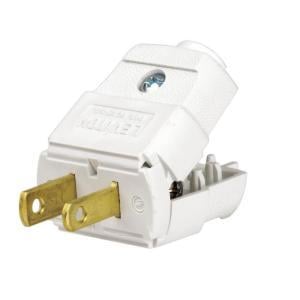
1 - Leviton 15-Amp 125-Volt Light-Duty Plug from Home Depot
1 - HEMMA Cord set from Ikea
1 - 1/4" drill bit
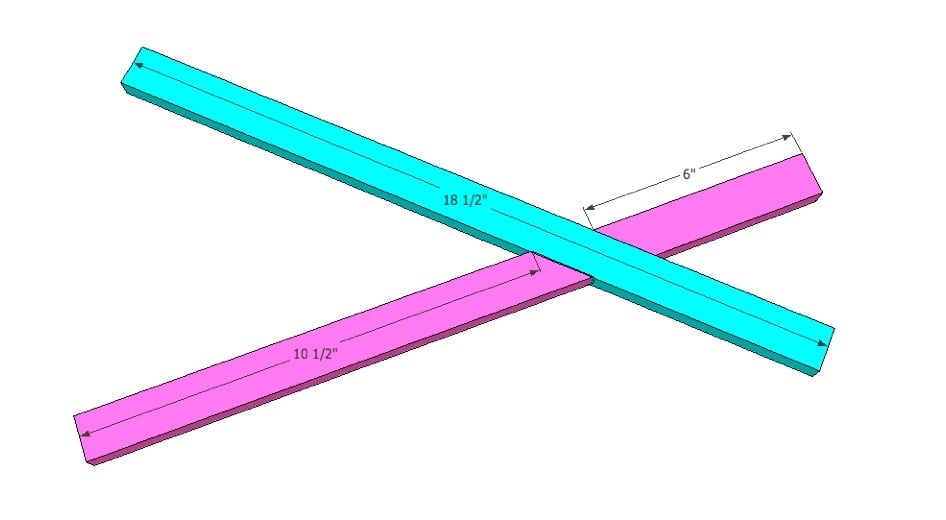
2 - 1x2 @ 18 1/2"
2 - 1x2, measuring 6" long from the long side with one end cut at a 45 degree angle
2 - 1x2, measuring 10 1/2" long from the short side with one end cut at a 45 degree angle
1 - 2x2 @ 69"
1 - 2x2, measuring 9 1/2" with one end cut at a 45 degree angle and the other at a 22.5 degree angle
1 - 2x2, measuring 11 1/2" from the long side with one end cut at a 22.5 degree angle
Make sure to use a miter saw to make your exact cuts. Angles on this project are very important!


Please read through the entire plan and all comments before beginning this project. It is also advisable to review the Getting Started Section. Take all necessary precautions to build safely and smartly. Work on a clean level surface, free of imperfections or debris. Always use straight boards. Check for square after each step. Always predrill holes before attaching with screws. Use glue with finish nails for a stronger hold. Wipe excess glue off bare wood for stained projects, as dried glue will not take stain. Be safe, have fun, and ask for help if you need it. Good luck!
Instructions
Step 1
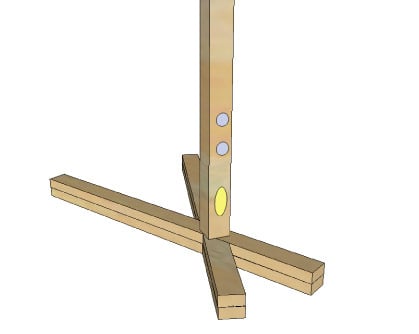
Align first set of 1x2s as shown in the diagram.
Step 2

Place second set of 1x2s on top of the first set with the long end going on the opposite path of the first one. Use glue and 1 1/4" finishing nails to attach. Try to only nail on one side, this can be your bottom so that you have less holes to fill :-).
Step 3
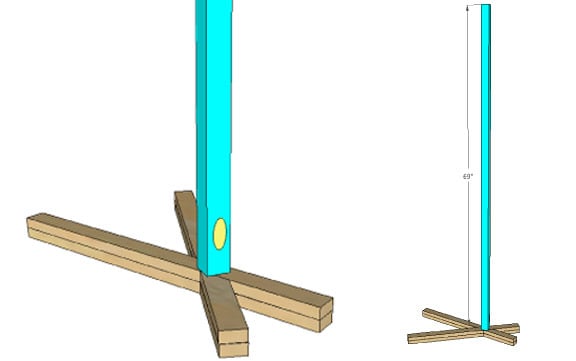
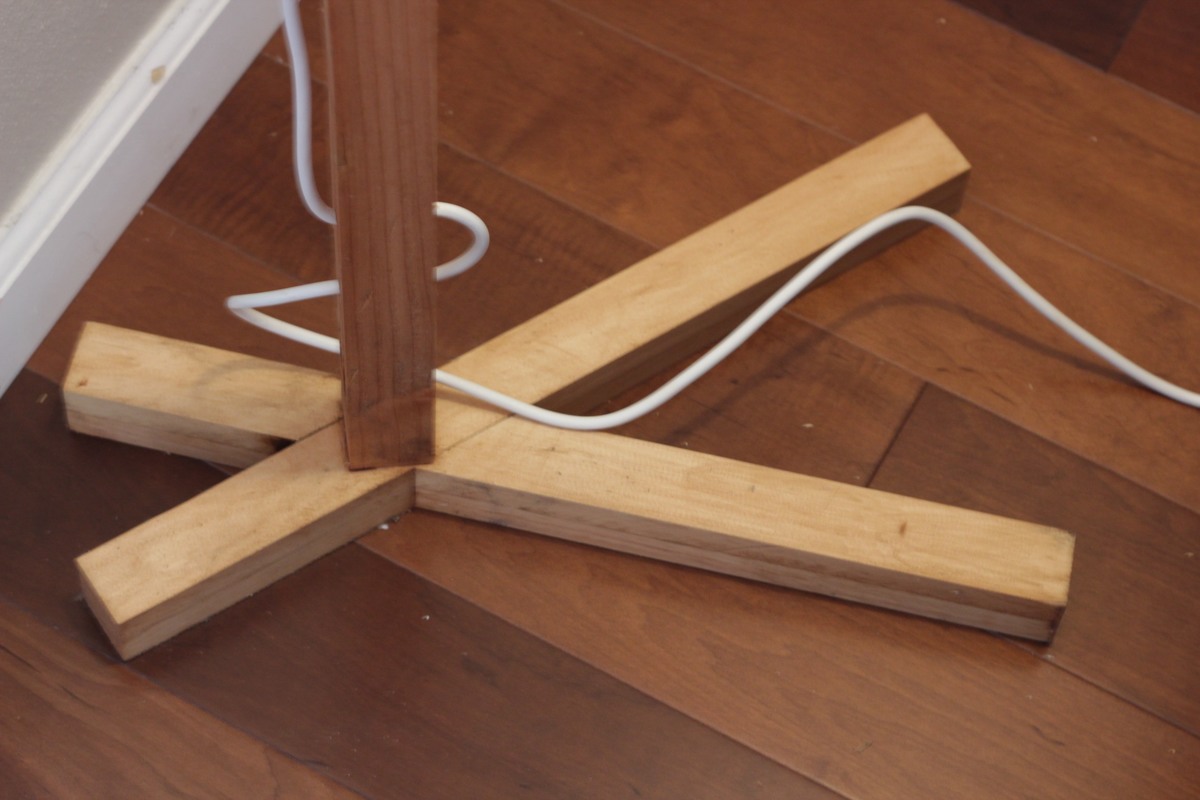
Attach long 2x2 to the base with your kreg jig set for 1 1/2" stock.
Step 4
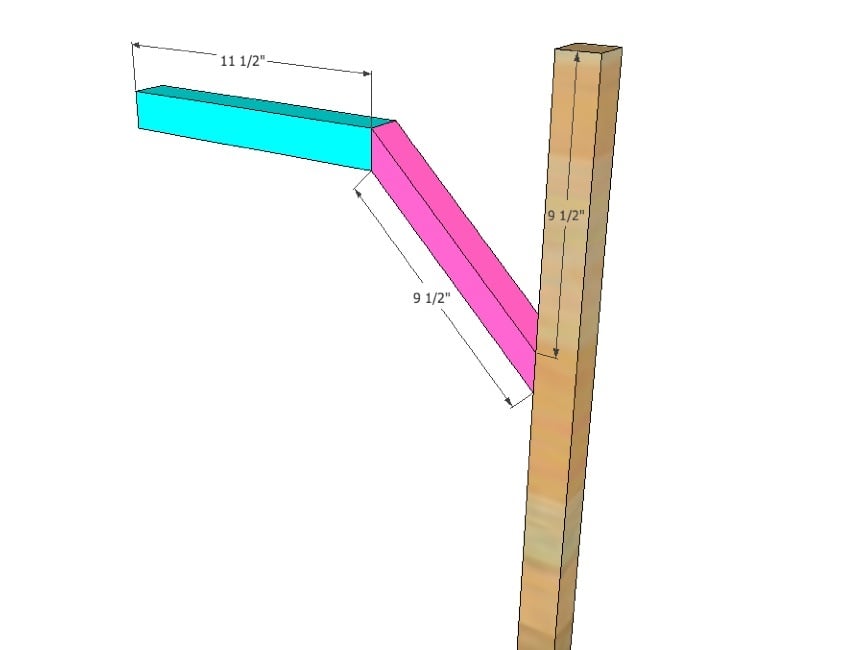
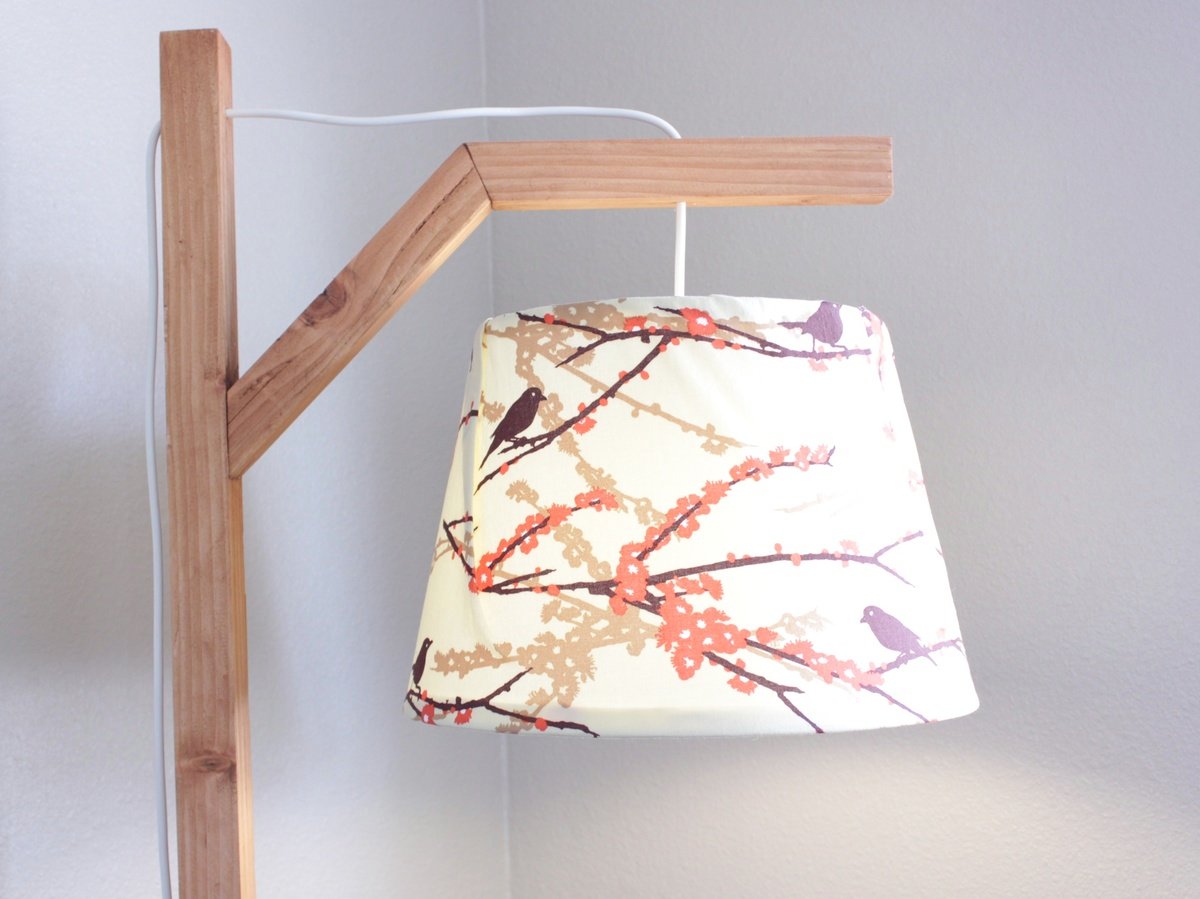
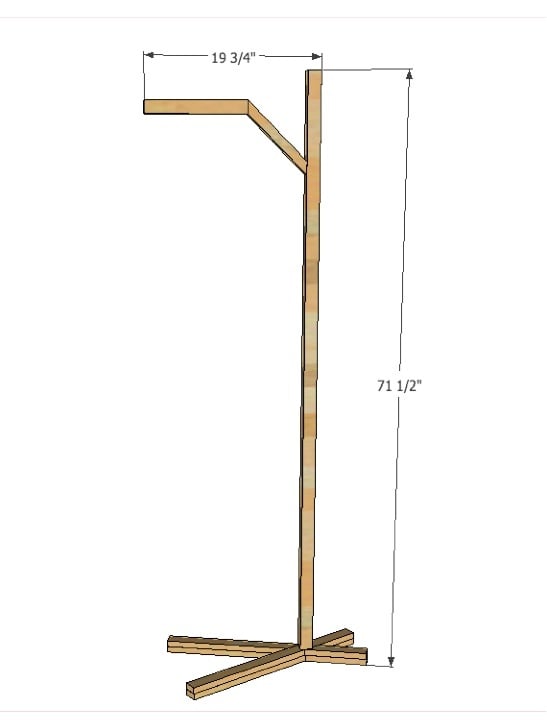
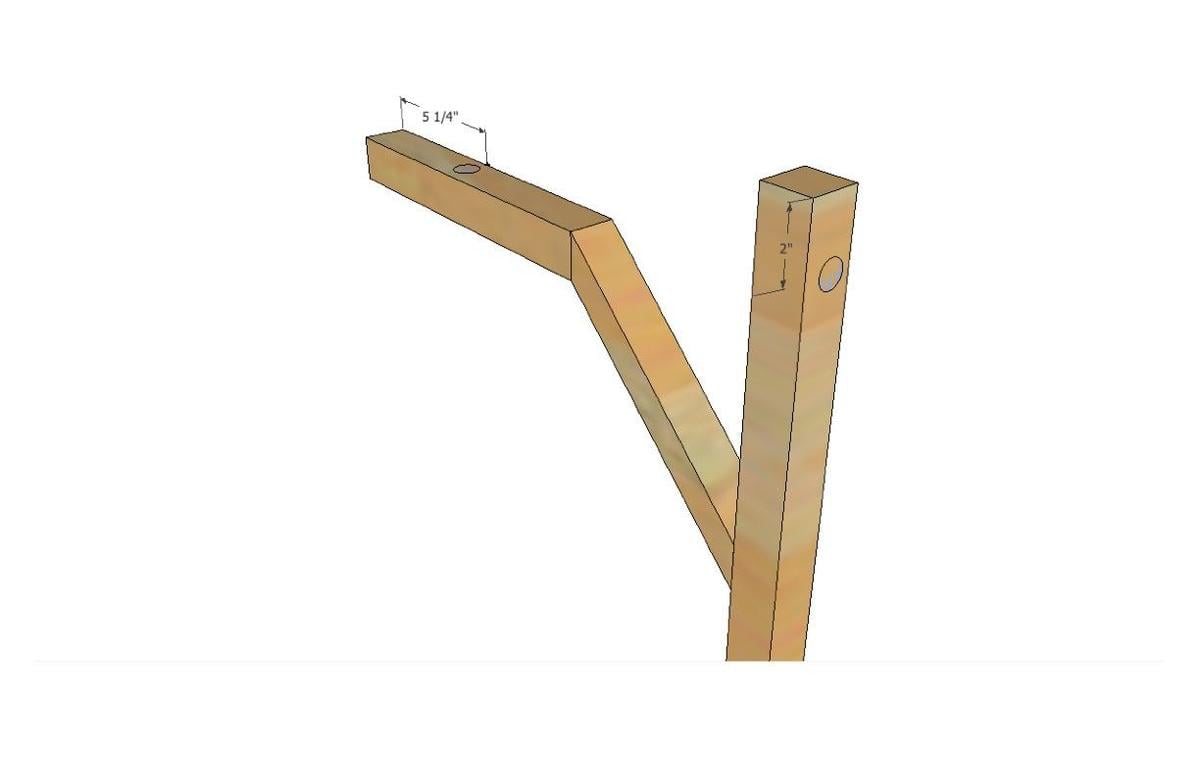
Attach lamp arm as shown in diagram. For the center piece, the end attached to the lamp base is cut at a 45 degree angle, and the end attached to the arm is cut at a 22.5 degree angle. Use your miter saw to get accurate angles. The end arm is also cut at a 22.5 degree angle to attach to the center piece and square at the end.
Step 5
Step 6
Use a 1/4" drill bit to drill holes in the back of the lamp toward the base as shown. This is where your cord will thread through. My holes were drilled 6" and 8" from the base, but you can spread them out further if you desire.
Step 7

Take your IKEA light kit and cut the cord end off. This will allow you to thread the cord through your lamp. Be sure to add your lampshade before threading through the wood. Please reference my final pictures for the exact way to thread the lamp.
Step 8
This is where it starts to get a bit tricky. Once your lamp is threaded, take your plug and uncrew it exposing the inside. You will need to strip a bit of the cord to expose the two white and black wires. There will be a "gage" side, this is where you insert your white wire. Make sure some of the copper insides are exposed. Insert your black wire with the copper exposed at the end on the other side. Close the plug casing over the wire and screw it together.
It is always recommended to apply a test coat on a hidden area or scrap piece to ensure color evenness and adhesion. Use primer or wood conditioner as needed.
Comments
StacieM
Tue, 09/06/2011 - 09:55
Very Cute!
Great job with the cost savings! Talk about saving money, that is a cute, simple, and cost effective home decorating solution. And I love that you can just change out the shade to match any season or decor. Thanks for the plans!
woodshopgal
Tue, 09/06/2011 - 10:36
Your shade?
Thanks for the post and neat idea! I am working on something similar, and hope to eventually post it.
Did you paint your shade? or use leaves, etc? Or did you purchase it finished like this???
Thanks
Rachel
In reply to Your shade? by woodshopgal
shanestric
Tue, 09/06/2011 - 10:43
Fabric
Hi Rachel! I actually used a super cheap $10 lampshade from IKEA and covered it with this fabric from etsy: http://www.etsy.com/listing/70718700/joel-dewberry-aviary-2-sparrows-in… . Lilybellafabrics is an AMAZING shop - I highly recommend her!
fethiye
Wed, 09/07/2011 - 14:56
Nice
Like what you did. Good job!
And I cannot get over that they are selling this for 199?! I wonder if anybody buys them.
panaluu2 (not verified)
Fri, 09/09/2011 - 10:11
I checked the canadian price
I checked the canadian price of this lamp. With shipping etc, its $413 to get one here. That should make you feel even better. How insane is that?
In reply to I checked the canadian price by panaluu2 (not verified)
shanestric
Fri, 09/09/2011 - 10:18
$413?!
Holy cow! $413?! That's crazy. It really was so easy to make - glad I could hopefully help people make it for a lot cheaper!
tivaclare
Mon, 09/12/2011 - 18:56
No Kreg Jig
I saw this lamp and fell in loooove. It is perfect for this little reading nook we are creating in our office with some nifty free-to-us sofa chairs. :-) This has the aesthetic and price range I need! :-)
Would it be possible to make this without a Kreg? If so, any tips?
My only completed projects thus far are the 10 dollar ledges and spa bench, so I'm still pretty "green", ha ha.
Unemployed at the moment, so not able to purchase any special tools, etc. Have to use what I've got, which are the basics, drill, jigsaw, circular saw, hand sander, etc.
In reply to No Kreg Jig by tivaclare
shanestric
Tue, 09/13/2011 - 09:59
Countersink Bit
Hi Tivaclare! Thank you so much for your compliments - so glad you like the lamp! I can't wait to see yours!
Yes, you could totally make this without the kreg jig. I just always kreg everything since it's such a secure method of screwing things together. But, you could countersink a hole through the bottom of the base and secure the post with a 3" screw. (If you don't have a countersink bit, i think they're just a few bucks at depot. Well worth it so that your base isn't then uneven from the screw.)
Happy building! Please let me know if there's anything else I can do to help!
In reply to Countersink Bit by shanestric
claydowling
Tue, 09/13/2011 - 12:38
Countersink bit alternative
If you can't lay hands on a countersink bit, or they prove cost prohibitive, you can buy a hand countersink at Harbor Freight. It's just a tool that looks like a screwdriver, and cuts a countersink in an existing hole. I have a couple of countersinks for my brace and bit, and I really like them.
Hilaryann
Fri, 12/16/2011 - 13:19
Nature Floor Lamp
I have a very similar lamp in my home office, which my Grandfather probably made in the 50s or early 60s. His allows you to position the lamp higher or lower on a stepped piece of wood, and I just love it.
kylieboo (not verified)
Tue, 12/20/2011 - 10:00
Attaching lamp arm
Just curious how you went about attaching the two angles of the lamp arm to each other, and then to the lamp post? Finish nails and glue? Or something else?
Can't wait to get started!
Outlander (not verified)
Wed, 12/28/2011 - 11:35
Great question......my pieces
Great question......my pieces are all cut and assembly will soon start. I bought a pocket hole jig just for this, so some fooling around will be required. I would like to know how the other pieces are attached, though.
In reply to Attaching lamp arm by kylieboo (not verified)
oldpaintdesign
Mon, 01/23/2012 - 12:19
Nails and Glue
Sorry - just saw your comment! Yes, that's exactly how I went about it. Use 2" finishing nails and wood glue, attach the arms together first and then attach it to the base with nails and glue.
I tried to go back and edit the post, but I can't find where to go about that - oops! Good catch, and good luck with your lamp!
glekapolis (not verified)
Wed, 01/02/2013 - 17:31
this is so perfect!
I saw that exact CB2 lamp a little while back. I have a pendant lamp that I found at a vintage store that I want to convert to a floor lamp and this is exactly what I had in mind! Now I know how to make it. The only thing is I live in an apartment and have no room to cut the wood on my own, so does anyone know if it is possible to get the materials pre-cut at a hardware store?
S_gham@19
Sun, 09/29/2019 - 00:02
I built this floor lamp…
I built this floor lamp following the instructions. However it falls down if it is on the carpet.
Is there anything I can do to make it fix the problem.
Thanks.
Shervin