


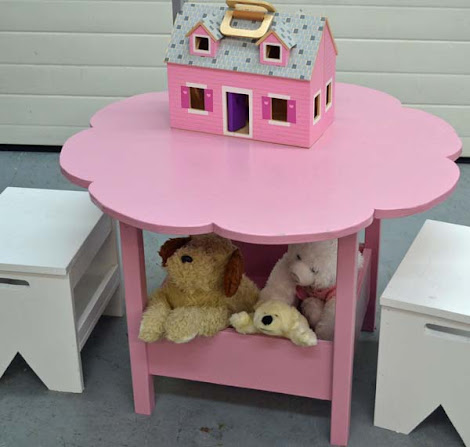
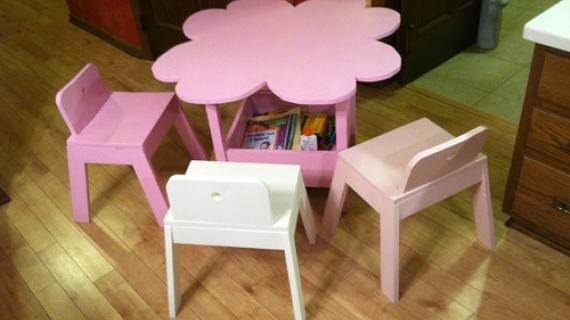
Free plans to build a kids storage play table with flower top.


Now for the Make 2 Challenge! Did you make two this Holiday Season - one to gift and one to give? Please share below. If you don't blog, you can link up to photos anywhere online, or even brag on this site and link up. Thanks for joining me in doing a little something extra this Holiday Season!

Preparation
1 - 2x2 @ 8 feet long 1/2 sheet of 3/4" thick PureBond Formaldehyde Free Plywood
1 - 3/4" plywood 31 1/2" x 31 1/2" (Used for tabletop) 4 - 3/4" plywood @ 2 1/2" x 15 3/4" (Aprons) 4 - 2/4" plywood @ 6" x 15 3/4" (Storage Sides) 1 - 3/4" plywood @ 15 3/4" x 15 3/4" (Bottom of storage compartment) 4 - 2x2 @ 22" (Legs)


Please read through the entire plan and all comments before beginning this project. It is also advisable to review the Getting Started Section. Take all necessary precautions to build safely and smartly. Work on a clean level surface, free of imperfections or debris. Always use straight boards. Check for square after each step. Always predrill holes before attaching with screws. Use glue with finish nails for a stronger hold. Wipe excess glue off bare wood for stained projects, as dried glue will not take stain. Be safe, have fun, and ask for help if you need it. Good luck!
Instructions
Step 1

When cutting plywood, it's best to make long, straight full cuts to conserve plywood and get your straightest cuts. First things first - cut with the grain of the plywood a strip 6" wide and 48" long. Then cut another strip with the grain of the plywood 2 1/2 wide by 48" long. Now from the remainder, cut crosswise for the tabletop, 31 1/2" long by approximately 40" wide. Cut your tabletop from this piece. Then from the remaining pieces, cut your storage bottom and the remaining pieces for the side and apron. Use the cut list for exact dimensions. The above diagram does not take into account saw blade widths - so measure, cut, measure, cut and so on.
Step 2

From the tabletop board, mark as shown above. I used a string line, but any long straight edge would work. Find the center and measure out 14" along each line and mark as shown in diagram above.
Step 3

Now simply draw arch shapes between each point, replicating the arch shape. I actually created pattern and used it to draw all of my petals. Once completed, carefully cut out with a jigsaw. Set aside.
Step 4

Now let's build the table base. Drill two 3/4" pocket holes on each end of each storage side, and attach to legs, flush to insides, with 1 1/4" pocket hole screws. What I like to do is build two leg sets made up of one side and two legs. Then it's a cinch adding the two final sides to create the base.
Step 5

Step 6

The aprons are a piece of cake! Just remember to drill a pocket hole facing upward in centers for attaching top in next step.
Step 7

The top will attach perfectly to the base. Line leg outside corners up with a inside point on flower top, center so all points are equal distance from leg corners, and screw base to tabletop.
It is always recommended to apply a test coat on a hidden area or scrap piece to ensure color evenness and adhesion. Use primer or wood conditioner as needed.

Comments
Milca (not verified)
Fri, 02/10/2012 - 21:32
Beautiful!
My oldest two daughters already have a crafts table to color/craft/schoolwork on. I will make this one for my youngest, so she has her little area for making messes. Perfect for using up the leftover paint from their newly redecorated bedrooms :) Thanks Ana.
spiceylg
Tue, 10/02/2012 - 12:56
sides of table top
Hello. This is adorable. If you used plywood for the table top, didn't it leave the sides rough? Did you band it or use wood filler at all?