

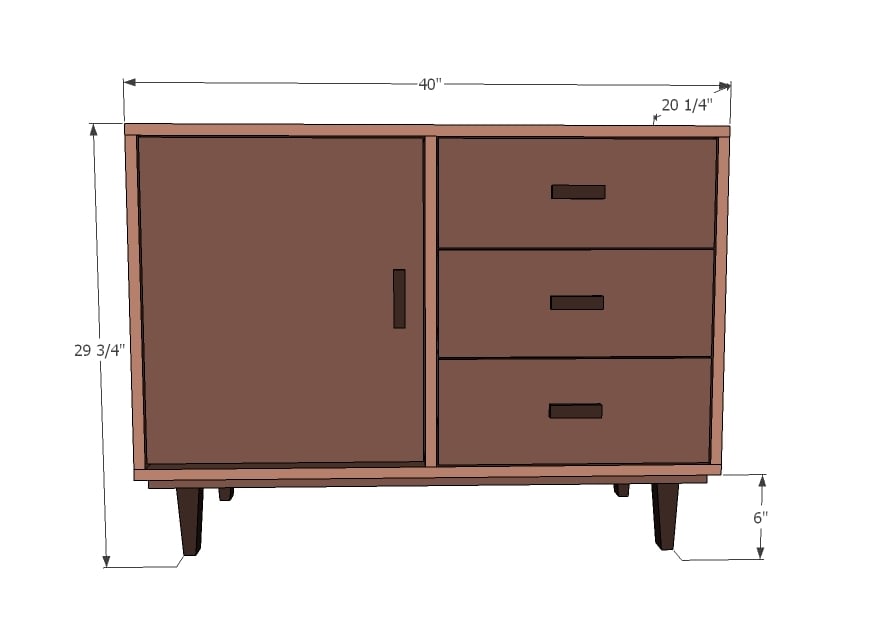
How to build a mid century modern console. Free plans include cut list, shopping list and detailed diagrams and instructions.
You've all heard my story, of how I had given up on ever having dreams of my own, and was probably destined to be one of those pushy parents living out their dreams through their children. Yep, that was me. A 28 year old stay at home mom, with big dreams, but no experience, education, connections, money, and living in remote Alaska, thousands of miles from any opportunity. Or so I thought.


Could I make a plan?


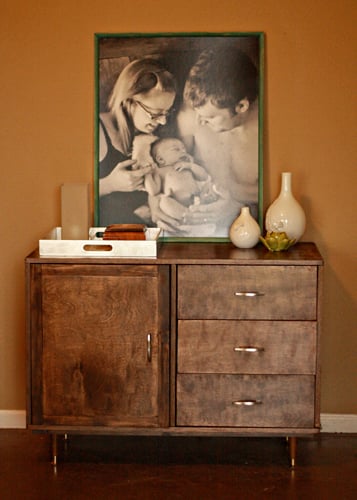
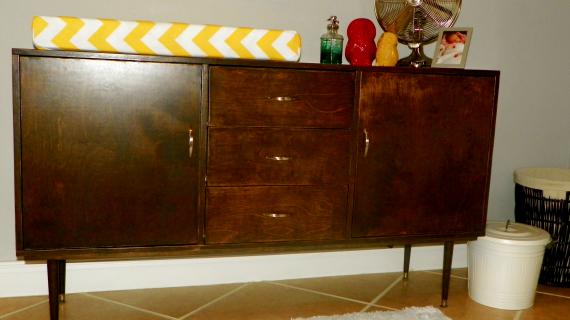
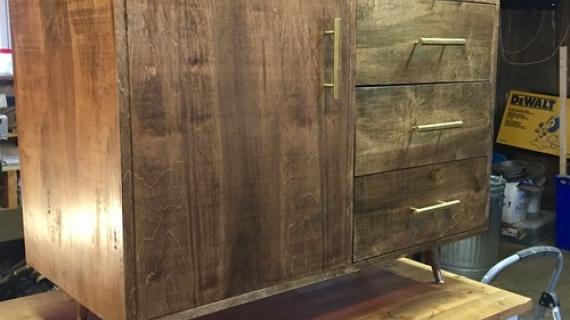
"We chose PureBond birch plywood, and stained it with Rustoleum Ultimate Wood Stain in Kona followed by 3 coats of poly. Oh, and my "decorative" door was an accident! I forgot to measure twice, cut once ;) I cut the door much too short, and had to compensate with scrap from the 1x2 pieces to create a frame with an inset panel. I'd say that it was a happy accident, it adds a bit of interest to the front! All the lumber and hardware came from Home Depot, with the tapered legs and edge banding from Lowe's. This is a beautifully styled, sturdy console, and I'm proud to say "I built that!" "
Preparation
1 – Sheet 3/4" plywood ripped into strips 20” wide
(The scrap strip can be ripped 7 1/4" wide to make
The drawer faces and replace 1x8)
2 – 1x2 @ 8 feet long
1 – 1/4" plywood – full sheet if you put a back on it
2 – 10 foot long 1x6 boards
1 – 1x8 @ 5 feet long OR use scrap plywood
4 midcentury modern feet
1 set euro style inset hinges
3 sets euro style white bottom corner mount drawer slides
4 knobs or handles
1 1/4” pocket hole screws or 2” screws
1 1/4" finish nails
2 – 3/4” plywood 20” wide x 40” long
3 – 3/4" plywood 20” wide x 22 1/4" long
2 – 1x2 @ 38 1/2" long
2 – 1x2 @ 15 1/2” long
1 – 1/4" plywood @ 40” x 23 3/4"
DRAWERS AND DOOR
6 – 1x6 @ 19 1/4" long
6 – 1x6 @ 16 3/8” long
3 – 1/4" plywood @ 17 7/8” x 19 1/4"
3 – 1x8 @ 18 5/8”
1 – 3/4" plywood @ 18 5/8” x 22”
Please read through the entire plan and all comments before beginning this project. It is also advisable to review the Getting Started Section. Take all necessary precautions to build safely and smartly. Work on a clean level surface, free of imperfections or debris. Always use straight boards. Check for square after each step. Always predrill holes before attaching with screws. Use glue with finish nails for a stronger hold. Wipe excess glue off bare wood for stained projects, as dried glue will not take stain. Be safe, have fun, and ask for help if you need it. Good luck!
Instructions
Step 1
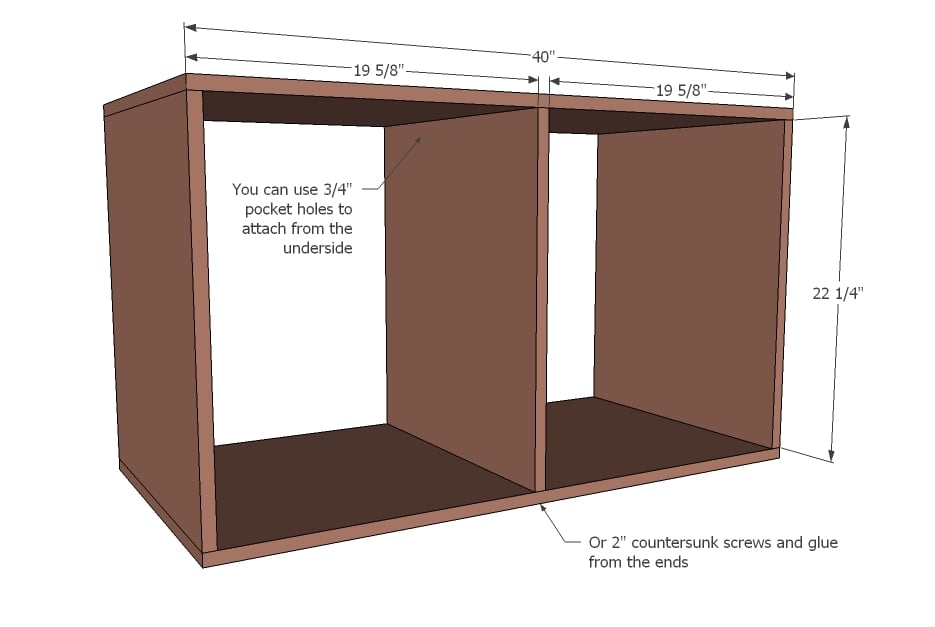
Build the box as shown in diagram. Make sure your cubbies are super square because we will be adding doors and drawers.
Step 2

Now add the decorative base trim.
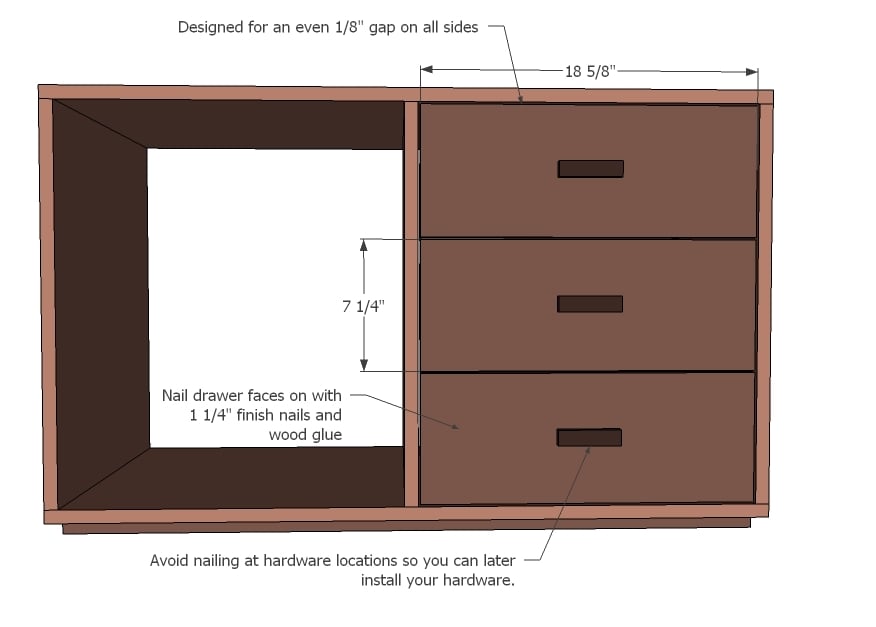
Step 3
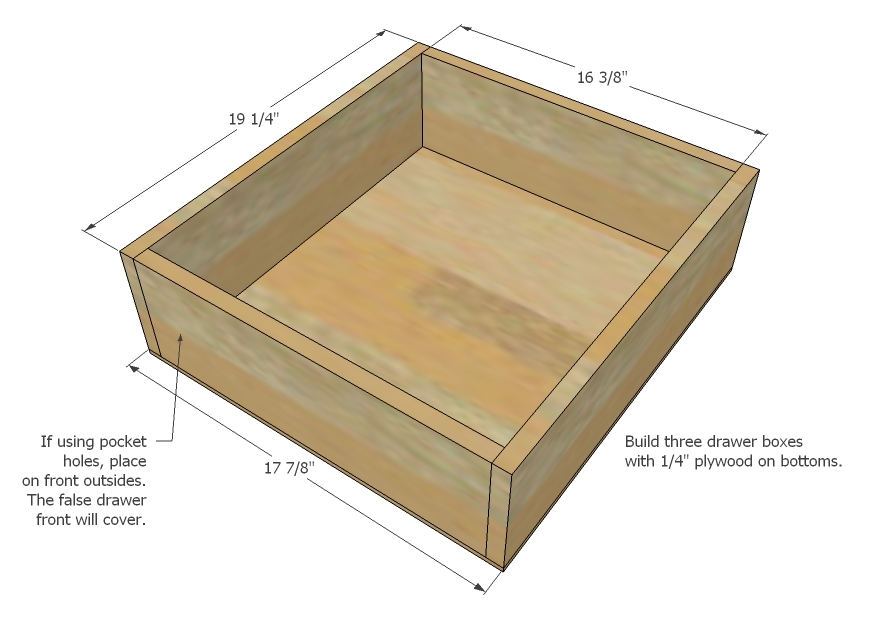
You will need to build three drawer boxes. Double check to make sure your drawers are 1" less in width than the opening to account for standard drawer slides.
Step 4
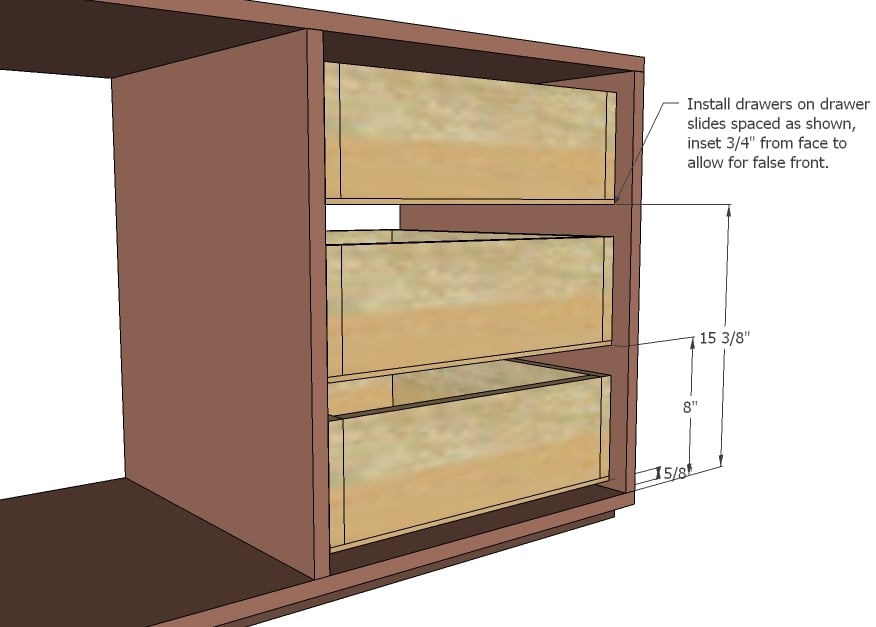
Insert drawers as shown in diagram with drawer slides.
Step 5
Step 6
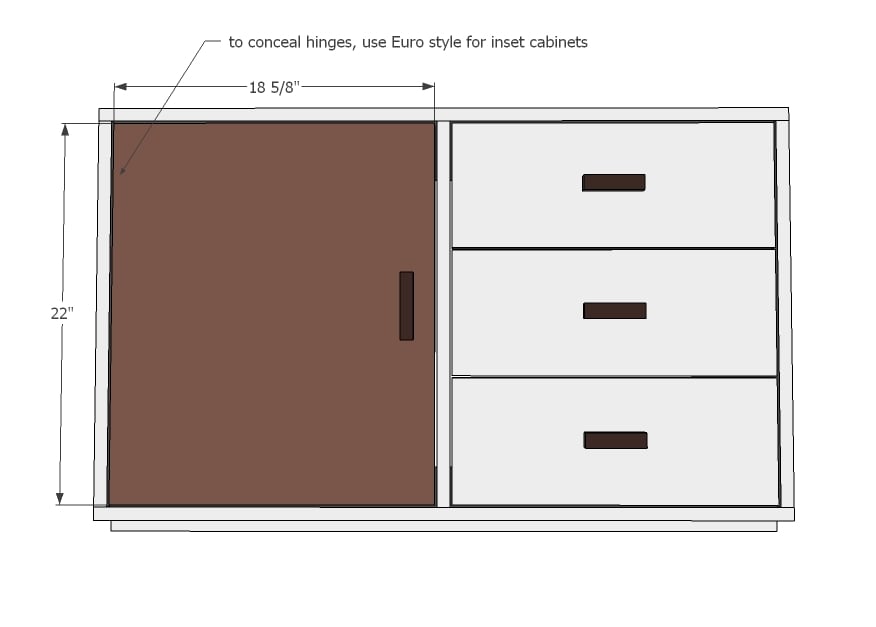
Now the door itself. I recommend cutting from the strips of plywood, keeping the grain running vertical with the door.
Step 7
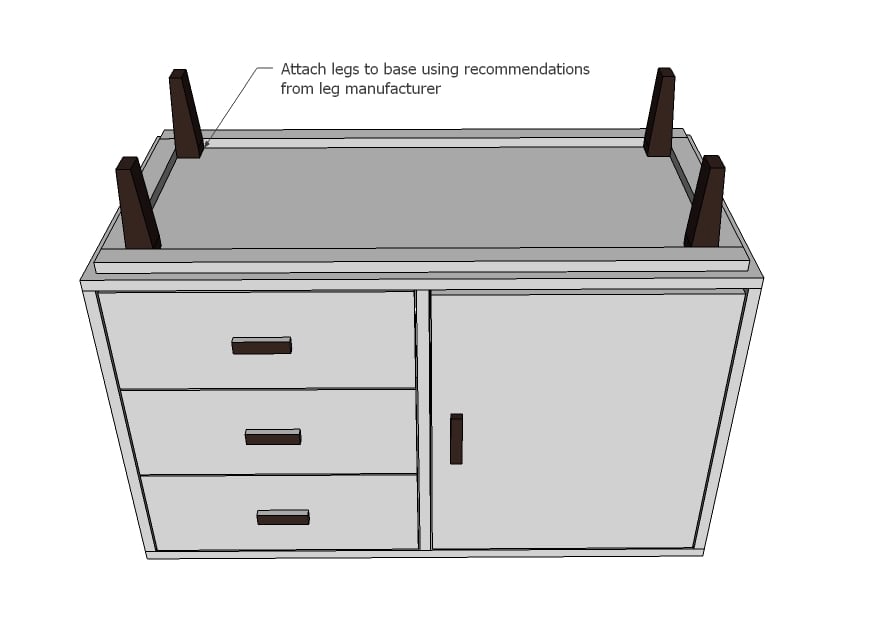
Now add the feet! And the hardware. This is the fun part!
Step 8
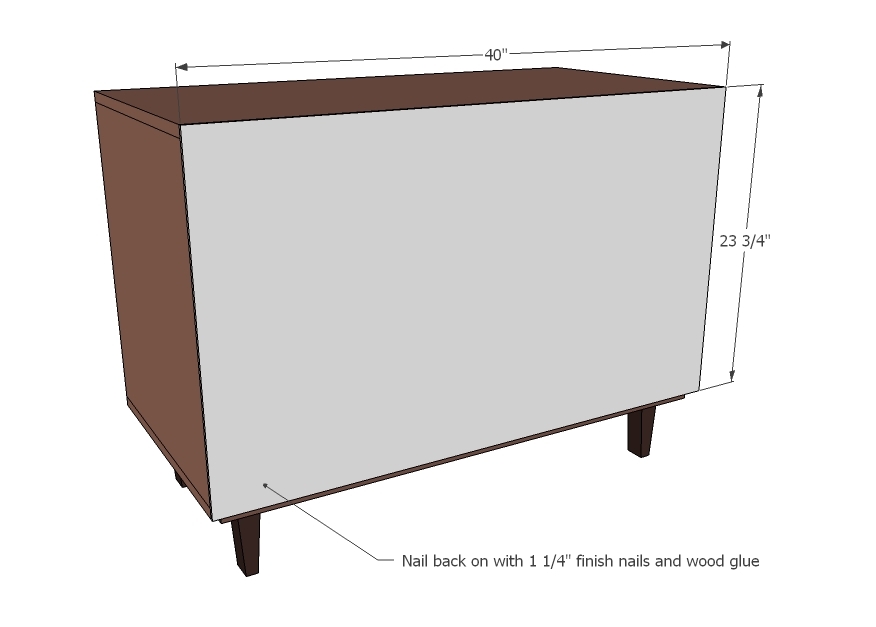
And finally the back.
You can also add shelves to the large compartment.
It is always recommended to apply a test coat on a hidden area or scrap piece to ensure color evenness and adhesion. Use primer or wood conditioner as needed.

Comments
Lady Goats
Tue, 02/28/2012 - 11:26
Awesome Job, Brooke!
And, Ana? WE HEART YOU!!!!!
Jenni (not verified)
Tue, 02/28/2012 - 11:42
Oh my gosh, I can't even tell
Oh my gosh, I can't even tell you how excited I am about this one. I've been scouring craigslist for months looking for a midcentury console/buffet table EXACTLY LIKE THIS. Thank you!!
Sara Jayne (not verified)
Tue, 02/28/2012 - 12:51
This would also make an
This would also make an awesome baby change table.
Sara Jayne (not verified)
Tue, 02/28/2012 - 12:51
This would also make an
This would also make an awesome baby change table.
claydowling
Tue, 02/28/2012 - 13:35
Midcentury Modern
Isn't a wildly popular style, but it's one of the styles I'm considering for my office at home. That or craftsman. In fact I just ordered a couple of craftsman design books for the office.
Cate888 (not verified)
Tue, 02/28/2012 - 14:28
I love this project! I think
I love this project! I think it would look better without the detail on the door but totally understand making the best of it.
Hannah Johnson (not verified)
Wed, 02/29/2012 - 08:05
Plans for longer width?
Do you have building plans for a longer with with at least a 60 inch width? I love this project, but want a longer console.
In reply to Plans for longer width? by Hannah Johnson (not verified)
claydowling
Wed, 02/29/2012 - 08:14
Easy conversion
For a very easy conversion, just add another door panel at the other end, and adjust the drawer width to match the new gap between the door dividers.
The traditional method for making a drawer isn't to use a measured drawing. They're cute, but not useful. For a drawer to look right it should be 1/8th inch smaller in both directions than the opening it fits into. So what you do is hold your drawer front/back up to the opening, mark the exact width with a very sharp pencil (0.5mm mechanical drafting pencil being ideal) or a knife, and then cut your parts. For traditional joinery the means of cutting and planing the ends would automatically remove about 1/8th inch from the width, but in this case you'll want to make the cut 1/8th inch in from the marked spot. Most easily done by making your cut on the inside of the marked line rather than the outside.
Daly @ ShadeSeed (not verified)
Thu, 03/01/2012 - 11:54
Great stuff
Would this construction be safe without adding the legs on it?
In reply to Great stuff by Daly @ ShadeSeed (not verified)
claydowling
Thu, 03/01/2012 - 12:19
Absolutely
This kind of furniture traditionally has legs, but there's nothing forcing it if you'd prefer to make it without the legs.
Whitney Bevis (not verified)
Wed, 11/07/2012 - 12:25
Poly application?
I read a tip to stain first then put the pieces of this project together to avoid drips but was wondering if that meant to stain and do all coats of poly, then build or to stain, build and then poly? Any help would be much appreciated as I am the queen of drips and clumps and am really trying to avoid them this time! Thanks!
Whitney Bevis (not verified)
Wed, 11/07/2012 - 12:28
Poly application?
I read a tip to stain first then put the pieces of this project together to avoid drips but was wondering if that meant to stain and do all coats of poly, then build or to stain, build and then poly? Any help would be much appreciated as I am the queen of drips and clumps and am really trying to avoid them this time! Thanks!
bethrose
Sat, 10/26/2013 - 14:01
newbie question
What size door slides should I be purchasing? 18"?