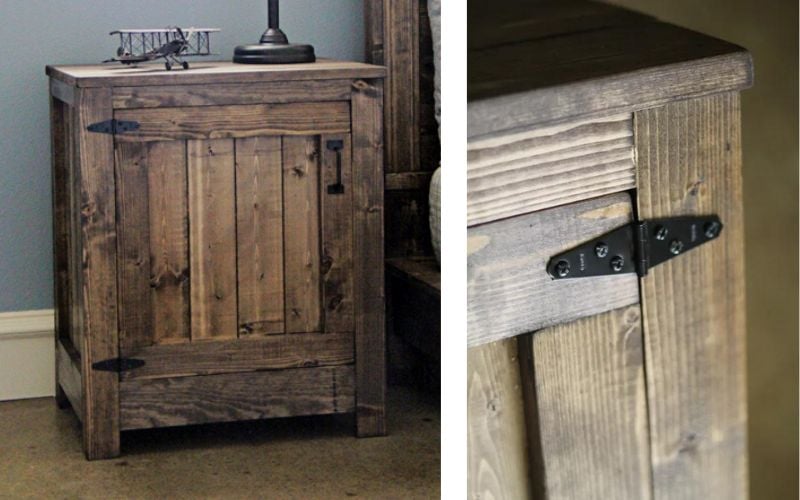


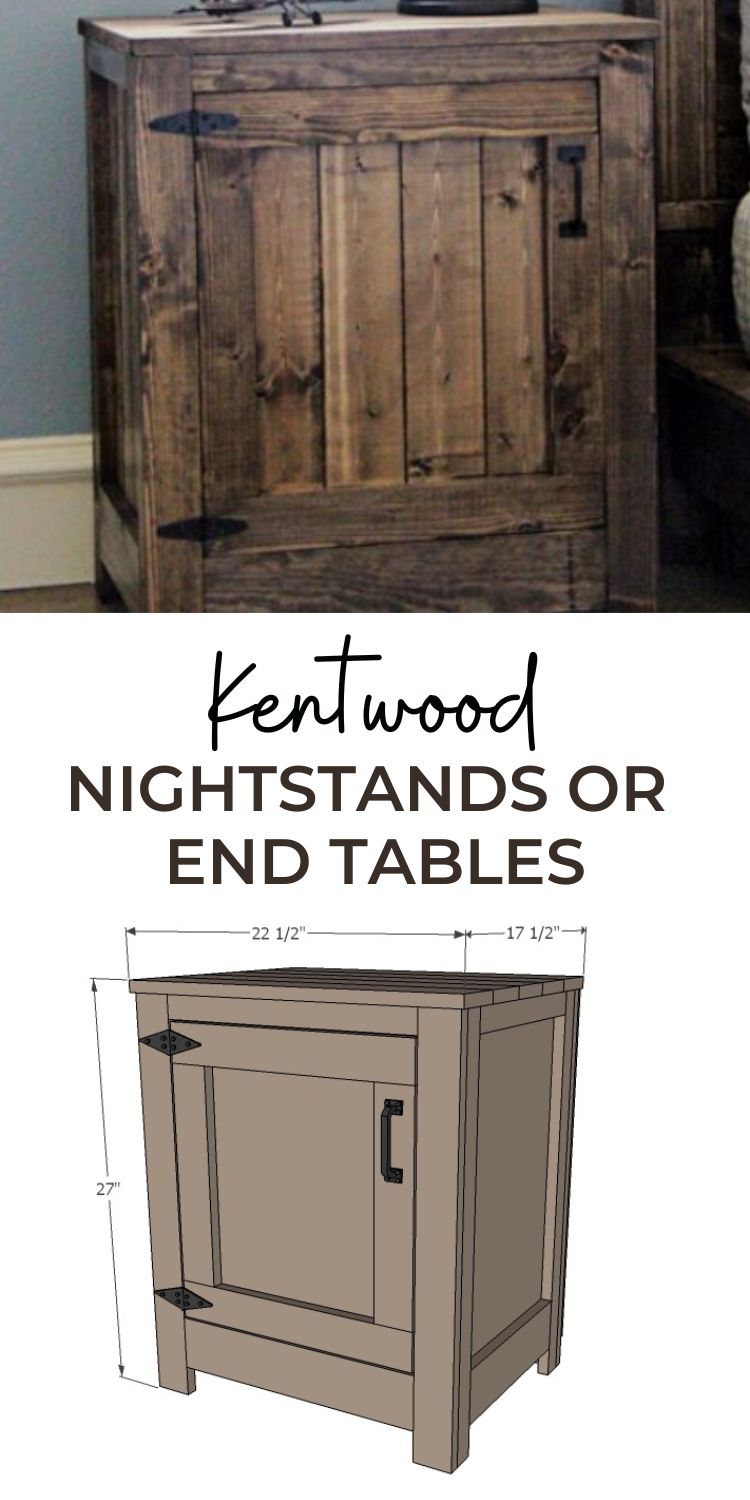
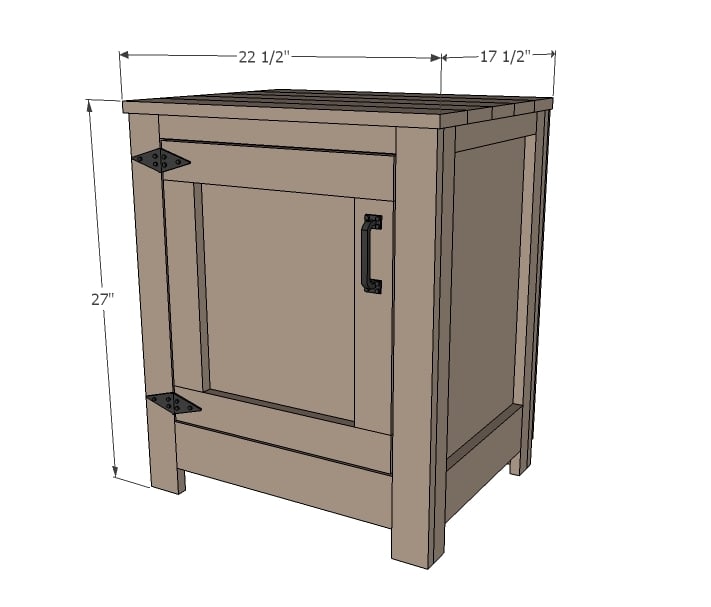
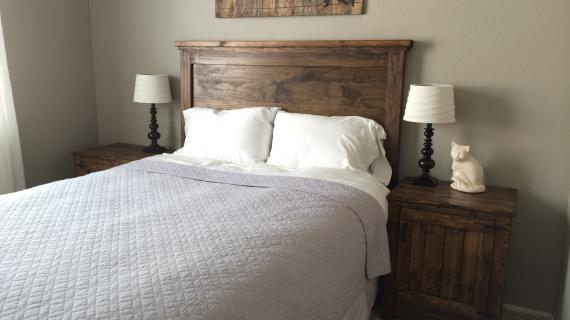
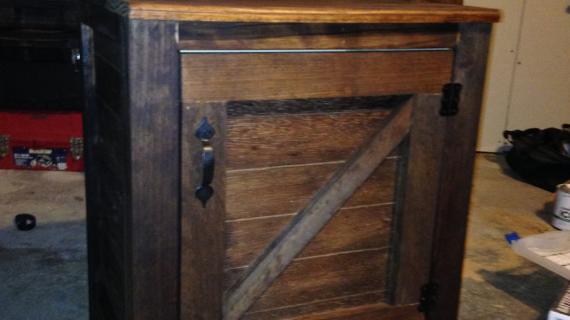
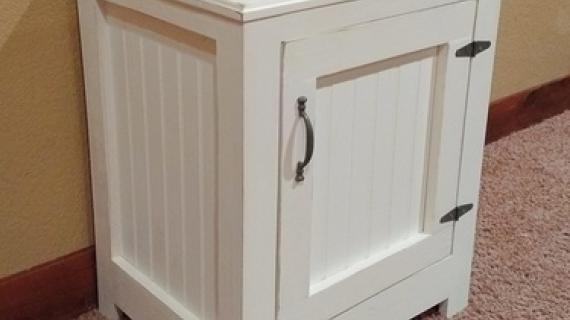
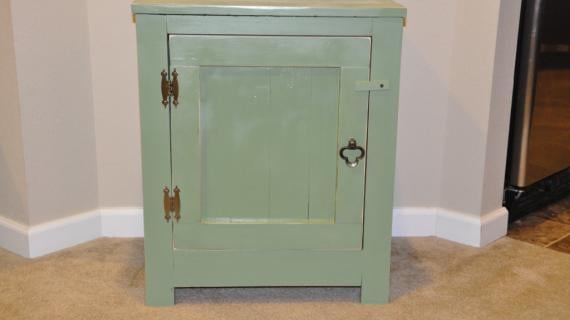
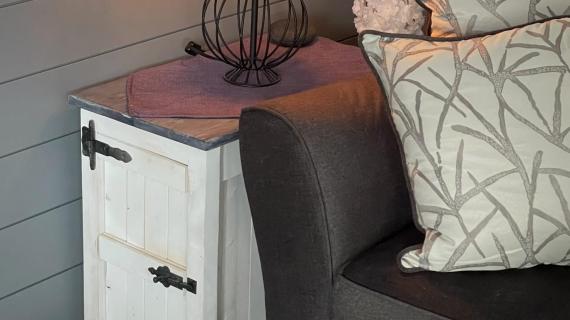
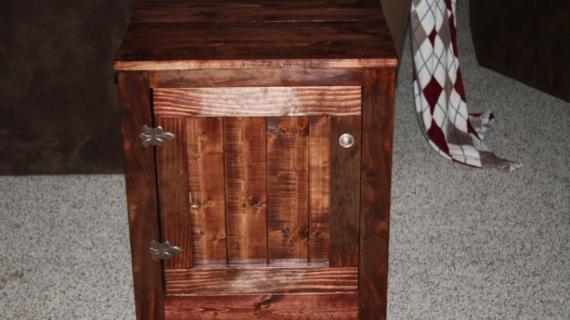
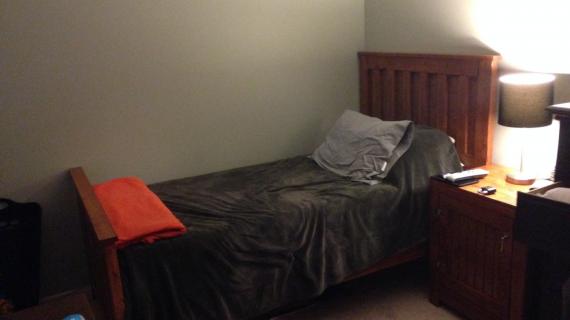
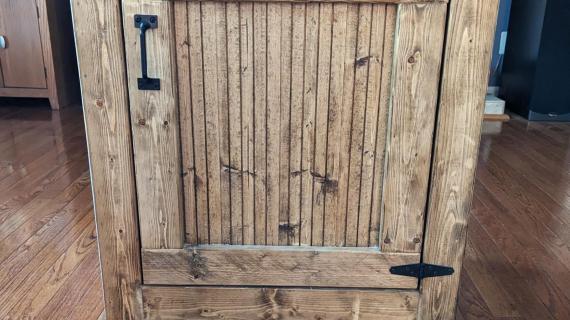
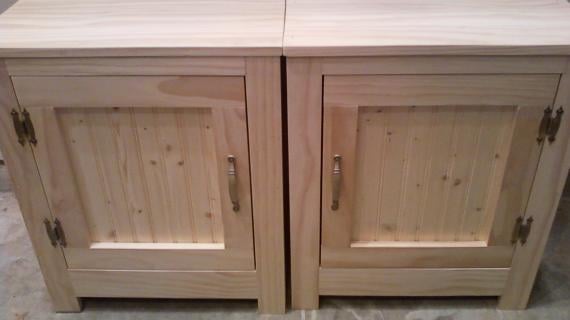
Free plans to build a cabinet style nightstand, bedside table or end table. This project features a planked wood rustic look, creating beautiful detailing in either a paint or stained finish. Simple hinges on a door create storage.
This plan is popular because it looks beautiful, is sized just right, is easy to build, can be built using scrap wood, and has a good amount of storage. Free step by step tutorial with detailed diagrams, shopping and cut lists from Ana-White.com

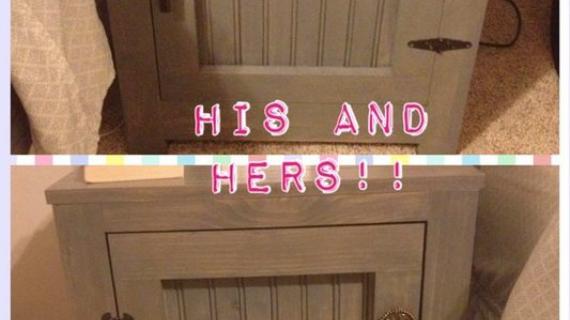
Pin For Later!
Preparation
- 2 – 1x2 @ 8 feet long
- 2 – 1x4 @ 8 feet long
- 2 – 1x3 @ 8 feet long
- ¾” plywood cut into 15 ¾” strips x 20 ½” long – one required, additional for shelves optional
- 1 – 48” wide by at least 22” high pine wainscoting panel for sides and door
- Optional ¼” plywood for back
- Set of 2 2” strap hinges
- Knob or handle
- Magnetic clasp
- 1 ¼” pocket hole screws
- 1 ¼” brad nails
- ¾” brad nails
- Wood glue
- 2 – 1x2 @ 12 ¾”
- 2 – 1x4 @ 12 ¾”
- 4 – 1x2 @ 26 ¼”
- 2 – ¼” paneling or plywood @ 15 ¾” 21 ¾”
- 1 – ¾” plywood @ 15 ¾” x 20 ½” (additional for shelves)
- 4 – 1x3 @ 26 ¼”
- 2 – 1x2 @ 17”
- 2 – 1x4 @ 17”
- 4 – 1x4 @ 22 ½”
- 2 – 1x3 @ 16 ¾”
- 2 – 1x3 @ 14”
- 1 – ¼” paneling or plywood @ 16” x 19”


Please read through the entire plan and all comments before beginning this project. It is also advisable to review the Getting Started Section. Take all necessary precautions to build safely and smartly. Work on a clean level surface, free of imperfections or debris. Always use straight boards. Check for square after each step. Always predrill holes before attaching with screws. Use glue with finish nails for a stronger hold. Wipe excess glue off bare wood for stained projects, as dried glue will not take stain. Be safe, have fun, and ask for help if you need it. Good luck!
Instructions
Step 1

You will need to build two sides. I recommend a Kreg Jig here for the easiest and best edge to edge joint.
Step 2
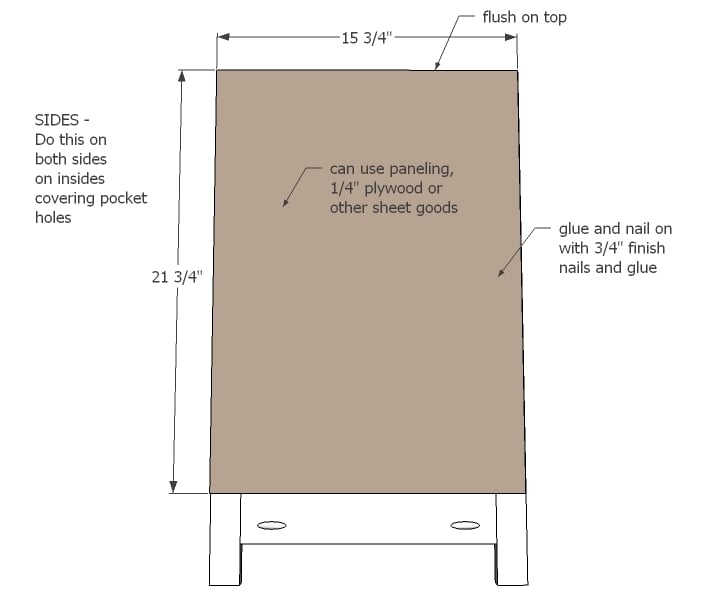
Then just cover the back in plywood or planking of choice. This completes to two sides.
Step 3
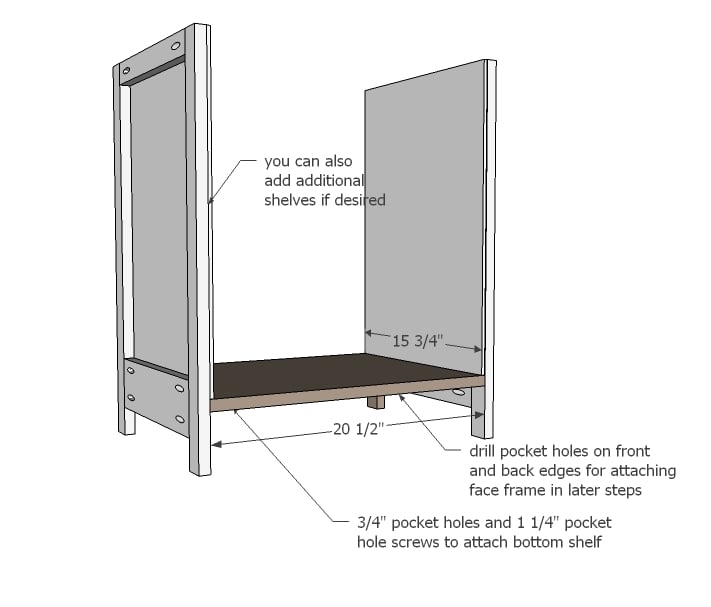
Now we add the bottom shelf.
Step 4
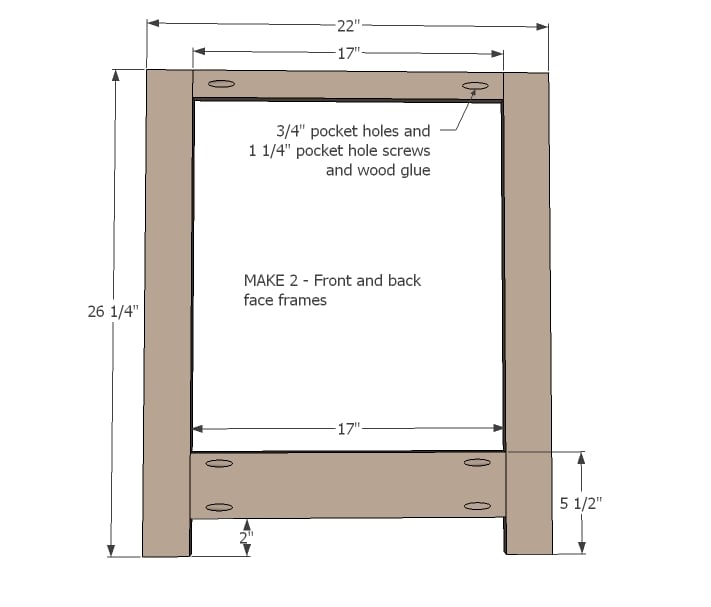
Next, build the front and back frames.
Step 5

Attach the four panels together.
Step 6

Build the top first, then attach to top.
Step 7
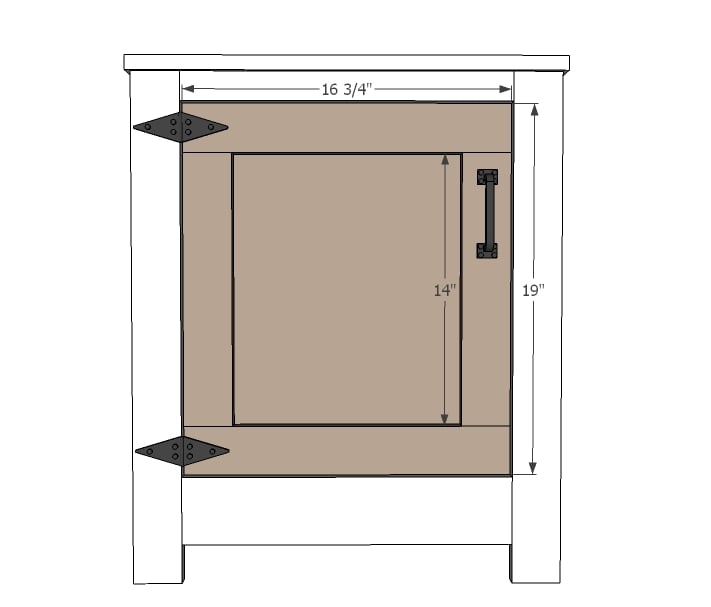
Next, build the door as shown here, and attach with hinges.
Step 8
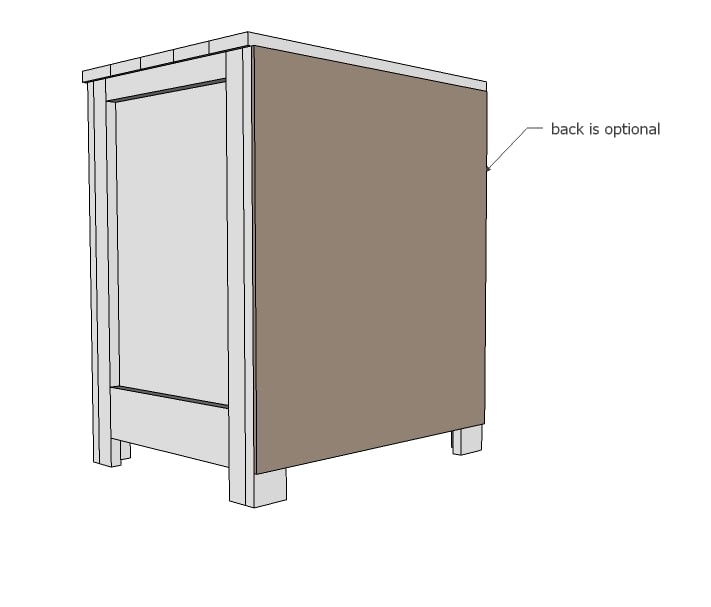
And if you want, you can add a back.
It is always recommended to apply a test coat on a hidden area or scrap piece to ensure color evenness and adhesion. Use primer or wood conditioner as needed.
Comments
Maria R (not verified)
Tue, 02/07/2012 - 10:47
Need these!
Ahhh! These are amazing!! I now have to find a place where they will go, immediately :). Great build!
JezzebellKing
Tue, 02/07/2012 - 11:25
Hello
This is beautiful OMG. Im thinking of doing the same for my sons. BTW could you please please give me the color of this finish because is the perfect color . please reply :) Great Job!!!
katiesommer
Tue, 02/07/2012 - 11:46
It is Rust-Oleum Ultimate
It is Rust-Oleum Ultimate Wood Stain in Dark Walnut.
dmcarwin
Tue, 02/07/2012 - 11:52
Beautiful! I am in love with
Beautiful! I am in love with this set, Thanks Ana and Whitney!
Cammy (not verified)
Wed, 02/08/2012 - 07:02
In the market for a new night table
This is perfect! I need a new night table for our guest room and you gifted us with a gorgeous design. Thank you!
Leener (not verified)
Fri, 02/10/2012 - 19:30
Question
Hi! This is absolutely gorgeous! I have a question though and I feel as though I am overlooking something that is either a) painfully obvious, or b) obvious to an experienced woodworker.
If you cut the front and back frame 1x2s and 1x4s at 17" and then attach a 1x3 to each side, wouldn't that make the table 23" across rather than 22" (17+3+3)? And for the side frames, if you cut the 1x2s and 1x4s at 12 3/4" and then attach a 1x2 to each side wouldn't that make 16 3/4" rather than 15 3/4" (12 3/4 +2+2)?
I just want to make sure before I do my cuts!
Thanks so much for this idea, I'm really looking forward to building it!
Guest (not verified)
Sun, 02/12/2012 - 10:18
Without studying the plan, I
Without studying the plan, I think what is throwing off your measurements is the nominal size of the wood. A 1x2 is 3/4 x 1 1/2 and a 1x4 is actually 3/4 x 3 1/2. Hope this helps!
Leener (not verified)
Fri, 02/10/2012 - 19:37
Question
Hi! This is absolutely gorgeous! I have a question though and I feel as though I am overlooking something that is either a) painfully obvious, or b) obvious to an experienced woodworker.
If you cut the front and back frame 1x2s and 1x4s at 17" and then attach a 1x3 to each side, wouldn't that make the table 23" across rather than 22" (17+3+3)? And for the side frames, if you cut the 1x2s and 1x4s at 12 3/4" and then attach a 1x2 to each side wouldn't that make 16 3/4" rather than 15 3/4" (12 3/4 +2+2)?
I just want to make sure before I do my cuts!
Thanks so much for this idea, I'm really looking forward to building it!
Guest (not verified)
Thu, 02/16/2012 - 21:17
Coating
Hi, this is absolutely beautiful. Thanks so much for the plan. The finish you've chosen works perfectly with the design. You mentioned the stain you used. Can you tell us what coating you used on top of this? Thanks again for the inspiration.
Guest (not verified)
Sun, 02/19/2012 - 15:24
Can anyone please
Can anyone please advise....what kind of wood to use? or did she use in this amazing design??? Thank you!
susyb1027
Wed, 02/22/2012 - 10:10
I had a similar idea but...
I had in mind something similar a while back but something that opens at the top that I can keep next to the toilet in the bathroom so it can hide the plunger and toilet brush. And then put a little latch on the door to keep my kids from trying to investigate it.
Guest (not verified)
Tue, 03/06/2012 - 18:21
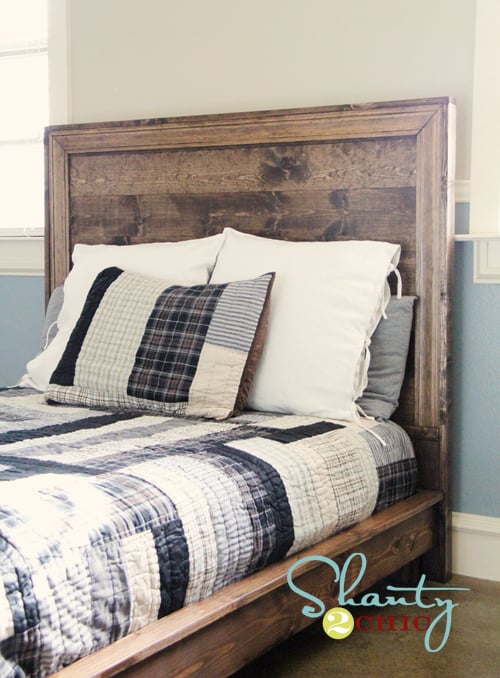
Headboard
Is there another link for the plans to make the headboard? The link here just opens up a thumbnail photo, but doesnt go anywhere.
Stacie (not verified)
Sun, 05/06/2012 - 11:43
I see the top is built from
I see the top is built from 1x4 cut to 22.5". The cut list calls for 4 boards, but the width of the 4 is only 14". The picture has 5 boards, which give the correct dimensions of 17.5" listed in the drawing. Is the correct number to cut actually 5, or did I miss something?
In reply to I see the top is built from by Stacie (not verified)
claydowling
Sun, 05/06/2012 - 20:07
Never trust a cutlist
You should never trust a cutlist completely unless you've made it yourself, and even then you should probably hold it suspect. They're tricky things. The most recent Popular Woodworking had a good article on how to create and use your own cutlist.
JenWoodhouse (not verified)
Sun, 07/08/2012 - 19:16
Just built a couple of these!
Yay! I just built a pair of these nightstands! I tried to register to submit a brag post, but it's not working properly. :-/
Anyway, here are my nightstands: http://jenwoodhouse.com/blog/2012/07/05/building-pair-knock-off-restora…
Randy Endemann (not verified)
Wed, 07/25/2012 - 10:41
Any way you can send me the Sketchup Plans?
Hi Anna -
I am getting ready to build this, but to make it fit our room, I have to reduce the height by about 2.5 - 3 inches. Before I go and redesign everything in Sketchup, is there any way you can email me your sketchup file to work from?
Thanks in advance!
Randy
Dan Pelton (not verified)
Fri, 11/09/2012 - 11:19
Other Plans
Do you have any other plans for other projects?
We loved this one.
tinkerjeannette
Thu, 01/24/2013 - 09:51
Toddler size
Hi Ana, just want to say that I LOVE LOVE your work !!!! I'm planing on doing the toddler farmhouse bed but I also wanted to make this adorable nightstand to go with it... would it be possible to make it smaller ? this is the first time, so I don't know how to start on doing the measurement adjustments for a smaller nightstand... please if you can help !!!
thanks :)
kongk
Tue, 05/21/2013 - 04:33
This is very educational
This is very educational content and written well for a change. It's nice to see that some people still understand how to write a quality post.!
Relationship Tips by T-Lad Web
Shell and Berto
Fri, 09/20/2013 - 14:44
HINGES!!!!!
I built these for my wife, I can't complete them because I can't find 2 inch strap hinges!!!!!!!! I'm going nuts, can't even find them online. I can find the silver color kind, but no black. Please reply with a link or something where I can get them. Thanks.
In reply to HINGES!!!!! by Shell and Berto
Jamaunzie
Fri, 09/20/2013 - 19:30
just paint the silver ones
just paint the silver ones flat black
StevenCooper
Wed, 12/11/2013 - 21:36
Attaching Top?
How did you guys attach the top? As it stands now I going to do it with countersunk 2" screws through apron from bottom.. any better ideas?
rockavee07
Mon, 03/17/2014 - 11:18
I was wondering what type of
I was wondering what type of wood was used for this project.
jempey23
Wed, 10/08/2014 - 14:41
Kreg jig
What happens if you don't have one? Any way to do these without one? Love these!!
bvstoker09
Tue, 12/23/2014 - 16:22
attaching top
How do you attach the top?
In reply to attaching top by bvstoker09
Ana White
Tue, 12/23/2014 - 18:15
Wood glue and finish nails
Wood glue and finish nails will do the trick.Take a look here for
additional tips.
http://jenwoodhouse.com/blog/
Renee514
Wed, 03/04/2015 - 06:48
Hinges
Where did you find the 2" black strap hinges? I am having a hard time finding those in store and on the internet. I love the look with the strap hinges.
Thanks
Ana White Admin
Wed, 03/04/2015 - 10:59
Hinges
Take a look at this post, a little spray paint goes a long way:) http://www.shanty-2-chic.com/2012/02/diy-restoration-hardware-nightstan…
If you can't find them at your store, check them out here too http://www.amazon.com/Stanley-Hardware-75-2990-Light-Hinges/dp/B00KXQHE…
Renee514
Wed, 03/04/2015 - 17:46
Thank you!
Thank you!
paulah96
Mon, 01/08/2018 - 15:42
Wainscoting
Where can I find the waintscoting panels? I've looked at Home Depot and Lowes and the only thing I found has a white coating on it. I've looked online and finding the same thing or I have to spend like $300 or more.
silverwhisper
Tue, 11/19/2019 - 17:27
Dimensions at each step
Hi, unless I am truly overlooking it, I don't see what dimension boards to use for each step. Can you please indicate somewhere on the illustrations or in the instructions what dimension boards are used? For example on the side frames, I can't tell from the photos or illustrations if it is 1x2 or 1x3, and I can't tell if the bottom piece is a 1x3 or a 1x4. Thank you
Cyrstal13
Tue, 09/08/2020 - 10:35
Door build plan
Is there a hyperlink for how to build the door?