


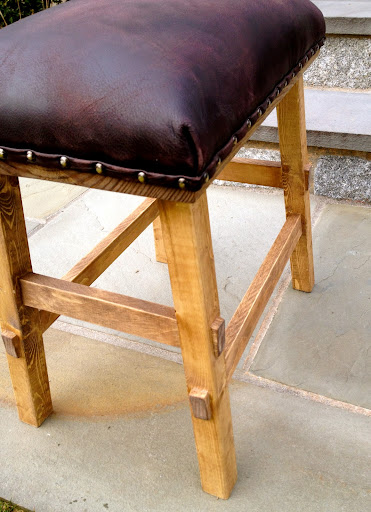
Free easy plans to build No Sew Upholstered Stools inspired by Pottery Barn Caden Nailhead stools.
I am so excited today to share with you plans for an upholstered rustic stool, very much inspired by Pottery Barn's Caden Nailhead stool, ringing up for as much as $230 for leather, made with pine legs. My question for you is what if you needed four?

Preparation
1 - 2x2 @ 8 feet long
1 - 1x2 @ 8 feet long
1 - 2x12 @ 18 1/2" long
Either use 1 1/4" pocket hole screws or 2 3/4" trim screws countersunk
4 – 2x2 @ 16 3/8” both ends cut parallel to each other, 5 degree bevel/5 degree angle off square, short point to long point
2 – 1x2 @ 8 5/8” Long point to long point, both ends cut at 5 degrees off square, NOT parallel to each other
2 – 1x2 @ 14 7/8” Long point to long point, both ends cut at 5 degrees off square, NOT parallel to each other
1 – 2x12 @ 18 1/2”


Please read through the entire plan and all comments before beginning this project. It is also advisable to review the Getting Started Section. Take all necessary precautions to build safely and smartly. Work on a clean level surface, free of imperfections or debris. Always use straight boards. Check for square after each step. Always predrill holes before attaching with screws. Use glue with finish nails for a stronger hold. Wipe excess glue off bare wood for stained projects, as dried glue will not take stain. Be safe, have fun, and ask for help if you need it. Good luck!
Instructions
Step 1

Marking Legs
To cut legs accurately, set miter saw for a five degree bevel and five degree angle. Cut just enough off the end of the 2x2 to cut the angle into the end (less than 1”). Then just slide the board down 16 3/8” (long point to short point, so one end to the next along the edge) and cut. Slide down 16 3/8” and cut again. The slide and cut two more times until all four of your legs are cut. Once cut, line up so legs splay outward as shown in diagram. Mark the inside corners. With a five degree bevel/angle, you’ll be glad you did this – it can be hard to tell what way the legs go!
Step 2

First Side Stretchers
Lay a board – even just the seat – down on your work surface. With the inside corners of legs facing upward and inward, rest on work surface, meeting up with the gray board. NOTE: on back edge, will not meet up because of angle cuts. Measure down and place top stretcher. Mark joints clearly, marking outside joint as well. Predrill holes – pocket holes would be great here – and attach with screws and glue. TIP: Check the bottom distance and top to make sure your legs are properly positioned. Repeat on opposite side.
Step 3

Side Stretchers
It’s going to get a little tougher here because now we are working with a 3d stool base. And easy way to do this – especially if you are making multiples – is to cut a scrap 2x board (how about leftovers from the seat boards?) at 5 5/8” long. Then you can rest under the stretcher as you prepare your joint. Predrill holes – again, pocket holes would be great on the insides – and attach with screws. If you are using countersunk screws, you will need some long ones! NOTE: If you are using countersunk screws, you may consider using 2x2s for the stretchers just to give you a little board to screw into. This would not change the cut list.
Step 4

Top
Mark location of legs and predrill holes. Attach with screws and glue.
Step 5

Step 6

Top Upholstery
It is always recommended to apply a test coat on a hidden area or scrap piece to ensure color evenness and adhesion. Use primer or wood conditioner as needed.
Comments
Guest (not verified)
Wed, 02/08/2012 - 11:44
LOVE!! I would love plans
LOVE!! I would love plans for counter height stools though. PLEASE!!
claydowling
Wed, 02/08/2012 - 11:46
False Ends
A good tutorial for somebody to make (probably me, since I'm beefing about it) would be how to make this with actual through tenons. You'd have an incredibly strong stool and I don't think it's any harder than what's shown. You just need a different (cheaper) set of tools.
The stool looks great though. A new contribution to the momplex?
Tsu Dho Nimh
Wed, 02/08/2012 - 14:46
Yes, Clay, You are nominated
If it's that easy, just show us how. :)
dananryan
Sat, 02/11/2012 - 07:42
tutorial please!!!
I would love a tutorial on tenons. Are you going to make one? That would be awesome!!!
viola
Wed, 02/08/2012 - 12:39
love and counter height
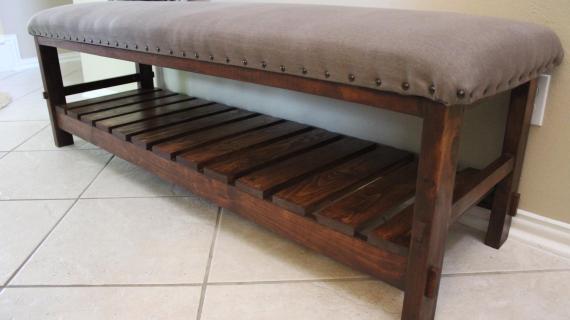
Love this stool and would love counter height...This would be great as a dinning or front hall bench also...Thank you...
Guest (not verified)
Wed, 02/08/2012 - 15:01
I learn something here every day
Hiding the screws under the fake ends is a nice touch SO SMART Thanks Ana you did it Again.
Jay @ Wilbur Road (not verified)
Thu, 02/09/2012 - 12:12
I am miaking a pair!
How in the heck did you know that I was in LOVE with these stools? I am thinking they are perfect for around the coffee table; scrabble games and puzzle building!
I think two would fit the bill, don't you?
Ana, you are amazing. Thank you, thank you, thank you!
Tal B (not verified)
Sat, 02/11/2012 - 07:10
Bar stools would be great!
Love this! I would love to know the height/plans for bar stools. Thanks for all your amazing plans and inspiration.
Linda
Sat, 02/11/2012 - 08:19
Counter height stool plans needed
I would like very much to have plans for counter height stools. Thanks for all you do, Ana!
Sunshine_4_jt (not verified)
Sat, 07/21/2012 - 18:39
Plans for Counter Height?
I also LOVE this stool, but will need to be three at counter height for the back side of my kitchen Island. Does anybody know where we can find the correct measurements for counter height at, and does it change the angles any?