
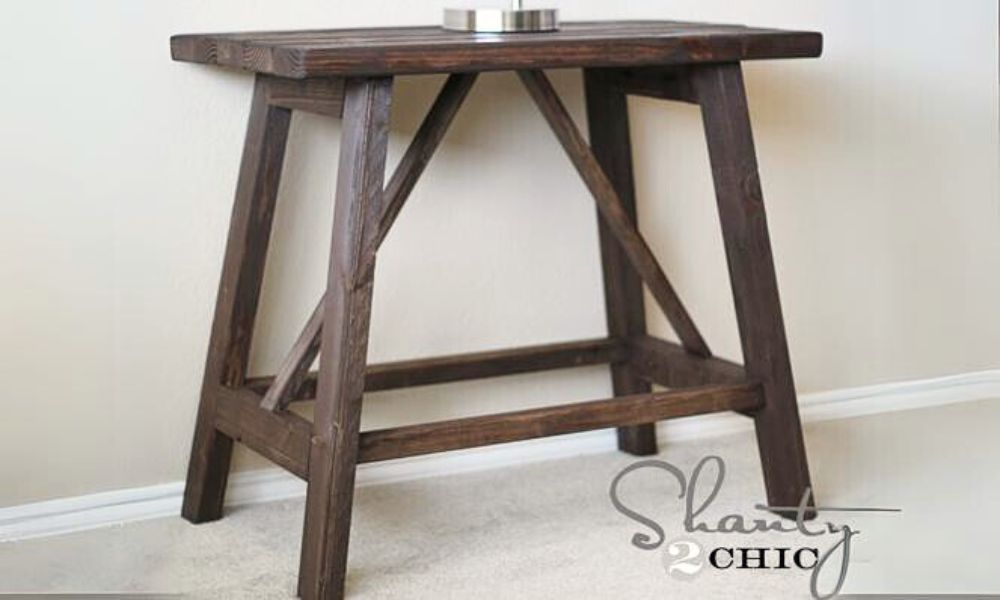

Build this end table! DIY this end table with free plans from Ana White!
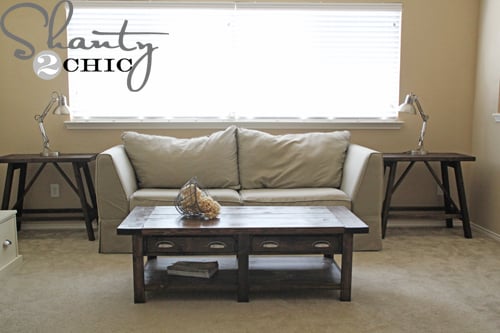
Can you believe that these end tables were built for $33?


Why We Built this End Table
I worked with Ashley from Shanty2Chic on this project. Like many of us, Ashley is a working mom, with children at home. She wrote me last night saying, I'll have pictures to you after baseball is over. Because Ashley, like me, is just another mom trying to improve her home on a budget. If we can do this, you certainly can as well.
Matching Coffee Table Plans
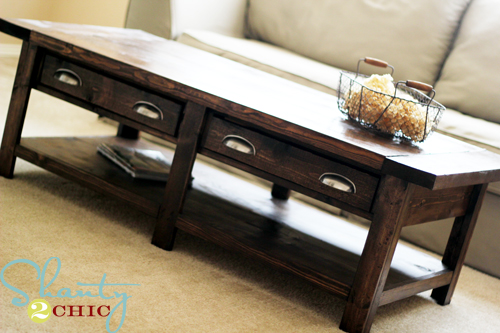
PSSS - Of course the coffee table is DIY too! Build your own with these free plans!

Preparation
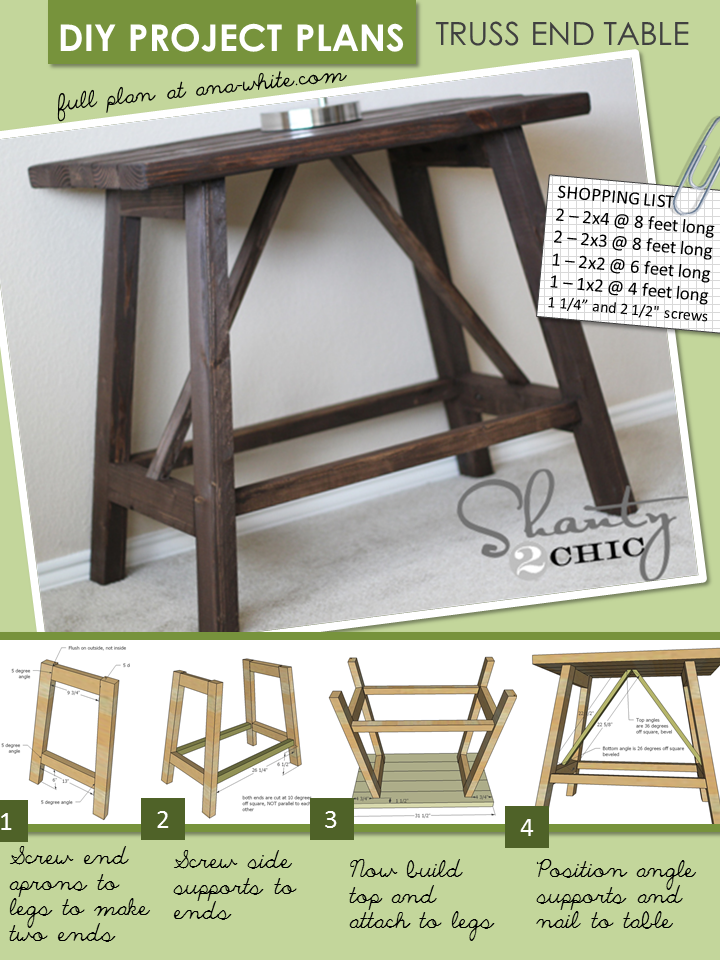
- 2 – 2x4 @ 8 feet long
- 2 – 2x3 @ 8 feet long
- 1 – 2x2 @ 6 feet long
- 1 – 1x2 @ 4 feet long
- 1 1/4” and 2 1/2" pocket hole screws
*If you can't find 2x3s - a 2x6 can be ripped in half to make two 2x3s. They should measure 2 1/2" wide x 1 1/2" thick.
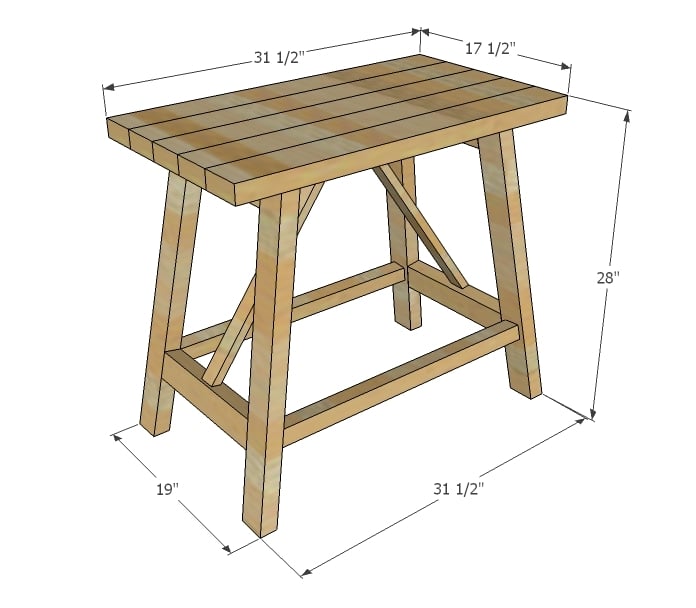
- 4 – 2x3 @ 27” (Both ends cut at 10 degree bevel/5 degree angle, parallel, long point to short point)
- 2 – 2x3 @ 9 3/4" (both ends cut at 5 degrees off square, ends NOT parallel, long point to long point)
- 2 – 2x3 @ 13" (both ends cut at 5 degrees off square, ends NOT parallel, long point to long point)
- 2 – 2x2 @ 26 1/4" (both ends cut at 10 degrees off square, ends NOT parallel, long point to long point)
- 5 – 2x4 @ 31 1/2"
- 2 – 1x2 @ 24” (cut angles in last step)


Please read through the entire plan and all comments before beginning this project. It is also advisable to review the Getting Started Section. Take all necessary precautions to build safely and smartly. Work on a clean level surface, free of imperfections or debris. Always use straight boards. Check for square after each step. Always predrill holes before attaching with screws. Use glue with finish nails for a stronger hold. Wipe excess glue off bare wood for stained projects, as dried glue will not take stain. Be safe, have fun, and ask for help if you need it. Good luck!
Instructions
Step 1

I always do this because with small angles - especially double angles - it will get confusing which way is which. It's the little things that save the time!
Step 2
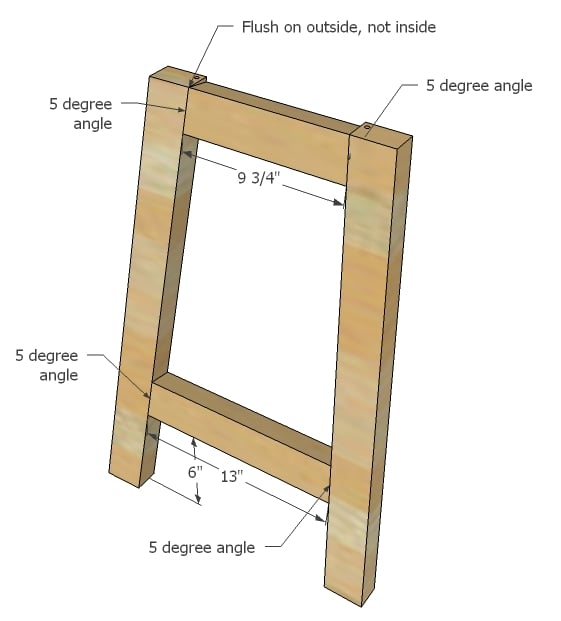
With the legs marked, add the aprons. Pay close attention to this diagram. The top apron is flush on top to the outside, but will NOT be on the inside, which is hidden under the seat.
Build two that are identical.
NOTE: Pocket hole users may wish to drill 1 1/2" pocket holes along top INSIDE edge of each end for attaching top in step 4.
Step 3
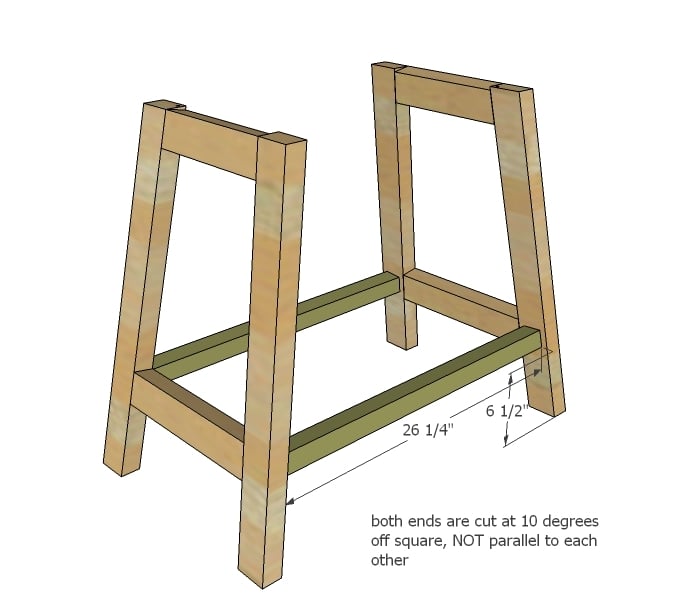
Once you have the ends built, it's time to add the side supports.
Step 4

I recommend building your tabletop first with pocket holes - 1 1/2" PH with 2 1/2" PH screws - and then attaching to leg sides.
Step 5
Step 6

For more photos and tips, and finishing information, please visit Ashley at Shanty 2 Chic.
It is always recommended to apply a test coat on a hidden area or scrap piece to ensure color evenness and adhesion. Use primer or wood conditioner as needed.

Comments
Dawn Samuels (not verified)
Tue, 03/27/2012 - 12:06
Truss End Table
Love this! I have admired these for years but always croaked at the price. I am hoping to give them a shot this spring!
Guest (not verified)
Tue, 03/27/2012 - 12:19
truss table
can't pull up the PDF file - it gives an ERROR message
Ana White
Tue, 03/27/2012 - 12:30
Awesome Dawn! Glad this plan
Awesome Dawn! Glad this plan will help you out!
For PDFs - I am trying to get the issue fixed - so sorry for the trouble. An alternative method is to view printer version http://ana-white.com/print/5104 and then print that version as a PDF to save for building.
sueslager
Tue, 03/27/2012 - 13:15
YES!!
I love these ... I've been wanting to branch out from 90degree angles ... this may be the reason!
thanks for so many awesome plans ... we too live where you make it or make do (or pay too much to have it shipped) ... i'm finding so many great ideas to fill our home!
Guest (not verified)
Tue, 03/27/2012 - 13:23
bevel for trusses
great plans!!! looks straightforward till the last step - are the trussed bevelled and angled? if so, what is the bevel (5 or 10 degrees)? shouldn't the `top' just be angled (sitting against the level table top)?
Ana White
Tue, 03/27/2012 - 13:50
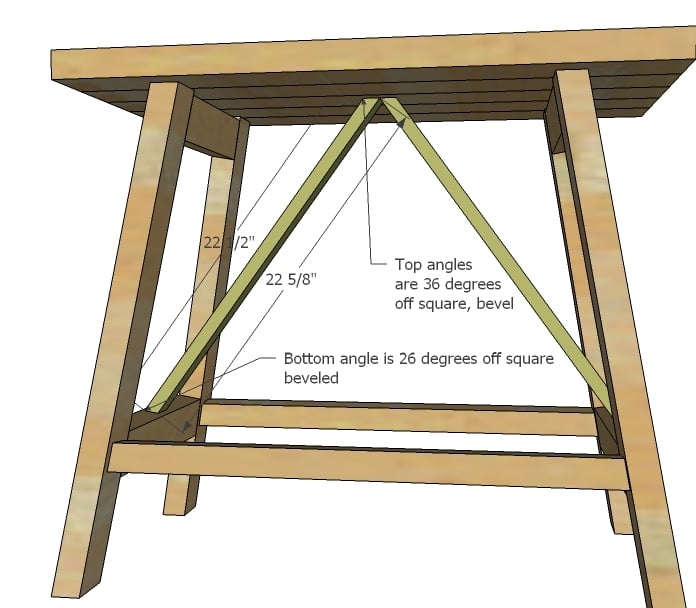
The truss part ends are just
The truss part ends are just beveled. The ends are only cut at 36 and 26 degree bevels - no double bevel here. However, it's kinda funky to cut these because the measurements differ. What I suggest doing is cutting one end with a 26 degree bevel, then just move your board down without rotating the board, adjust the saw to a 36 degree bevel, in the same direction (so just move the saw bevel over 10 degrees in the same direction) and cut the second bevel. Make sense?
In reply to The truss part ends are just by Ana White
4U2C
Thu, 07/12/2012 - 14:25
Having so much fun making virtual saw dust in Sketchup
Having so much fun making virtual saw dust in Sketchup while trying to duplicate some of these great projects but, I am having a problem that I hope Ana, or someone can answer.
I understand the 10 degree bevel/5 degree angle on a real miter saw, but am having a hard time reproducing this in Sketchup. Please tell me what I'm doing wrong ;)
In Sketchup I perform the following steps:
1. Draw a 2"x3" square
2. Extrude this 27"
3. (here's where I think I'm going astray) I select the protractor and click on the top left corner of a 3" wide edge, then click again to the right along the same 3" edge, I then rotate 10 degrees and click to confirm the angle. I repeat this on both sides of the 3" faces.
4. Draw a line from the starting point of where the protractor drew a line, to the point where the end of the 3" side intersects at 10 degrees (which appears to be 1/2") and repeat on both sides
5. Looking at the 2" side, I draw a line from the 10 degree intersection I previously made, clicking straight across a second time, then rotating 5 degrees and creating a marker.
6. Create a line that intersects the 10 degree intersection and the newly created intersection that was created with the 5 degree marker.
I can delete each polygon and have the shape I need for the face (top of the 2"x3" piece), but I do not have a face on the end... appears hollow. How do I close this? I can't extrude or move the edges... when I select all 4 edges that I want to create a polygon on, the selection disappears when I select push/pull or move.
I wrote this as I created the object to hopefully give the best description... hopefully there is a simple fix?
Thanks
Matt
ksperk01
Fri, 07/12/2019 - 05:25
Angles and Bevels
Do you have or would you consider doing a tutorial on bevels and off square cuts?
Oosumsauce
Tue, 03/27/2012 - 13:51
Bevels
I'm new to all this and haven't even put my hands on my (I mean my husbands) saw yet so I'm confused about this bevel thing. Can you explain it to me?
In reply to Bevels by Oosumsauce
Ana White
Tue, 03/27/2012 - 15:06
Hi an angle would be like
Hi an angle would be like cutting a piece of a pie, where the cut is made at an angle. A bevel would be instead of cutting with the knife at an angle, you instead angle the blade so the cut is straight across, but as it goes down, angles to one direction or another. Make sense? The saw will do most of the work for you if you have a compound miter saw.
Tracie (not verified)
Tue, 03/27/2012 - 15:57
Thanks for the additional
Thanks for the additional information on the bevel. When it says a cut has an angle and bevel, do you just set the saw for both and they are made in the same cut?
In reply to Hi an angle would be like by Ana White
Oosumsauce
Wed, 03/28/2012 - 13:03
Bevel
Thanks for the reply. I feel better knowing my saw will be able to help me out with this.
[email protected] (not verified)
Tue, 03/27/2012 - 14:54
PDF Versions
Y'all realize your PDF versions never, ever work, right?
Darin
In reply to PDF Versions by [email protected] (not verified)
Ana White
Tue, 03/27/2012 - 15:08
Hi Darin, I am sorry about
Hi Darin, I am sorry about the PDF issue. I am trying to figure out why it does not work and fix it for everyone.
YankeeBelle
Tue, 03/27/2012 - 17:32
PDF
I have a computer file full of Ana's PDF plans....they usually DO work! Thanks for clearing up the angle confusion Ana....love that you are so accessible and answer our newbie questions!!
Donna @ RetreatIdeas (not verified)
Wed, 03/28/2012 - 09:08
Color is just right!
The picture of that table is precisely the color of wood I need for my new place.
Sheela (not verified)
Wed, 03/28/2012 - 11:36
I love these!
These are gorgeous and have such an open feel to them! Thanks so much for posting these plans!
Mary Nickels (not verified)
Wed, 04/18/2012 - 17:37
Cutting
Doin'it!! thanks for the instructions. Already have a problem though, as this is my first build..... For the 4 boards @ 27" you say parallel, long point to short point. So in otherwords, I don't flip the board so the angles are the same looking at the length from the side, correct? Also, since it is cutting at an angle, do you measure 27" from the longer side once you've made the cut? Or do you just measure 27" from the beginning before you've made any cut at all. Thanks for answering a beginner's question!
Jan (not verified)
Fri, 05/18/2012 - 11:17
How can I make this larger?
Recently I saw this same kind of table, but it was a bit larger. Do you think this could be modified to work as a dining table? I don't have much experience building, but would like to give it a shot.
Papadee
Sat, 06/02/2012 - 14:23
Great plans
Thanks for being so generous with the plans.
A lot of your plans fit perfectly for barn wood I have available.
Appreciate the blog.
All the best,
Paul
Morgan H (not verified)
Thu, 06/14/2012 - 11:46
Console Table Modificaton?
I love the design of these tables, and it seems easy enough for me to actually build myself! Quick question, do you have a console table version of these plans? I wasn't able to find it on your site, but the look of this truss table would be amazing as a console table along the back of my couch. I thought I'd reach out and ask before I (and my not-so-experienced furniture building skills) attempt to figure out how to adjust this end table design.
Thanks so much, love all of your work!
A woman Becomi… (not verified)
Sat, 06/16/2012 - 10:31
LOVE THE PLANS!!!
I have to say, that I just found your website and I feel so motivated by all your plans. I GREATLY appreciate all the time, effort, tips, and wonderful photos that you have been ever so sweet to share. I went to the hardware store yesterday and felt so impowered when choosing my lumber. THANK YOU AGAIN for helping a mom grow into an independent little carpenter. ;)
James (not verified)
Fri, 11/02/2012 - 15:59
Finally, someone I can understand
Let me start off by saying that I never took woodshop as a kid and work in software development. I am not a builder.
That changed a couple years ago when I bought my first house. I had to learn how to install plumbing, electrical wiring, walls, shingles, drywall...a lot of stuff. But the one thing I was never able to learn was how to build decent furniture to put in my now repaired home.
I read manuals, plans, and magazines about furniture making, and none of it made sense. I had just about given up on the idea of avoiding Ikea grade furniture until I found your site.
Yesterday, I built this table. After I put that last support in, I stood back and had to just marvel at what I had just built. The plans were easy to follow, and the quality of the final product is amazing.
Thank you so much for doing what you do. I'll be using a lot more of your plans, and when friends ask me how I was able to make such top notch furniture, I'll tell them the amazing Ana White showed me how.
Mandy Smith (not verified)
Fri, 01/11/2013 - 06:31
Truss end Table
Hi I was looking at these plans and step one says the legs are 2x4 but the picture looks as if they are 2x3 and the top is 2x4 not sure what you used here
Heather B Newbie (not verified)
Mon, 01/14/2013 - 21:19
I LOVE LOVE LOVE these tables
I LOVE LOVE LOVE these tables but I was wondering if you have any side tables (such as these) in taller versions? Long ago i feel in love with tall side tables and they are hard to find especially with drawers. Just hoping your creative ability will rub off on me. Thanks for your help.
PaddyMacR
Fri, 06/05/2015 - 19:00
Bevels
I'm sorry, but the explanation of bevel and angle doesn't work for me. Is it not simpler to simply show a drawing with these angles, because that is what they both are?
Thanks
Redwrangler
Wed, 09/14/2016 - 16:23
Angles and bevels
To all of those who had problems with this project: I've been building furniture for a few years and had quite the time with this puzzle. More detailed instructions would have been worthwhile. Don"t be afraid to chime in and let Ana and co. know that this one was a bear and that all the declarations touting the ease of this project were a little misleading.