


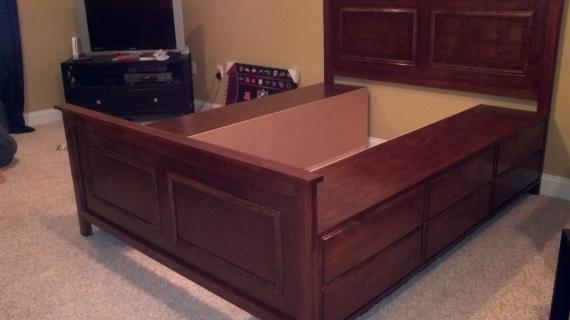
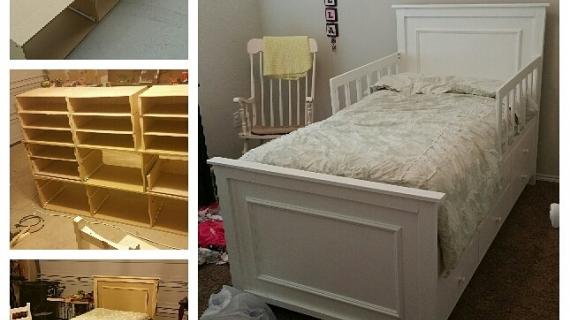
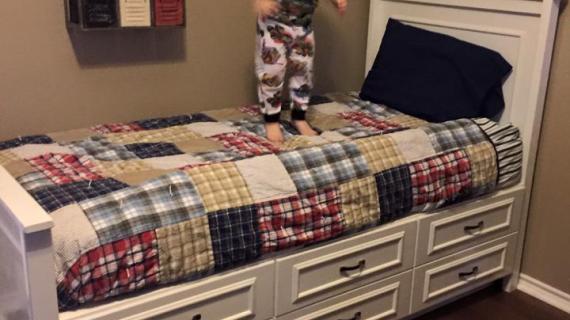
Make a storage bed! Free plans to DIY this bed!


Preparation
Headboard/Footboard
1 – Sheet 3/4" Plywood, MDF
2 – 1x3 @ 8 feet long
2 – 2x3 @ 8 feet long
1 – 1x2 @ 8 feet long
2 – small moulding pieces 8 feet long
3/4” finish nails
1 1/4” pocket hole screws
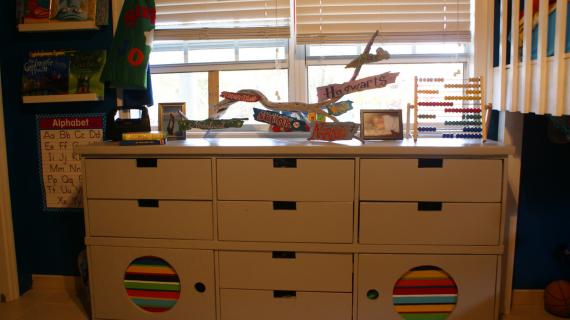
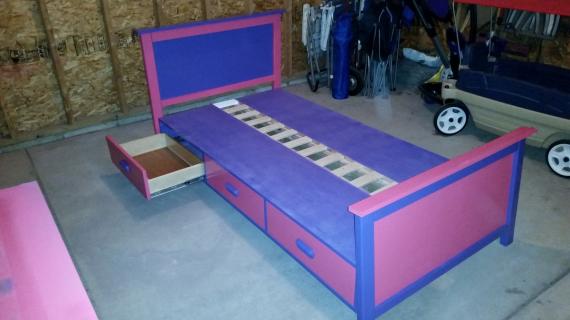
Storage Bases
2 – Sheets ¾” plywood or MDF cut into strips 15 3/4" wide, referred to as 1x16 boards throughout this plan
2 – sheets ¼” plywood or other backerboard
4 – 2x4 @ 8 feet long
2 – 2x2 @ 8 feet long
2 – 1x3 @ 8 feet long (for the slats – try and burn up small scraps here)
7 – 1x6 @ 8 feet long OR 1 sheet ¾” plywood cut into strips 5 1/2" wide, used as 1x6s for drawers. You could even use 5/8” thick material
4 – 1x8 @ 6 feet long
Optional drawer moulding
12 – Drawer Knobs or handles
12 – 14” long drawer slides, the white euro style bottom corner mount ones will work best
1 1/4” and 2 1/2" pocket hole screws
1 1/4” finish nails
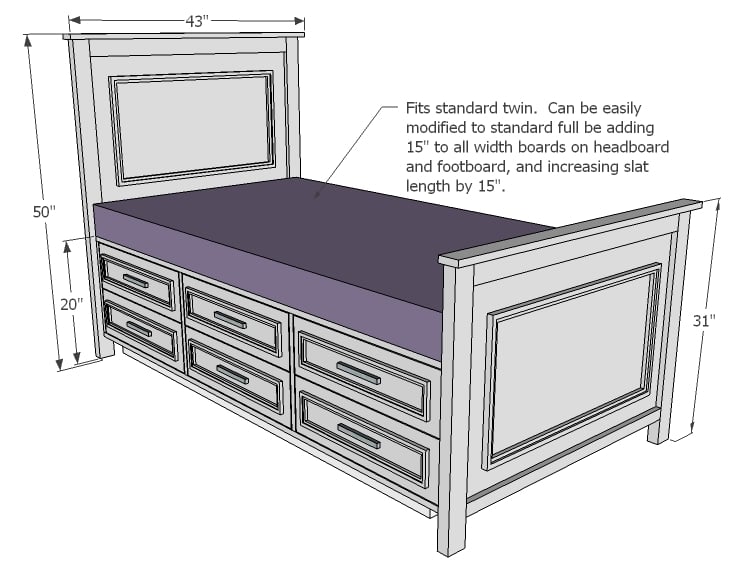
Headboard/Footboard
2 – 3/4" plywood or MDF @ 36” x 26 3/4"
2 – 1x3 @ 36”
2 – 1x2 @ 36”
2 – 2x3 @ 49 1/4”
2 – 2x3 @ 30 1/4"
2 – 1x3 @ 43”
4 – Moulding pieces @ 30” (long point to long point, both ends cut at 45 degrees off square, not parallel to each other)
4 - Moulding pieces @ 16 3/4” (long point to long point, both ends cut at 45 degrees off square, not parallel to each other)
Storage Bases
4 – 1x16 @ 75”
8 – 1x16 @ 14 7/8”
2 – ¼” plywood @ 75” x 16 ¼”
4 – 2x4 @ 70”
4 – 2x4 @ 10”
2 – 2x2 @ 75”
14 – 1x3 or 1x2 scraps @ 7”
DRAWERS
24 – 1x6 @ 14”
12 – 1x6 @ 21 ½” (omitted optional fronts to save materials)
12 – 1x8 @ 23 ¾” (Drawer Faces)
12 - ¼” plywood @ 23” x 14” (Drawer Bottoms)
Please read through the entire plan and all comments before beginning this project. It is also advisable to review the Getting Started Section. Take all necessary precautions to build safely and smartly. Work on a clean level surface, free of imperfections or debris. Always use straight boards. Check for square after each step. Always predrill holes before attaching with screws. Use glue with finish nails for a stronger hold. Wipe excess glue off bare wood for stained projects, as dried glue will not take stain. Be safe, have fun, and ask for help if you need it. Good luck!
Instructions
Step 1

For the headboard and footboard, start by drilling 3/4" PHs around the top and side edges of panels with Kreg Jig.
Step 2

On the front side, attach top and bottom trim.
Step 3

Use 1 1/4" PH screws to attach legs to panel - flush to trim and back of plywood.
Step 4

Now add the top.
Step 5

Step 6

The footboard just has shorter legs.
Step 7
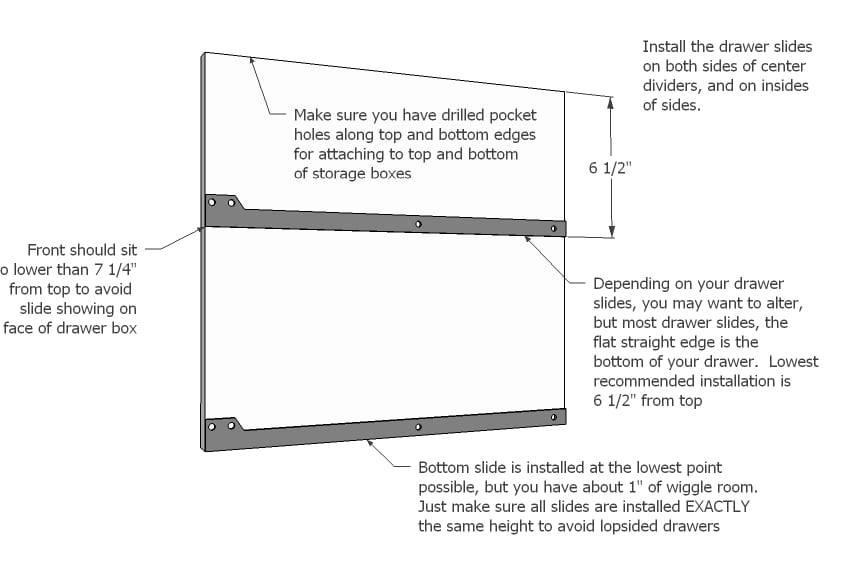
Depending on your skill level and how confident you are, I would attach drawer slides now rather than later. Attach to both ends on insides, and then on both sides of center dividers. IMPORTANT: For drawer faces, inset slides 3/4" to give room for a drawer face.
Step 8

Now add tops and bottoms to the dividers ...
Step 9

Build drawers. Drawers MUST be 1" less in width than overall width for standard slides requiring 1/2" clearance for each slide. Make sure you measure before building drawer boxes - your widths may need to be adjusted.
Step 10
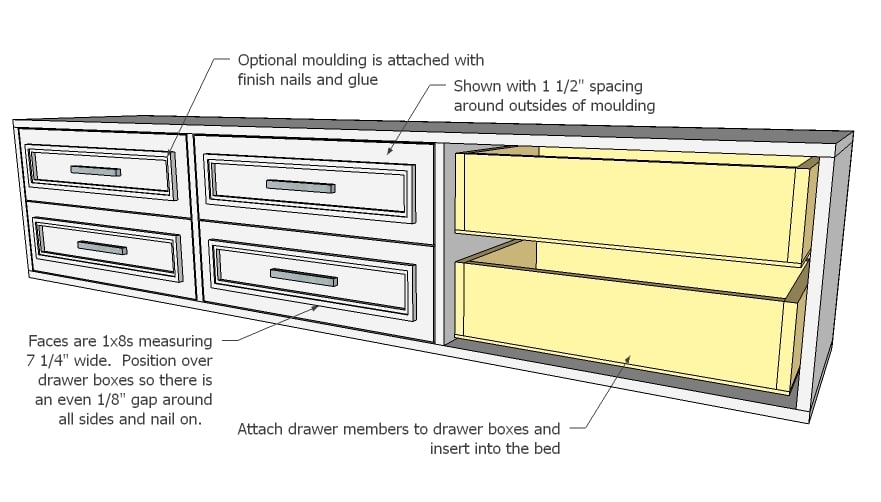
Attach drawer members to drawers and insert in bed. Attach drawer faces to drawer boxes and add moulding if desired.
Step 11

These boxes are to support the weight of your drawers. They will be heavy. Attach flush to back and headboard side.
Step 12

When you go to assemble the bed, add a 2x2 cleat and 1x2 or 1x3 slats to support the mattress. Screw footboard and headboard to storage boxes.
It is always recommended to apply a test coat on a hidden area or scrap piece to ensure color evenness and adhesion. Use primer or wood conditioner as needed.
Comments
Joleene24
Wed, 04/25/2012 - 12:05
Love it
I love this bed! Where do you attach the 2x4s for the drawer support? Underneath? Flush to the front of the storage or offset? Sorry about my confusion.
In reply to Love it by Joleene24
exuma_momma
Thu, 04/26/2012 - 10:03
drawer support
Hi Joleene,
I wasn't completely sure on this one either. I attached mine underneath the drawer boxes flush to the back side and flush with the end that attaches to the headboard. Does that make sense? Ana, if this is incorrect... please feel free to correct me. They seem to be supporting the boxes very well :)
Michele Miller (not verified)
Fri, 05/25/2012 - 15:00
2x4 support
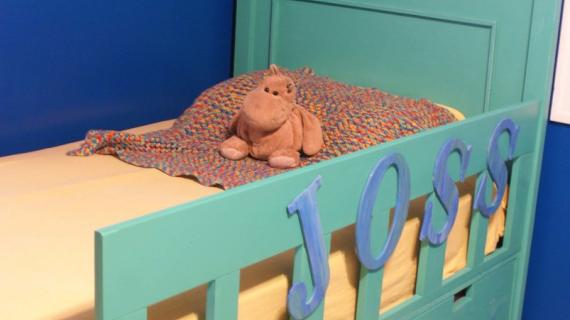
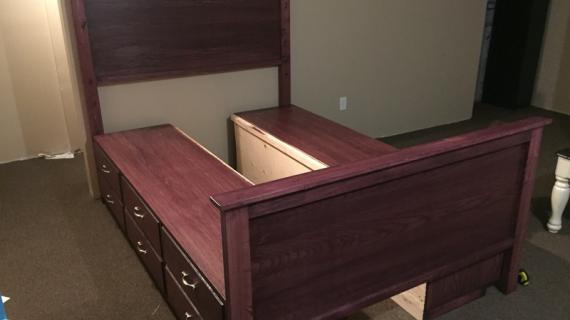
Yes, that 2x4 box should be on the bottom to support the weight of everything above it. If you look at the photo of the green bed, you can barely see the box there.
Michele Miller (not verified)
Fri, 05/25/2012 - 15:00
2x4 support
Yes, that 2x4 box should be on the bottom to support the weight of everything above it. If you look at the photo of the green bed, you can barely see the box there.
Michele Miller (not verified)
Fri, 05/25/2012 - 15:00
2x4 support
Yes, that 2x4 box should be on the bottom to support the weight of everything above it. If you look at the photo of the green bed, you can barely see the box there.
birdsandsoap
Wed, 04/25/2012 - 23:49
I love the distressing
I love the distressing technique you did on this bed. Great depth of color with all of the sanding!
Kriminie1 (not verified)
Thu, 04/26/2012 - 07:20
This is perfect!!!
This is exactly what i want for our bed!!! Would it be easy to modify for a queen??? How tall is it with the mattress!!! Its lovely and so inspiring!!!
megan_m
Thu, 04/26/2012 - 08:13
I love it...
It would be perfect for my daughters' room. When the baby moves in, there will be two girls in a less than 10x10 room.
The extra storage would be amazing, but I know they would both no doubt pull out the drawers and use them as steps. And we already have to replace hardware on two different pieces of furniture around our house. :s
Joleene24
Thu, 04/26/2012 - 10:07
Thanks!
Exuma_momma,
That makes it clearer, thank you!
Amy J. (not verified)
Mon, 05/07/2012 - 14:45
Thank you!
Thank you thank you thank you! I have been thinking about modifying one of your bunk bed plans and building something like this under it! Now you have made it easier!!
Darcie (not verified)
Fri, 05/11/2012 - 21:59
could you omit the lower drawers and add a trundle?
I love the added storage but a trundle bed is a must in my socialite daughters' room. Think we could omit the bottom set of drawers and squeeze in a trundle bed for sleepovers?
Darcie
Guest123 (not verified)
Thu, 06/21/2012 - 18:25
i need that
thats what i was wondering...my daughter has alot of girls coming over now and i dont want to buy one because they are like 300-1000 dollars plus the mattresses!
ReallyNeedTHISBED (not verified)
Thu, 08/09/2012 - 08:03
Omit Lower drawers and Add trundle???
I too agree-I've made the farmhouse bed in a King and love it. now i need something nice for my kids but need storage.
I'd like the top set of drawers attached to the bed so the trundle portion is still easy-light enough to pull out from underneath.
Does anyone know how to do this?
Im sure it isn't a major overhaul but I wouldn't dare figure it out myself.
Ian (not verified)
Thu, 05/17/2012 - 10:56
Storage Base
Could you elaborate a little more on the assembly of the storage base?
In reply to Storage Base by Ian (not verified)
exuma_momma
Wed, 05/30/2012 - 18:29
Storage Base Info
Hi Ian! I'd recommend checking out a couple of Ana's other storage bed plans that shows some of the steps in images. Like this: http://ana-white.com/2011/04/plans/hailey-storage-bed-twin That might help with a visual better than I can with writing.
I cut the boards to the sizes and, the best way I could, I assembled them into the boxes. I mostly just pre-drilled and countersunk my screws since I knew the mattress would cover the holes anyway, but you could use pocket holes too I'd imagine. I'm still pretty new to the hobby, so it took a bit of trial and error for me to get my boards all lined up and straight, and I still didn't get them exactly straight.
I spaced them evenly across for the drawers, or as even as I could get them.
I'm not sure if this will help any, but hopefully it will. Best of Luck!
sandrabees
Wed, 06/20/2012 - 17:02
building this now
So very excited! I am modifying for a queen hopefully I have everything right!
Leslie K (not verified)
Sat, 09/01/2012 - 16:08
Drawers
Would it be possible to modify the drawers so that they are deeper and only used from one side? How could that be done?
This is the piece we have been looking for to solve issues in my 15 year old's 10 x 10 room. Putting the dresser under the bed allows for more floor space. His current dresser no longer fits his clothes as they are adult size now!
Rhondaand Rodney (not verified)
Sat, 09/01/2012 - 16:20
I like this bed
I like this bed
Jonica (not verified)
Fri, 10/12/2012 - 20:31
How much would it cost to
How much would it cost to make this? Guessing is ok.
Jsmith42
Wed, 12/30/2015 - 21:11
Not sure if I missed it, but
Not sure if I missed it, but what was the overall cost with supplies?
merzetti
Tue, 03/08/2016 - 15:01
Missing steps to the plan
Can anyone help me? Are there supposed to be 2 bases [one for each side]? If not, how is the side against the wall held up? What are the final dimensions of the base unit[s]?
thanks for any input
merzetti
Sun, 03/13/2016 - 12:13
Missing dimensions
I have scoured these plans for a hint as to the dimensions of the supporting box. Fairly complete instructions for the headboard and footboard...where do I find the plans for construction of the storage box?? Please and thanks.
CurtP
Sat, 03/26/2016 - 12:53
Pocket Hole Question
First of all I love the build. I do have a couple of questions. On the headboard and footboard plywood pieces, there are pocket hole screws along the bottom edge. Is there supposed to be something joined to the bottom? My second question is also about the HB/FB. How are the trim pieces held on glue and nails or glue and screws?
Thanks,
Curt
In reply to Pocket Hole Question by CurtP
Lady Goats
Sat, 03/26/2016 - 22:46
PHS
Hi Curt, It looks like the top of the head and foot boards have the pocket holes drilled to later attach the 43" 1x3 top trim piece. Along the bottom is a little more confusing. There isn't anything in the plans that show what you would attach there (it would be 36", and everything on the cut list is accounted for), so I would leave those off. If you end up needing to attach something there, later, it'd be on the bottom and out of sight, so you'd be okay predrilling/screwing directly into it (since it wouldn't be seen... However, I don't think anything is supposed to go there.
Hope this helps!!