


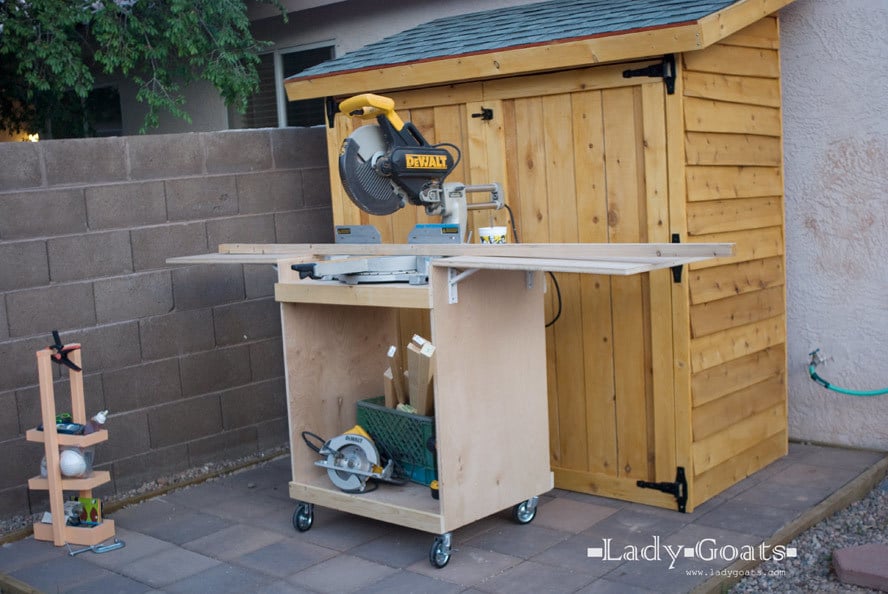
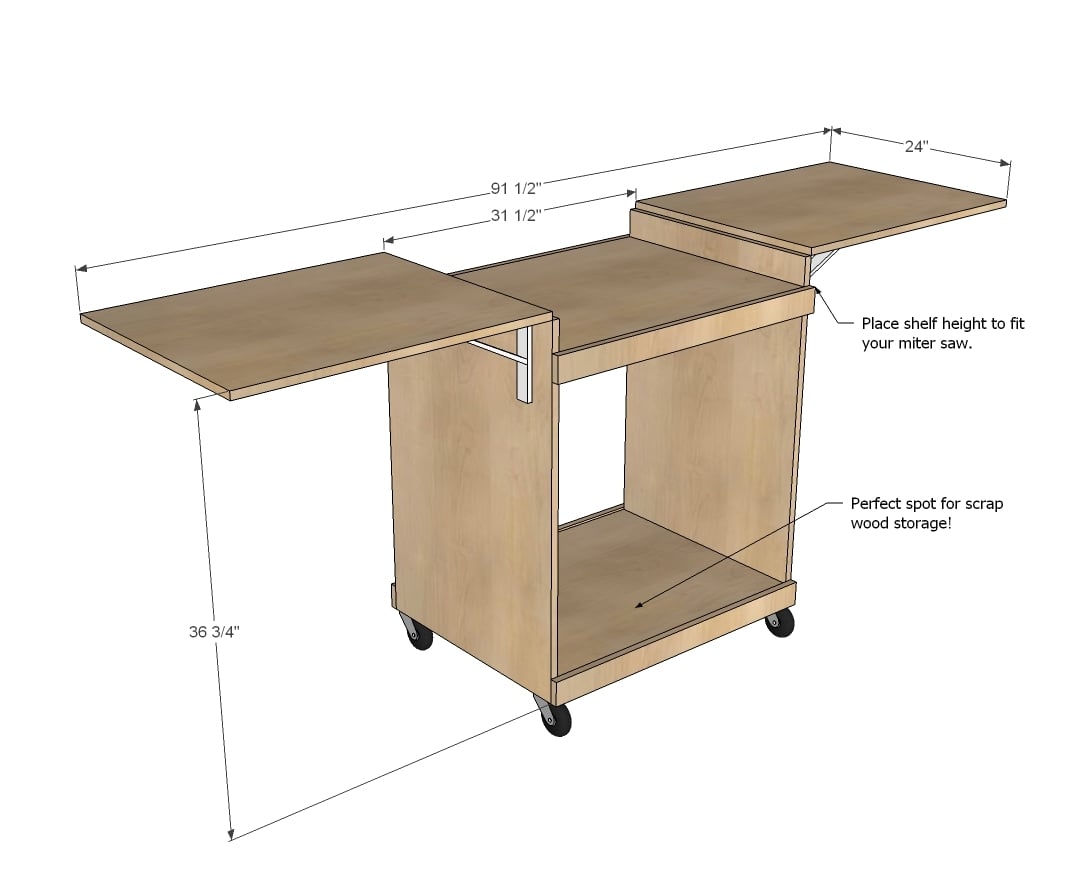
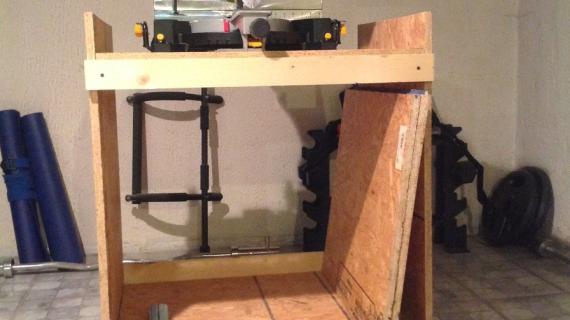
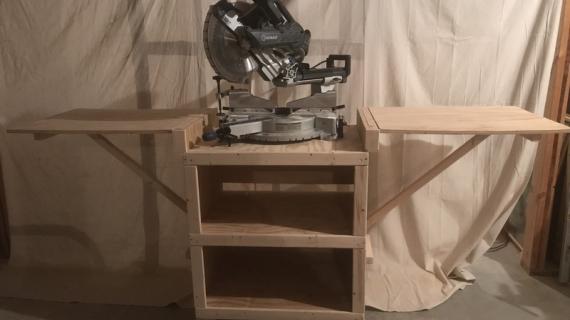
Make a miter saw cart from a single sheet of plywood! Has folding wings to stow away in tight spaces.

Hi everyone! Great news - we were able to set all the trusses last night! Thank you for all the well wishes, everything went well! I will share all the details with you in a Momplex post tomorrow.
Today I am pretty excited to share this new project plan with you!
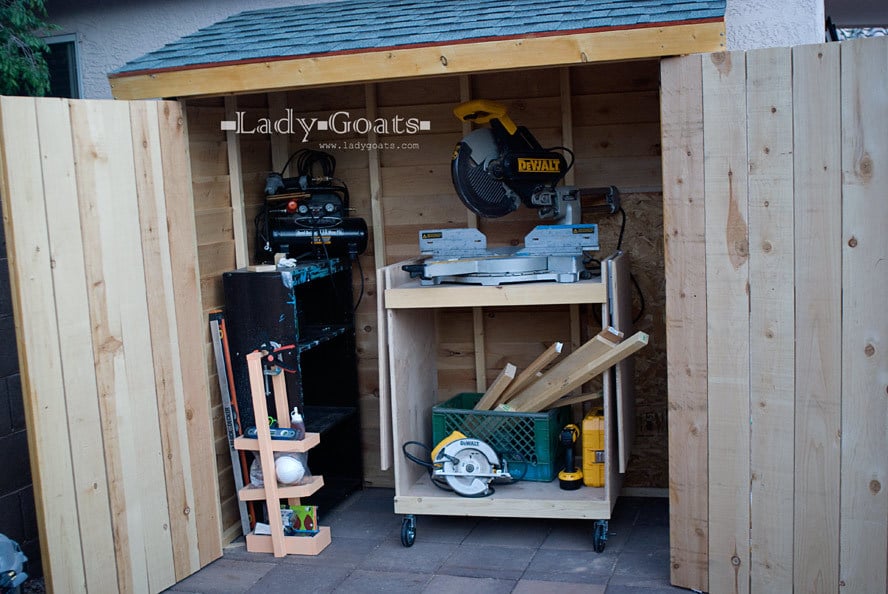
Remember when Gina built this cedar shed to store her tools and work from?

Well, this gives her about 18 square feet to store all of her tools and work from. We thought the best way to use this space for storing a mitersaw would be with a cart with extending leaves.
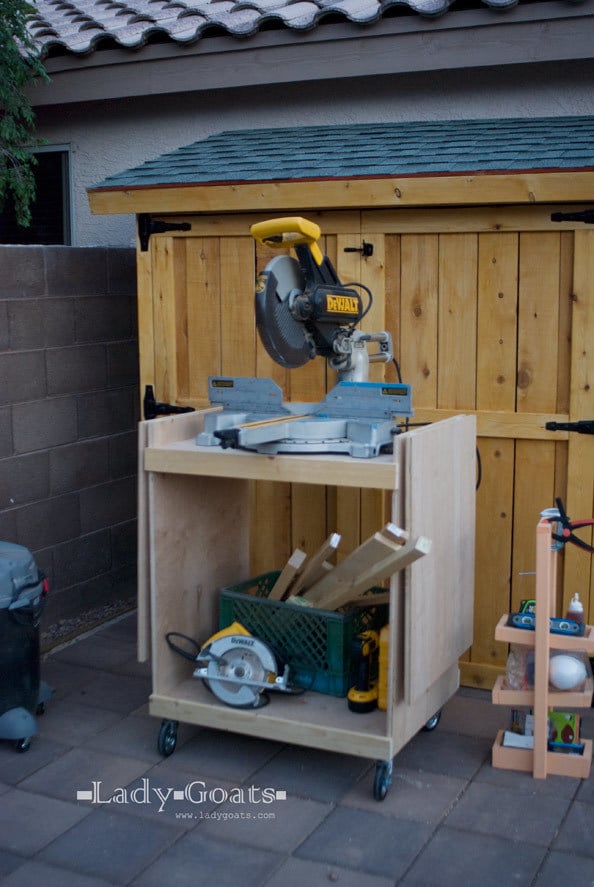
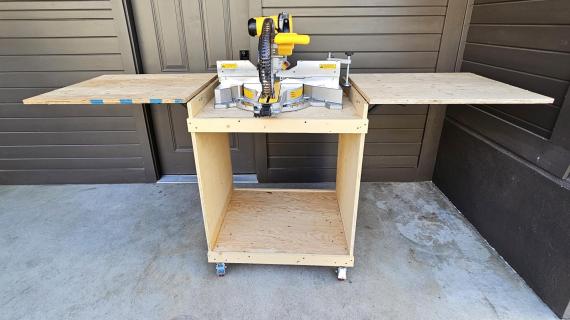
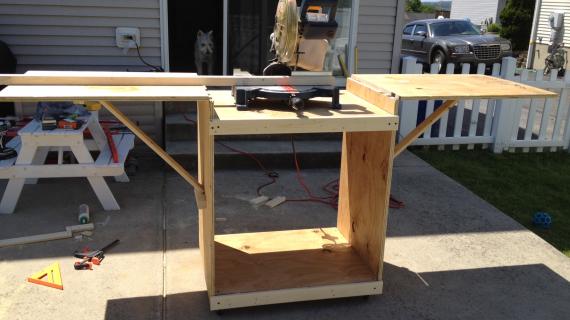
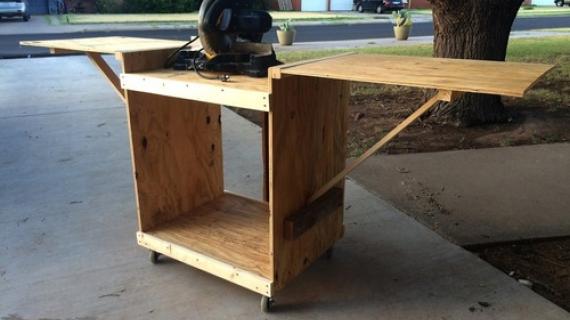
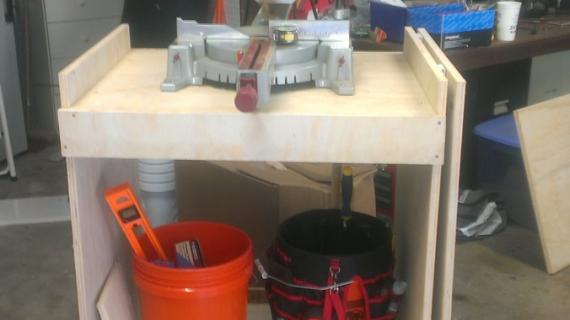
So together we came up with this plan, and this is what Gina made.

We took extra measures to get it all in a single sheet of plywood to save us all money building.
Here's from Gina:
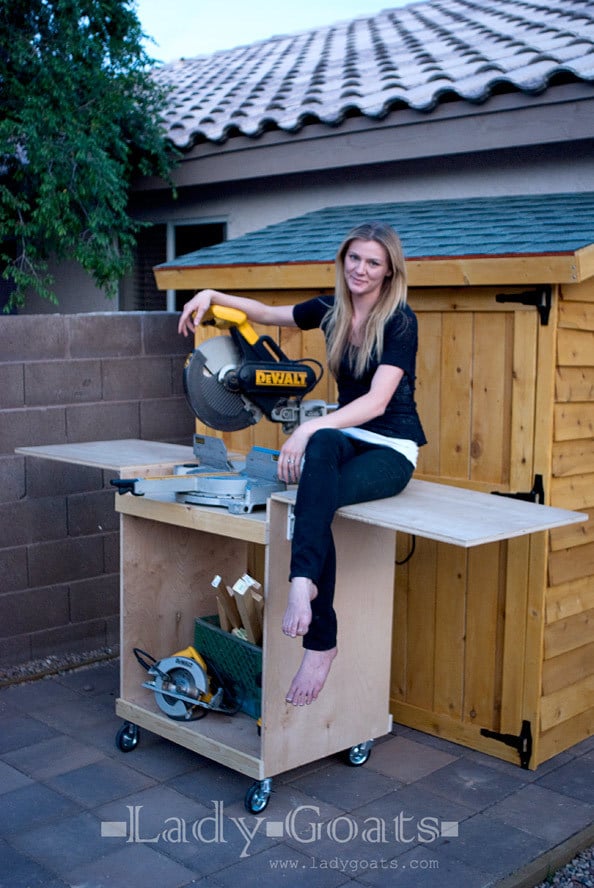
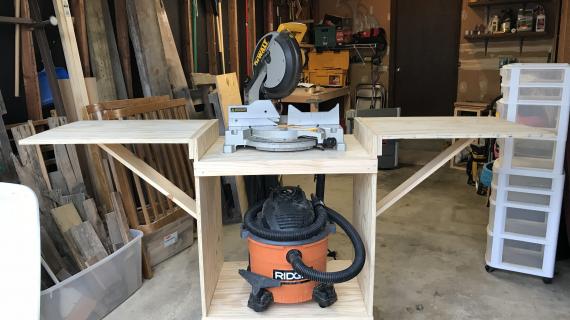
This was a super super quick build. I had the base built in under an hour, and got all the hardware attached the next day while dinner was cooking. I definitely included the use of pocket hole screws in the shelves for added stability, and really recommend that they're used consistently. The caster wheels I used are from Harbor Freight (I got 3 without breaks, and one with a break that is at the front right corner of the table) found here and here. They work fine. They're not bad, but you might have to swivel the cart for a sec to get it to go in the direction you want. No big deal. The support hinges (mentioned in the shopping list) are amazing.
Thank you Gina! Gina has also kindly put together a longer post with more details right here, so make sure you check it out for lots more tips and photos.
NOTE: The hinges used in this plan have not been tested for weight limits and are designed to be used to support boards being cut. Use and build at your own risk.
Preparation
- 1 – sheet 3/4" plywood cut in half lengthwise into 24” x 96” strips.
- 1 – 2x2 @ 8 feet long
- 1 – 1x3 @ 12 feet long – or (2) 8 footers
- 4 – plate mount caster wheels with locking brakes
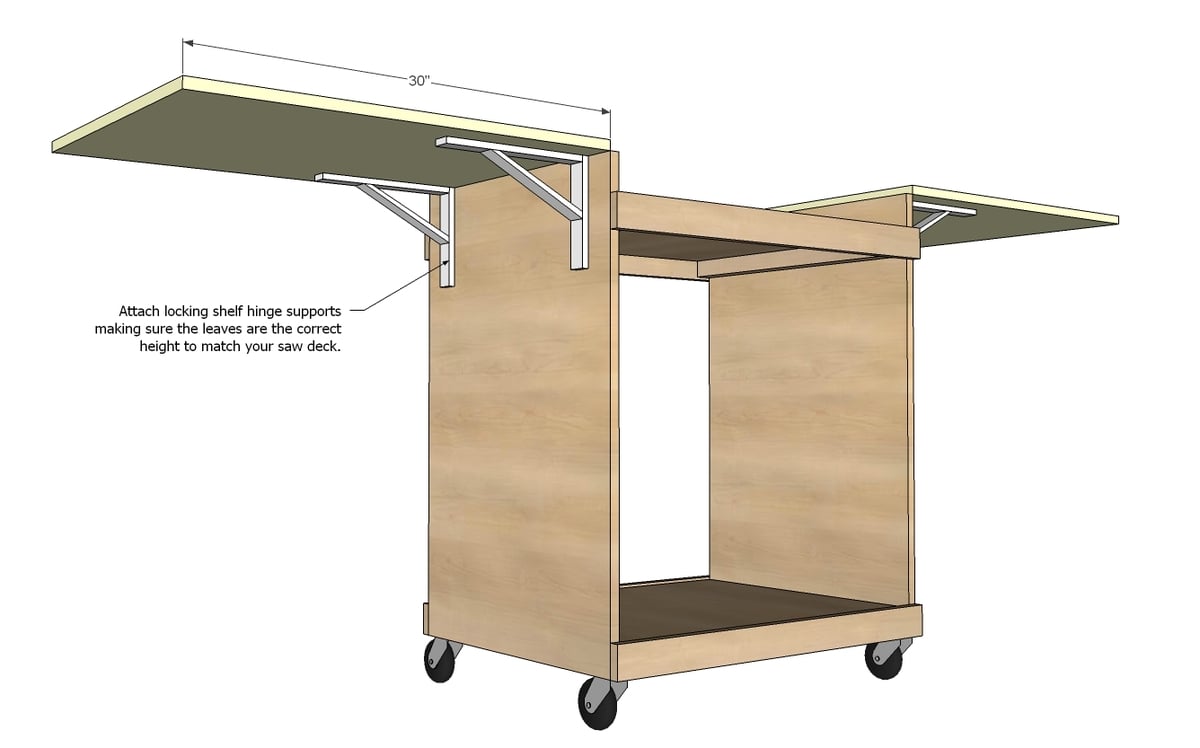
- 2 – shelf hinge supports http://www.woodcraft.com/product/2001690/3177/12-shelf-width.aspx NOTE: For use as an assembly table we recommend a locking support as well
- 2 – 3/4” plywood @ 24” x 36” (sides)
- 2 – 3/4” plywood @ 24” x 30” (shelves)
- 2 – 3/4" plywood @ 24” x 29 3/4" (leaves)
- 4 – 2x2 @ 24” (cleats)
- 4 – 1x3 @ 31 1/2" (supports)
Cut plywood into two strips 24" wide x 8 feet long. From these strips, cut one each 36", 30" and then the remainder for leaves to get all cuts from a single sheet of plywood.


Please read through the entire plan and all comments before beginning this project. It is also advisable to review the Getting Started Section. Take all necessary precautions to build safely and smartly. Work on a clean level surface, free of imperfections or debris. Always use straight boards. Check for square after each step. Always predrill holes before attaching with screws. Use glue with finish nails for a stronger hold. Wipe excess glue off bare wood for stained projects, as dried glue will not take stain. Be safe, have fun, and ask for help if you need it. Good luck!
Instructions
Step 1
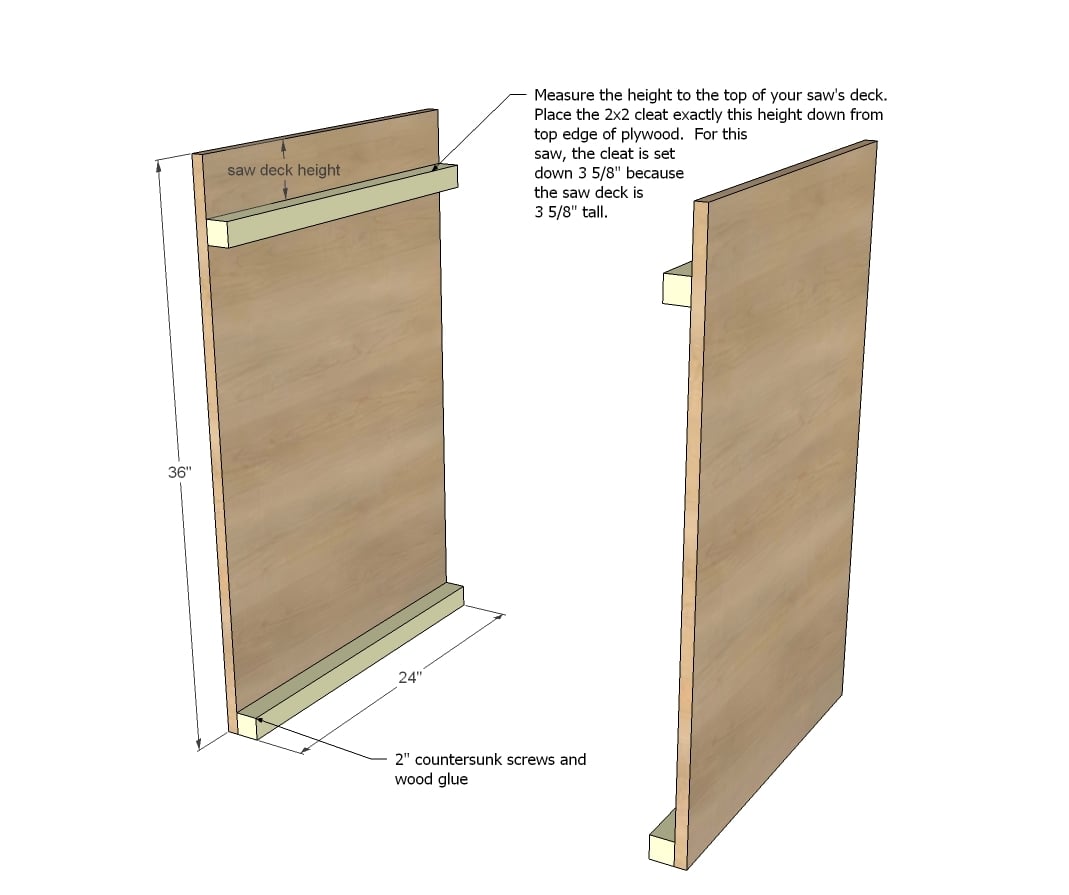
It is very important to place the cleat the distance down from the top of plywood edge equal to your saw deck height. Measure carefully.
Step 2
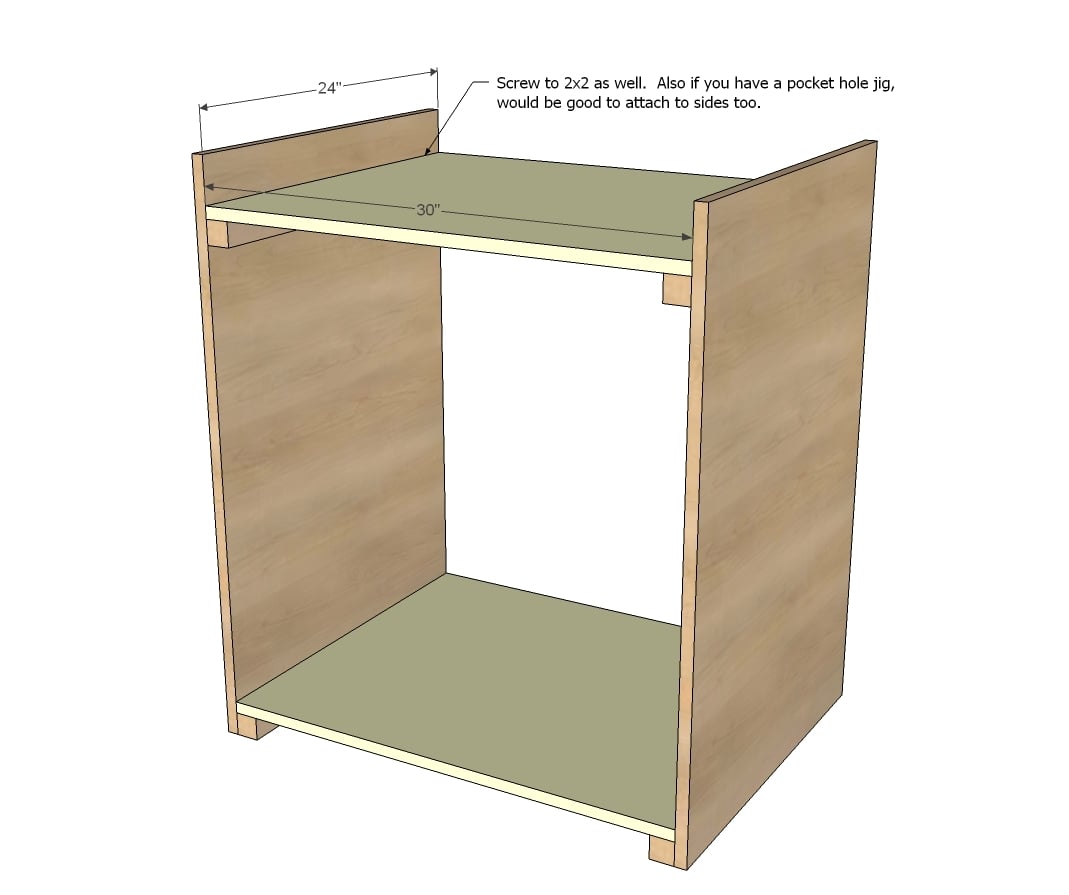
I'd also recommend attaching the shelves with 3/4" pocket holes and 1 1/4" pocket hole screws and glue, or brackets just to provide a little extra support.
NOTE: You can add extra shelves as well.
Step 3
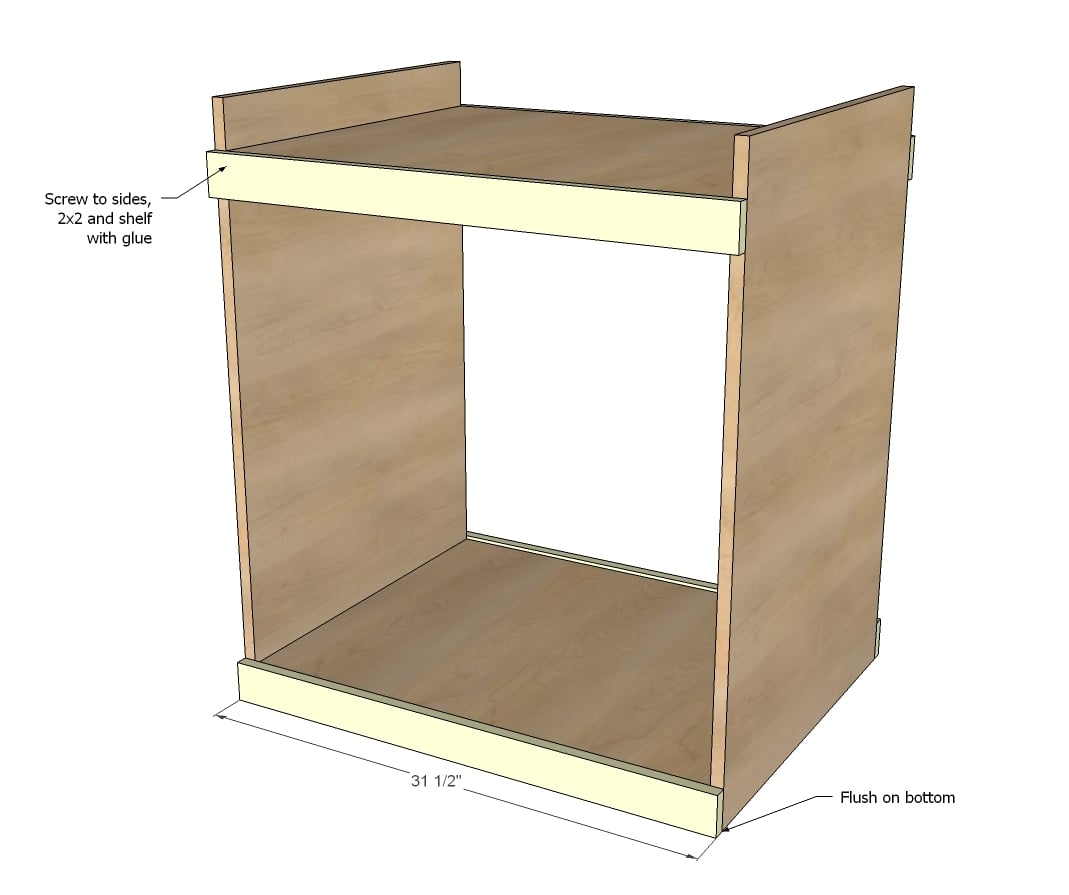
These will reinforce the joint. Another idea is to add more lower down, like a crate, and you could use the bottom shelf for scrap wood storage. Note that the bottom trim is mounted flush to bottom.
Step 4
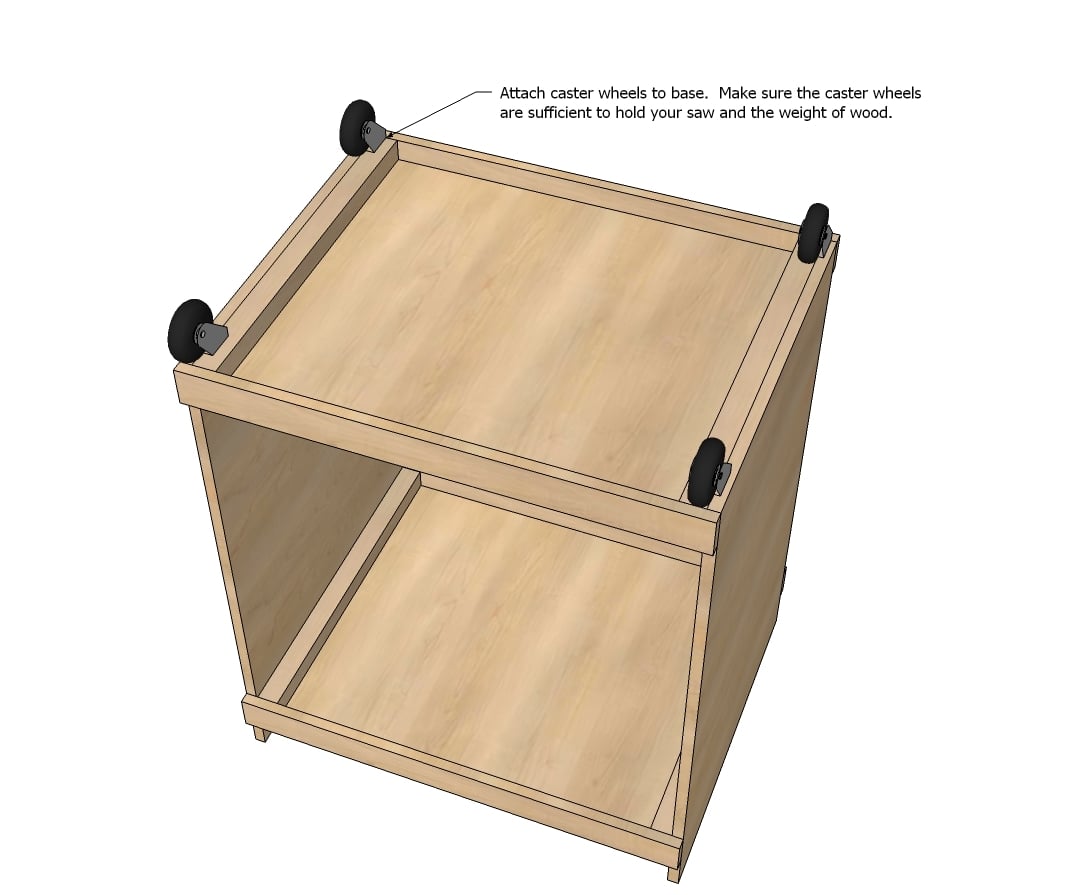
Mount your caster wheels to the bottom.
Step 5
Step 6

It is always recommended to apply a test coat on a hidden area or scrap piece to ensure color evenness and adhesion. Use primer or wood conditioner as needed.

Comments
Gabe (not verified)
Wed, 04/11/2012 - 11:38
I think I would add two 2x2s
I think I would add two 2x2s under each wing running outwards where the hinge supports attach. Otherwise, with time, gravity is going to bow those wings downwards. The 2x2 fences will help this as well.
In reply to I think I would add two 2x2s by Gabe (not verified)
Codding58
Wed, 06/15/2016 - 08:28
Agreed
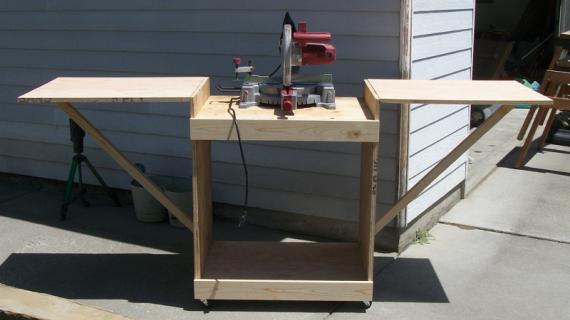
I agree with you, and am making the same modification on my build. You can already see the sagging in the main picture on the ends of the wings compared to the material on the saw deck.
Ruthiep
Tue, 01/25/2022 - 10:33
Bowing on wings
Can you provide a picture of where you put the 2x2s to prevent the bowing?
dmcarwin
Wed, 04/11/2012 - 11:45
This is great!
Thanks Ana and Gina! Someday I will have to make one of these! So Awesome!
claydowling
Wed, 04/11/2012 - 15:16
Awesome Cart
As I posted on your blog, everyone needs something like this.
Fuchsia
Wed, 04/11/2012 - 19:23
I am making this as soon as I
I am making this as soon as I can get to the lumber store. It looks so easy and very functional. Thanks for another great plan!
benny
Thu, 04/12/2012 - 03:14
Just what I was looking for
Thank you this looks like just what i need for my saw. have small shop so this is perfect
cdswhite
Thu, 04/12/2012 - 09:20
Love it Gina and Ana!
I love this cart! Nice job and I hope to be making it soon!
Daly @ Natural… (not verified)
Thu, 04/12/2012 - 09:27
You Ladies Rock!
Building this shed as a first thing is good thinking. The rest will be here soon, hopefully.
A Crisp (not verified)
Thu, 04/12/2012 - 13:58
Yes!
This makes me so unbelievably happy! I can't event tell you how much I need a set up like this. I will be rushing out to pick up up the necessities to make this come together. THANK YOU so much for another great idea!
redhead_61
Thu, 04/12/2012 - 16:46
Amazing
I took a wood working class and he had all the tools in the shop set up so they were sunk into the nice long tables surrounding so that there were no problems cutting big 8 feet pieces of wood. This solves the need for small space building but WAY better cutting technique. AWESOME!
Milca (not verified)
Mon, 04/16/2012 - 17:29
Just bought a miter saw last week
And was trying to figure out how to maximize my space (10x12 approx) room in basement for those long winter months. This will be great! I can have it set up by the wall, think workbench, but still be able to easily move the saw forwards when cutting longer lumber [so it can stick out the doorway]. Anyways... makes sense in my head :) Thanks Ana. LOOOOVE your site! Milca
hiswif26 (not verified)
Tue, 04/17/2012 - 13:23
OMG Thank you so much for
OMG Thank you so much for posting this. My husband and I were looking at buying a miter saw last weekend, but didn't have anything to put it on so decided to hold off. This will be perfect!!
Linda7
Thu, 04/19/2012 - 19:48
What a great cart!
I am so excited to begin building this cart! Great job on the plans, Ana, and wonderful build, Gina. I do have a question regarding the placement of the shelf for the saw. If I place the cleat exactly the same distance from the top of the plywood as the height of the deck, and then attach the shelf to the cleats, won't that raise the deck 3/4" above the height of the wings? OR does this have something to do with the placement of the folding shelf brackets? I am not good at figuring this stuff out, so would appreciate your explanation. Thank you.
In reply to What a great cart! by Linda7
Lady Goats
Thu, 04/19/2012 - 20:52
Shelf placement
Hi Linda, that was my question initially! It works out that the brackets bring the shelf up 3/4" above the sides, so it evens out!
Linda7
Fri, 04/20/2012 - 08:31
Shelf placement
Thanks so much! Can't wait to get started (after my brackets come in). :-)
Michael B (not verified)
Fri, 04/20/2012 - 14:40
Hinges
Hi, great job with this. Planning on building this for my shop now. Do you know if the shelf hinges come in pairs? Is that why you put two for the quantity needed?
RNorman (not verified)
Mon, 04/23/2012 - 07:00
Yes they are in pairs.
They do come in pairs. The same supplier is also having a special on casters, FYI if you choose to get it all from one source.
Hellgamatic (not verified)
Tue, 04/24/2012 - 15:05
Does anyone know of a way to
Does anyone know of a way to reduce the price of building this? The hinges are $32 for the set of four, and my budget is like $30 total :/ Is there some other way to make the shelf supports? Regular hinges and some kind of wood brace, maybe? I really really want this to be my first *real* project because it is a step towards all of my other projects going smoothly...
crouton976 (not verified)
Sun, 05/13/2012 - 00:13
Well, you could possibly make
Well, you could possibly make some stops out of 2x2 that run from the front of the wings to the back, then hinge another piece made out of 2x4 with both ends mitered that you manually raise to brace the wings... One side against the wall of the base, the other against the side of the stop.
Let me know if you need a sketch...
In reply to Does anyone know of a way to by Hellgamatic (not verified)
Lady Goats
Wed, 05/16/2012 - 13:23
Reducing the $ of building the miter saw cart
Scroll sown to "build the flip-up assembly table" on this site http://www.familyhandyman.com/DIY-Projects/Woodworking/Workbenches/modu… - gives a cheap way of accomplishing the flip-up aspect. It's a little inconvenient having to store/find the boards to hold the leaves up, but if you can manage, it'll save the $$ of the hinges!
frankb03
Wed, 03/23/2016 - 13:06
eBay
I bought a pair of Chrome Steel Folding Shelf Bench Table Folding Shelf Bracket 330lbs for $18
claydowling
Wed, 05/16/2012 - 19:39
Support without expensive hinges
This is a prime opportunity to pull out some tricks from the world of drop leaf tables. My personal favorite, for ease of construction, is a pair of sliding bars under the leaves that slip into the table when they aren't needed.
The other cool trick was used by somebody here to put leaves on the farmhouse table. There were bars attached to the underside of the leaf that slid into sockets in the table.
In reply to Support without expensive hinges by claydowling
exuma_momma
Fri, 05/17/2013 - 10:51
I love the idea of the
I love the idea of the supports sliding under the saw when the leaf isn't being used. Now if I can pull that off in the building :)
Lady Goats
Tue, 05/22/2012 - 20:45
A small update about the miter saw cart
Hi everyone! A few days ago, one of the leaves fell off of my miter saw cart as I was lifting it to do a project. It just pulled right off of the screws, and landed uncomfortably close to the big kid, who was painting some scrap wood nearby. Freaked. Me. Out!
My initial thought was that the leaf was too heavy for the screws that came with the hinges (they state that they can hold up to "x" amt of weight, but that's when they're upright... It didn't say anything about how much weight the poor little screws can hold when it's dropped down!). So I took a smaller ply scrap that I had and screwed it on. It wasn't very pretty, but it was workin' so far....
Fortunately for me, a friend was asking about the leaf size the next day (what're the odds? She had the leaf cut a little too short and wondered if that'd be ok!), and I told her what happened. She then went and asked around for advice, and it seemed like all of the suggestions were to add another support that folds out under the leaf when it's lifted (which just didn't seem to make sense to me.. the hinges hold the weight, and that doesn't affect the screws)... Blah blah blah, back to the story!
The screws pulled out of the leaf, but were still strong on the cart itself, so I put 3/4" anchors (the kind that you use in drywall - but the ones I have I got from walmart and they said they work in drywall, stucco and wood, so I'd just look for ones that work for wood) into the holes in the leaf, and screwed the leaf back onto the hinge.
I spent about an hour lifting and dropping the leaf (making sure to engage/disengage the hinge each time), and have been using my saw regularly in the past couple days, and I'm not seeing any sign of the screws loosening. I'll definitely keep you posted if there's a change!
moonhopping
Sat, 08/31/2013 - 22:54
Thanks for the update
Thanks for the update. It is finally below 90 degrees so excited to be able to get building. I am going to start on this tomorrow and will pick up some anchors before I start. Thank you for sharing your amazing plans.
Phestr
Sat, 09/01/2012 - 07:23
Gonna build, but a little different...
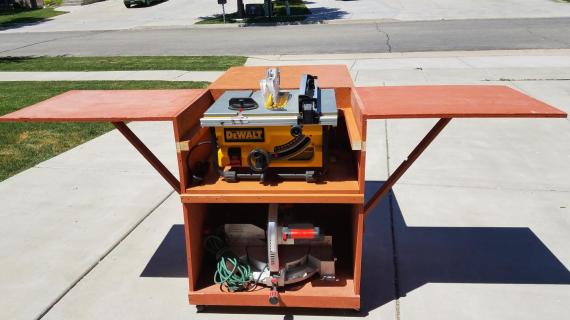
Thanx for the plan! I'm gonna build, but with a removable saw shelf that has 2 heights...one for the miter saw, and once for my table saw. I'll post pics when I'm done.
CanadaMarg (not verified)
Sat, 09/29/2012 - 20:34
Mitre Saw Cart!
Thanks for the plans and these comments! I made the cart this afternoon out of an old Ikea cabinet that was junk from a friend's kitchen reno, and some building material scraps. I had to make the wing "locks" out of 2x2's bc i live out in the country and didnt want to make a special drive past out nuts-and-bolts hardware store. Total investment- $15!
The best part- now I can roll the mitre saw outside when I do projects, and keep the garage from getting so dusty!
coasterbrake
Thu, 04/04/2013 - 09:14
Built it!
It was super-easy to build this. My tips are:
-- buy locking caster wheels. That really should have been obvious, but wasn't to me.
-- don't forget to acquire fasteners for the support pieces. I used nails left over from previous projects
-- do only one folding shelf if you need to reduce costs (or if you forgot to buy two PAIRS of brackets)
-- a long clamp will serve you well when you're screwing it together. Otherwise, you may need another set of hands to get everything square.
davidmauer15
Thu, 07/11/2013 - 13:43
Ways to hold up the wings
I can see three ways of propping up the wings.
1. Use the metal shelf supports that Gina suggests. Expensive though.
2. Some people have put in two stop blocks and put a 2x2 or 1x2 in to hold up the wings. I tried this and it works okay, especially if you use two pieces of wood per side.
3. Couldn't you make some sort of hinged support that folds out to hold up the wing and then folds away when you don't needs the wings?
G5Flyr
Thu, 05/22/2014 - 20:26
Great Plan!
Thanks for coming up with this and posting it for all of us. This is by far the simplest and least expensive of any DIY miter saw station I have seen. I can't wait to get started!
vireoes
Fri, 08/15/2014 - 21:47
Wings fall off
I built this cart attaching the wings using the brackets suggested. The brackets don't seem strong enough and the screws have ripped out of the plywood dropping the wings to the ground several times. Anyone else have a simple plan they could outline to secure the wings a different way.
M Harlicker
Mon, 11/10/2014 - 16:49
Modification?
I would love to see a workbench modified to include a "dropped shelf" to hold my miter saw that I could close or cover while not using it. I've seen an awesome workbench, but just can't remember where--been searching so many blogs I can't keep them straight! I'll have to think on it more and see if I can come up with a plan...
froman1960
Fri, 09/15/2017 - 20:57
Modification
I saw one with a top cover too and one attaching the shop vac to it from the back. But when I finally buy a house I'm going to make one of those flip tops so I can rotate it and have a flat surface to work on. It will also have the table saw attached and maybe my router. Big dreamer that I am.
DrOcean51
Tue, 05/05/2015 - 18:51
PLAN ON BUILDING THIS
What size casters did you use?
anointed builder
Tue, 07/28/2015 - 14:51
Very inexpensive project.
Very inexpensive project.
EmH-C
Mon, 08/31/2015 - 11:00
Can't wait to get started - thank you so much!
This is going to be my first proper project (not just adapting stuff I bought). It's going to enable me to make all the other stuff I want to make comfortably and safely. I've adjusted some measurements to customise it to fit my small miter saw and fit into my new little workshop. I've had to adjust to metric lumber and what's available in B&Q (I'm a Brit). I'm starting tomorrow. Will let you know how I get on.
Thanks ever so much for the plans and inspiration.
In reply to Can't wait to get started - thank you so much! by EmH-C
Ana White
Mon, 08/31/2015 - 19:30
Can't wait to see it!
Can't wait to see it!
EmH-C
Mon, 09/14/2015 - 06:30
I finally got it finished. Thanks Ana.
I finally got my miter saw table done. It took a bit longer than I would've liked and it's far from perfect, but to me it is a thing of beauty.
Well, maybe not beauty exactly, but I'm so pleased with it!
I want to say a huge thank you Ana. This is going to enable me to make stuff comfortably and safely. It's a big deal because I have MS and being enabled to do new things, rather than being disabled by the symptoms of my MS feels terrific. It's part of me fighting back.
Thank you Ana, for the plans and the inspiration.
Em
In reply to I finally got it finished. Thanks Ana. by EmH-C
Ana White
Mon, 09/14/2015 - 12:00
Hi Em,
Hi Em,
I am so thrilled to hear that! Thank you for sharing.
froman1960
Fri, 09/15/2017 - 20:41
Plywood
Is that hard or soft plywood?
The new measurements are 23/32. Some are 3/4" but that 23/32 messed me up for a bit.
SuperMick
Wed, 01/09/2019 - 05:54
Better hinges
I built this cart years ago, and love it. However the hinges mentioned wore out quickly. I have replaced them with these, which work much better.
HOFFEN 14" Black Paint Folding Shelf Bracket Industrial Decorative Wall Lip Folding Table Legs Brackets Heavy Duty https://www.amazon.com/dp/B07BHCN94G/ref=cm_sw_r_cp_apa_i_fQFnCbVP2JTBW
ivyfamily5
Sat, 09/19/2020 - 13:39
Such a great workspace
I started with this plan and tweaked it a little bit. I love it! I love all of your plans, Ana White. Thank you so much for sharing your passion with us.