


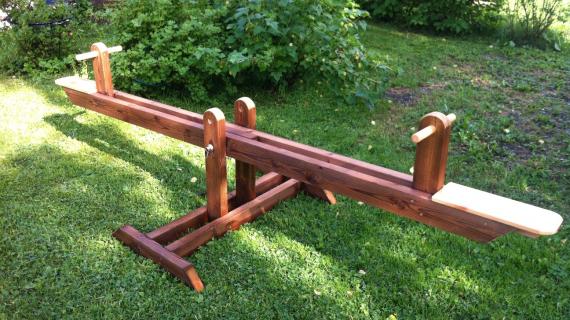
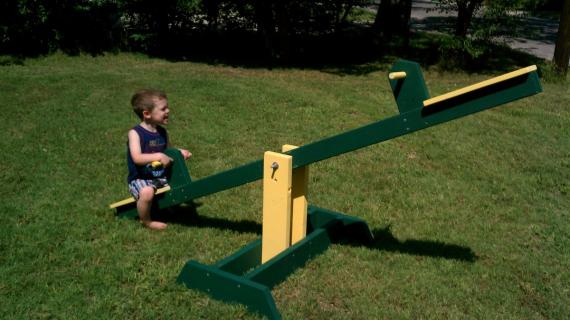
Make a teeter totter or seesaw for less than $20! You'll just need some 2x framing lumber, a bolt and screws, and our free, easy step by step seesaw plans.
This project has been built hundreds (if not thousands) of times and beloved by children everywhere. Build and use at your own risk.
Preparation
2 – 2x4 @ 8 feet long
2 – 2x6 @ 8 feet long
1 – 10” 5/8” bolt with nut and four washers
1 – 1x8 @ 3 feet long
1 – 24” 1” dowel or closet rod
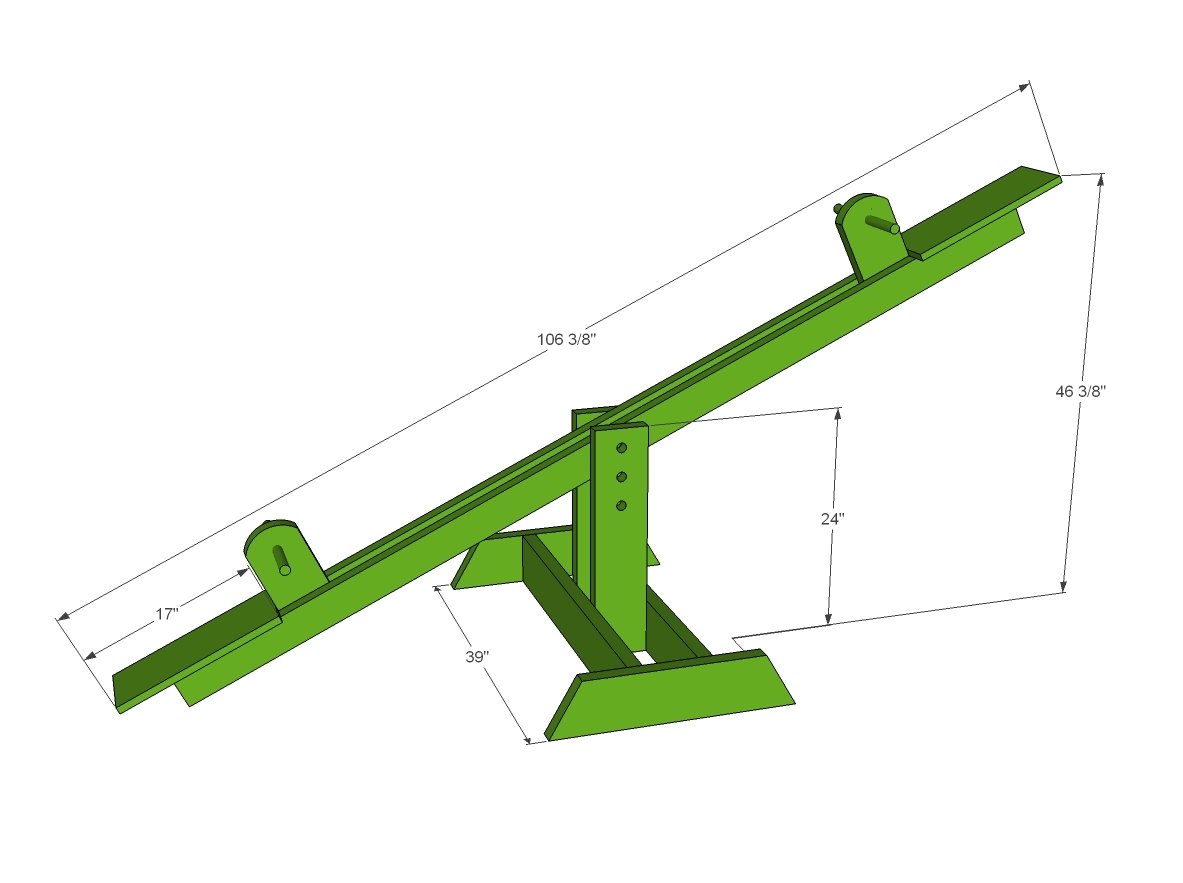
2 – 2x4 @ 96”
2 – 2x6 @ 24” (uprights)
2 – 2x6 @ 36” (long base)
2 – 2x6 @ 24” (short base - both ends cut at 30 degrees off square ends NOT parallel to each other)
2 – 2x6 @ 12” (scrap piece can be shorter than 12” – used for handle)
FROM EACH 2x6 cut one each of the 24”, 36”, 24” and 12” to conserve boards


Please read through the entire plan and all comments before beginning this project. It is also advisable to review the Getting Started Section. Take all necessary precautions to build safely and smartly. Work on a clean level surface, free of imperfections or debris. Always use straight boards. Check for square after each step. Always predrill holes before attaching with screws. Use glue with finish nails for a stronger hold. Wipe excess glue off bare wood for stained projects, as dried glue will not take stain. Be safe, have fun, and ask for help if you need it. Good luck!
Instructions
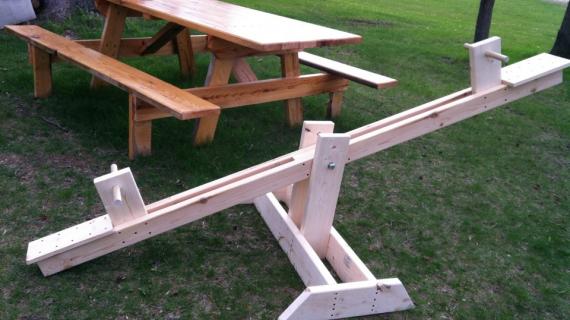
Step 1

Attach long base supports to uprights with lots of screws and glue.
Step 2

Then add the side supports again with lots of screws and glue.
Step 3

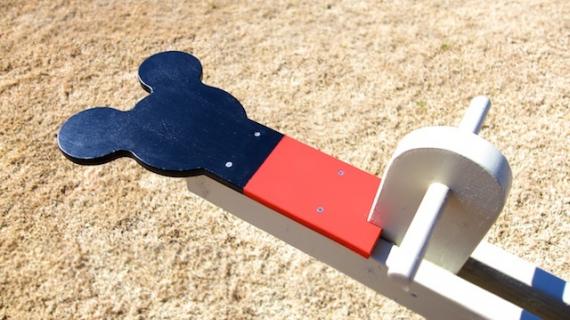
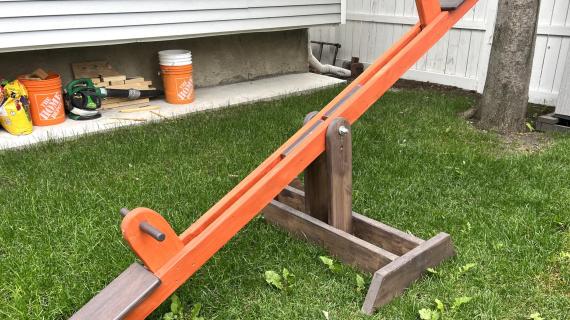
Build the seat part by sandwiching the handle supports between 8 foot long 2x4s and attaching with glue and lots of screws. Drill a 5/8" hole in center of 2x4s for the pivot bolt.
Step 4
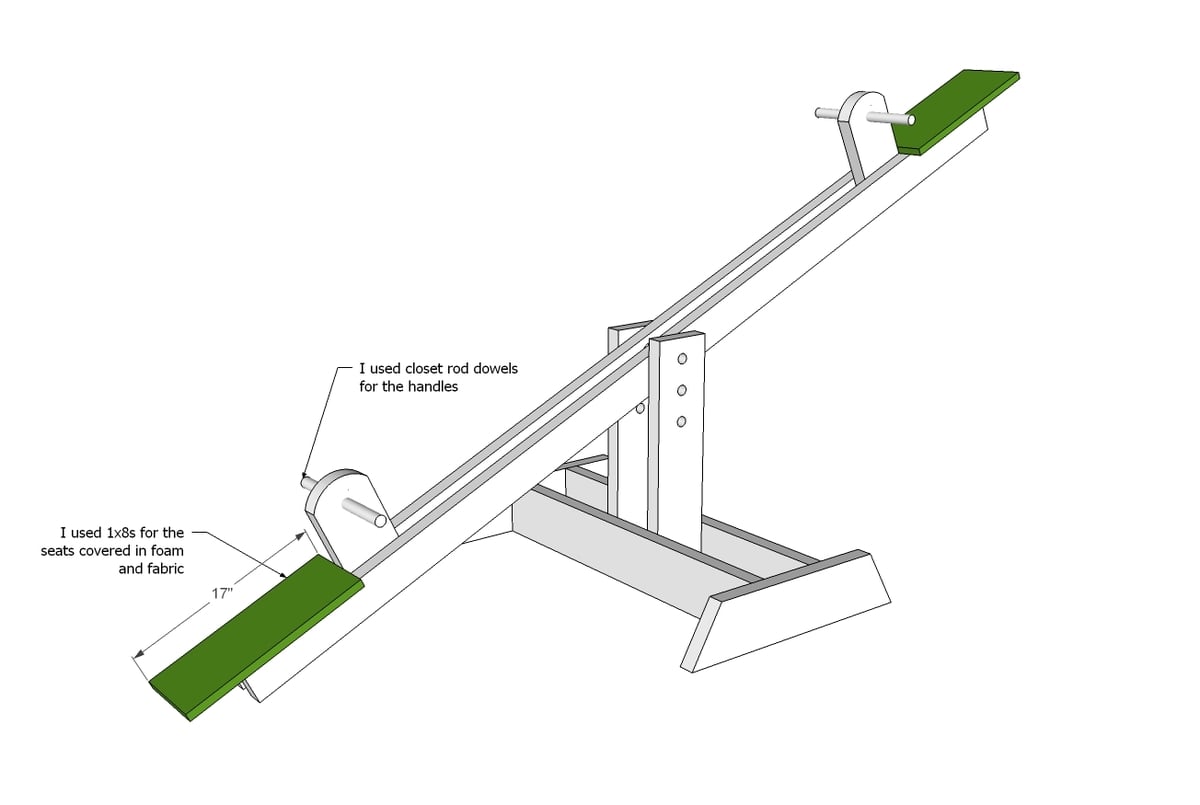
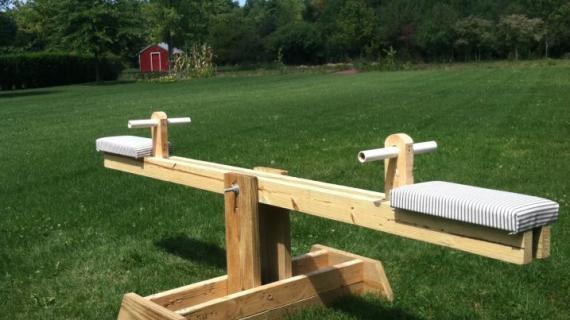
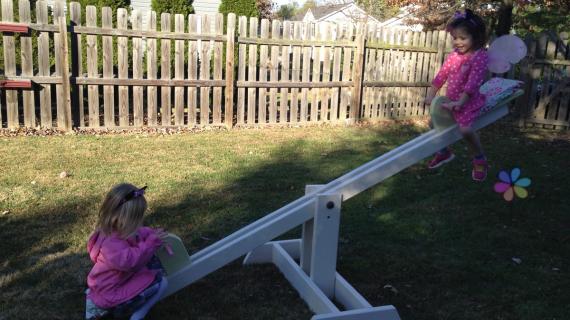
I used scrap 1x8 boards for the seats, covered in a foam chair pad cut in half and outdoor fabric. I drilled three holes in the uprights with 5/8" bit so the seesaw could be adjustable. The most difficult part of this seesaw was getting the bolt holes lined up. We ended up just making the bolt holes a little larger so the bolts could pass through easier. On the bolt, we put washers on each side of the uprights to protect the finish and for a smoother ride. For the handles, we had extra closet rod dowel, so we just cut to size, and drilled a hole and inserted the rod. We then glued and screwed in place.
It is always recommended to apply a test coat on a hidden area or scrap piece to ensure color evenness and adhesion. Use primer or wood conditioner as needed.
Comments
Lady Goats
Thu, 05/03/2012 - 11:54
How great!
When I saw the picture of Grace on your header, I was so anxious to see if there were plans for this! OH YAY!!!! Those girls are 1.) just TOO cute, and 2.) SO happy! I seriously need to find a place for this (and TOTALLY agree that the "safe" TV isn't so safe!).
Danielle Z. (not verified)
Thu, 05/03/2012 - 12:32
Um, awesome!!
I love this!!! I'm heading to town tonight to pick up lumber to start a new project and might just grab a little extra to do this too! I am wondering if you had to guess, how big can the kids be until they're too big for this?
I have three boys (9, 7 & 5) and I'd hope they'd all get a little use out of this before they're too big. Not holding you to anything, just wondering what your opinion might be??
You're absolutely right! Laying around watching TV or playing computer games all day (my boys' vice) is a heck of a lot more dangerous than any "dangerous" piece of play equipment!
sotomorrow (not verified)
Thu, 05/03/2012 - 12:45
This is an amazing birthday
This is an amazing birthday gift! I just had my birthday (the big 2-8) and I wish I had gotten a see saw!
redhead_61
Thu, 05/03/2012 - 12:51
PERFECT
Ana:
This was totally on my list of things to pitch to you draw up plans for. I don't have enough room in my backyard, but we are opening up the cabin this weekend and it would be perfect there!
I love that it is adjustable. I was going to suggest drilling additional holes on the actual seesaw part so that it can be moved laterally. That way one side is heavier say if my 2 year old and my 4 year old want to go together. That would help offset the weight difference right? I was also thinking you could add a little front and back lip to the seat to make it a little safer? LOVE IT
Legomamaof4
Thu, 05/03/2012 - 14:20
This plan is on my MUST DO LIST!
When was the freedom of playing on the Swing set, Teeter totter and marry-go-round so bad? Yeah occasionally you got a bump, bruise and broken bone, but that was the fun of being a KID! You bounced back!
I love this design. Thank you, thank you, and thank you for all of your wonderful plans. Simple things like the dollhouse and outdoor play are bringing back the fun in being a kid again!
I will definitely make this for Papa and Grandma's House for this SUMMER.
dananryan
Thu, 05/03/2012 - 19:31
Weight limit?
Oh Ana, where were you when my children were little...what do you think the weight limit is on this wonderful toy? You never sieze to amaze me. Lucky birthday girl!
Darrell from M… (not verified)
Fri, 05/04/2012 - 08:32
SeeSaw improvement
Use a piece of pipe (for a bushing) for the 10" X 5/8" bolt to go through to save wearing of the wood as the SeeSaw goes up and down.
babysteps
Fri, 05/04/2012 - 16:19
I was thinking the same
I was thinking the same thing. It will last longer.
In reply to I was thinking the same by babysteps
Ana White
Fri, 05/04/2012 - 17:11
Great idea!!! Thanks for
Great idea!!! Thanks for taking your time to improve the plans!
Cindy from Indiana (not verified)
Fri, 05/04/2012 - 09:28
I love this!
Holy smokes, I love this project!
Hmmm, I never thought to search your site for outdoor play equipment before. Now I am going to have to do that for our daughter - she's 5!
And if you don't have other plans for play equipment, then I'm not above begging for some...hint, hint, hint. ;-)
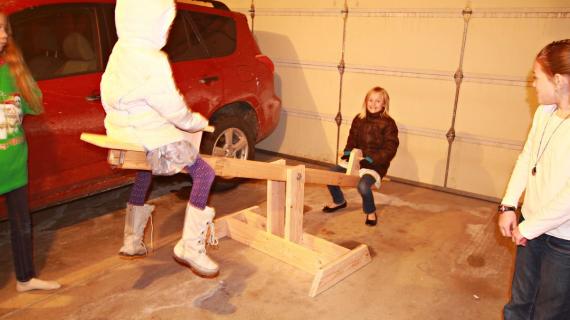
This turned out great - two adorable girls on a great new toy.
Great job!
Aisha_ (not verified)
Fri, 05/04/2012 - 12:08
Thank you! Thank you Ana!!
Thank you! Thank you Ana!! Can't wait to make this for the kids! What type of finish did you use on yours? Should I get cedar if I don't want to stain it that way it will weather nicely outside.
aclayton
Fri, 05/04/2012 - 15:00
Type of Wood?
What type of wood did you use for this project? Did you stain it or seal it in any way?
Ana White
Fri, 05/04/2012 - 17:13
Hi everyone! We used regular
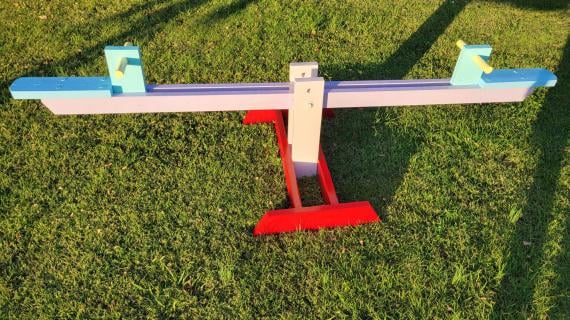
Hi everyone! We used regular stud grade lumber for this project. I did not want to use treated because the kids will be touching it. We did not have time to paint, but recommend to the parents to paint and keep up with the paint job. Just like a wood house, as long as the finish is properly applied and maintained, the wood will last through your child's childhood and beyond.
Thank you everyone for your nice comments - I hope you build this project! So fun to see the kids enjoying it!
Alvin Schrock (not verified)
Fri, 05/04/2012 - 19:26
SeeSaw
I love the insight from everyone on something as fun as this. I look forward to building it for my kids.
Thanks, Alvin
debandtom25
Sat, 05/05/2012 - 04:13
Yes!!
My daughter saw this and demanded to have one. Okay princess, mommy will get right on it. :)
Leslie in RI (not verified)
Sat, 05/05/2012 - 11:36
I Want One!
Ana, I love this seesaw and was wondering: Have you ever thought of building one for adults? I was watching some crazy HGTV show last night and there was an adult sized seesaw and it was so awesome, so now I want one.
Pretty please?
titewad65no (not verified)
Mon, 05/07/2012 - 08:14
Weight
All, I was looking for a plan and found this and it's GREAT. I used 2x6's for everything. I also put an extra 2x6x2 where the bolt goes inbetween the two long 2x6's. Last night i was on one end and a 5, 10 and 10 year old was on the other end. NO problems with stressing it. I'd feel fine with an adult on each end. using 2x6's instead of 2x4's makes it a bit heavy for moving, but is a solid smooth ride. If I were to redo it, i'd make the upright support posts higher (up-to-3 feet) with holes drilled up and down to adjust. That way you'd have 5 year old heights as well as 10 and adult! :) I also added 3" lag bolts in the support area's along with the 3" screws. Hit me up via email if you have more questions on what i did, but it's a great plan and THANK YOU very much. Neighbors have already commited on how good it looks
brad deegan (not verified)
Thu, 12/13/2012 - 00:20
How high?
just wondering how high you would make it were you to make it again? I am getting set to build this for my daughter and would love to play on it with her. Also thanks for the tip of using heavier wood to be stronger.
tiffanycoalson
Fri, 03/27/2015 - 07:28
Type of Wood
Hi,
I was wondering what type of wood you used. Would stud grade wood be sturdy enough for adults? Thank you!
In reply to Type of Wood by tiffanycoalson
Ana White
Fri, 03/27/2015 - 12:30
Pine boards, stud grade
Pine boards, stud grade plenty sturdy. Hope this helps!
jviamikus
Thu, 05/10/2012 - 03:36
LOVE IT!!!!! I have 2
LOVE IT!!!!! I have 2 daughters with birthdays in June and July this is going to be my 4 year olds Gift!!!!!! THANK YOU SO MUCH. I found your blog one day when looking for ideas on ways to make your own storage items. At that time had not used a saw and had a hard time with a drill. I started small with a hand saw and a hammer and nails. My husband and the small family owned hardware store got a kick out of me. My husband saw that this was not just a fase I was going through and I was kind of good at it. He has been teaching me how to do things and has went through his tools and has giving me a buch of things he dose not use any more. I now have a buch of wood working tool and loads of support form my huband. This has brought us closer as well. We were having a lot of trouble when I started this and by us working together amnd him showing me how to do things we have spent more time together and have enjoyed each others company. Thank you so much
hammertime
Thu, 05/10/2012 - 08:09
Cut list question?
I am working on this right now, but I think the short bases are supposed to be 2x6. Therefore, I think the cut list should read 2x6 rather than 2x4 for the short bases. I'm a beginner builder, so correct me if I'm mistaken!
Milca (not verified)
Tue, 05/15/2012 - 11:31
Exactly what I wanted to build this summer!
Built a playhouse for the kids 3 years ago with little improvements each year. This year I was thinking we needed a seesaw to complement the rest. What perfect timing :) Thank you sooooo much for taking the time to draw up the plans!
party venues i… (not verified)
Sun, 09/09/2012 - 03:10
Perfect birthday gift to
Perfect birthday gift to energetic, active kids! They will certainly love having a piece of the playground in their own yard!
jeremiah (not verified)
Wed, 11/21/2012 - 09:11
Love this project.. I have a question though..
First off, I love this project and thanks for posting it!
I am using 2x6 for everything.. but when I drill out the hole for the dowel it will not fit into it.. 1inch dowel, 1inch bit..
I dont want too much wiggle, but I was wondering what size bit you used..
Thank you!
Happy Thanksgiving too!
Ping Kwan (not verified)
Wed, 01/02/2013 - 17:57
Nice one!
I love SeeSaw so much! Thank you for your sharing!
csaksmith
Sat, 01/10/2015 - 13:23
Typo
The dimensions under "cuts" for the short base is wrong. It says it is a 2x4 but it should be a 2x6.
Okie89
Thu, 05/21/2015 - 20:28
Thanks
I needed a seesaw as a prop in a show my wife is producing. This plan went together in nothing flat, mostly with lumber I had lying around the shop. FYI, the trick to getting the 5/8" holes to align is to use a 5/8" dowel to line everything up as you put it together.
Moonlight1968
Fri, 07/24/2015 - 15:57
Attaching seat
How did you attach the seat? I covered it in padding and fabric but do not see a way to attach the seat now. Thanks!
lrfreitas.ocean
Mon, 09/13/2021 - 09:14
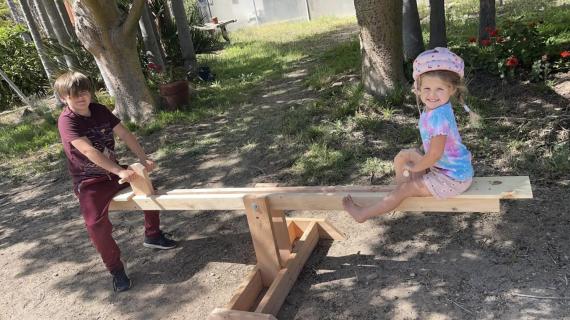
Just finished building this…
Just finished building this. My daughter didn't even waited to be properly finished to start playing. She loved it.
For those who don't find same material (we dont have 2x4 or 2x6 and it's hard to find straight boards at hardware store) it's possible to adapt.
I used 2000mm boards in length, 4,5 x 10 cm eucalyptus, four in total. From 2 of it I cut the pieces by reducing them in proportion: 25cm, 50cm, 75cm and 25cm. Didn't waisted anything! Even the scrap pieces from the 30° cuts where used to form a diamond (glue 2 triangles together) and place in-between the long ones, so the 5/8" screw could find another support.
Now it's time to sand, apply router in the edges and paint it.
Thanks for the lovely project!