


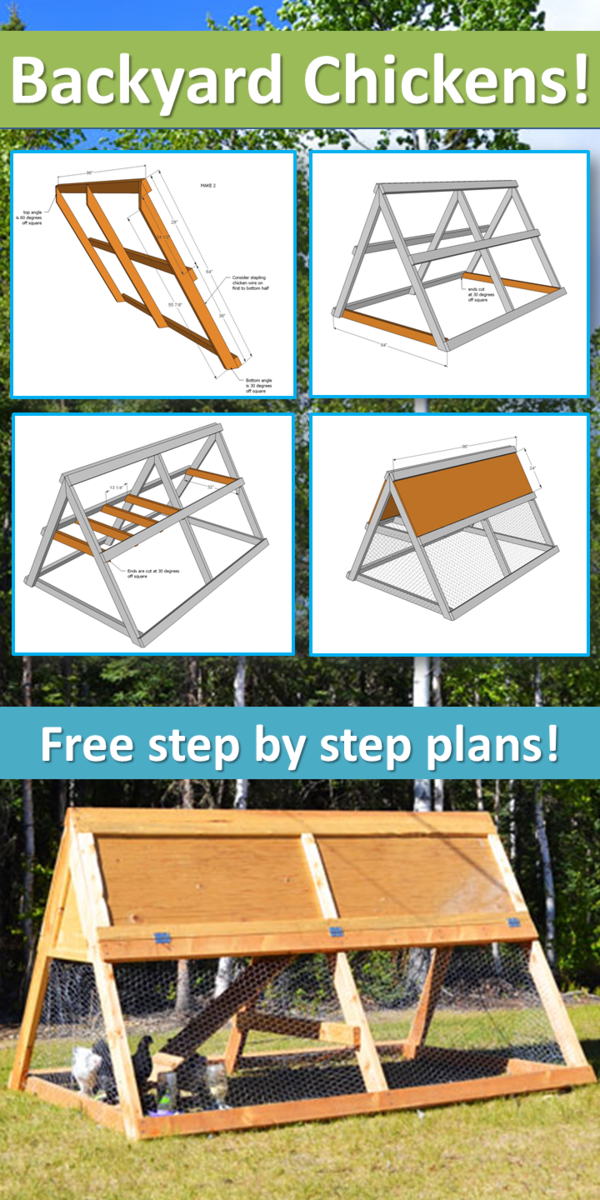
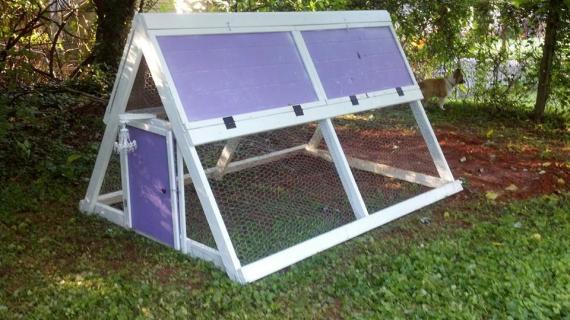
How to build A Frame Chicken Coop - portable and small with built in nesting box and perch. You'll love our easy to follow free plans from Ana-White.com. Builders spend about $100 building this coop.
UPDATE: I have created new, updated plans for this chicken coop here.
Scramble made it up the ladder yesterday.
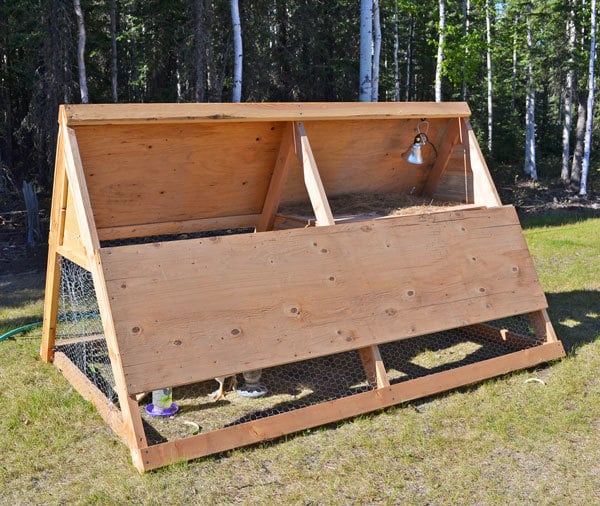
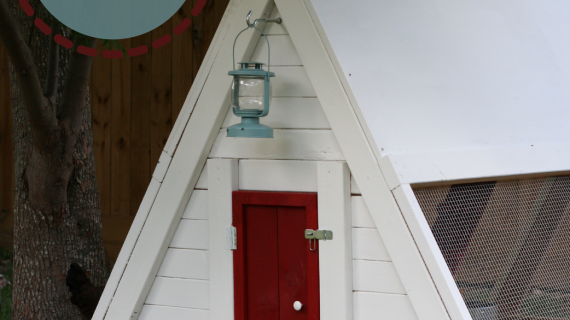
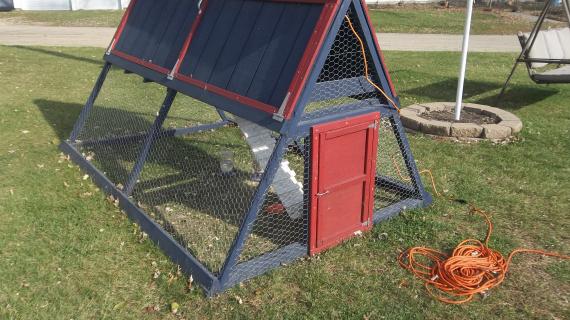
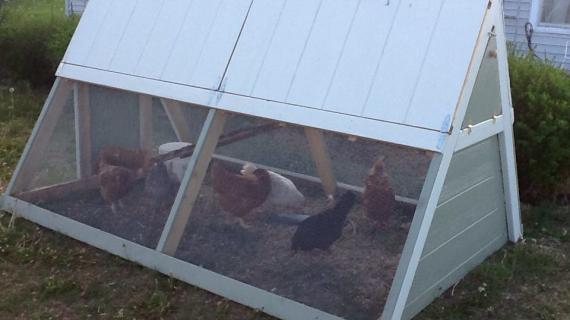
Our girls - French Toast, Sunny, Easy and we hope Scramble is indeed a lady too - have been enjoying this simple, easy to make and portable A Frame style chicken coop for about a month now.
Pin For Later!


Preparation
- 14 - 2x4s, 8 feet long
- 1 - sheet 3/4" t1-11
- 6 total T-Strap hinges
- 30 feet of 30" wide chicken wire (I used 36" because I couldn't find 30" locally)
- 2 3/4" exterior self tapping deck screws
- 1/2" exterior staples for chicken wire
- scrap plywood piece for floor of upstairs coop and ladder
- Optional 1x2s for trim out if desired
- 6 - 2x4 @ 64" (Long point measurement, top end cut at 60 degrees off square, bottom end cut at 30 degrees off square)
- 6 - 2x4 @ 96"
- 2 - 2x4 @ 64" (Long point measurement, both ends cut at 30 degrees off square)
- 5 - 2x4 @ 32" (Long point measurement, both ends cut at 30 degrees off square)
- 4 - pieces t1-11 siding cut into 24" x 48" pieces
- Optional 1x2 trim


Please read through the entire plan and all comments before beginning this project. It is also advisable to review the Getting Started Section. Take all necessary precautions to build safely and smartly. Work on a clean level surface, free of imperfections or debris. Always use straight boards. Check for square after each step. Always predrill holes before attaching with screws. Use glue with finish nails for a stronger hold. Wipe excess glue off bare wood for stained projects, as dried glue will not take stain. Be safe, have fun, and ask for help if you need it. Good luck!
Instructions
Step 1

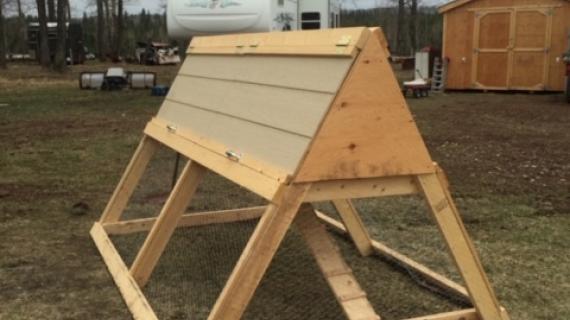
Cutting the top angle is going to be a pain - I know - if your miter saw does not cut 60 degree angles. What you will need to do is mark the angles with your square and then cut with a circular saw. Remember, it's 60 degrees off square.
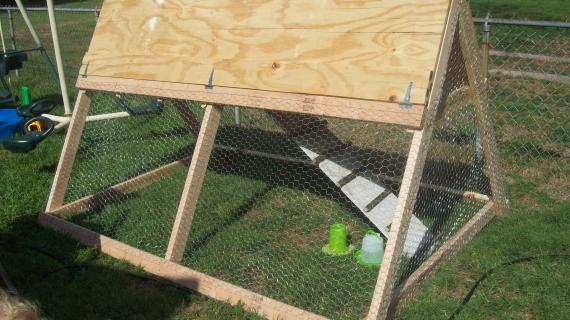
Once you have your rafters cut, then you can simply attach the side support boards. NOTE: I left a 24 1/2" gap for 24" wide t1-11 - you may wish to leave a slightly wider gap for easier access to the upstairs coop - or you can cut your plywood down to fit.
Another trick here is to cover the bottom with chicken wire. These things are always easier done now rather than when you are inside the coop :)
Step 2

Once you have the two walls built, just attach at base with base supports. Then attach tops with countersunk screws.
Step 3
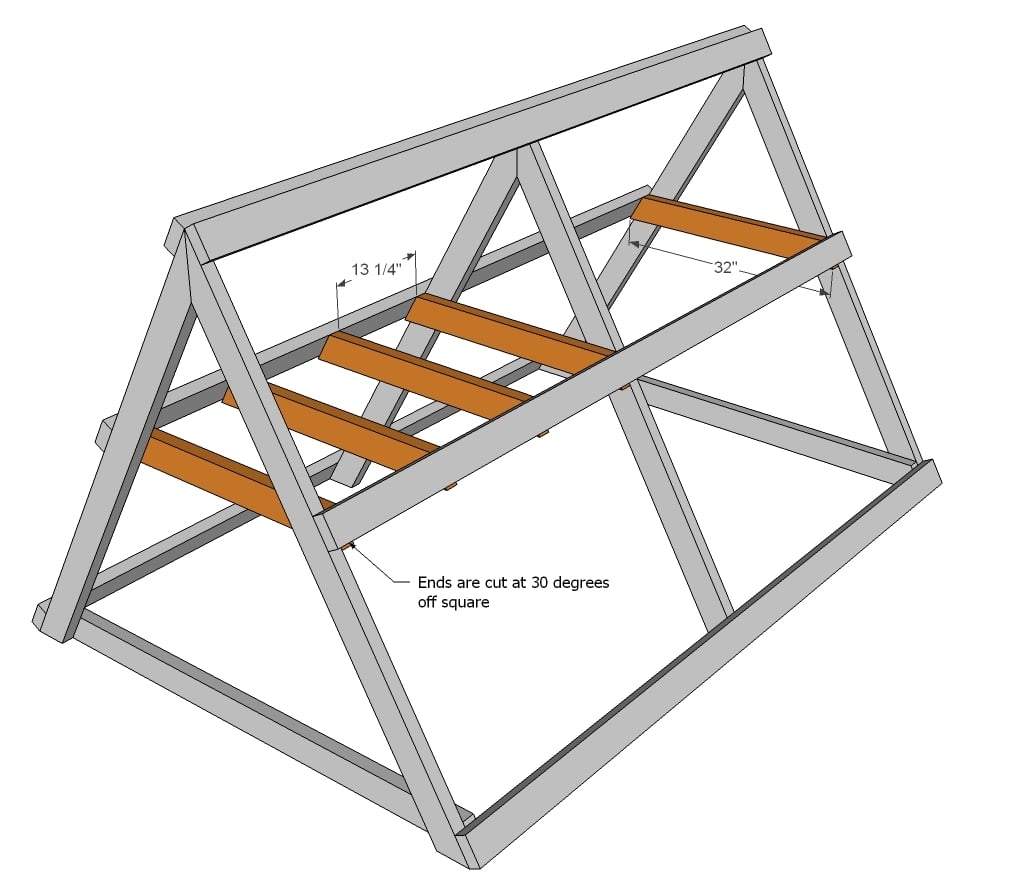
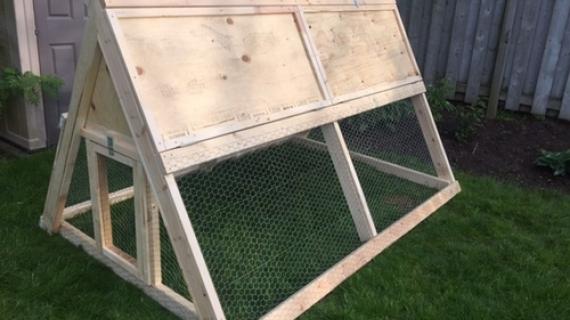
Thes are really going to add a ton of strength to the coop! And make a floor for the upstairs room. Attach from outside with the 2 3/4" exterior screws.
Step 4

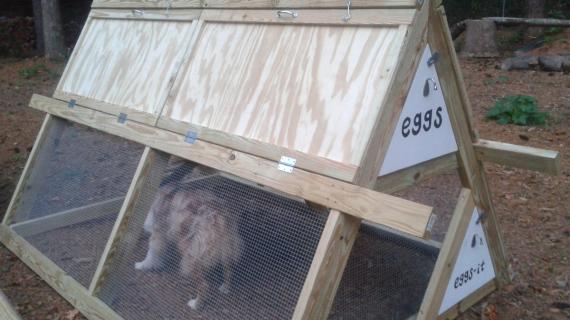
Now add the doors. For mine, we used two full doors, but a better idea would be to split the doors into two so accessing the different sections is easier.
NOTE: We trimmed out the doors in 1x3s for added strength and because the hinges we had required it.
Step 5

It is always recommended to apply a test coat on a hidden area or scrap piece to ensure color evenness and adhesion. Use primer or wood conditioner as needed.


Comments
Cheramie (not verified)
Thu, 05/31/2012 - 17:29
Wow, Ana!!! You guys are so
Wow, Ana!!! You guys are so incredible about just picking a direction and running with it! I'm so impressed, once again! We have a coop on wheels that's been done for about a year, but still can't move the chickens out of the stationary one because we haven't gone to the trouble to put together the wired 'run' area that will slip over the front of our little chicken ark. :) Thanks for the inspiration to get them outside fertilizing our yard and get us done scooping poop!
Ginger (not verified)
Fri, 06/01/2012 - 13:14
Great design! I need to make
Great design! I need to make one this weekend.
If anyone building this has raccoons in their area, be aware that raccoons can tear right through chicken wire. Not all will, but they can. For a bit more predator proof coop you might want to consider using welded wire, it is more expensive, but worth it in the long run. Oh, and the small square welded wire is better than the large so the raccoons can't reach in a try and pull the chickens through. Once again, ask me how I know. Hopefully you can learn from my experience.
Lavina Dee (not verified)
Fri, 06/01/2012 - 23:15
Great job! Just an FYI, we
Great job! Just an FYI, we don't heat our chickens (Were on the Kenai Pen.) and they tend to do better when kept at a consistent temp. We don't heat our girls at all. Not even in the winter. Granted our temps are more mild than yours but they don't need blankets or heaters in the summer. They will grow a thicker layer of feathers and they will huddle for warmth. We love having fresh eggs and will never go back to store-bought!
summer.ross84
Sun, 06/03/2012 - 12:28
Made this!
My husband and son made this yesterday for our chicken Penny. It turned out great. Thanks for the plans!
anniejw17
Mon, 06/18/2012 - 12:42
Coop in progress!
My husband and I built most of this yesterday evening. It took about 4 hours, and we still have to put in the roost floor, make an egg door, and trim out and put on the side doors. So far materials have cost just under $200, but I did buy some extra hardware cloth (not chicken wire). I've made a few modifications; I'll be sure to post pics when I'm done! This week we'll add the feeder and waterer (planning to DIY using PVC), make the ladder, and add a door at the bottom of the coop to let the chickens out to free range. We don't have chickens yet but I have begun the search. If anyone in northwest Atlanta has some who need a loving home, let me know!
Cinnamongrrl
Thu, 03/19/2015 - 12:21
Coop in progress! Update?
Anniejw17-- I recently moved to Northwest Atlanta and was wondering if you'd found a good chicken supplier? I'm still trying to get things ready for my chicks, and would LOVE more info. on this particular area. Also, would love to see pics. of the coop!
Linda Johnson (not verified)
Thu, 07/26/2012 - 11:52
What is the capacity of your
What is the capacity of your henhouse? Could you have a couple more chickens in it?
You might freerange if you sewed those jackets for them that they fall out of when a hawk picks them up by it! The collar extends up over their necks like Elvis with his collar up, and when they get picked up by the quilted jacket, they sag down under it and their wings fall out of the armholes. The hawk is left with nothing but a quilted jacket...unless he comes back, I guess. Then the chicken wouldn't be wearing her jacket. Hawks might figure this out!
Eri (not verified)
Sat, 08/04/2012 - 20:33
Make this into a tractor?
Aloha Ana!
I'm really digging this A-fram coop design of yours, but am wondering if you have any ideas on how to easily convert it into a tractor with wheels and a handle? I have a few ideas, but wondering what the logistics look like in your mind.
Looking forward to hearing back from you.
Mahalo,
Eri
Elena (not verified)
Wed, 08/08/2012 - 08:13
This is very cool! Nicely
This is very cool! Nicely done.
michael s (not verified)
Fri, 08/10/2012 - 05:22
This weekend
Two weeks ago we lost 4 of our chickens to a hawk or fox. I've been crawling the internet looking for something we can use as a tractor and it seems that adding two wheels to the back of this coop should accomplish this. We're going to try to build the coop this weekend. Will update on cost and time once done. Thanks for posting!
Michael S (not verified)
Sun, 08/12/2012 - 15:40
Done
Did it this morning! Took 7 hours after getting the materials. Few notes:
- Cutting the 60 degree angles correctly represented the most significant preparation component.
- Biggest time eater was the cloth wire. I got durable cloth and stapled it on the inside.
- It is much much heavier than expected.
Modifications:
- I added wheels to the back for use it as a run/tractor.
- I split the doors into four, two on each side, which required trimming using 1x3s for strength and to accommodate the hinges.
Cost about $150 total (material purchased at Lowes)
Meg Smith (not verified)
Tue, 09/25/2012 - 11:57
I am planning to build this
I am planning to build this coop this weekend with a couple modifications already in mind:
-I will be using 1x3s for the side support boards and bottom base supports.
-2x3s for the rafters and floor braces
-Finish out the upstairs before dealing with doors.
-Adding handles, which used to be wooden curtain rods, to be installed underneath the upstairs support beams
-I will be using two pieces of a shipping crate for the doors, so they will jut like eaves over the middle support board.
-And lastly, I plan to make a door on the wheeled end so the chickens can come and go if they ever have a chance to free range.
Annemieke (not verified)
Sun, 09/30/2012 - 03:23
A frame Chicken Coop
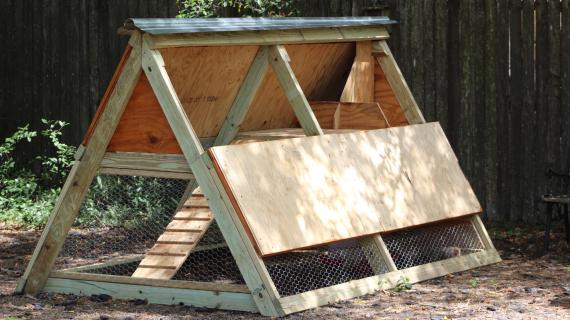
Made this chicken coop. We did ours in hardwood and used marine ply for the roof. We also split the doors (so 2 each side) and did the triangular door to the egg section. We also put a door at the bottom to make it easier to let them out and free range. It turned out more expensive and it very heavy but we managed to pull it along with the ride on lawn mower!! The 3 bantam hens are in there and have already made themselves at home. Thanks for the plans!
Tara Humara (not verified)
Wed, 10/03/2012 - 16:33
Chicken Coop Fun!
It turned out really nice; thank you! But...
This chicken coop took forever to build.. my boyfriend and I did it in a couple days maybe 6 hours each day. I'm impaired when it comes to building anything and scared of power tools. It did turn out really nice, but it was not an easy project. I'm really surprised that we didn't kill each other with the saw or drill. I know a few times I thought about hitting him with a 2 x 4 for making fun of me because I couldn't figure out how a support board fit into the frame or because I was putting the hinges on backwards. He cut one of the boards short though, ha! But I can't use a t-square and wanted to pitch it over the fence.
He'll read this and laugh I'm sure.
It was a really good project though, and maybe after he was done saying the B word a million times our relationship is actually better than before. :)
Michael M (not verified)
Thu, 11/15/2012 - 17:47
Nesting
Great design, like many others I made a few modifications ... doors for upstairs and downstairs, and a fixed corrugated metal roof. curtain rod for roosting.
I have a question about egg laying. We have three young chickens all different breeds, they are now right about at the age where they should start laying, horrible timing too as it is now getting really cold! The upstairs has a nice straw layer for them, and they sleep up there. They do use the roost occasionally but not at night as far as I can tell. Did anyone add any kind of nest box? I assumed that the whole upstairs would be the nest/egg area (this is our first time having chickens). It fills up with poop pretty fast so we clean it out regularly and replace the straw. Also threw in a few golf balls to send them a message that they should start laying up there. Thinking about putting a heat lamp in too.
Trying to be patient. Am I doing it right??
tashmoore
Sun, 07/19/2015 - 04:58
nest box
I know you have probably already figured this out, but for any newbies reading this chickens need a seperate place to nest. Away from the poop. That is one thing I don't like about this design (the other thing is it only holds 4 chickens, which is good for the city, but I live in the country :) ). You could get a milk crate or a small cat litter box (12X12 at least) and fill it with straw or wood chips and put your golf balls in there. When they are ready to lay they will lay, and even with a nest box they might not lay in the 'right place' right away. Just leave the golf balls (or dummy eggs) and they will figure it out eventually.
Michael M (not verified)
Thu, 11/15/2012 - 17:49
Great design, like many
Great design, like many others I made a few modifications ... doors for upstairs and downstairs, and a fixed corrugated metal roof. curtain rod for roosting.
I have a question about egg laying. We have three young chickens all different breeds, they are now right about at the age where they should start laying, horrible timing too as it is now getting really cold! The upstairs has a nice straw layer for them, and they sleep up there. They do use the roost occasionally but not at night as far as I can tell. Did anyone add any kind of nest box? I assumed that the whole upstairs would be the nest/egg area (this is our first time having chickens). It fills up with poop pretty fast so we clean it out regularly and replace the straw. Also threw in a few golf balls to send them a message that they should start laying up there. Thinking about putting a heat lamp in too.
Trying to be patient. Am I doing it right??
billd333
Fri, 06/13/2014 - 09:50
A-Frame coop question
Hi Michael, couild you tell me specifically where you installed the curtain rod for the roost?
Thx,
Bill
suthap klomrod (not verified)
Sun, 01/20/2013 - 02:03
It wasn't until I found this
It wasn't until I found this site that I finally completed my chicken coop project. Learn how to build your own chicken coop and start raising chickens in your own backyard. Details here http://bit.ly/UpVkyz
stellvilla
Tue, 09/24/2013 - 07:01
sketchup model
This looks great! Would you be willing to share the sketchup model?
PhoenixWytch
Mon, 02/01/2016 - 13:41
Needed So Badly!
We need this so badly. We bought a coop from the store, but it was damaged when we moved to our new house. While I've patched it to the best of my ability, so a new coop is third on my To Do list.
Stephtait1
Wed, 12/13/2017 - 12:45
Does the up stairs area need a floor??
Hello! Can someone tell me if I need to lay some kind of floor down in the top part of the A frame? Or is it supposed to just be the blanks for roosting??? I’m a first timer! Any advice would Ben most appreciated!
MTfan
Tue, 08/20/2019 - 10:23
Keeping the rain out (?)
I am in the process of building this a-frame coop and am wondering how to keep the rain from coming into the coop at the top of the doors? HELP PLEASE!
MTfan
Fri, 08/30/2019 - 08:07
Highly UN-recommended plan
I am no stranger to making things. I am more active in the garage than my husband. And yet this A-Frame Coop project was a pain from beginning to end. I do NOT think it should be rated as "Beginner" level. There are many things left out of the plans that need to be figured out on your own (ie: the floor for the upper level of the coop, ladder, roosting bar, nest box). And then of course there is the water that comes in through the top of the doors. Nobody seems to have a solution for that one. As a matter of fact, after working on this project for over one month, I'm still trying to figure that problem out.
I would never recommend this coop to anyone.
jrt
Sun, 09/08/2019 - 10:40
After using this coop for 2 years, here's my verdict
I made this coop about 2 years ago. At the time, I was grateful for Ana providing a free, step-by-step template to build it. I am still grateful to this website for that service; I've built my son's loft bed with a plan from this site. After using this coop design to house a flock of 4 chickens for 2 years, I highly recommend NOT building this coop. Here's my reasons:
1) Though advertised as a "chicken tractor," this design with its numerous 2x4s and thick plywood is far too heavy (> 150 lbs) to mount wheels on a pivot on the bottom. Rolling out the wheels splintered the bottom of the frame when trying this, due to the weight. Yes, there are "handles" at either end of the coop that two humans can use to lift and shift the coop, but my wife and I found this quite awkward due to the weight.
If you are dedicated to moving the coop, your yard must be especially flat and even to deter predators from sneaking in under gaps between the ground and frame. Your birds will dig from the inside, even as predators dig from the outside After losing 3 birds to predators, I fortified it inside and out with a trench filled with hardware cloth.
2) The A-frame design is compact, which is why I picked it. However, its design makes it difficult to feed and water the chickens, as well as provide grit and shell for their health and digestion. One has to awkwardly lean over and lower in a 30-40 lb water jug, setting it in inside on the floor, on a cinder box (or similar), or suspend it on a heavy-duty chain. I tried several different ways to hang or put in food, water, and nutrients to keep the birds from knocking them over or defecating in them, while still making them easy to swap out. This was particularly challenging in the winter when the water would freeze. Ultimately, I added an exterior run and provide food etc. that way.
3) Chicken use the entire upper compartment as a nesting box. This means that one can't easily reach all the eggs through the egg door, and one has to lower/raise the side door to access the eggs. The A-frame design means one has to awkwardly lean forward into the coop. A rectangular design perpendicular to the ground with smaller compartmentalized nesting boxes would make this process a *lot* easier.
4) The A-frame design makes it difficult to clean up scat, making our chickens vulnerable to worms.
5) The design lacks a roosting bar. There's just not enough room for roosting, ladder, and scat-free food and water and nutrients, plus cleaning.
6) The heavy side doors put too much strain on the small hinges. I've had to move the hinges twice to keep the door from falling off.
7) There's huge leaks on the top of the side doors. I added a metal, W-shaped roofing edge (called a 'valley' at Menards) along the top seam to channel the water off and shield the door seams.
In sum: You get what you pay for. I'm in the process of building out a new coop and proper run with easier access for feeding, gathering eggs, and cleaning. Ms. White's plan ended up costing ~$200 in 2017 for lumber and hardware. I'm prepared to spend more than double that this time to build it right and keep my investment safe and easier to maintain.
shelbyclowers
Tue, 04/07/2020 - 10:30
Thank you for these helpful…
Thank you for these helpful instructions! I made a few modifications like my door opens up and I also included another door on the bottom to allow chicks in and out!