


Build your own router table! Free router table plans from Ana-White.com


Did you get a chance to watch Patrick and Gabriel Gallant's amazing Farmhouse Table video?
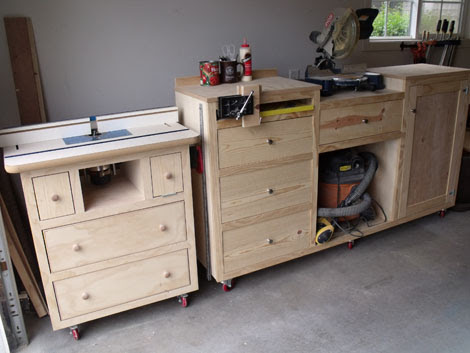
Did you notice Patrick's drool worthy shop furniture?
Well, after so many of you requested plans, Patrick offered to share the router table plans with you today!!!

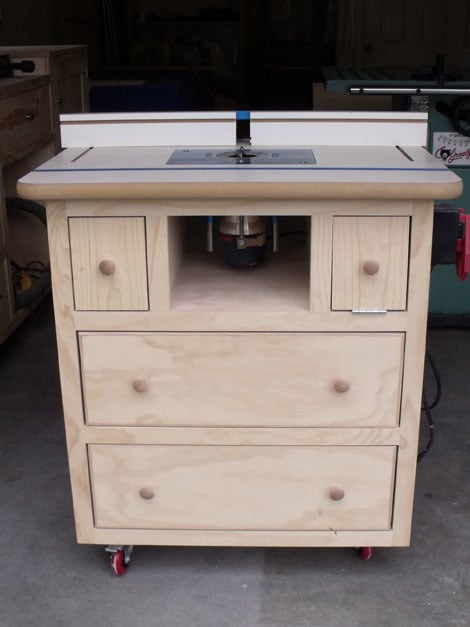
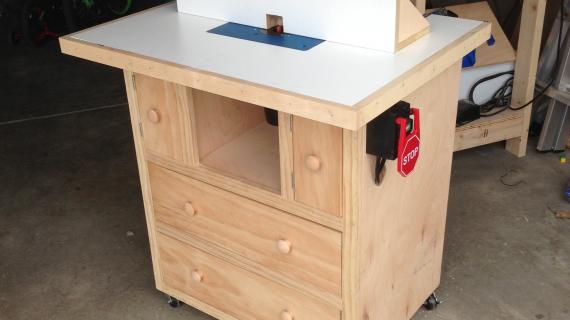
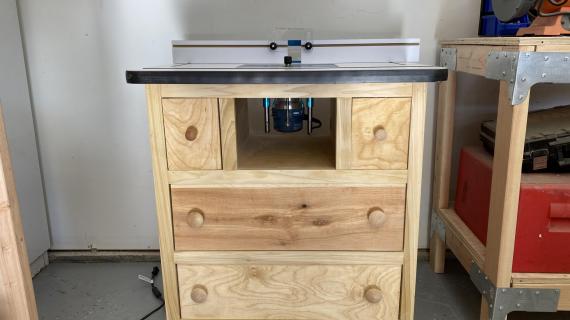
Yes, you can build this beautiful and super functional router table just like Patrick's!
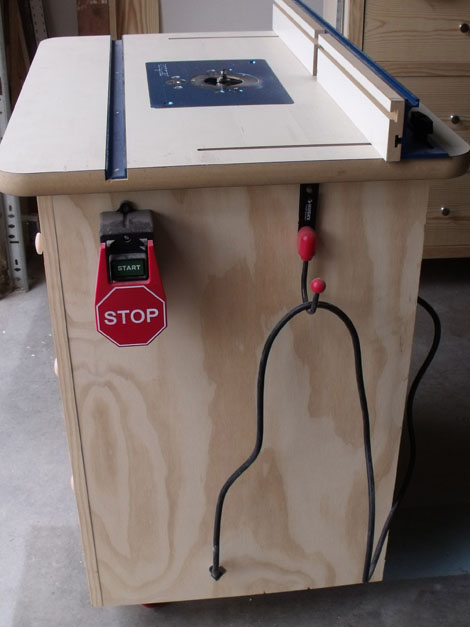
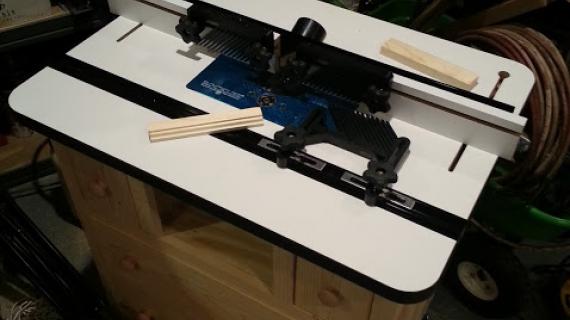
Patrick has thought of everything! Even the on/off switch and cords!

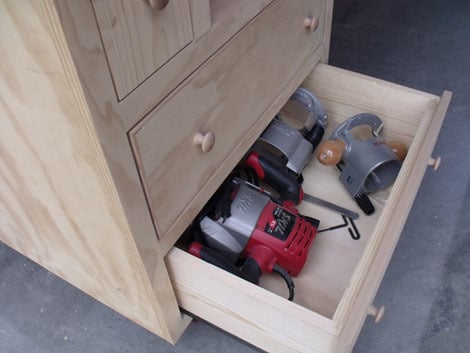
And for those super expensive router bits?
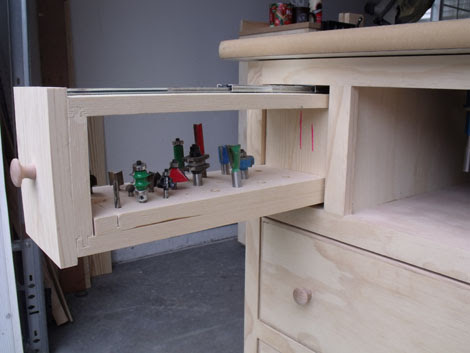
This router table has it all!

And more storage down below.
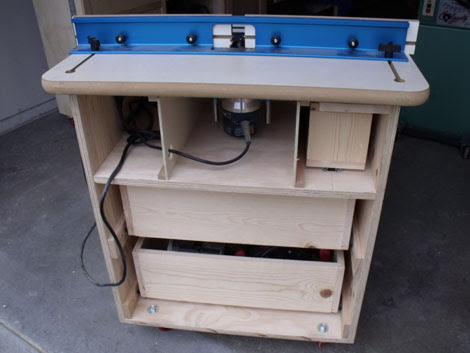
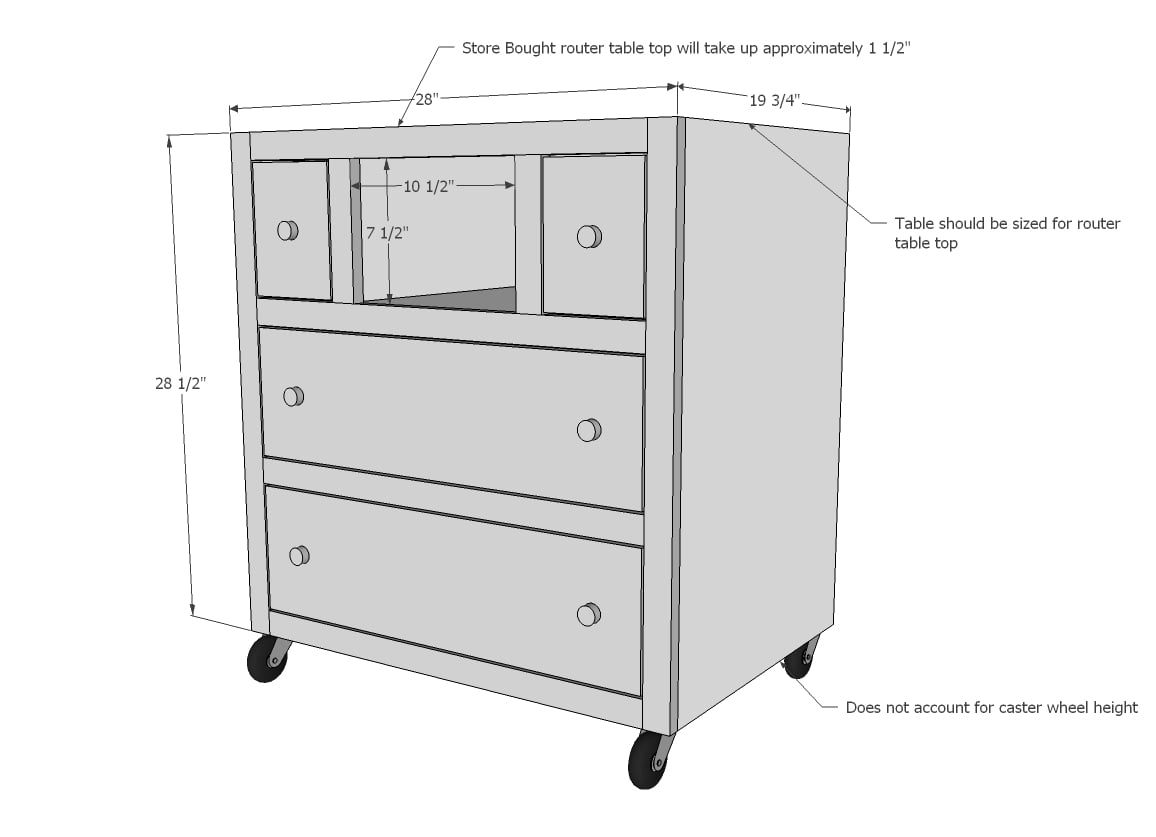
The cabinet is designed to work with a standard router table (suggest that you buy first and the router too).
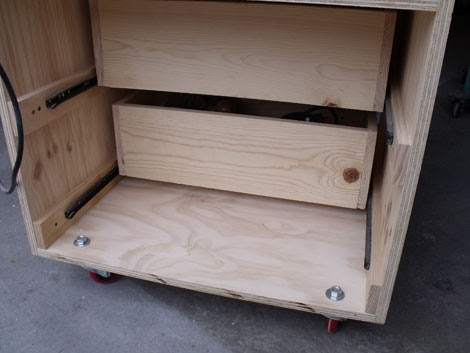
Drawers are all on metal glides, and the whole cabinet is on casters too!

Please extend a HUGE thank you to Patrick for designing and sharing these router table plans with us! We've worked together to develop a plan, and you'll see a few small mods just to make things a little simpler, but this one is really all Patrick.
And here's a few building notes directly from Patrick:
The top 2 drawers are 1x6's. I used 16" drawer slides and made 16" drawers but I could have gotten away with 18.
Top left drawer. Use 16" full extension drawer slides. Cut 2 16" pieces out of your 1x6. Cut two pieces 4 7/8". Make a box out of these 4 pieces. Cut a 14 1/2" piece for the middle and drill a series of 1/4" and 1/2" holes in it. This will house your router bits. Mark a center line on the top piece and turn it over to make a center line on the bottom. This line is where you will center your top and bottom drawer slide. On the drawer opening in the face frame, mark a center line on top and bottom. This way you can center your drawer seeing as the drawer slides go on top and bottom instead of the sides. Cut the drawer front out of the 1x6 leaving enough room for 1/8" gap on all four sides. My drawer fronts were 7 1/8" long.
Top right drawer. The drawer front is also 7 1/8" long. All this is is a door disguised as a drawer. on the bottom of the drawer front, mark a center line. Mark a centerline on the face frame opening as well. Then attach a small door hinge on the bottom and a door magnet on the back.
Something to consider. Attach the table top before doing all of this. The space is too small to be able to get your drill in there to attach it after it's all done.
In order to get the size that I wanted, I had to make the bottom drawer fronts out of plywood. This means that the convenience of making drawer fronts out of standard size boards wasn't there. I cut the drawer fronts to fit and then attached 1/4 x 3/4 molding (nosing) whatever you call it on all four sides which are mitered at the ends. This can be difficult without a nail gun.
The casters are 3'' lockable wheels. You can use the ones on the bolts like mine or you can use the ones that screw on.
Usually I use all 3/4 material for dividing the cabinets but this was pretty hard to do up at the top. What I ended up having to do was to use 1/4" plywood to divide the router from the drawers. Attach a square dowel to the cabinet and then attach the thin plywood to the square dowel.
The rest is just standard cabinet making.
Maybe I can draw some pics if this is too confusing. I can make components in sketchup but I can't put them all together for some reason.
Again, huge thank you to Patrick, and the plans follow! Best luck building!
Router Table Plans
Preparation
- 1 Sheet 3/4" plywood ripped into two 19" x 8 foot long strips (remaining scrap can be ripped into 5 1/2" wide strip and used to replace some of the 1x6 boards - if you do this, may I suggest altering to 18" widths so you can get two 5 1/2" strips out of scrap plywood? You'll still need to buy a 1x6) OR 3 - 1x6 @ 8 feet long (plan assumes your 1x6 are 5 1/2" wide)
- 1 - 1x3 @ 8 feet long
- 2 - 1x2 @ 8 feet long
- 1 - 1x8 @ 6 feet long (plan assumes your 1x8s are 7 1/4" wide)
- Recommended joinery is 1 1/4" PH screws and 1 1/4" finish nails
MAIN BOX
- 3 - 3/4" plywood 19" x 26 1/2"
- 2 - 3/4" plywood 19" x 8 1/4"
- 2 - 3/4" plywood 19" x 28 1/2"
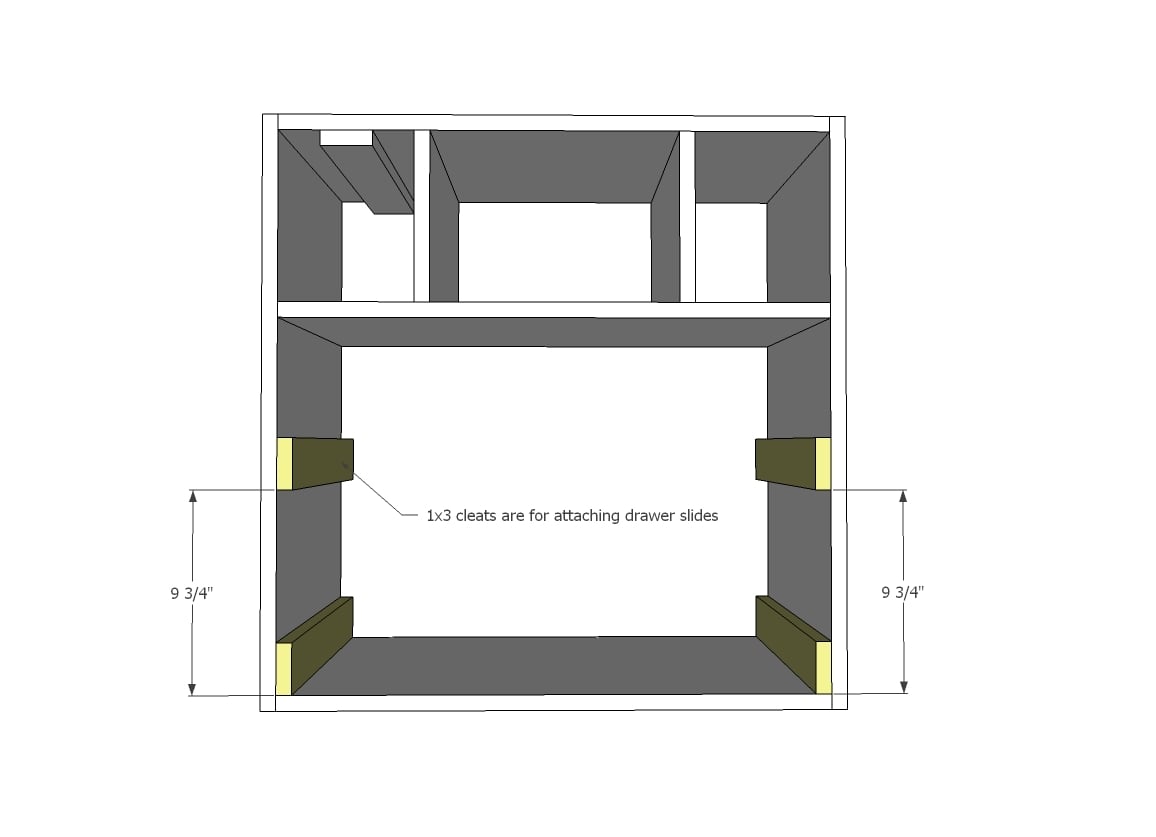
- 5 - 1x3 @ 19" (or width of your plywood)
FACE FRAME
- 2 - 1x2 @ 28 1/2"
- 4 - 1x2 @ 25"
- 2 - 1x2 @ 7 1/2"
SMALL DRAWER
- 2 - 1x6 @ 16"
- 2 - 1x6 @ 5"
- 1 - 1x6 @ 14 1/2"
- 2 - 1x8 @ 5 1/2" (drawer faces for both top drawers)
LARGE DRAWER (for 2)
- 4 - 1x6 @ 22 1/2"
- 4 - 1x6 @ 16"
- 2 - 1/4" plywood @ 24" x 16"
- 2 - 1x8 @ 24 3/4"
Be sure to check dimensions of your router to ensure proper fit, may need to make minor adjustments to the plan.


Please read through the entire plan and all comments before beginning this project. It is also advisable to review the Getting Started Section. Take all necessary precautions to build safely and smartly. Work on a clean level surface, free of imperfections or debris. Always use straight boards. Check for square after each step. Always predrill holes before attaching with screws. Use glue with finish nails for a stronger hold. Wipe excess glue off bare wood for stained projects, as dried glue will not take stain. Be safe, have fun, and ask for help if you need it. Good luck!
Instructions
Step 1
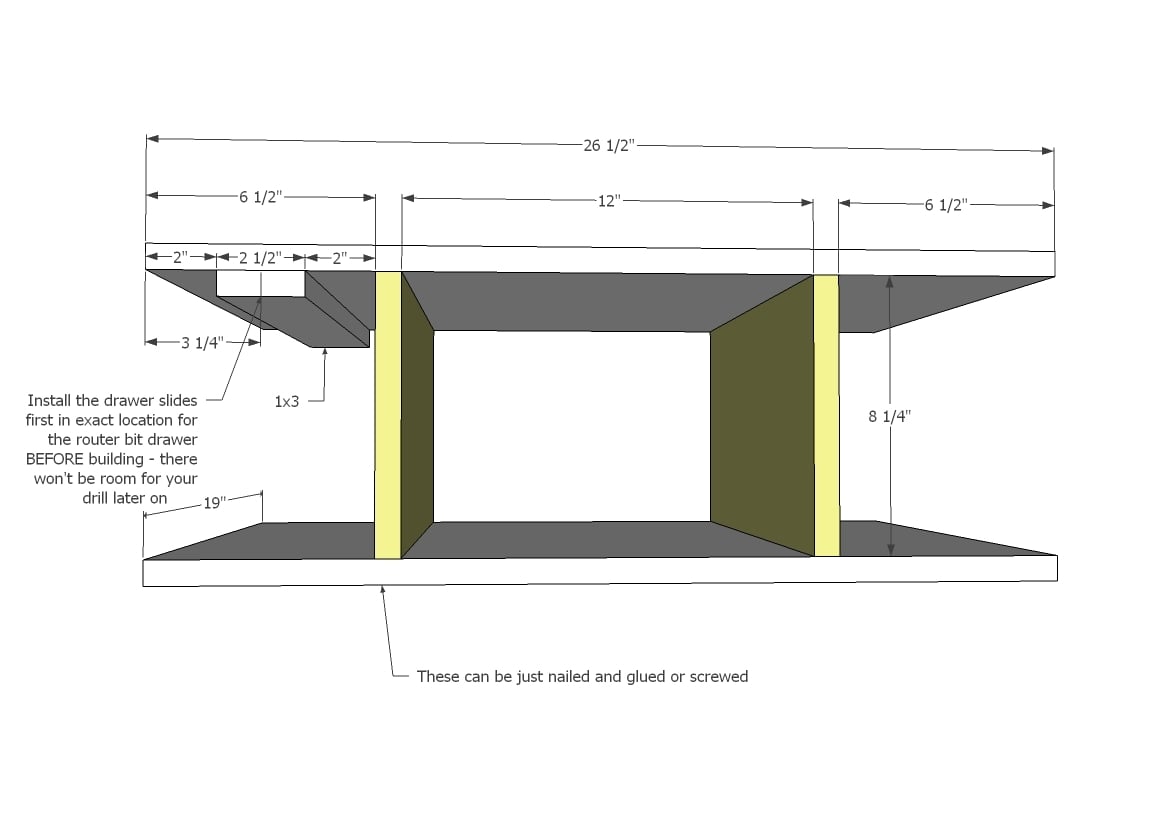
So the tricky part here is the little drawers. You'll need to do some prepwork to get the drawers in before building - because once built, there's no way you are going to get a drill in the tiny space to attach drawer slides. So do a test layout of the top center piece as shown here. You'll want to attach the 1x3 ...
Step 2
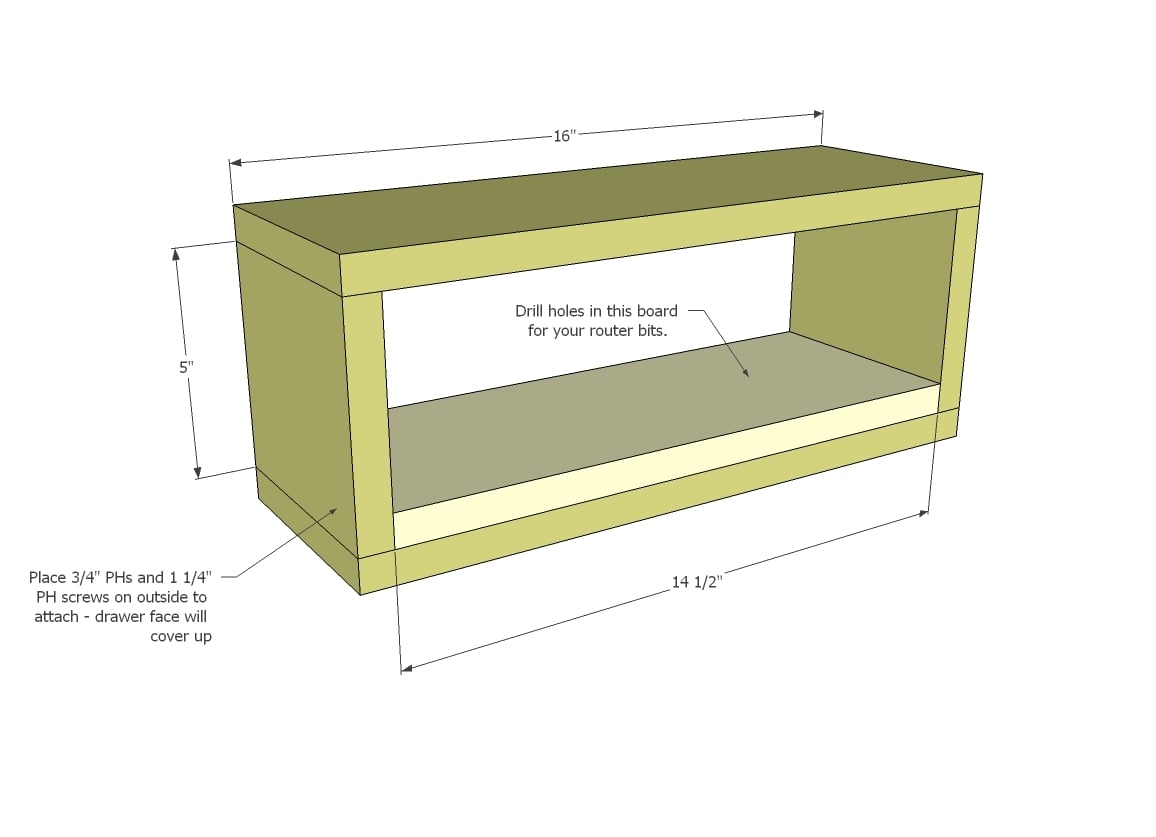
Build your router bit box as shown above. The 14 1/2" piece is for drilling out holes for your router bit collection ....
Step 3
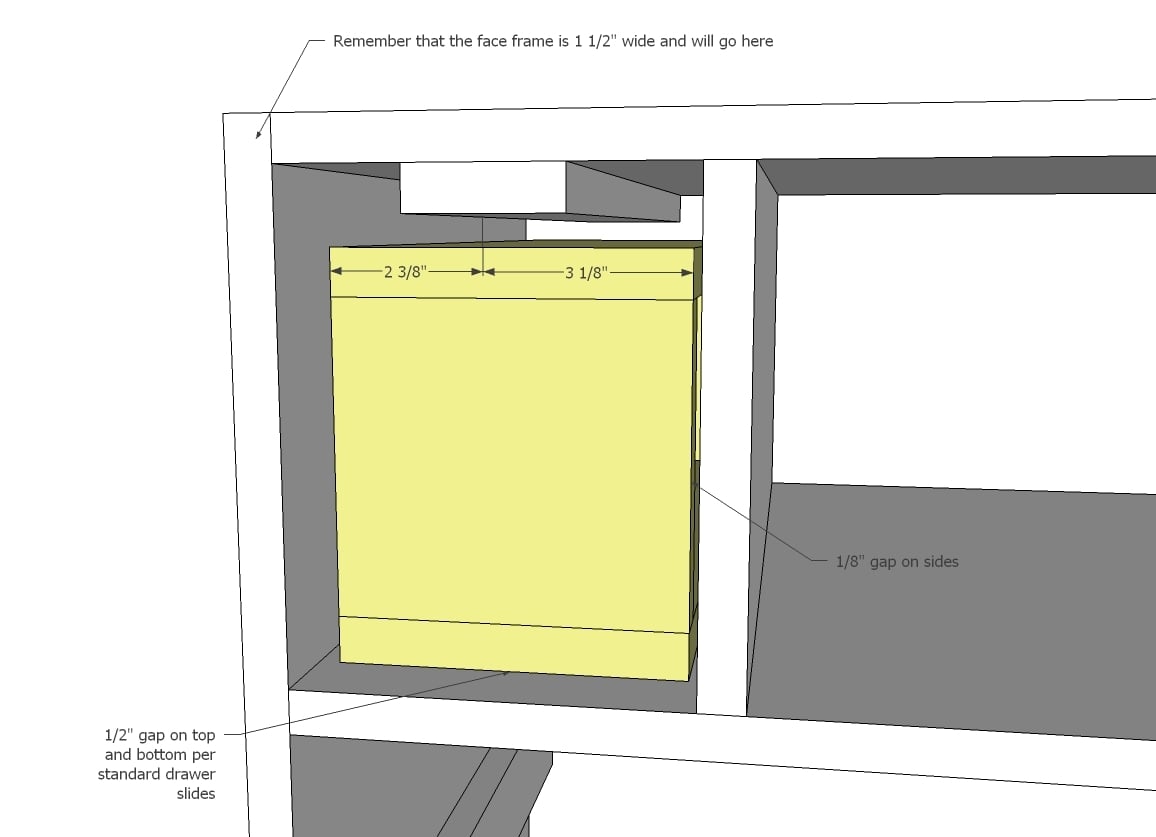
Remembering that the project gets a face frame, install the drawer slides cabinet member on the project BEFORE construction. Test the drawer for fit before you glue anything.
Step 4

Once you are happy with the drawer fit, you can add the sides and bottom.
Step 5
Step 6
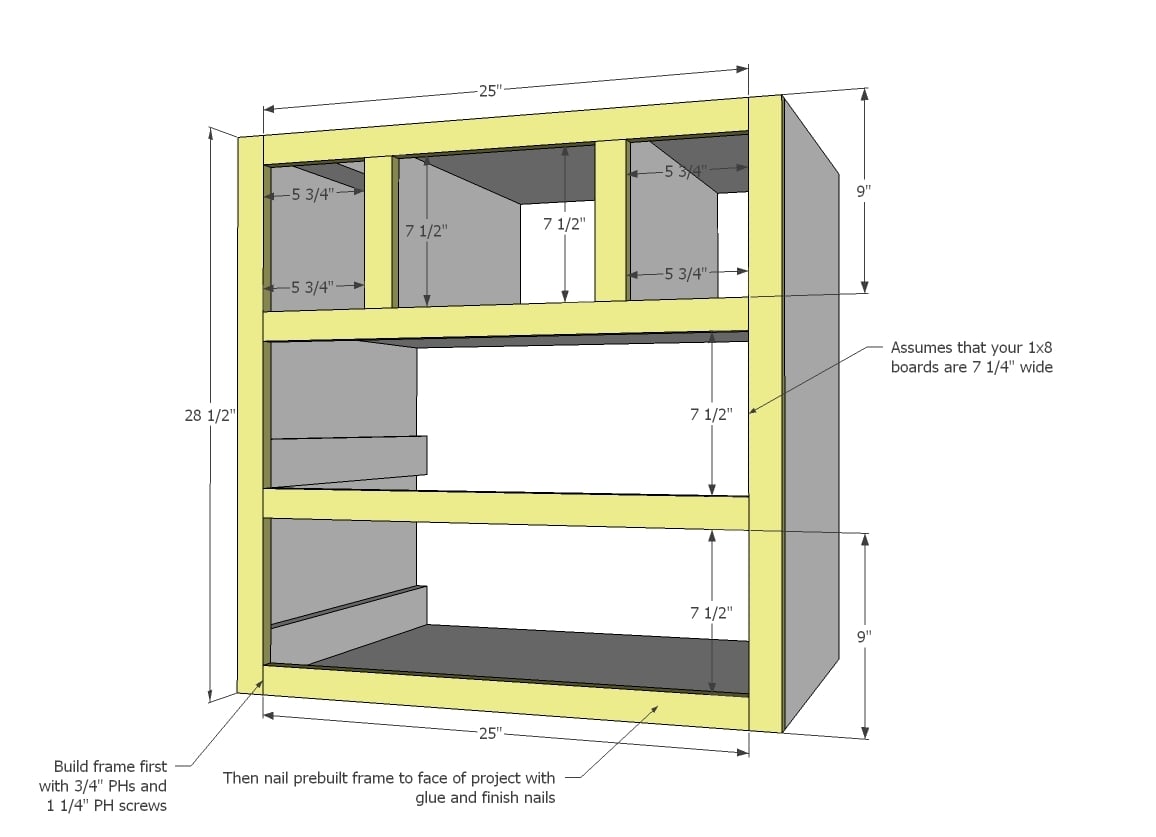
Now build the face frame and attach to front of cabinet.
Step 7
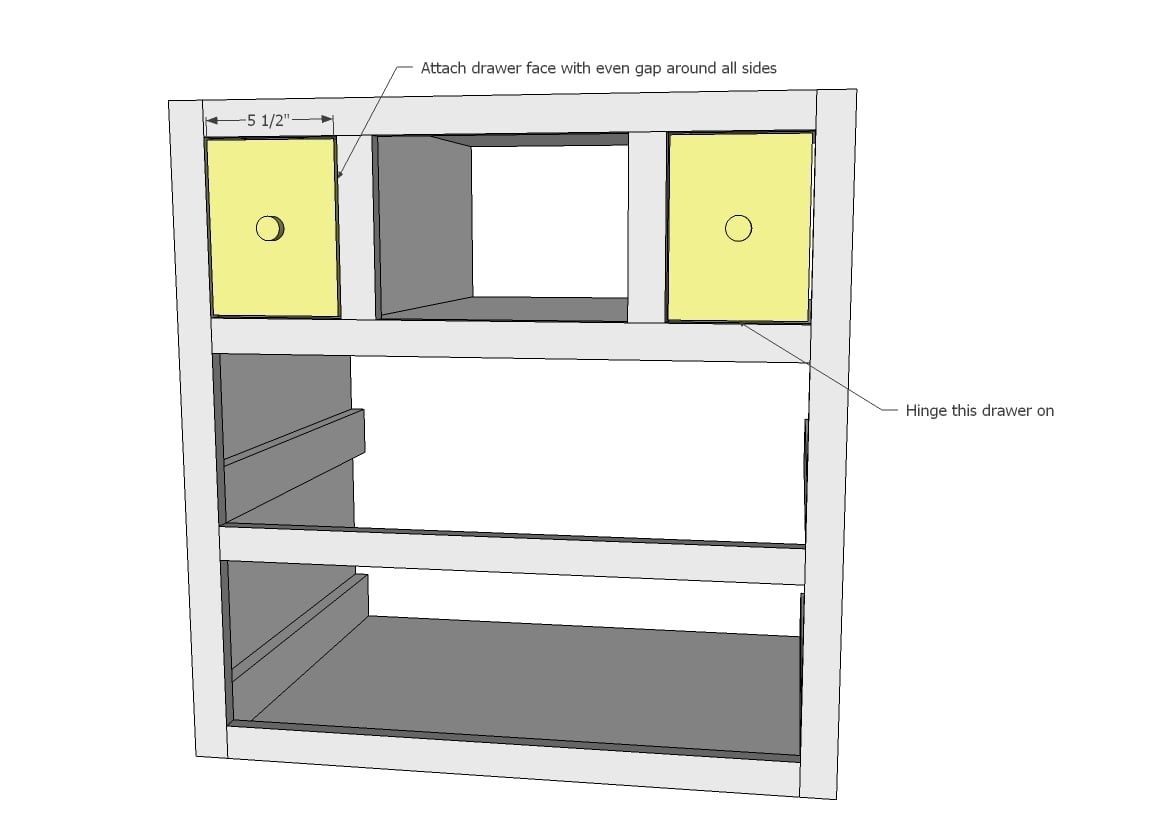
And then finish off small drawers with faces.
Step 8
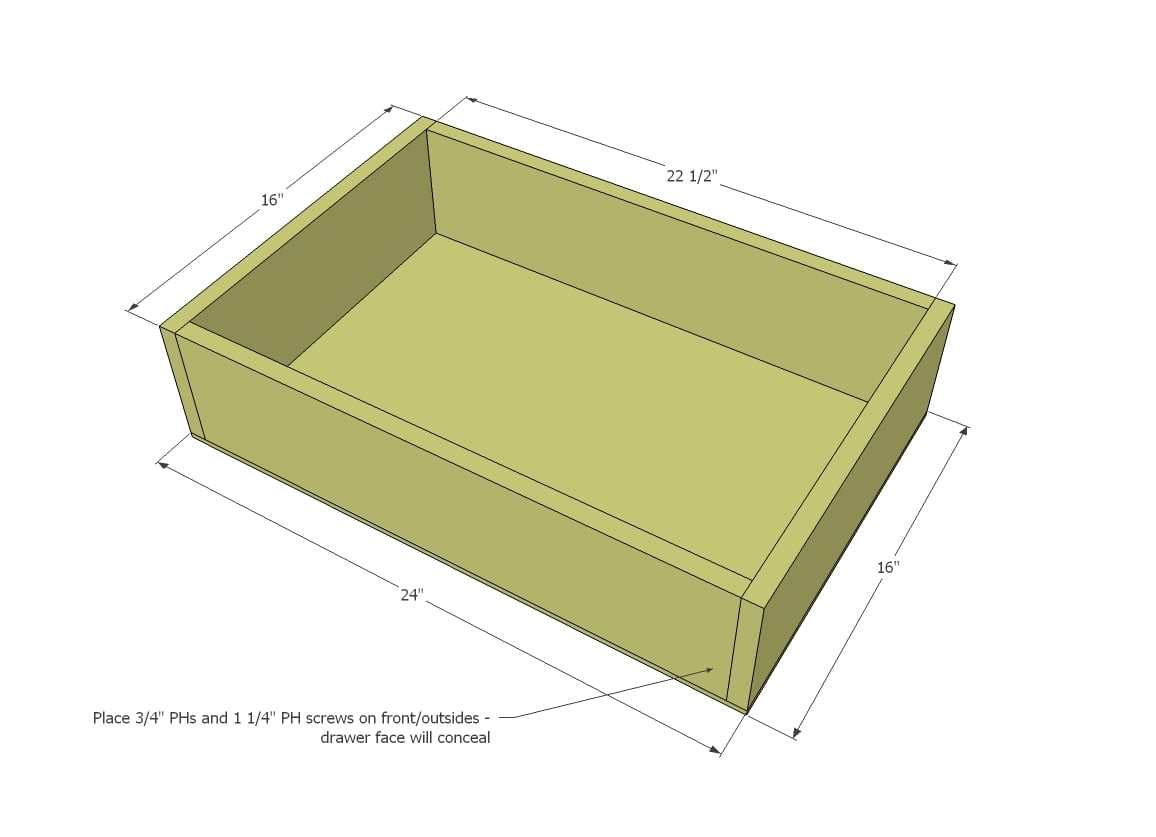
Build two large drawers. Check your overall widths - drawers should be made overall 1" less than the opening to allow for standard 1/2" clearance drawer slides. Check for square.
Step 9

Install drawers 3/4" inset in cabinet to allow for drawer face.
Step 10
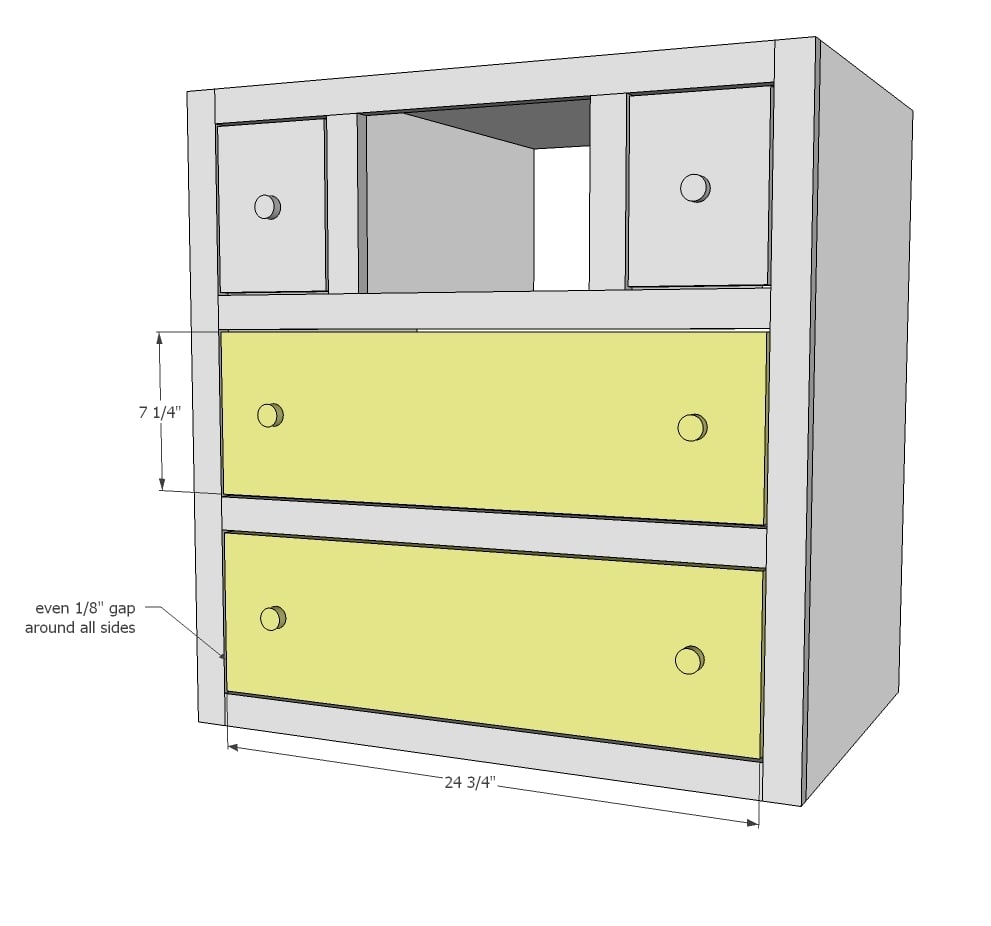
Attach drawer face to drawers with even 1/8" gap on all sides.
Step 11

And then add the caster wheels.
Step 12

Cut out holes for router and attach router table top.
Step 13

And I love how Patrick did this!
It is always recommended to apply a test coat on a hidden area or scrap piece to ensure color evenness and adhesion. Use primer or wood conditioner as needed.
Comments
deltaechobravo
Wed, 07/11/2012 - 14:38
Router table top
This project looks great.
As I do not yet have a router table top, I went looking around on Amazon and it looks to me like he's using the "Rockler High Pressure Laminate Router Table Package #1, with Plate for Group A Routers".
I'm not plugging it as I have no personal experience with it, but it seems well reviewed. If you are like me, and are both in the market for one and considering building this cart, I thought the info might be useful.
Thoughts, comments, corrections, admonishments all welcome,
D.E.B.
ps- the cool stop switch is called a "Safety Power Tool Switch" by the same company.
In reply to Router table top by deltaechobravo
dan-k
Wed, 07/11/2012 - 15:55
Router table top
I have the same top and it has worked well for me. There are plans out there to build your own also if your budget doesn't allow.
Jon (not verified)
Wed, 07/11/2012 - 18:39
Great design and video. Can
Great design and video. Can you ask Patrick what he was using for his loose mortise and tenon jig? It looked like a beadlock system, but I couldn't tell for sure.
Thanks!
FlyLow (not verified)
Wed, 07/11/2012 - 18:56
From Patrick's previous
From Patrick's previous comments it's Beadlock jig.
While I like the joinery and how easy it looks, I don't like The tenon stock you have to buy. They do offer a router bit for it.
patrickhosey
Wed, 07/11/2012 - 19:14
Glad you guys like it
It is the beadlock. The tenon stock is made to fit the mortises without cleaning it, but I find it too tight so I end up cleaning the mortises anyway. It's still a pretty awesome little jig. I've never seen anyone combine pocket hole joinery with loose tenon but I figured I'd give it a shot and it worked. Flylow, I gotta see this table top you made up. It sounds pretty awesome.
Something to consider about this router table is the opening for the router. It's a tight fit but it works for me because I have a router lift. You might have a hard time if you have to remove your router every time to change bits.
Grizzly has a table top for pretty cheap right now and it looks pretty good. Mine is from Rockler and I really like it.
Also always unplug the system from the wall before changing bits. It's unlikely that the router will turn on while your fingers are in there true, but good safety habits are a real good thing. Use push sticks. I can't tell you how many times my sticks got nicked up saving me from a trip to the emergency room.
John@RemodelingBIBLE (not verified)
Thu, 07/12/2012 - 00:23
It's my first time dropping
It's my first time dropping by and I am already a fan! The step-by-step details are just awesome. Keep up the good work.
Dori (not verified)
Thu, 07/12/2012 - 01:46
You beat all, Barn....
You beat all, Barn....
birdsandsoap
Thu, 07/12/2012 - 03:36
Looks great, Patrick! It's on
Looks great, Patrick! It's on my to-do list now.
little stuf
Thu, 07/12/2012 - 09:16
Awesome!
Wow! Awesome plans! I love how you thought of a place for everything. The extra storage is nice, as well. This is a must have! I'm also loving the other tool cabinet in the background! Is your work area always that neat? :)
In reply to Awesome! by little stuf
patrickhosey
Thu, 07/12/2012 - 10:32
Work Area
It actually does stay neat. Because there is a place for everything and the storage is close by and convenient, it takes no time to put your tools back. Also I know exactly where to look to find tools and jigs. They used to be in random spots all over the garage.
Pam the Goatherd
Thu, 07/12/2012 - 10:07
I have a router, new in the
I have a router, new in the box, that I would love to use but haven't even taken it out of the box in the two years I've owned it because I don't have a table. Will have to add this project to my to-do list - sooner rather than later!
Seth Gee (not verified)
Thu, 07/12/2012 - 11:02
How about that miter saw table
Nice work on that router table. I know a ton of people have been looking for one like that...me especially, but I already bought a table.
Any chances there are plans for that miter saw table?
rodney (not verified)
Thu, 07/12/2012 - 17:39
second
I second that!!
little stuf
Thu, 07/12/2012 - 20:05
Third!
I agree with the last two! Plans? :)
beansurfin
Fri, 07/13/2012 - 08:24
Fourth
I fourth that!
patrickhosey
Thu, 07/12/2012 - 20:10
Miter Beast
Might take a little time but I think we can make it happen.
Tim Willie (not verified)
Sun, 07/15/2012 - 16:17
Great project and a suggestion
Great project Patrick.
For those of you asking, Anna posted a plan for a miter saw table with fold-out leaves. I would start with that for the middle of the plan that Patrick has, but leave the fold-out leaves off. Then for the storage on the sides you could modify this or one of Anna's other plans. You can get the needed height differences from Anna's miter saw table.
Stephanie Lane (not verified)
Sun, 07/15/2012 - 16:18
Router Table
Patrick,
Your router table is AWESOME! I have the exact same router and the expensive metal cart from Rockler. I'm always afraid the cart is going to tip over. This looks solid and everything is nicely storage away.
Can you get cracking on those miter saw work bench plans! I have the exact same miter saw and that bench is PERFECT!
Laura Fama
Mon, 07/16/2012 - 05:10
Amazing
This router table is nice, but I love, love, love the farmhouse table. It's gorgeous. The video was sweet as well as the music. Way to go!!!
Keith (not verified)
Mon, 08/20/2012 - 10:08
Miter table
I am looking fwd to seeing a design for your miter table. It would be the perfect item for my shop. Being in the military, my family and I move around a lot and these two tables would make the moving of my shop so easy. Thanks for the router set up plans and info. Also, I checked out the kreg jig page and it looks to be a perfect addition to the shop. Have you found it to be a must have? Thanks again for your time.
Keith
In reply to Miter table by Keith (not verified)
patrickhosey
Mon, 08/20/2012 - 11:01
Miter Table
Hey Keith,
I have gotten lots of requests for the miter table. We'll have to get that done soon.
Like you, I'm also military. We are moving to Norfolk in a few months so I'll be able to test out how well they work for mobility. We military move around so much that whatever shop furniture you have has to be able to roll up in to the truck with ease. I'll be documenting the move to show how it works.
Keep in mind you might want to DIY move instead of having them move for you. Could you imagine them tagging every single chisel, every tool, every paint brush? Geez. No way.
Keith (not verified)
Mon, 08/20/2012 - 13:09
mil move
all those number tags and 200 sheets of items. you could install drawer locks and then they can just tag the box. did you put a set of wheels in the middle of your miter cabnet? after i make the router table i might jstu shoot from the hip on the mtter table. i am still looking fwd to your plans though. I am new to this site, but if i can follow you that would be cool. i will be making a login and posting my work as well. plz let us kow how your stuff moves. you might need a forklift for the miter table... let us know... and have a safe and fun move.
marvinn (not verified)
Sun, 09/23/2012 - 03:09
how wonderful !
how wonderful !
Fivehand (not verified)
Mon, 01/21/2013 - 12:43
attaching the router table top...
awesome table! great work!
how did you go about attaching the table top to this? i've been planning on purchasing the rockler high pressure laminate router table top. does it come with hardware? any suggestions there?
Akasma
Fri, 04/04/2014 - 23:32
These are amazing! Would still love to see miter table plans
Thank you so very much for sharing your plans Patrick and thank you Ana for the site. Just added your book to my wishlist!
Would still love to see the plans for that miter table to go along with this. Thanks again!
tgreenway57
Fri, 02/13/2015 - 18:34
Router Table
Thanks Patrick for sharing this plan with Ana White, I really needed a router table plan.
Kasfbar
Mon, 05/18/2015 - 08:43
garage
garage
tlbailey1
Tue, 07/07/2015 - 10:52
Mitre Saw Cart Plans?
Looks awesome, hope to get building one soon. Are there plans for the mitre saw cart as well? Both of these would work extremely well for my workspace and help free up some room on the bench.
MPinc
Thu, 02/11/2016 - 04:43
Top cabinet slider hardware
Patrick-
What type of hardware did you use for the slider shelf up top? I'm having a difficult time getting the side & bottom hardware to hold it firmly in place.
Any insight would help.
Thanks.
Mike
TheDailyCompulsion
Sun, 06/05/2016 - 17:50
Router permanently inside table?
Is this plan meant for the router to be permanently fixed inside the table? I would like to be able to remove the router if needed but the space between the router and the level above the first drawer is not enough for me to pull my router out without taking apart the table.
ktpmm5
Fri, 10/28/2016 - 10:50
question about the drawer slides
Patrick - great table! I'm working on building mine and have a question about the drawer slides, particularly for the top left (router bit) drawer. The plans say to use 16" full extension drawer slides. On the top left drawer, that means they would overhang the router drawer, correct? Can I use drawer slides like " Liberty 14 in. Soft Close Ball Bearing Full Extension Drawer Slide?" I don't see any that are made for the top of a drawer. Thanks so much! (Obviously I'm a complete noob at these things!)