

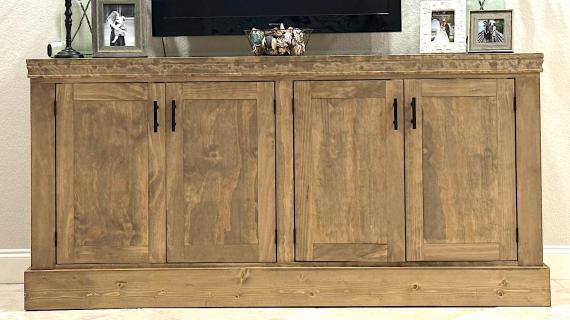
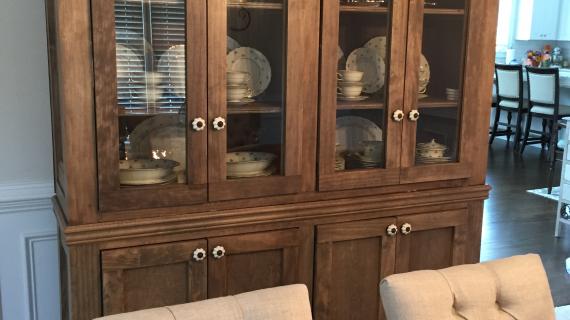
Build your own farmhouse style sideboard with doors! We love it paired with our matching hutch plans.
Our free step by step plans include detailed diagrams, shopping and cut list, and lots of reader submitted photos. Build yours today and save hundreds off retail.
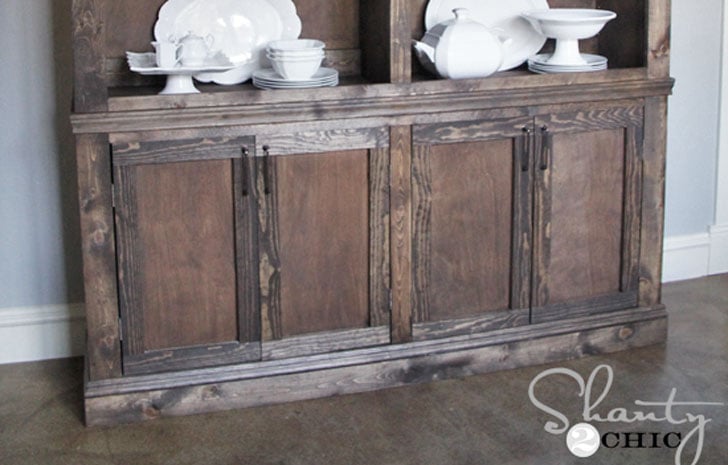
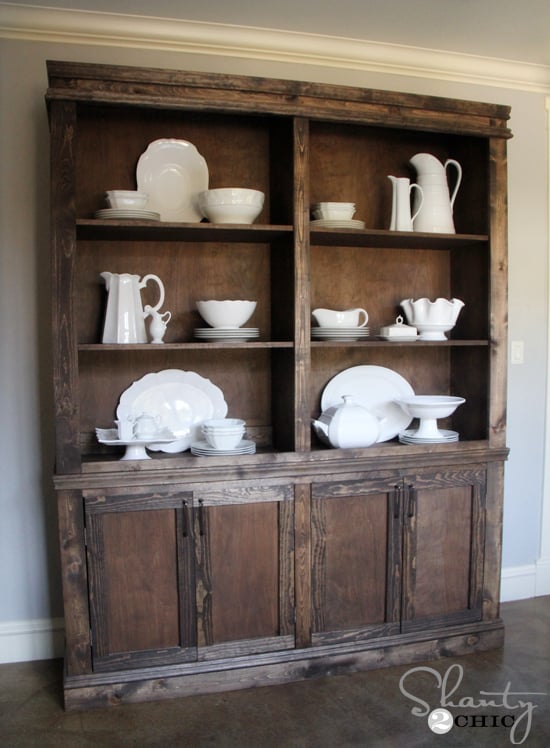
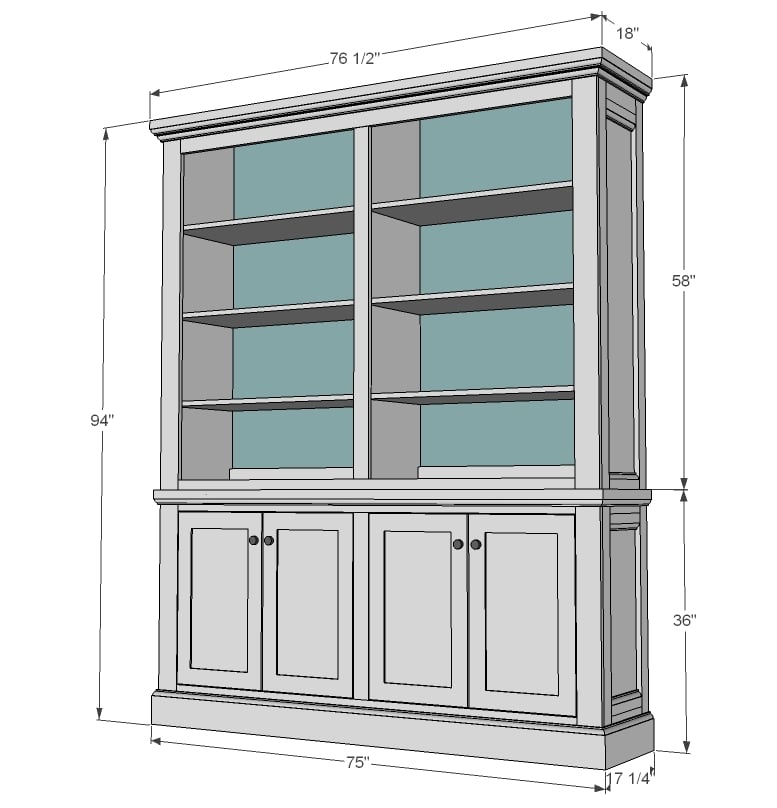
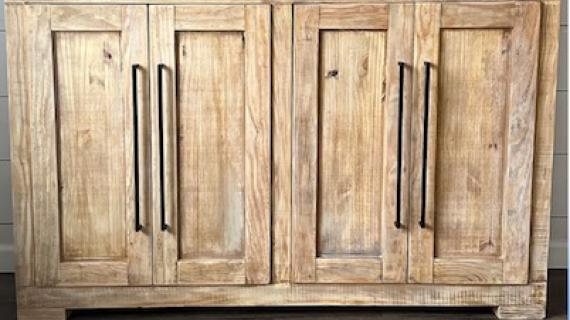
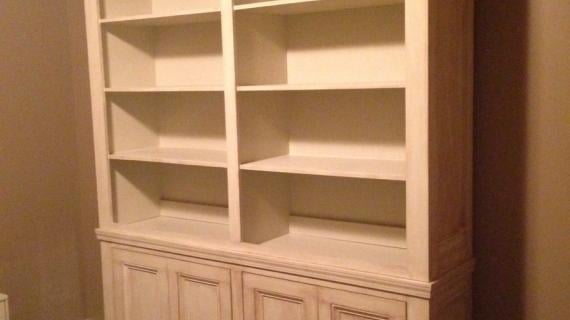
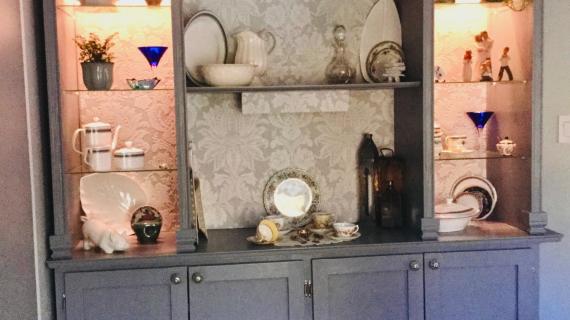
This beautiful sideboard features four large doors and lots of cupboard space. We've added moulding detail to fancy it up.
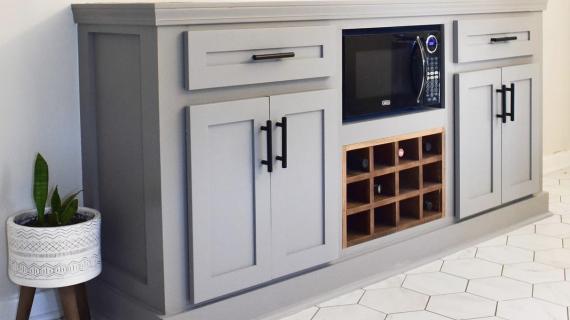
You can stain or paint any color of your choice.

This plan was designed and built in collaboration with Whitney from Shanty2Chic:
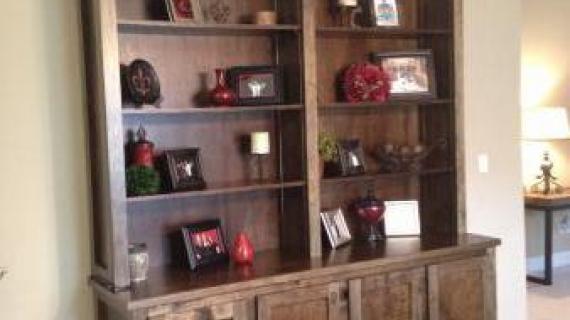
I have drooled over RH's sideboards for years, but never dreamed of being able to own my own. I about choke every time I see those $3000 price tags! I wanted something grand, and with a little bit of farmhouse charm. Ana delivered! This was a very large piece to build, but the cuts were simple without any weird angles. I finished both pieces in a weekend and could not be more pleased. The best part... I spent less than one tenth the cost of RH's. This may be one I pass down to one of my kiddos one day ;-)
For lots more pictures, and more details straight from Whitney on building this amazing sideboard, you can read her post here.
Preparation
- 1 – 10’ stick moulding for top
- 1 – 10’ stick 5 1/4” base moulding
- 1 – 4’ stick 2 1/4” base moulding
- 3 – 1x3 @ 8 feet long
- 1 – 1x4 @ 8 feet long
- 1 – 1x4 @ 6 feet long Additional
- 1x3s for doors if desired
- 1 and a 1/2” sheets of 3/4” plywood, ripped into strips 15 3/4” wide (referred to as 1x16s in this plan)
- 1 – 1/4” plywood full sheet for the back
- 4 sets hinges
- 4 knobs or handles
- 4 – 1x3 @ 10 3/4”
- 4 – 1x3 @ 35 1/4”
- 2 – 1x16 @ 35 1/4”
- 1 – 1x16 @ 73 1/2”
- 1 – 1x16 @ 30”
- 1 – 1x16 @ 70 1/2”
- 2 – 1x4 @ 32 1/2”
- 1 – 1x4 @ 73 1/2”
- 1 – 1x3 @ 26 1/4”
- 1 – 1x3 @ 66 1/2”
CUT DOORS IN PLANS
It is crucial that our plywood be ripped consistently the same width. If you have your hardware store rip your plywood, ask to have the saw set horizontally, so the plywood is pushed through the saw without readjusting the saw.


Please read through the entire plan and all comments before beginning this project. It is also advisable to review the Getting Started Section. Take all necessary precautions to build safely and smartly. Work on a clean level surface, free of imperfections or debris. Always use straight boards. Check for square after each step. Always predrill holes before attaching with screws. Use glue with finish nails for a stronger hold. Wipe excess glue off bare wood for stained projects, as dried glue will not take stain. Be safe, have fun, and ask for help if you need it. Good luck!
Instructions
Step 1

Start by adding trim to ends first. Also add 2 1/4" base moulding to insides of end outsides (see ends in next diagram).
TIP: Drill 3/4" PHs facing upward on inside of plywood ends before attaching trim for attaching top in next step.
Step 2

Now it's time to join it all together! Attach the plywood to the sides and add center partition.
Step 3
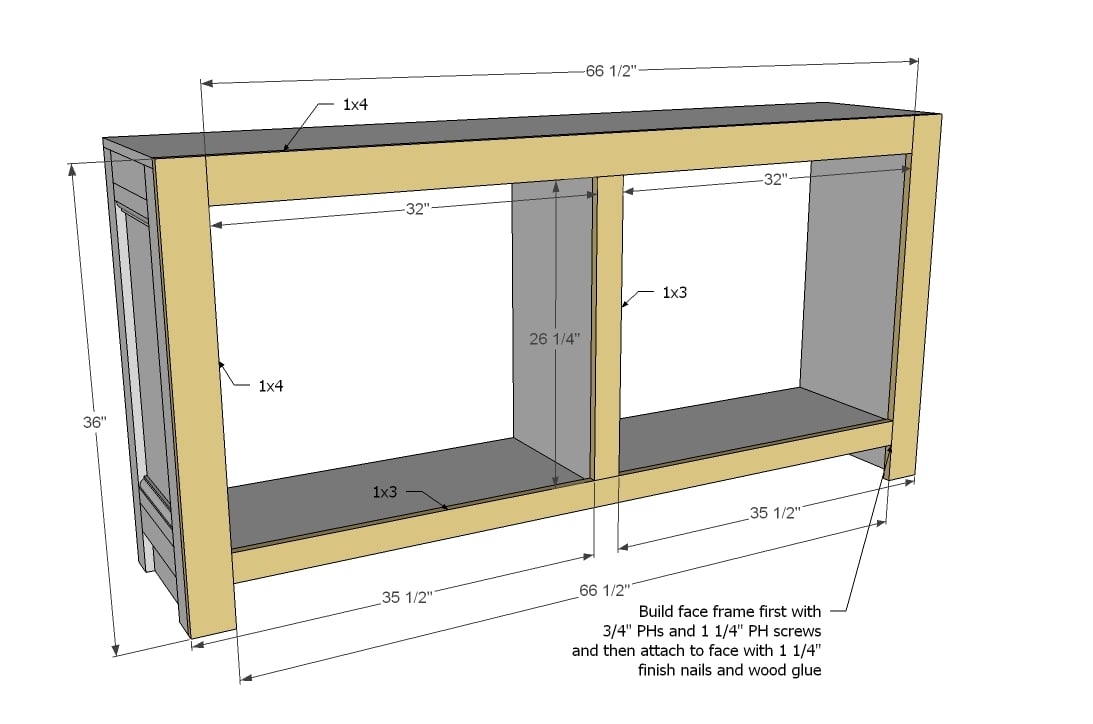
Build your front face frame first and then attach to front of sideboard.
Step 4

Cut moulding to fit and attach with finish nails and glue.
Step 5

Step 6

Build doors to fit openings - leaving approximately 1/8" gap around all sides, including bottom. Attach with either butt hinges that are installed in the gap between door and face frame, or use euro style full insets - you may need to add blocking for these to work.
Step 7

Shelves can be added at any height, either fixed or with shelf pins.
Step 8

Attach back with 1 1/4" finish nails and glue.
It is always recommended to apply a test coat on a hidden area or scrap piece to ensure color evenness and adhesion. Use primer or wood conditioner as needed.


Comments
Kyla (not verified)
Wed, 09/19/2012 - 12:54
This is gorgeous. I can't
This is gorgeous. I can't stop looking at it. It's already on my list of future projects, and I left a space for the hutch!
Herman (not verified)
Wed, 09/19/2012 - 20:55
Sketchup
Did you use Sketchup for the plans? If so, will you make that available for download?
Anonymous Coward (not verified)
Thu, 09/20/2012 - 04:33
TIP: "Shelves can be added at
TIP: "Shelves can be added at any height, either fixed or with shelf pins."
If you want to use shelf pins, it's far easier if you do the marking and drilling before you build the base, marking down from the tops of the side and center pieces. Make a template for the holes (a strip of pegboard works) and use a drill press or drill block to get them straight and perfectly spaced.
John Scruggs (not verified)
Thu, 09/20/2012 - 09:38
Thanks for all the good projects
Thanks for the projects on here learning to do wood working and boy you and my wife are keeping me going with a lot of the projects you post on here I like doing them plus it keeps me in good with my wife if I can stay up with them so keep me going Love it.
buffy0506
Fri, 09/21/2012 - 07:50
This is exactly what I needed!
I'm hoping to build some built-ins on a fireplace wall that extend into our dining room, and putting a hutch in the middle was part of the plan. This will fit perfectly, and the base (altered to a different height) will be perfect for the rest! I also need to build doors for another cabinet, and again this is exactly the style I was looking for but was too overwhelmed and didn't know where to start (so the cabinet has been door-less for going on 7 years!). Thanks so much!!!
Jocelynzl (not verified)
Fri, 09/21/2012 - 16:45
Love it
I've been looking for plans like this forever. Thank you so much for sharing!
Derek (not verified)
Sat, 09/29/2012 - 16:23
Great Plan
Awesome plan and I am currently building the sideboard. When will the plans for the hutch be up on the site. My wife wants me to add that as soon as there are plans to build off of! Thanks for all the wonderful plans and excellent instructions!!
Carrie McCarthy (not verified)
Fri, 11/09/2012 - 08:00
Shopping List
Hi Ana,
Is the shopping list above for just the lower sideboard or does it include the hutch? I'm going to make just the sideboard this weekend and I wanted to make sure I was going to buy the right thing.
Thanks
Carrie
Nicholle (not verified)
Sun, 11/11/2012 - 16:02
I need help
I am wondering if I send you a photo and info about an area that I am trying to renovate if I could get your help.
Thanks
Nicholle
Dawnmari (not verified)
Wed, 01/16/2013 - 17:50
Can you make the bottom larger?
Hi, Love the plan, just wanted extra room like for a buffet table too. Can you make the bottom larger so that there is like a shelf and can you help with the directions for that. Just curious, love it .... wanted to put it on a glass porch, but needed side table room as well. Thanks. :)
solarvirga
Sun, 06/30/2013 - 08:16
Foyer Table
I absolutely love these plans. I'm using them to build a foyer table for a *gasp* snake cage. White-washed the whole thing and then glued some hard-wood floor to the top. I'll submit some pictures soon!
Ervink1429
Tue, 10/08/2013 - 19:31
Hutch plans??
Do you have the hutch plans available for this project yet??
Jtheonewhocould
Sat, 09/20/2014 - 01:13
How to modify the plan to suit my needs
Hi Anna,
This piece is beautiful. The design is very close to what I have in mind, however I would like to modify it. How could I add in a sliding glass doors to this plan? Or perhaps just glass doors period. Also I would like the shelving to be removable. How could I go about doing that?Thank you for taking the time to answer my query. I appreciate it very much.
djj1125
Sun, 02/15/2015 - 00:41
shanty sideboard with overlay doors instead of inset
how can I change the plans for overlay doors instead of inset
djj1125
Sun, 02/15/2015 - 00:45
shanty sideboard with overlay doors
How do you change the plans for the shanty sideboard so that you only have two doors instead of four and to have overlay doors instead of inset doors?
DIYER_MD
Sun, 02/15/2015 - 14:58
You can take a look at the
You can take a look at the one I built by going here:
http://ana-white.com/2014/01/shanty-sideboard-and-hutch-first-build
To modify the plan, you can build the sideboard without the doors. Then measure the opening for each door and add 1 inch to both the length and width of the measurements. That would give you a 1/2 overlay on each side. (you can adjust this as you like to get the look you want.). I got the hinges from Lowes. The hinges I used mount to the edge of the frame to make the doors overlay. To mount these type of hinges will require that you drill the mounting hole using a Forstner Bit which you can also get from Lowes. The hinges also allow minor left/right and up/down adjustments after they are mounted.
Hope th\is atleast gets you going in the direction you want to go.
Terry
justinhase
Fri, 08/14/2015 - 16:41
Part 2 of this Plan
Ana, Is there a pdf of the second half of this plan? I may be missing it but I can't seem to find the instructions for the top half of this piece. Is there a link to the instructions for the other part of this project somewhere else on your site?
In reply to Part 2 of this Plan by justinhase
Ana White
Sat, 08/15/2015 - 09:30
Here we have it http://ana
Here we have it http://ana-white.com/2012/10/plans/shanty-hutch
justinhase
Fri, 08/14/2015 - 16:49
Hutch Plans
If you, like me, couldn't find the plans to the second half of this piece, here they are:
http://ana-white.com/2012/10/plans/shanty-hutch
Jline
Thu, 12/17/2015 - 21:01
10' molding for top
When it mentions in the shopping list 10' molding for top what is the type of molding, any particular width or something like crown molding used in houses? Thank you.
bassmaaann
Mon, 01/13/2020 - 12:39
Top moulding specs
Is there a specific moulding size and type used for the top moulding? The shopping list doesn't specify. Thanks
bornlax55
Mon, 05/17/2021 - 12:42
Sideboard Plans
Is there a separate link or pdf for the plans? Or do the plans only consist of the pics/text that is shown after I click on the project? Some of the text makes it read as though there are significantly more detailed plans available rather than the 8 steps listed above. thx