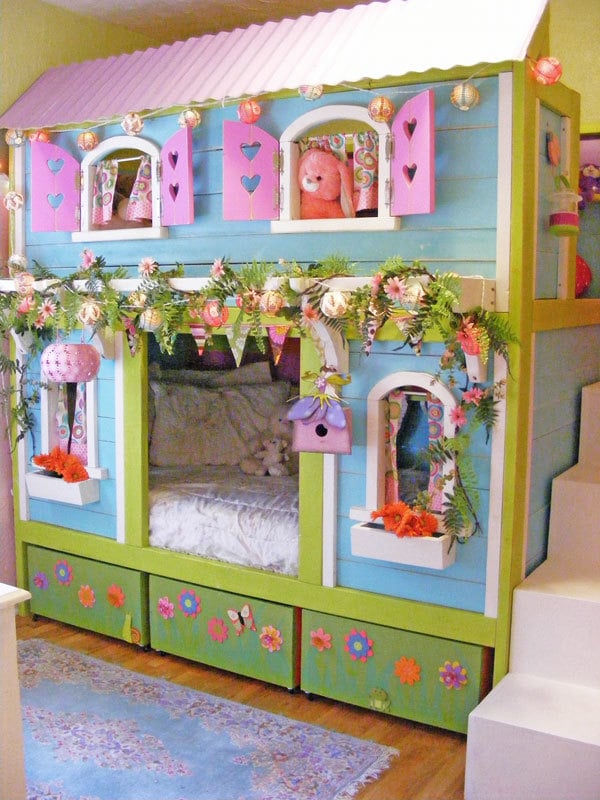


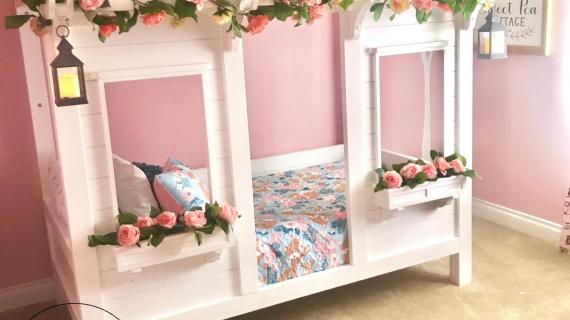
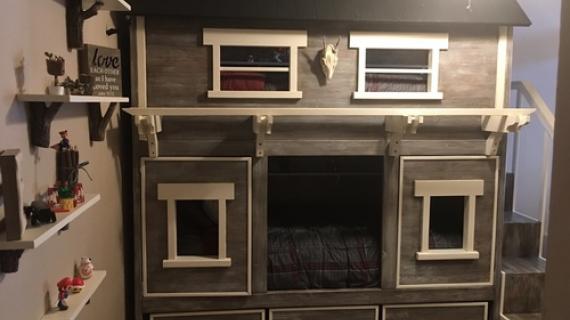
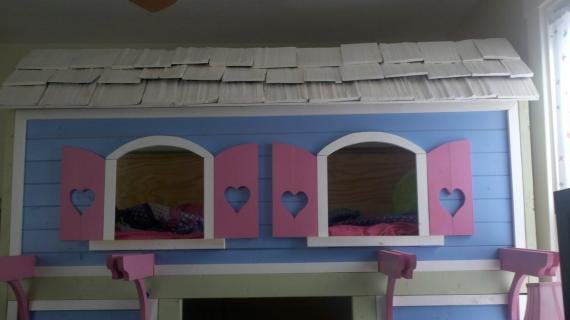
Free plans to build a cottage bunk bed! You can build this dream bunk bed with step by step plans from Ana-White.com. Designed and built by Jenny at Birds and Soap.
If you've got a little girl in your home, I have a feeling she's going to get a new interest in power tools after this post. That is if she isn't already!
You already know Jenny from Birds and Soap who has engineered such amazingness as a farmhouse bed with hinged footboard storage compartment, right?

Well, Jenny has been working on creating the perfect bunk bed system for her little girls.
And what could be more perfect for a little girl than this?

Yes, this bunk bed is DIY!
Don't let the cute hat and pretty smile fool you, this Momma knows how to make her little girl's dreams turn into a little girl sleeping in a dream bed, DIY style! Yes, Jenny designed, and with the help of her family, built this bed!
And she kindly wrote me asking if she could share the plans with you so you could also build a dream bed for your little ones!
This one is all Jenny, so you simply must go check out tons more pictures and her building story!
And here's from Jenny:
This bed has been a loooong time in the making. I spent the entire winter planning and googling inspiration for a bunkbed that would serve my two girls with functional storage, style, and charm that would give them childhood memories of great. If you’ve got to share a room, it might as well be awesome, right? Somewhere along the line, Pinterest showed up and I found a great place to organize all of the inspiring ideas I found along the way.
I have affectionately coined this bed “The Bunkbed to End All Bunkbeds” because of the time and work invested to make it happen. While researching other bunkbed plans and pictures, I came across many a moms’ anguish over the difficulty they had when changing bed sheets on bunkbeds. I adjusted the plan so that there are a few inches around the mattress to accommodate all those layers of bedding and plenty of room to pry up the corner of a fitted sheet... It’s the little things.
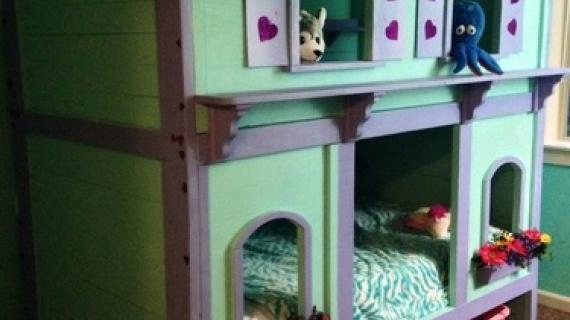
This bed has a lot of little details to make it extra special. I included narrow shelves on the rear panel to give each child a space for books, the nightly drink of water they “have to have,” and an alarm clock too. The space underneath the bed will accommodate a trundle bed if needed; however, I chose to maximize storage by building three large storage boxes on casters for easy reach of shoes, toys, and little sisters (because YOU KNOW they are going to try it). They also have an optional interior box that slides back and forth on a rail for helpful organizing (shoes underneath, socks on top. BAM!)
The stairs are open concept shelving; I’m sure that drawers would be lovely, but I am still too intimidated to go “all drawer” on a project yet. It was a happy accident when I discovered that the storage bins I purchased at Lowes fit like. a. glove. into these little compartments! The shutters, window boxes, and stair railing all echo the sweetness of this charming design. While the galvanized metal “roof” over the front panel gives an illusion of depth, I think what really takes this bed up to eleven is the pergola- because who has a bunkbed with a pergola?
My girls, that’s who!
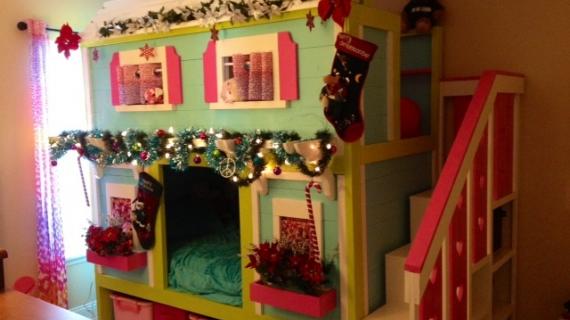
And hopefully yours will too! I hope this plan will be a springboard for some amazing bunkbed brags! Oh, how I wish I had little boys; I can already envision a rustic, lodgy take on this design…Wood stained siding, real tree branches for the pergola, Hunter green shutters with little Pine tree cut-outs; what little boy wouldn’t love that? Personally, I was going for a “Garden Cottage” feel for my girls’ version- but hey, whatever floats your boat!
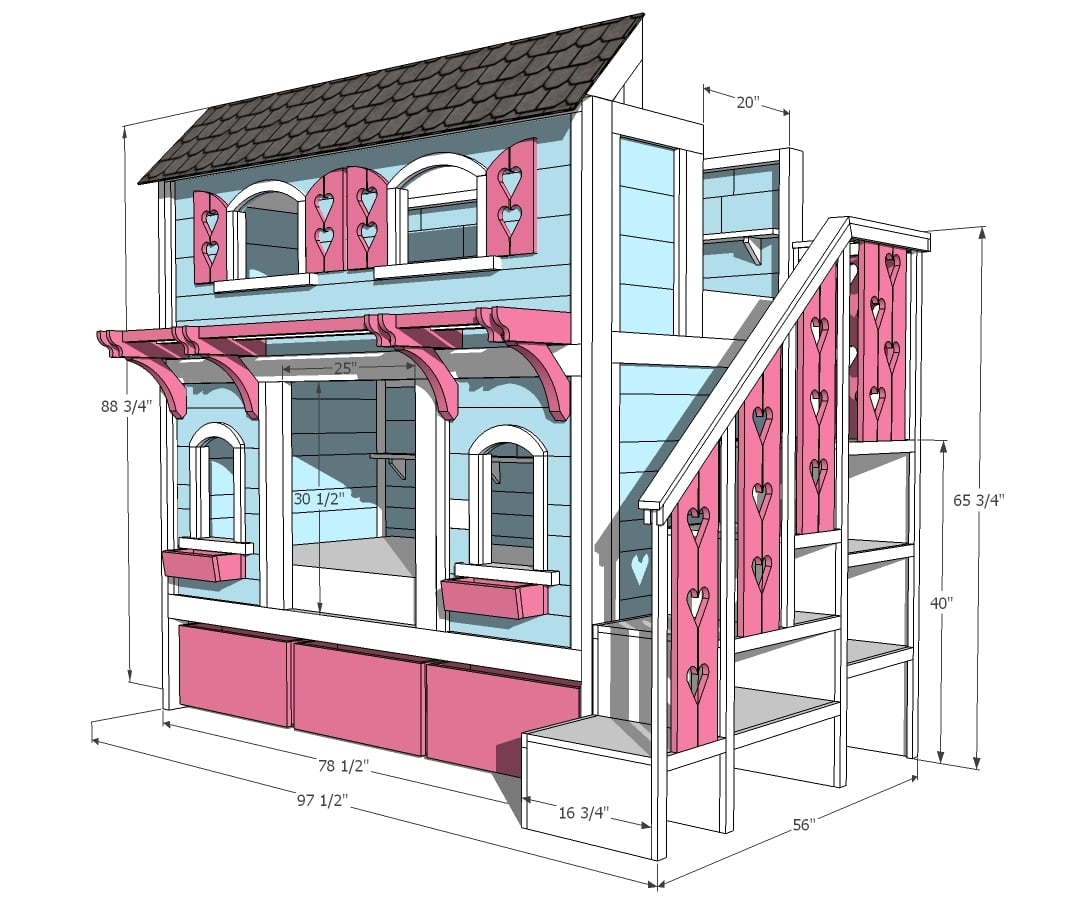
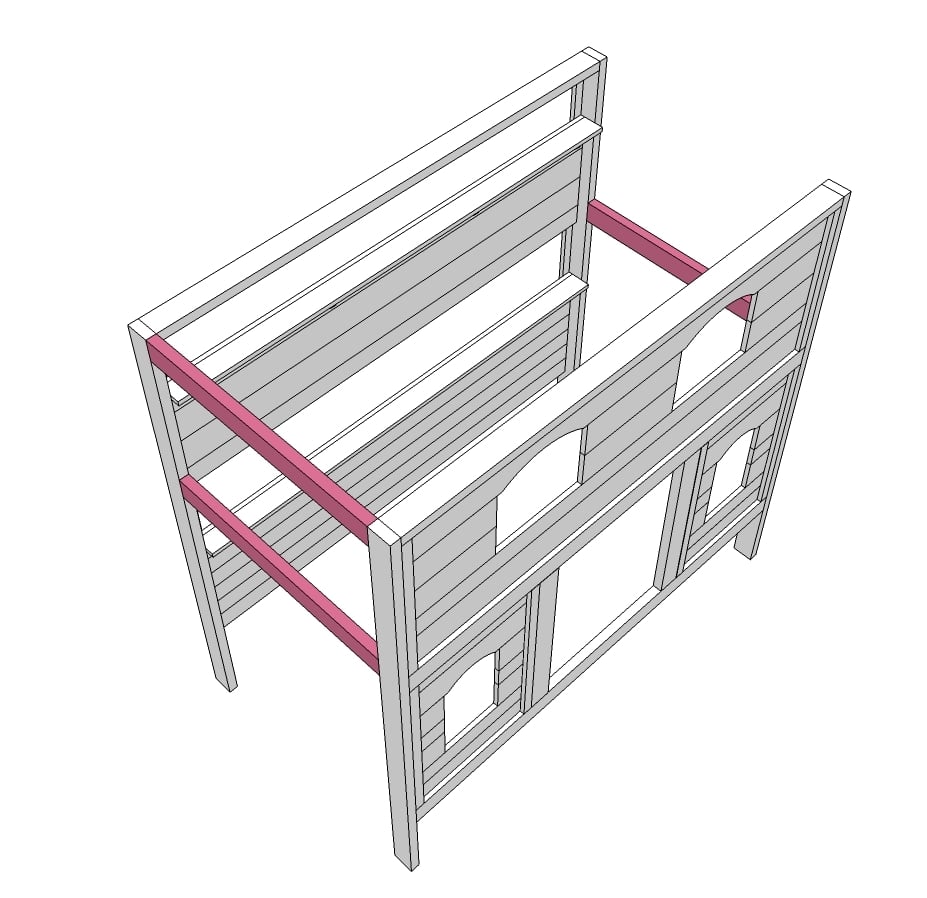
This bed is separated into front and rear panels, which are held together by the side panels. It can be broken down rather easily to move with you. It’s sturdy! I planned the stairs to be built from one sheet of plywood. Because of this, they are a little narrow (at least my childbearing hips have noticed, haha!) They are about 17” wide; if that feels a little too small for you and yours, you might consider widening the dimensions by a few inches and purchasing more plywood.
The building process went fast. That is, after I pre-cut, primed, and painted the pieces BEFORE I assembled them. Save yourself some heartache and have a painting party before you put this beast together! I tricked my teenage nieces into coming over and helping me out which saved a lot of time. And my other advice on paint: Sample-sized paint jars from Lowes have revolutionized my DIYing, building, and crafty self! The cost of these 7-8 ounce jars is slightly less compared to a quart of paint, and allows for many color options. I probably spent nearly fifty dollars on paint for this bed, but I was able to get over a half-dozen colors; something I would not have done had I been purchasing paint by the quart or gallon.
I am a firm believer in distressing ANYTHING that goes in a kid’s room, because it’s eventually going to get “distressed” on it’s own. I sanded the boards on the edges, highlighted the knots and patterns in the wood by letting a little undercoat or wood show through. I thought it worked with the feel I was going for and added to the whimsical nature of the design.
A huge, HUGE “Thank You” to Ana for making it possible for me to share this plan! Without you, I would have serial-killer-scrawled images on Post-It notes and one really messy Sketchup file! Thank you for taking the time to make this into a visually appealing (and logical) step-by-step plan to follow (not to mention how flattered I am that it is on your awesome website). You’ve got “Mad Sketch-Up Skillz,” girl!
Seriously, Jenny, this is all you!
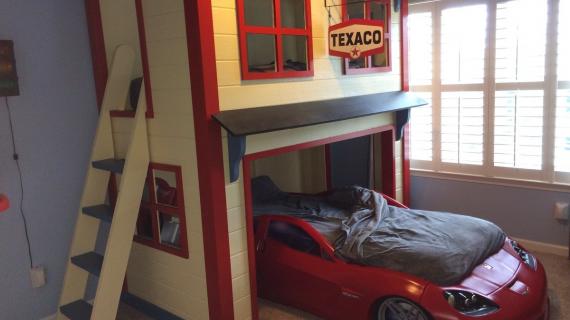
This is such a large plan, we'll do the actual bed post today. That way if you have a boy, you could use just this plan to say make a fire station bed. We'll put the plans for the rest of the bed accessories out later this week.
Thank you Jenny, this is a real treat!
If you haven't already - you have to go visit Jenny at Birds and Soap now for lots more photos and details!
PS - this week I am traveling to shoot video for the SKIL Tool Company (yay, more video project plans!) and will be doing my best to keep up with comments and emails ... that is pending it doesn't take me several dozen takes for me to get it right and we are still filming! #notgoodontv
Again, a huge huge thank you to Jenny from Birds and Soap for sharing her design and photos with you! We'd love to see your bed photos when you build it, so please share!
We'll be adding plans for the roof, pergola, window boxes, shutters and those stairs later this week so stay tuned!
Preparation
(16) 2x4x8’s
(20) 1x6x8’s
(20) 1x4x8’s
(12) 1x2x8’s
(6) 2x2x8’s
(10) Extra 1x4x8 or 1x6x8 boards for slats (I used half and half)
(3) boxes 1 1/4” pocket hole screws
(2) boxes 2 1/2” pocket hole screws
(1) box 2 ¼” wood screws
Wood glue
Sandpaper
Paint
Primer
Paintbrushes or rollers
The Bed is divided into four panels. Front, Rear, Left, and Right. The cut list is grouped into boards needed for each completed panel. Roof, Shutters, Window Boxes, and Pergola (all the bells and whistles) will follow. Cut lists for Stairs and Storage Boxes will be listed separately as well.
Front Panel
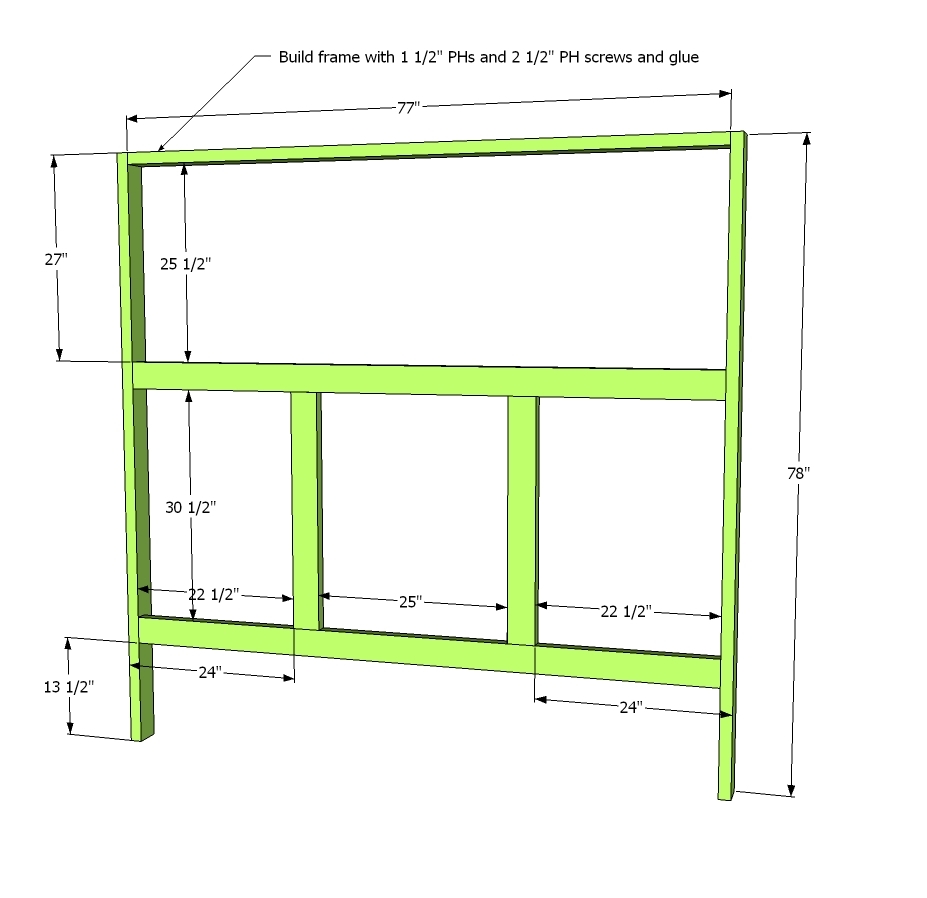
Front Panel Frame
(2) 2x4’s @ 78” vertical bed posts
(3) 2x4’s @ 77” horizontal braces
(2) 2x4’s @ 30 ½” vertical braces for lower opening
(2) 2x2’s @ 77” bed rails
Front Panel Trim
(4)1x2’s @ 30 ½” lower front panel trim
(2) 1x2’s @ 25 ½” upper front panel trim
Lower Front Panel Pieces
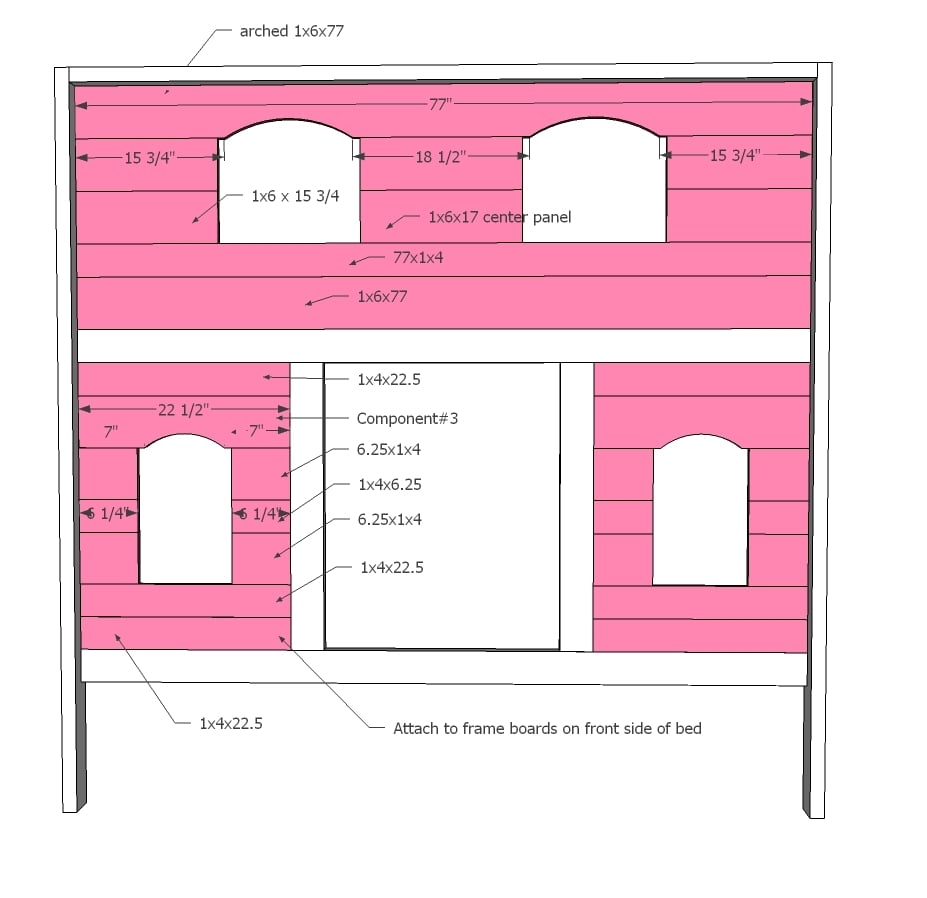
(6) 1x4’s @ 22 ½” lower front panel
(2) 1x6’s @ 22 ½” lower front (these will have arched cuts for window frames)
(8) 1x6’s @ 6 ¼” front lower window panels
(4) 1x4’s @ 6 ¼” front lower window panels
Upper Front Panel Pieces
(2) 1x6’s @ 77” upper front panel pieces (one will have arched cuts for upper window frames)
(1) 1x4 @ 77” upper front panel piece
(4) 1x6’s @15” window edge panel piece
(2) 1x6’s @ 17” center upper panel pieces between windows
Lower Window Sill and Trim
(2) 2x4’s @ 15” with 2 ½” x ¾” notches cut on ends, centered. Lower window sills
(8) 1x2’s @ 13” lower window side trim pieces.
(2) 1x4’s @ 11 ½” lower window top trim, arched.
Upper Window Sill and Trim
(2) 2x4’s @ 20” with 2 ½” x ¾” notches cut on ends, centered. Upper window sills
(8) 1x2’s @ 9 ½” upper window side trim pieces.
(2) 1x4’s @ 16 ½” upper window top trim, arched.
Rear Panel
Rear Panel Frame Pieces
(2) 2x4’s @ 78” vertical bed posts
(3) 2x4’s @ 77” horizontal braces
(2) 2x2’s @ 77” bed rails
Rear Panel Trim
(2)1x2’s @ 30 ½” lower rear panel trim
(2) 1x2’s @ 25 ½” upper rear panel trim
Rear Paneling
(I used leftover scraps from the other panel pieces to create a colorblock effect on the boards resting above the shelves. Instead of one long, solid board, I joined random painted lengths of scraps with pockethole screws to create one long board. This saved me the cost of four boards plus I used my scraps and it looks cool!)
(5) 1x4’s @ 77” rear panel pieces
(7) 1x6’s @ 77” rear panel pieces
Rear Panel Shelving
(2) 1x4’s @ 77” rear panel shelves
(8) 1x4’s @ 45 degrees on one end, 3 ½” on the longest side, trimmed back ½ on the short side to create a shelf bracket.
Side Panels
Side Panel Frame Pieces
(3) 2x4’s @ 38” left and right panel frame
(1) 2x4 @ 21” upper bunk opening vertical frame piece
(1) 2x4 @ 18” upper bunk opening horizontal frame piece
Side Panel Trim
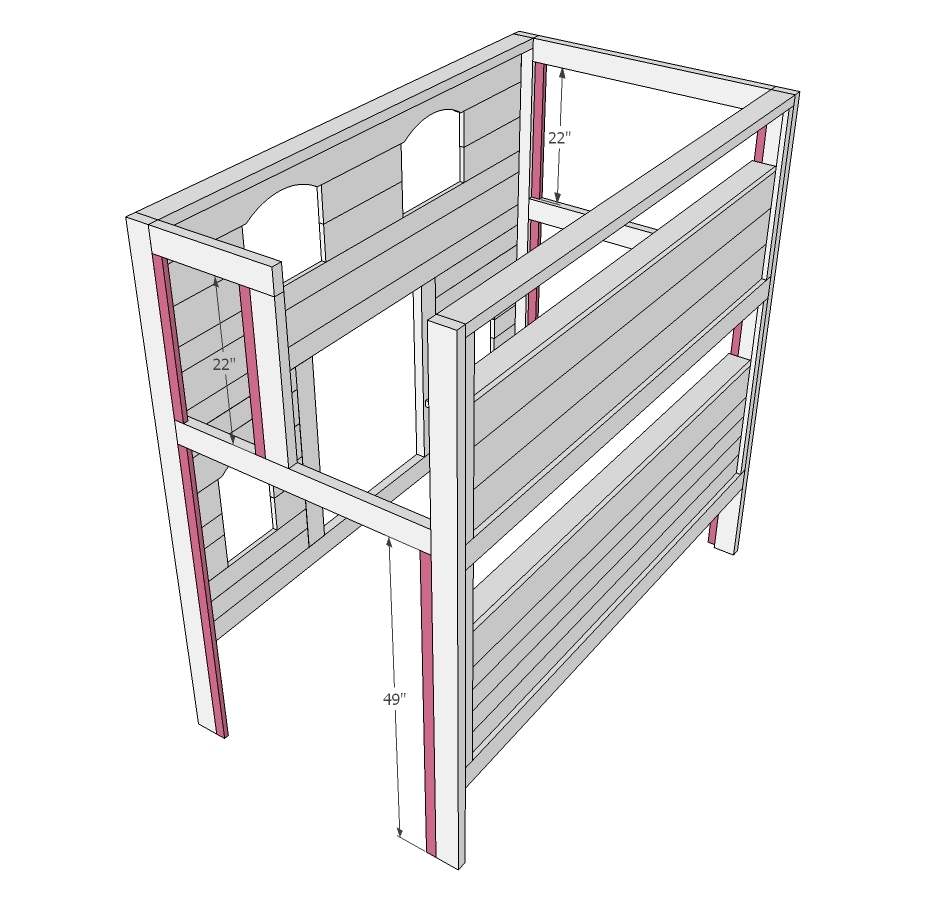
(4) 1x2’s @ 22” upper bunk side panel trim pieces
(4) 1x2’s @ 49” lower bunk side panel trim pieces
Side paneling, Left and Right
(12) 1x4’s @ 38” side panel pieces
(14) 1x6’s @ 38” side panel pieces
(4) 1x6’s @ 18” upper side panel pieces near opening


Please read through the entire plan and all comments before beginning this project. It is also advisable to review the Getting Started Section. Take all necessary precautions to build safely and smartly. Work on a clean level surface, free of imperfections or debris. Always use straight boards. Check for square after each step. Always predrill holes before attaching with screws. Use glue with finish nails for a stronger hold. Wipe excess glue off bare wood for stained projects, as dried glue will not take stain. Be safe, have fun, and ask for help if you need it. Good luck!
Instructions
Step 1
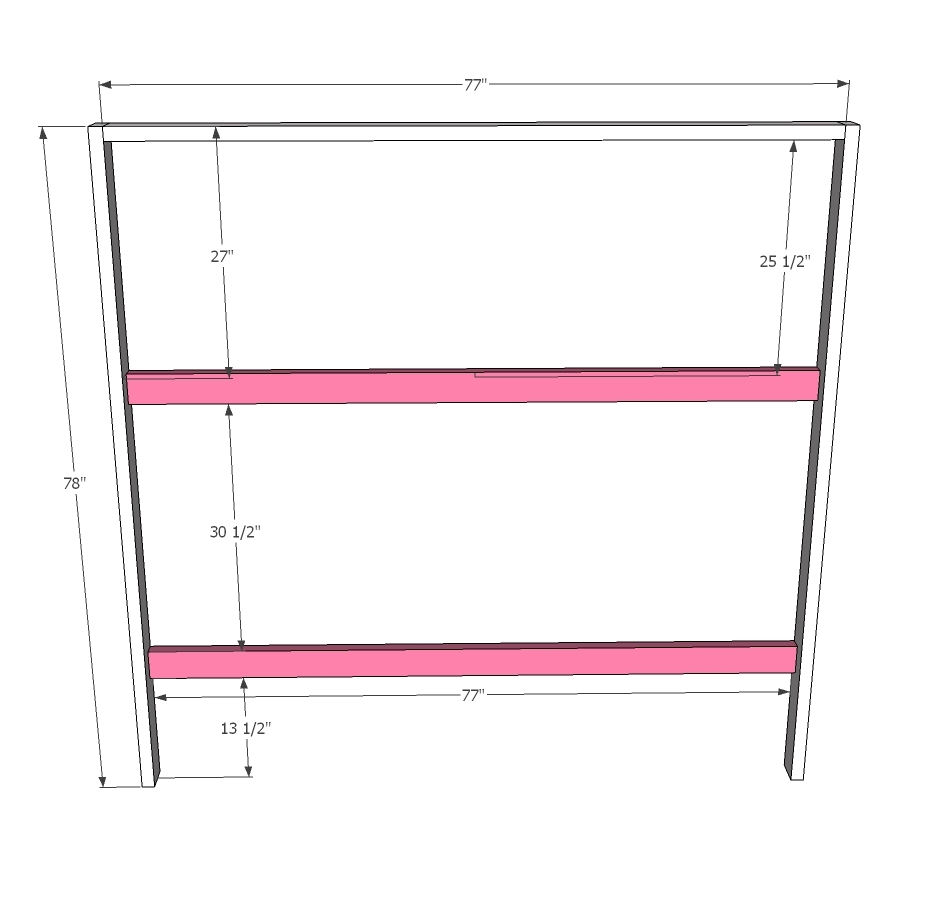
Front Frame
Starting with the front frame, attach the 78” vertical bed posts together with the top horizontal support. The posts will be turned in so that the 1 ½” edge is on face with the front panel. The 77” top piece is attached using 2 ½” pockethole screws drilled from the underside and wood glue on the insides of the bed posts and is also turned so that the 1 ½” edge is on face.
Next, the other two 77” horizontal frame pieces will be attached on the inside of the posts. These will be turned on their sides, with the widest face of the board facing out (on my first go round, I had them turned the other way, which gave no structural integrity to the bed rails. Don’t do that.). The middle board is screwed in and glued at 25 ½” down from the bottom of the first board, and the bottom board gets screwed in and glued at 30 ½” from the bottom of the middle board. These pocketholes should be screwed in from the back of the frame and the 2x4’s should sit flush with the front edge of the bed posts.
Last for the frame, the two vertical 2x4 pieces that will frame out the bottom opening are screwed in with pocketholes as well, each at 26” from the inside edge of the bed posts (this should leave a center opening of 25”). h
Check for level on all boards.
Step 2
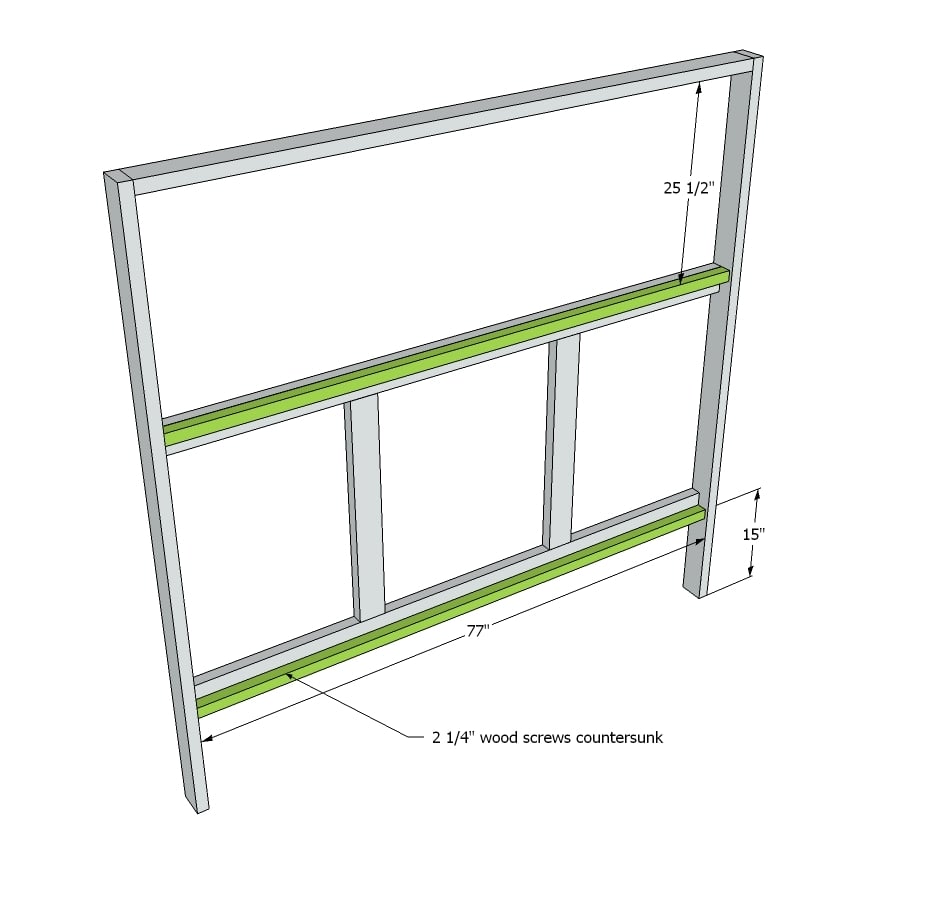
Mattress Cleats
Attach the 2x2 rails that will be used to support the mattress slats to the bottom and middle 2x4 horizontal boards on the inside of the frame. Using 2 ¼” screws pre-drilled and countersunk every 15”, and wood glue the entire length, attach the bottom rail flush with the bottom edge of the lower board, and for the middle section, attach the 2x2 rail so that it is flush with the top of the middle board. This will give a little more head room in the lower bunk area.
Step 3
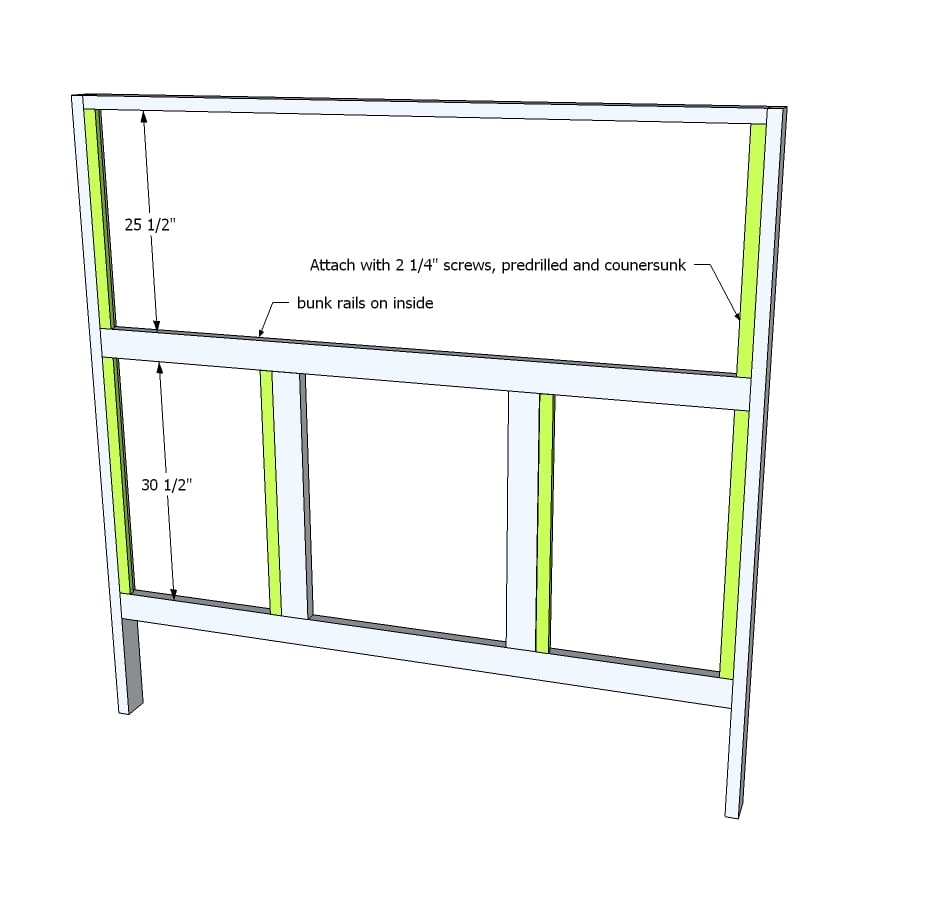
Front Inside Trim
Attach trim pieces to vertical posts. Using 2 ¼” screws, again, pre-drill and countersink the edge trim into the bed posts. For the Front Panel, They are attached with the wide edge facing out and these edge pieces will be flush with the front face of the bed frame.
Step 4

Front Upper Paneling Window Cutouts
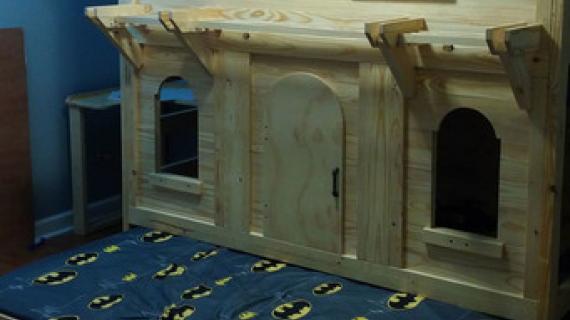
Panel construction: Beginning with the upper portion, if you would like arched windows, you will need to measure and cut arches into this board. If you are okay with square windows you can skip this step. To figure out height and width of the arches, I used a very complicated method:
First you measure 15 3/4 inches in from the edge of your board and mark it. Then, you measure another 13 ½ inches from that mark and make a line. You now have the width of your arch measured. Do this exact same thing starting from the opposite end of the board measuring inward. The window openings will be even from the edges, and you should have an 18 ½ inch space in the center between the two marks.
Now find something big and round. I found a flower pot from something I let die hanging out in my driveway. You want a large enough circle so that you will get a slight arch and won’t be cutting too high into your board. Line your object up so that it is within your two marks and trace around it. Voila! A perfect arch!
My advice here is to cut out one side with a jigsaw, then take that scrap and use it to trace your next arch for the other window. I did not do this and my window arches ended up being slightly off, which made for trouble when I tried to make identical shutters. Bottom line: however you get your arch, whether you trace around a garbage can, pizza pan, or dreamcatcher- make sure it matches the second one. You can’t really tell from looking at my finished bed that they are uneven, but trimming it out was a real pain.
NOTE: Short panel pieces on outsides of top windows are 15" long. 15 3/4" long marks the start of the optional arch cutouts.
Step 5
Step 6

Upper Window Sills
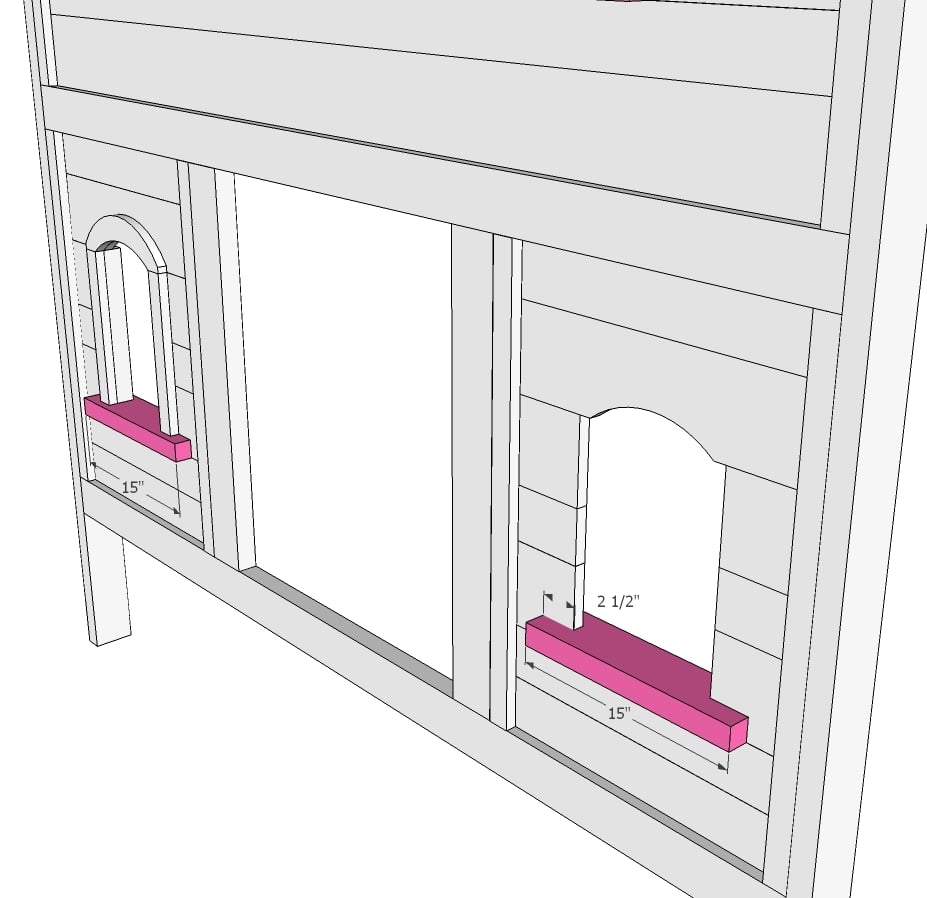
Next you will be creating a window sill. Stand up your panel and lean it against something sturdy to work. Starting with the upper section, measure the width of you windows. If your cutting is correct, they should be 15 inches wide. Using the 20 inch 2x4 for the sill piece, you are going to create a notch on each end that is roughly 2 ½ “ long and ¾” wide. Mark your board lengthwise on center and also mark two lines at 2 ½” in from each edge. Carefully measure 3/8” out from the center line on each side and mark lengthwise.
Cut out this rectangular shaped notch with a jigsaw and dry fit into your window opening. It should lie flat resting on the board below the window space and each notch should secure it to the adjacent panel pieces. It took me a little effort to get a nice fit; a little tweaking might be required.
When you are finished, glue the sill into place on all edges and use your nailgun to secure it into position. Do this for each upper window.
Step 7
Lower Window Sills
Now for the lower windows, this is more of the same. The lower window opening should measure ten inches wide, therefore the sill piece will be 2x4x15 inches wide. Again, a 2 ½” x ¾” notch on center will complete the lower sills. Glue and nail into place.
Step 8
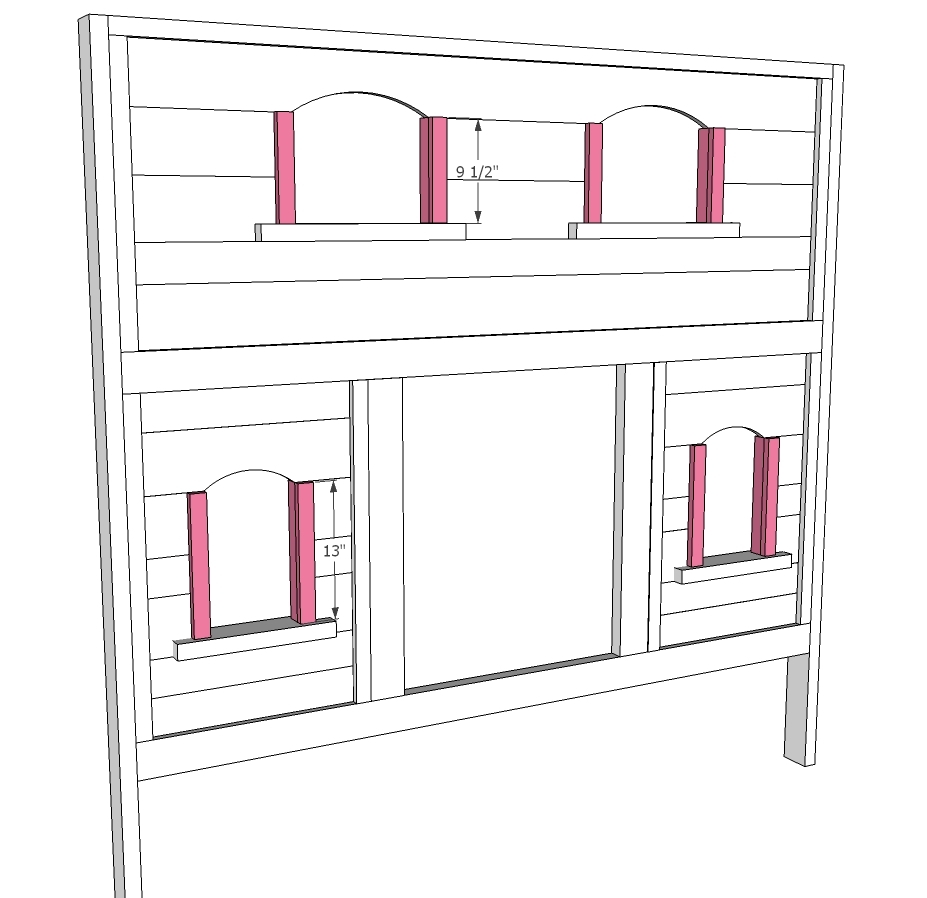
Window Side Trim
Trimming out the windows: The upper and lower windows are trimmed out with 1x2 material. When it came time to trim out my windows, instead of painting and precutting each piece, I chose to paint a 1x2x8 at length, cut as I needed, and touched up as I went. Due to the nature of trim work, things never seem to go perfect, and trim pieces end up a hair to long or too short so I opted to measure and cut as I went versus having too short of boards that end up in the scrap bin.
Starting with the interior edge of the window, measure the length from the top of the window sill to the top of the window opening. If you made arches, your trim will fit in that nice little ¾” space. The top windows should measure roughly 9 ½” tall and the lower window interior trim should measure roughly 13” tall. Glue the trim on either side of the window opening, keeping the outside facing edges flush and nailing into place.
Using more 1x2 material, the face trim will be added on each side of the windows. The measurements for length will be the same as the interior trim, also nailed and glued and kept flush the edge of the interior trim edge. When you are finished nailing and gluing, the sides of the windows will be secure and smooth.
Step 9

Arch Trim
To trim out the top of the windows I used a 1x4 board cut to the width of the outside trim. Again, for the upper windows, this board should be roughly 16 ½” wide and for the lower windows, it should measure 11 ½” wide. Fit it into place so it rests on top of the trim, and with a pencil, trace the arch pattern from the window opening onto the back of your board.
To get the outside arch, I measured ½” up from the bottom edge of the board and drew another arch freehanded. I tried to keep an even 1 ½” width all the way around. It is not that hard, but if you are intimidated, there is always finding another circular object to trace. Cut out both of these lines with your jigsaw and sand the edges smooth. I swear my lines were *perfect* because I’m crazy like that. But after I got went to town with my jigsaw it didn’t seem to matter much anyway; even at my best, I was all over the place ( I blame it on my blade). Needless to say, it took some serious sanding to get things nice and even.
Now if you made your windows square, things just got a whole lot easier because all you need is a piece of 1x2 cut to length.
Use glue and a nailgun secure the top trim into place on all four windows.
Boom! That’s it. Your front panel is finished! If you want to add shutters and window boxes you can add them next. I advise holding off on the roof and pergola till the end- those extras will follow later in the plan. There’s no getting through a doorway with the roof installed and a pergola hanging off the front! Take some time to look over your finished panel to make sure there are no nailheads sticking out. Use a nail set to put them below grade. Fill nail holes, sand any rough edges, touch up paint, and so on.
Step 10

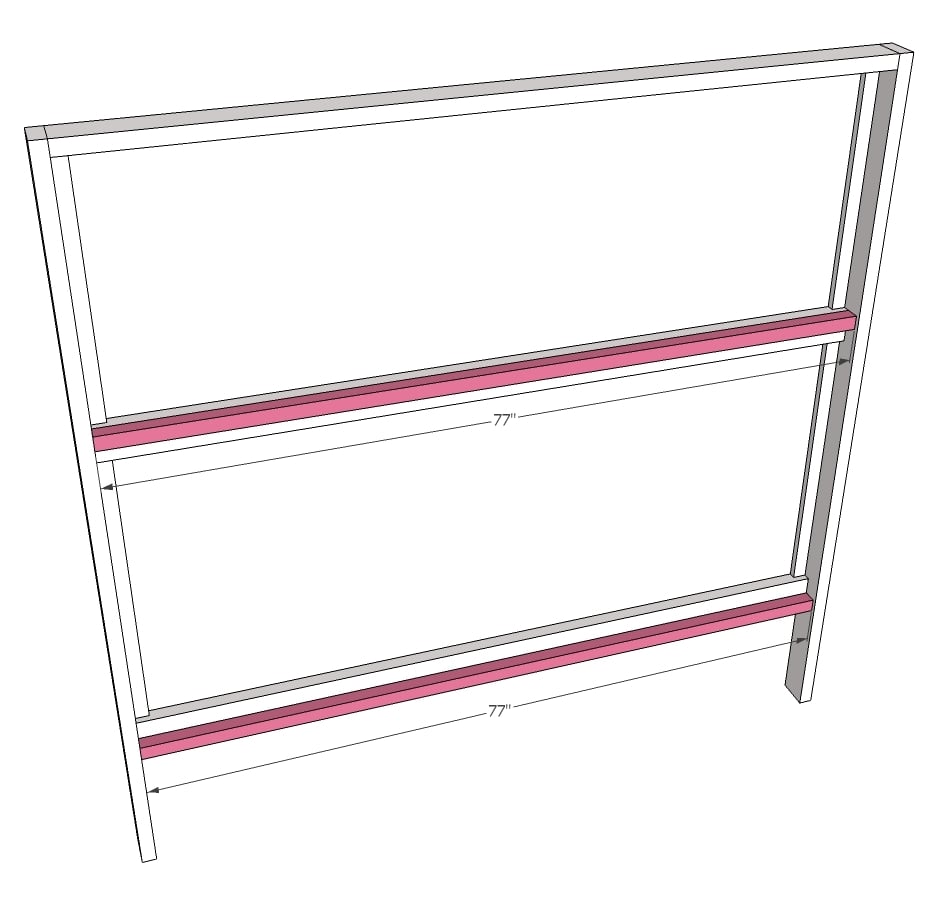
Rear Panel Framing
The rear panel frame is assembled identically to the front panel. The 78” vertical posts will be attached with the horizontal top piece using 2 ½” pockethole screws and glue.
Step 11
The middle horizontal frame piece is screwed in at 25 ½” below the top piece using pockethole screws drilled from the backside of the frame and also lying flush with the outside post edges. The bottom frame will be attached at 30 ½” from below the middle piece in the same manner.
Step 12

Rear Panel Trim
Attach the four trim pieces. 25 ½” 1x2’s in the upper section and 30 ½” 1x2’s in the lower section. They should be pre drilled, countersunk, glued, and screwed with 2 ¼” wood screws so that they sit flush with the rear of the panel frame.
Step 13
Attaching the rails
Again, these rails are attached in the same manner as you did with the front panel. Glue, pre-drill and countersink 2 ¼” wood screws every 15 inches across the rails to secure them. The bottom rail sits flush with the bottom edge of the 2x4 frame and the top rail sits flush with the top edge of the 2x4 frame.
Step 14

Assembling the rear panel sections:
Now this should be really easy, after all it’s just horizontally stacked boards nailed into place. However, unlike the front panel, these boards are not broken up by center sections and extra trim. Because these panels are so long, the boards tend to be a little flimsy and want to sag in the middle. I solved this problem by using pockethole screws to join the boards on the back side.
This time, when you lay the panel down, the “pretty side” will be facing you. With your trim already in place, you can dry fit the boards to see how they will fit within the space. For the upper section, I used three, solid 1x6’s at 77” long to fill the bottom portion below the shelf. For the space above the shelf, instead of solid boards, I used scraps left over from my other cuts. I primed and painted scrap boards in four different colors, distressed the edges, then joined them together at random with 1 ½” pockethole screws on the back, giving the panel a color-block effect. This saved some money and used up a large amount of scrap that would otherwise still have been sitting on my patio. If you choose to do this, keep in mind that you want to be consistent with board size; I used 1x4 material all the way across for one row, and 1x6 material for the second.
With your boards fitted into place, remove them from the section and turn them over. Using your Kreg Jig, drill pocketholes along the top and bottom edge of your boards roughly every 15”. Alternate the pockethole placement on each row to get a solid panel. Glue and screw your panel pieces together. Wipe the excess glue before it dries.
Also, I drilled pocketholes on the ends of the boards. This rear panel is heavy!! Because of the weight of the boards, the panel almost wants to sag in the middle, so I made sure to place pocketholes along the outer edges for a solid frame attachment.
This was time consuming and I burned through 1 ½” pocket screws rather quick, but the panel ended up strong and sturdy. To attach your boards to your panel, you will need to stand it up while you secure the section with pockethole screws. Use a scrap block to make sure your boards are flush with the interior edge while you glue and screw.
For the lower section, you want to create your panel in the same manner. Dry fit your boards, drill pocketholes around the edges, and glue and screw until you have one large plank. Notice the board size on the bottom section; it is made up of (4) 1x4’s and (3) 1x6’s all at 77” long. For the color-blocking on the bottom section, I used (2) 1x6 boards, making my shelf just a few inches lower than the upstairs bunk. I did that because there is limited headroom in the lower section and figured a lower sitting shelf would be better. Totally up to you.
Step 15
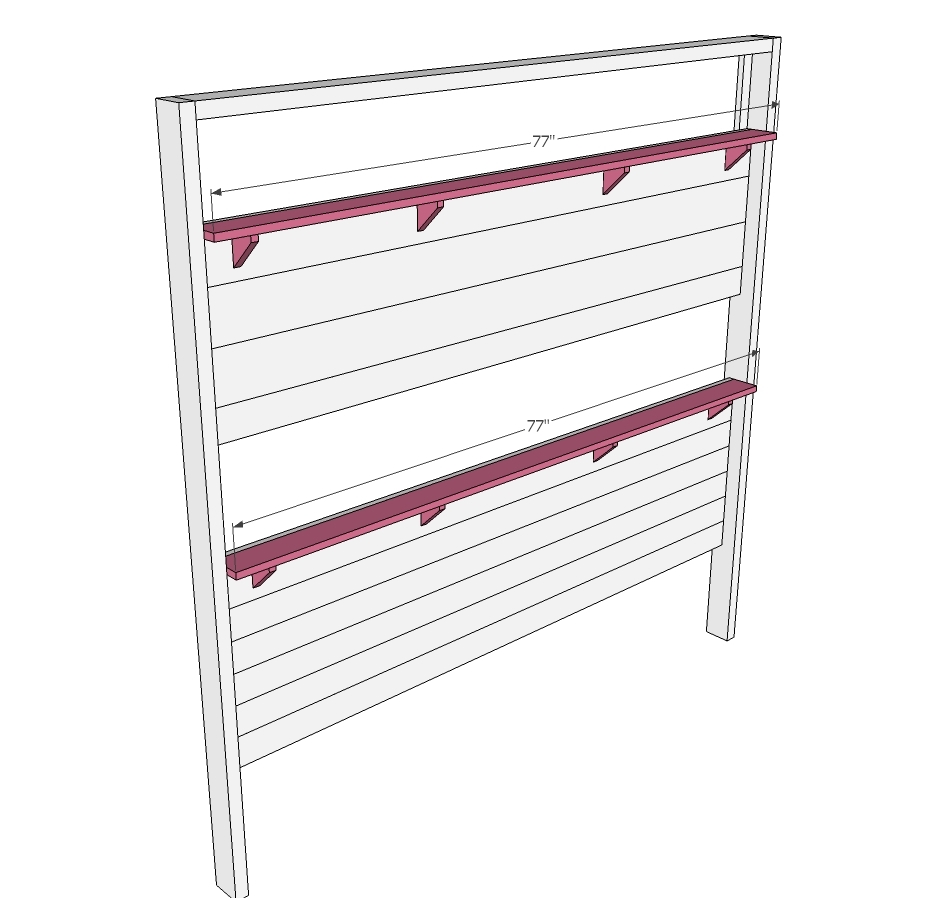
Attaching the Shelf
The shelf is so simple, yet adds so much to the inside of the bed. In order to attach the shelf across the bed, I made simple brackets by cutting down piece of 1x4 and making 45 degree cuts.
Start with a board and measure 3 ½”. This measurement will be the long side of he angled piece. Adjust your miter saw to cut a 45 degree angle. You will get a perfect right triangle. Then, trim off ½” in from the point on one side, with a 90 degree straight cut. This createos a little bracket that lets a 1x4 board rest nicely on top with a ½” overhang.
Once you have made the eight brackets, find the third board down from the top of your panel. Measure 15” in from each end and mark. Attach the bracket with a nailer and glue, keeping it flush with the top edge of the third board. Measure another 15” in from the two brackets you just nailed, mark and attach the remaining two brackets for your first shelf, checking for level.
Attach the 1x4x77” shelf by gluing it to the rear panel and brackets. Use your nailer to hold it in place. Wipe any excess glue and allow it to dry.
Done! This sucker is heavy. You need a helper to move this unless you want a hernia. Keep it secure so it won’t fall over while you are working on other aspects of the plan.
Step 16
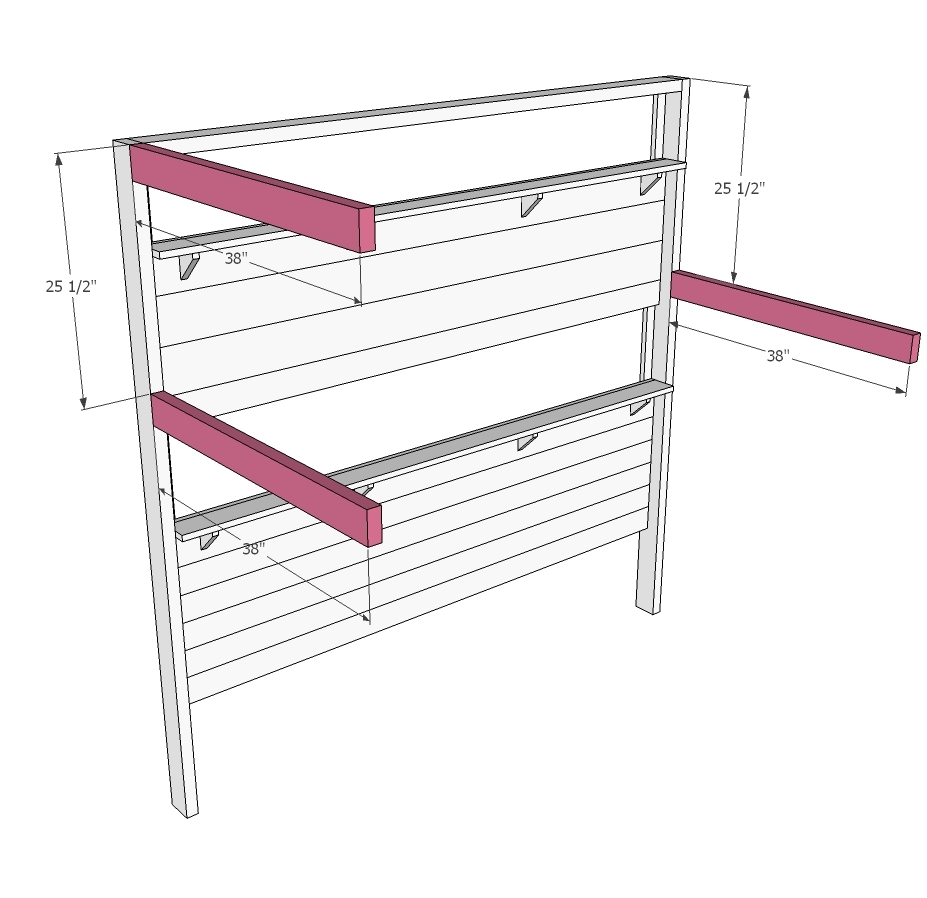
Side Panels
The side panels will go up rather fast. Instead of gluing the frame pieces together, you will just be screwing them in with pockethole screws. This way, the bed can be disassembled, allowing it to be moved inside; or if you should happen to join Witness Protection and need to flee the state, you can take it down in ten minutes flat.
Measure 25 ½” down from the top of the vertical frame pieces on each panel and mark. Do this on all four vertical posts.
Find your (3) 2x4 frame pieces measuring 38” in length and pre-drill the board ends with pocketholes so they are ready to screw on the fly (I even placed the 2 ½” screws in the holes ahead of time for lightning fast drilling action).
To put the bed together, you can either lean the panel against a wall or have someone help you hold it up while you attach the frame pieces to the first panel. The panels are heavy and can be a little bit of a balancing act before you get the first side secured; that’s why I recommend having the screws in place and ready to go.
Starting with the rear panel, attach the side frame pieces on each end of your panel so that the top of the board sits flush with your marks, drilling the screws from the inside of the bed. After these two boards are in place, attach the last 38” piece to the very top of the panel’s left post. It should mount flush with the post.
Step 17
Attaching Front Panel
Next, you will need to maneuver the front panel into position and screw opposite ends of the side frame pieces into place. When all three pieces are secured, you can let go!
Step 18

Stair Side Framing
To attach the frame for the upper wall near the top bunk opening, find your 22” vertical piece and drill pocketholes into each end. Next, drill pocketholes into only one end of the last 18” frame piece. Join the boards together at a right angle, the 22” board should be aligned vertically, wit h the 18” piece lying horizontally across the top. Take this “L” shaped piece and screw it into the upper right side panel.
Step 19
Attaching the Trim
All trim will rest flush against the outside edges of the side panels. Below the center frame support on each side panel of the bed, you will need to attach your trim pieces. Using (4) 1x2 strips cut at 49” long; pre-drill, countersink, and drill into the vertical posts with 2 ¼” screws. Remember the side panels are not glued in for this step.
Next is the trim for the upper portion of the side panels. Attach (4) 22” strips in the upper section with the same method.
Step 20
Side Panels
If your boards are pre-cut and painted, this will go very fast. Using wood glue and a nail gun, from the inside of the bed, start at the top and work your way down each side. The upper sections will use (4) 1x6 boards on each side. The left panel will be 38” long and the right will only be 14 ½” long to fit that tiny half wall. Apply glue to the back side of the trim pieces and glue between the board edges while you nail the boards into place along the trim.
On the lower sections, I alternated between (6) 1x4’s and (5) 1x6’s to fill in each side until you reach the bottom of the bed. There will be a small ½” gap along the bottom of the side panels (it serves no purpose, just too small to do anything with). Wipe excess glue and allow the panels to dry.
Note: When it is time to move the bed, you can remove each panel by unscrewing the trim pieces along each post. The panel sections will come out whole and then all you have to do is disassemble the side frame. Easy Peasy!
Step 21
Mattress Slats
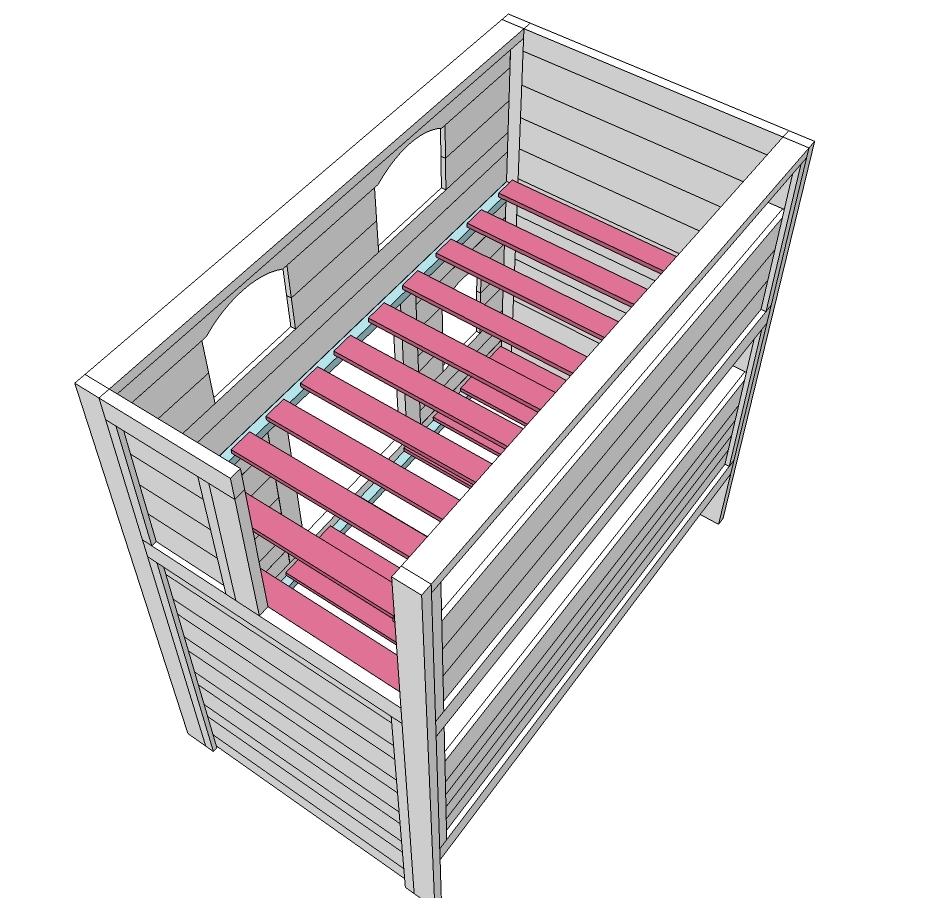
I made the slats for the upper and lower bunks out of 1x4 and 1x6 boards cut at 41” long. I placed them close together (8-10” apart) and lined each bunk along the rails. Because this bed is slightly larger than a standard twin mattress (For good reason! Nobody wants to get bloody knuckles trying to change the sheets), the top bunk end slats need to be touching the side panels. When you enter the upstairs bunk, there will be a gap at the end of the bed. Make sure a board is in place to fill the space and create a little platform. For extra cool points: Paint the underside of the boards that line the upper bunk. The lucky child who sleeps below will be staring at those boards every night of his/her life before they drift into sleep. I painted the slats different colors from my leftover paint jars (and even cooler: cover the underside of the upper mattress with an extra fitted sheet- fun characters or something or other that kids like).
It is always recommended to apply a test coat on a hidden area or scrap piece to ensure color evenness and adhesion. Use primer or wood conditioner as needed.


Comments
birdsandsoap
Mon, 09/24/2012 - 12:54
Thank You, Ana!
Thanks for all your help, I'm so excited to share this plan!
mach170 (not verified)
Thu, 12/27/2012 - 20:26
It looks like the model in
It looks like the model in the pictures was done in SketchUp. If so would it be possible to get the SketchUp file?
Maria in Maui
Mon, 09/24/2012 - 14:00
Amazing!!!
This is absolutely amazing! I just adore it. Great job, seriously, this is the cutest, most detailed bed I've ever seen! I am completely inspired, I gotta come up with a boys themed one!
Thank you both for sharing!
dmcarwin
Mon, 09/24/2012 - 14:43
Awesome!
So very Beautiful! Thanks so much for sharing!
abbpim
Mon, 09/24/2012 - 16:17
This is awesome!
About a month ago, I made the farmhousre storage bed that Jenny posted. Directly after that project, I began revamping my kids' ikea bunk bed from something very boring to something imaginative. I decided to make it into an L shaped loft/playhouse bed, but I've put the project on hold in order to gather inspiration while completing some toys for inside the playhouse. (Yeah I was really just about to put the walls up when my husband reminded me that I won't be able to get anything big inside the playhouse if I put the walls up first... DUH!). So I've been trying to design in my head the perfect loft/playhouse bed for my girls when suddenly these plans popped up today! The strange thing is that I was truly messing up my brain trying to figure out the best solution for storage stairs. It's like a telepathic message was sent from my brain to the ana white site! This bed is the perfect style for my kids, and now hours of my time had been saved! Thanks Jenny and Ana! I'm starting this project ASAP! You are both creative geniuses!
In reply to This is awesome! by abbpim
birdsandsoap
Mon, 09/24/2012 - 21:53
That is awesome!
I can't wait to see your brag post, I love it when things fall into place like that. Thanks for your kind words.
hoffer5353
Mon, 09/24/2012 - 18:51
Fab!
This is absolutely fab, when I saw it I felt like I would love to crawl in and go to bed. You have some very lucky kids! Thanks for sharing your creation!
redhead_61
Mon, 09/24/2012 - 21:23
Completely PERFECT
This is maybe the most amazing thing I have seen on this sight besides Ana building ya know a house! I have been wanting to ask her to design a tree house inspired bunk bed for my kids. The over all design is VERY similar to what you have here. I need it for a queen and full bed, I will have to see if I can modify to come up with that! Maybe next year you will be seeing my brag post! Amazing job it is so darling.
I am pinning you because you deserve the recognition.
In reply to Completely PERFECT by redhead_61
birdsandsoap
Mon, 09/24/2012 - 22:03
Thanks!
This bed is like having the Ultimate fort in your room that you never have to take down. If you made it a queen/full size, your kids would feel like they get to sleep in a mansion! Get to work, because I would love to see what you come up with!
jesikuh123
Fri, 03/22/2013 - 07:49
Missing Plan Link
Hi there!
I am trying to download the PDF file for this bed but the link seems to be broken. Can you relink it or email it to me please- this is a perfect spring-time -lay-off job for my husband!
my email is j.mccloskeywarner@gmail.com
Tank You!
bhoppy
Tue, 09/25/2012 - 06:04
Awesome!
I know I say that about a lot of plans and brags but this is seriously the cutest thing I've seen.... I was looking at it last night and my daughter of course saw it on the computer screen and said "Mommy I want that!" LOL She said she wants it decorated exactly the same too. Thanks for all the detailed instructions! I would love to try and tackle this but I know we are going to have to move again in a year or two, can the bed come apart once it is assembled?
In reply to Awesome! by bhoppy
birdsandsoap
Wed, 09/26/2012 - 03:34
Yes!
The front and rear panels of the bed are held together by the side frame pieces. This bed comes apart into 4 panels and is easy to move. I designed it with that in mind. I think the stairs were more awkward to move in to the bedroom than the giant bed.
melissa buckwalter (not verified)
Tue, 09/25/2012 - 07:35
LOVE IT!
I have a 3yo boy and 1yo boy. I would love to see a boy version. Bunkbeds usually scare me, but the high railing and stairs make me feel like this would be a perfect fit!
angd73 (not verified)
Tue, 09/25/2012 - 11:48
This is great!
This bed is so awesome my two sons were drooling over it (pink shutters and all!) lol
MichelleC
Tue, 09/25/2012 - 13:28
Incredible!
Would you be able to give us the approximate amount that it cost you to build this? I know price will vary a LOT but just so that I have a ballpark figure...:-) Amazing job, my 4 year old girl wants one badly now, and even my 8 year old boy wants me to build him a boy version. I'm a mom of 5 who lacks a big sack of money, so I don't know how quickly that'll happen!!! :-)
In reply to Incredible! by MichelleC
birdsandsoap
Tue, 09/25/2012 - 21:13
Yes!
Brace yourselves; there's a lot of wood here. I can't give an exact number because I worked on this bed FOR-E-VER and there were many trips back and forth to Lowes...with that said, I probably spent $350-$400 on the bed. Much of the 1x material was purchased as "culled lumber," slightly damaged so I bought it at a discount. If you need an exact estimate, I would print out the materials list and price accordingly to your area. I built this bed in stages, the girls had it in their room long before the stairs and storage boxes were built. We kept them out of the top bunk until we had stairs (but that doesn't mean we didn't catch them scooting dressers and stacking chairs on top to get to the second level, haha!). Kids are crazy, at least mine anyway.
lan99
Sun, 10/27/2013 - 06:09
A more recent cost update. I
A more recent cost update. I just got the lumber to build this, at home dept, for $445.
The fasteners will probably be about $40. Paint, maybe $50?
Jeff (not verified)
Tue, 09/25/2012 - 14:43
Awesome!!
I'm totally going to build this, but I may need specs on the stairs. Have the plans been posted for the stairs?
In reply to Awesome!! by Jeff (not verified)
birdsandsoap
Tue, 09/25/2012 - 21:07
This is such a big project
This is such a big project that Ana will be posting it in segments. You can expect the stairs and storage boxes shortly!
4juniNcece
Thu, 02/04/2016 - 14:56
plans for stairs
are the plans for the stairs anywhere?
In reply to plans for stairs by 4juniNcece
Ana White
Fri, 02/05/2016 - 16:00
http://www.ana-white.com/2012
http://www.ana-white.com/2012/09/plans/sweet-pea-garden-bunk-bed-storag…
merseyblue (not verified)
Tue, 09/25/2012 - 15:01
Wow! Wow! Wow!
This totally amazing! I LOVE IT! Thanks for sharing :)
Not sure if it is the ideal project for me to start with LOL (will definitely need to rope in some help), but got to have this for my 5 year old. I just have the one child, so wonder if a safe alternative to the mattress slats could be used on the top bunk - so it could be used for play instead.
In reply to Wow! Wow! Wow! by merseyblue (not verified)
birdsandsoap
Tue, 09/25/2012 - 21:08
My husband agrees with you on
My husband agrees with you on that one. We had one slat break (it was a bad board with a large knot in it, so it split ) and I think it makes him nervous.. You could run another rail across the center of the upper bunk and sheet it with plywood (is that called a "bunkie" board?) instead of using slats. Totally up to you.
Brian Winkler (not verified)
Tue, 09/25/2012 - 15:35
Stairs and Drawers
Do you have the plans for the stairs and drawers to this bunk bed. Your design is awesome and I know my girls would love to have a bed like this. Thanks
jacobsmom (not verified)
Tue, 09/25/2012 - 16:40
when you said 3 boxes of PH
when you said 3 boxes of PH screws, were these the 100 ct 250 ct or 500 count? because in most cases you can get a 500 box for cheaper than 3 boxes of 100
In reply to when you said 3 boxes of PH by jacobsmom (not verified)
birdsandsoap
Tue, 09/25/2012 - 21:01
100 count
I kept thinking my one box was enough, but I went through so many assembling the rear panels to make them solid that I had to keep going back for more. :)
James Rende (not verified)
Tue, 09/25/2012 - 18:18
Did you use Sketchup?
Do, I have to ask if the drawings were made using google sketch up? because I would LOVE to get a hold of the .skp files if they were. One way or the other, I intend to build this sucker for my little girl. Thumbs up because this? is exceptionally elegantly clever work right here.
Adam Simmons (not verified)
Fri, 09/28/2012 - 11:44
Been wondering this too ...
I, too, do a lot of work in Sketchup. I've been wondering is Anna posts her files anywhere, they're be really, really nice to work off of instead of re-drawing from scratch.
I *LOVE* this bed. My middle son would lose his mind if I built it for him.
Tracey Desjarlais (not verified)
Wed, 09/26/2012 - 05:47
This is the exact bed that my
This is the exact bed that my daughter and I were looking at for a thousand bucks plus! She is going to be so excited when I show her this and even more so when I tell her we are going to build it together (she's pretty handy to be 5!). Thank you so much for the awesome plans, can't wait to get started!
momofour09
Thu, 09/27/2012 - 05:29
LOVE!!!
I won't get myself in trouble and let my girls see this until I'm sure I can make it. Do you think this is too complicated for a beginner? I know there are a lot of steps, but looking through it didn't seem overly complicated. Also, do I need a kreg jig or can I just countersink my screws?
Thanks in advance and for sharing these plans?
In reply to LOVE!!! by momofour09
birdsandsoap
Fri, 09/28/2012 - 12:59
You can do it!
This is a BIG project, but totally doable for a beginner. The most complicated part are the window arches, and you could skip that all together and just do square windows if you prefer. It is a simple plan, there are just A LOT of boards.
I would recommend a Kreg Jig, because I think you will just get frustrated trying to countersink all those screws. It's worth the extra $ to get the jig for this project (plus, you'll be a furniture building genius by the time you finish this bed and you will want to use your jig on everything). If you can't afford the master kit right off, you can buy the smaller one with a clamp for a reasonably low price ($40 + a clamp). The Kreg jig will also come in handy for assembling the planks of the rear panel, you will want to screw them together on the back side so they are one solid section (to avoid sagging and bowing). Pockethole screws make for a strong joint.
Jessica Murawski (not verified)
Mon, 10/22/2012 - 17:07
PDF Plans?
I have been trying to find the PDF plans for the main portion of this bed, but I've not had any luck. I've found the drawers, stairs, roof and pergola and window boxes/shutters, but the link for the bed plans does not work. Can anyone help me out? I love this design and would love to build it for my daughter!
Liz Thompson (not verified)
Mon, 10/22/2012 - 22:43
Sweet Pea Bunk Bed
Hi,
I just found your site 10 minutes ago and I am in love with it. You are so talented! Thank you so much for making your plans available to us at no cost. Just want to let you know that I tried to download the pdf version of the "Sweet Pea Bunk Bed" but it seems like the link is broken. Would you please let me know when it's fixed? Meanwhile I'll try to come back whenever I get the chance. Take care!
dabsabre
Wed, 10/24/2012 - 10:58
was wondering if you
was wondering if you considered using plywood for the front/back/sides? wouldn't that save quite a bit of $$ in the long run?
In reply to was wondering if you by dabsabre
birdsandsoap
Wed, 10/24/2012 - 11:31
yes, I did.
I did consider plywood, but chose not to for several reasons:
1. I would have had to buy 5 sheets, which @$35/sheet it was not cost effective. And I would have had a lot of scrap.
2. I don't like the way the knots are patched in the plywood with those biscuit things, they are a pain to fill and sand.
3. The overall texture gave nothing to be sought after. I wanted character, and the boards gave a cottage feel like real siding- couldn't get that with a plain sheet of plywood.
After I nixed plywood off the plan, I priced siding. I thought that some pre-fab house siding would work great and look nice. It would have cost nearly the same as 1x material, but it was thinner and I would have had to add additional framing to the panels to make them sturdy.
Boards cost less in the long run, they give strength that siding can not give, and they look much better than plain plywood. I purchased much of the wood at a discount too.
dabsabre
Wed, 10/24/2012 - 12:25
thanks for the feedback.. I
thanks for the feedback.. I hadn't sketched it out to see how much scrap there would be from the plywood. the local blue/orange are wanting $7 for a 1x6x8 piece of whitewood and that's gonna add up but the boards do add to the charm.. good stuff..
Jeanna (not verified)
Wed, 10/24/2012 - 21:32
LOVE LOVE LOVE!!
I am SOOO excited to make this beautiful bed set for my new grandbaby. She's just 5 months old, so if I start now, she should get it by her 4th or 5th birthday! Just kidding. Would LOVE to see a boy's version of this, super super cute! Thanks so much for sharing your adorable plans!
Jasmilly (not verified)
Sun, 11/04/2012 - 15:36
This is soo cute! I want to
This is soo cute! I want to make one for my Daughter but I'm having trouble downloading the PDF Plans it keeps comming up with an error??
Thanks
Marsy (not verified)
Tue, 11/20/2012 - 04:01
Mattress?
Love this bed! In fact...my husband is building it right now! But it occurred to him last night...how do you get the lower mattress in? Do you put it in before you assemble the bed? or do you have to go in from the top with it before the top slats are in? Our daughter is so excited about her new bed!
Pbkmaine (not verified)
Tue, 11/20/2012 - 08:35
For the posters with boys: It
For the posters with boys: It would be easy to change this. You could go wild west or log cabin or farm house. Use stars instead of hearts for the shutters. Color scheme in browns or blues or greens.
Sticks and Stones (not verified)
Sun, 11/25/2012 - 16:16
side panel frame typo
Just a heads up there is a typo in the cut list under side panel frame. The 1-2x4 @ 21" should be 22"
Sticks and Stones (not verified)
Sun, 11/25/2012 - 17:44
Also the side panel left and
Also the side panel left and right the 4- 1x6 x 18" should be 14 1/2 "
In reply to Also the side panel left and by Sticks and Stones (not verified)
birdsandsoap
Mon, 11/26/2012 - 00:09
Thank You!
Thank You!
Micah (not verified)
Wed, 12/26/2012 - 21:55
Plans
Is there anyway I can get the PDF version of the plans so I can print them out to have in hand. I seem to work better that way! I am about to tackle this big boy for my boys and I am so excited! A lodge in the woods is what I am going for so hopefully it will turn out like I have it planned in my head! Thank you for this post it is awesome!
RyanEck (not verified)
Mon, 12/31/2012 - 16:04
PDF Plans
The PDF file doesn't work for me either. Is there an ETA on when that might work again? I'm really excited to work on this project for my daughter.
Thanks
In reply to PDF Plans by RyanEck (not verified)
birdsandsoap
Mon, 12/31/2012 - 17:04
I sent Ana a private message
I sent Ana a private message today regarding the PDF file. I'm sure she will address it soon!
Rylee's Mamo (not verified)
Thu, 01/17/2013 - 20:23
Sweet Pea Bunk Bed plans pdf
Hello, I was hoping the link for the .pdf file would be available. My father in law is homebound due to a broken hip and is *very* anxious to get started. If one is available elsewhere, please let me know.
THANKS for an AWESOME design!
All Names Are Taken (not verified)
Sat, 01/19/2013 - 23:58
I absolutely adore this bed!!
I absolutely adore this bed!! I have been researching "playhouse beds" since my daughter was born nearly 4 years ago. The time has come to put up or shut up and I want THIS one! I believe my DH and I can build this, but he'll have to have it spelled out for him. lol
I was wondering if there is any way someone can help me figure out how to create this without the lower bunk? I'd like the exact same look, but with just the upper bunk with open space underneath for play. We'll also need to move the stairs to the other side.
I know these things are very easy to figure out for many of you, but my brain just doesn't work that way. lol
Again, great job! Thank you for creating a plan for exactly the look I wanted.
Lynn40
Fri, 02/01/2013 - 17:21
Makes me wish I were a little girl again !!
This bed is just WOW awesome !! Makes me wish I were a little girl again !! My dad was a contractor and I know If I would have showed him this he would have made it for me !! I am raising my 1 year old nephew and I am looking for a bed to make for him I know this is a little girls bed with some imagination I am sure I can make it an awesome boys fort !! Thanks so much for sharing !! You have a wonderful imagination and creativity !!
Red Bee
Mon, 03/11/2013 - 20:31
PDF File Not Working
My husband has agreed to build this, but would like to have the pdf file and it loads on all the other SPBB posts, but not this main one. Can this possibly be fixed? Thanks.