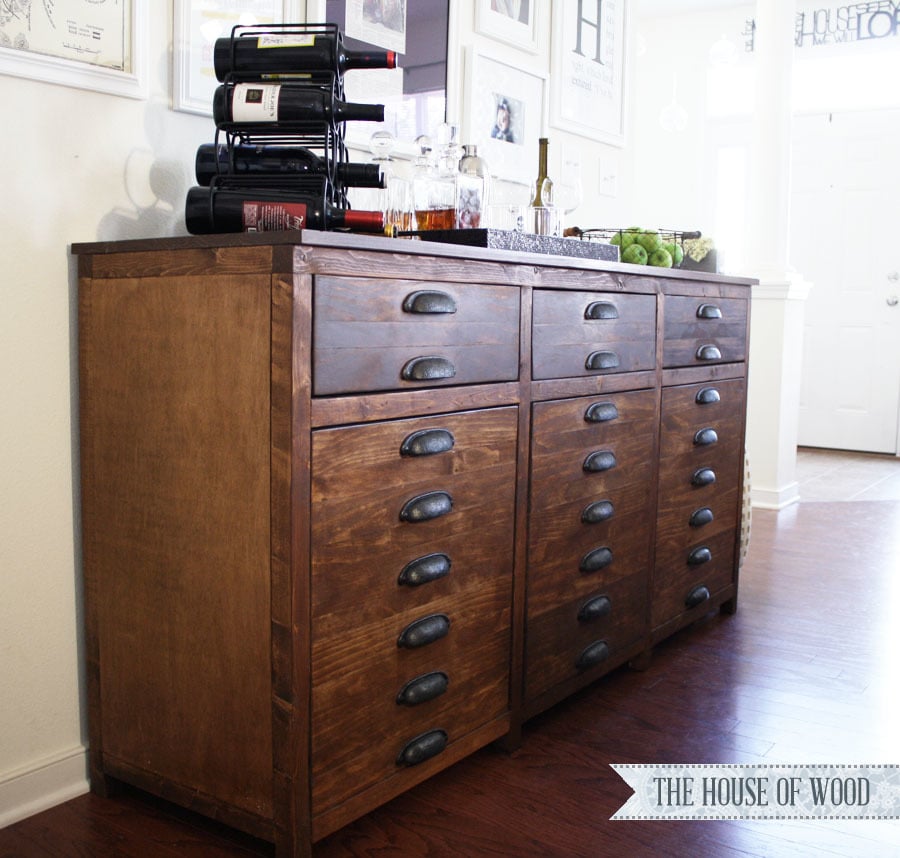


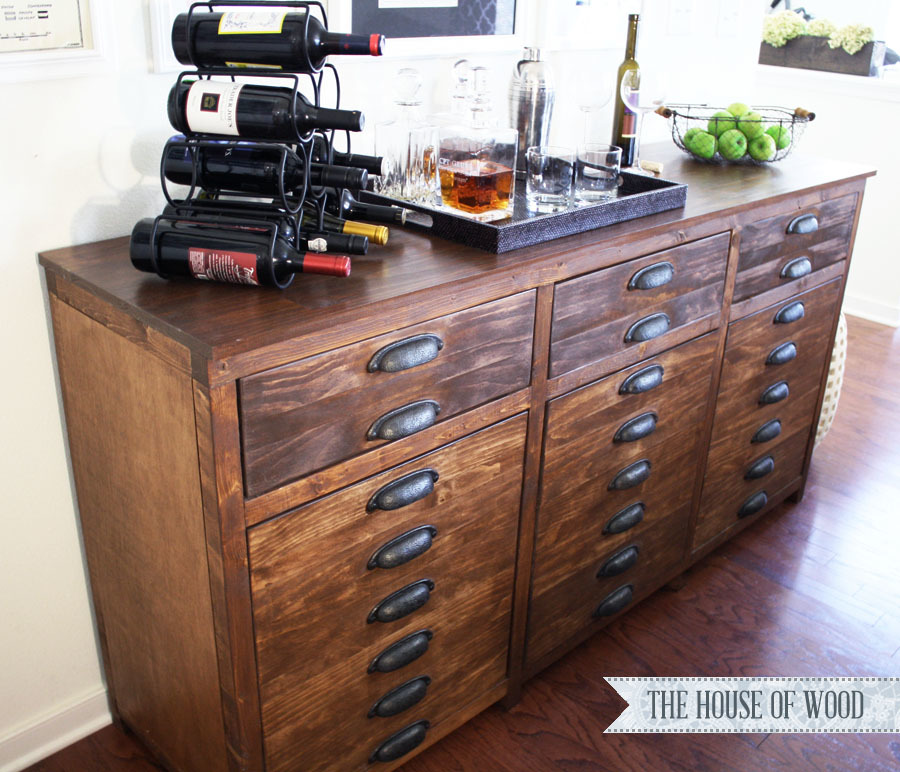
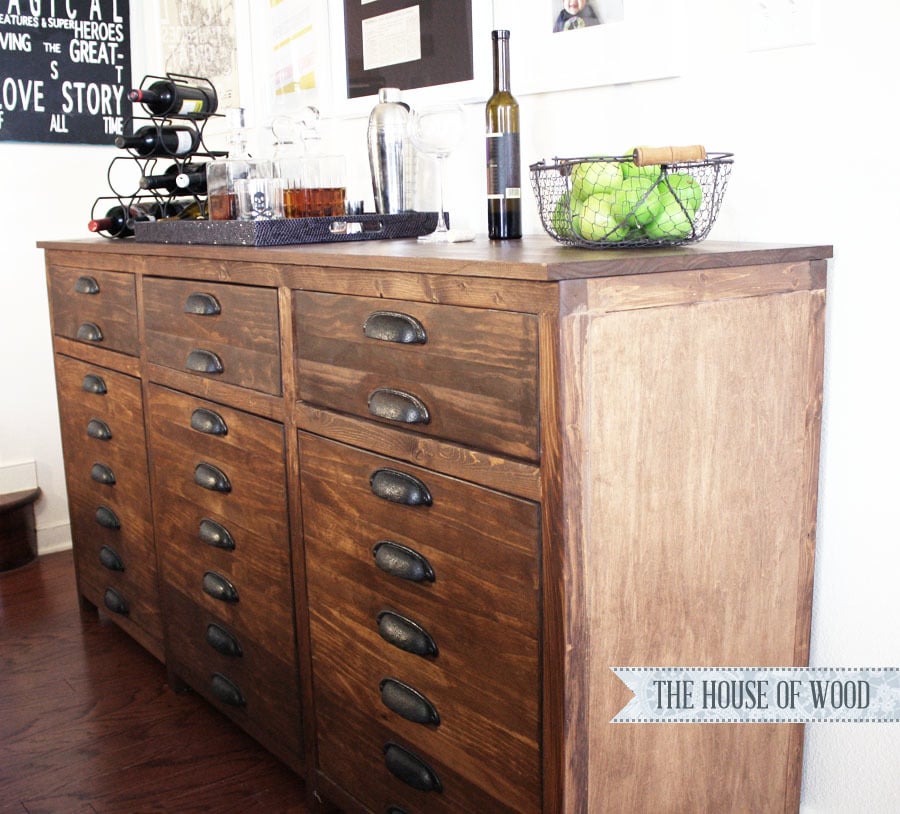
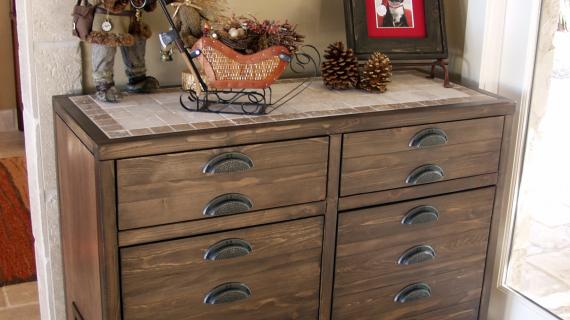
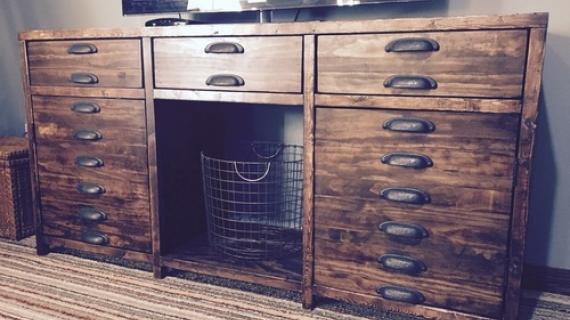
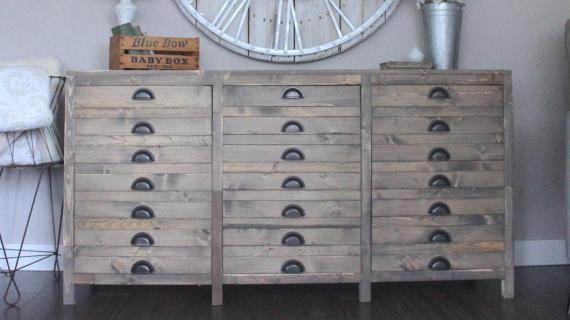
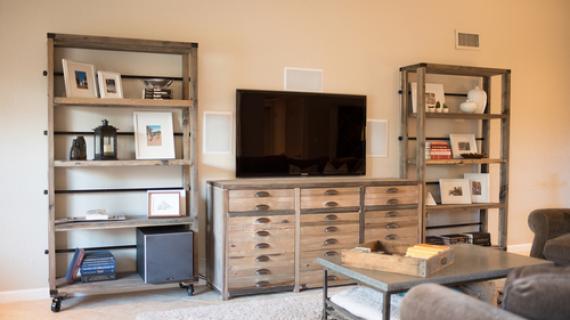
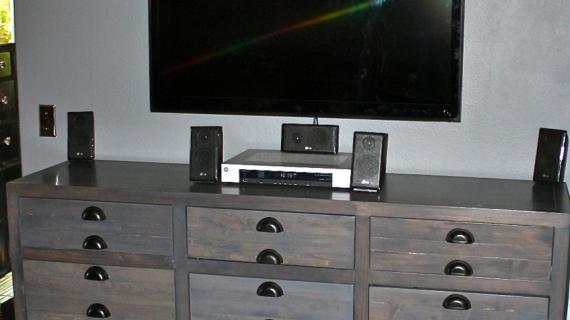
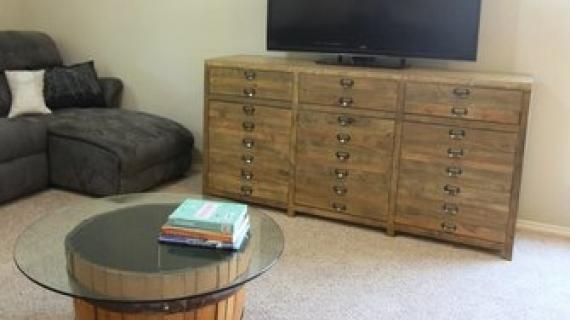
Build your own sideboard with free plans from Ana-White.com. Features three large drawers and three large cupboards behind doors, inspired by Restoration Hardware Printermaker Sideboard, there's plenty of style and storage in this project plan!


Happy Monday!!!
We are so glad to be back home!
Thank you all for your patience with me last week as we traveled. There truly is no place like home.
We'll be leaving again next week, but this time, we are coming to visit you! I'll put a post together later today with all of those details :) to say I'm excited is an understatement!
With all this travel and preparations and everything else going on, I've been afraid to start tackling projects, knowing I may not have the time to finish them. Do you ever get that way? Don't want to start a project because you know the time isn't right?
Well, I have a story for you today that has inspired me, and will hopefully inspire you too.
My friend Jen Woodhouse was nine months pregnant when she wrote me saying she wanted to work on a bar cabinet, but her baby is due in three weeks. I had promised her plans a bit back, and she wrote saying if I could get her plans right away, she could hopefully finish the project before the baby came. Otherwise, she thought she might need three weeks to adjust to the new baby and recover before she could build again.
I got her the plans as fast as I could.
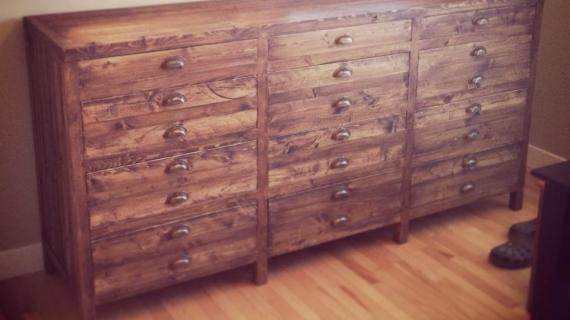
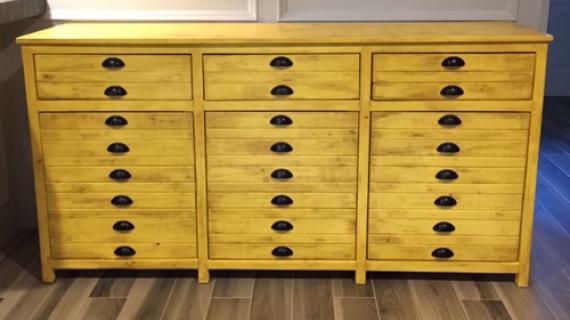
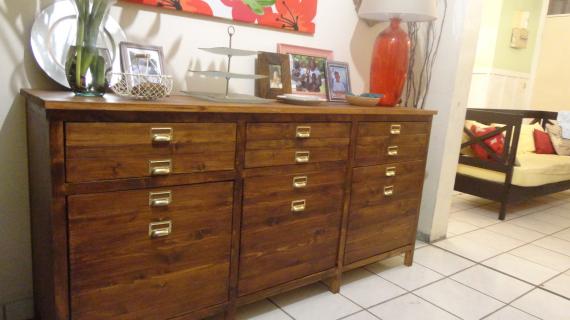
And in literally the days before the new baby arrived, this is what Jen built.
I feel so inspired to just go start tackling my projects now, even if my suitcase isn't unpacked yet, even if I need to start packing my next suitcase. Because if Jen can build this at nine months pregnant, what can't we all do?

And might I say this buffet cabinet or sideboard is very beautiful??? Don't you love the finish? I especially love the character all those little false drawers add to it!
Jen used PureBond Plywood, which is formaldehyde free and made with soy based adhesives, and soooo beautiful for the main plywood pieces. If you are expecting, it does not mean you still can't safely build!
Of course we have you covered with the free step by step plans, but you simply must go visit Jen Woodhouse for step by step building photos, details on her build, and modifications she made. Go visit Jen now!
So what is keeping you from building? If you want this sideboard, go build it! The free plans follow!

Preparation
3 sets euro style bottom corner mount drawer slides, 16” length
3 – sets inset hinges
24 – cup style handles
8 – 2x2 @ 8 feet long
6 – 1x3 @ 8 feet long
6 – 1x2 @ 8 feet long
1 sheet ¾” plywood (get 1 ½” sheets if you want shelves)
2 – 1x6 @ 10 feet long
1 ¼” and 2 ½” PH screws
Wood glue
FACE FRAMES
2 – 2x2 @ 72”
8 – 2x2 @ 34 ½”
9 – 2x2 @ 22”
DOOR/DRAWER FACES
24 – 1x3 @ 21 ¾”
18 – 1x2 @ 21 ¾”
6 – 1x2 @ 22 ½”
MAIN BOX
4 – 2x2 @ 15 ¾”
2 – 1x16 @ 69”
4 – 1x16 @ 31”
DRAWERS - CUT TO FIT YOUR CABINET!!!!
4 – 1x2 @ 15 ¾” (slide supports)
6 – 1x6 @ 19 ½”
6 – 1x6 @ 17”


Please read through the entire plan and all comments before beginning this project. It is also advisable to review the Getting Started Section. Take all necessary precautions to build safely and smartly. Work on a clean level surface, free of imperfections or debris. Always use straight boards. Check for square after each step. Always predrill holes before attaching with screws. Use glue with finish nails for a stronger hold. Wipe excess glue off bare wood for stained projects, as dried glue will not take stain. Be safe, have fun, and ask for help if you need it. Good luck!
Instructions
Step 1

You’ll probably want shelves, so go ahead and get the extra sheet of plywood, and just have all the plywood ripped into 15 ¾” wide strips, referred to as 1x16s throughout this plan. BUT if you don’t want shelves, or have some scraps to use up, here’s how you can get all the pieces on a single sheet.
Step 2

Note: Back face frame does not have the middle drawer dividers (2x2 @ 22”)
Step 3

You'll want to build your doors now to fit the frame. Trust me on this one, lining up 11 boards and getting them all square is going to be a trick. Use the frame to help you build the door faces now.
On second thought – I’d recommend a 1x3 here on the back but a 1x2 will do the trick. Just a little more to bite into.
Once your doors are done, you can put aside.
TIP: Test your drawer face boards for fit at this step too - everything is easier to do when your frame is laying flat down.
Step 4

Now connect the two frames. Use glue and screws and check for square.
Step 5
Step 6
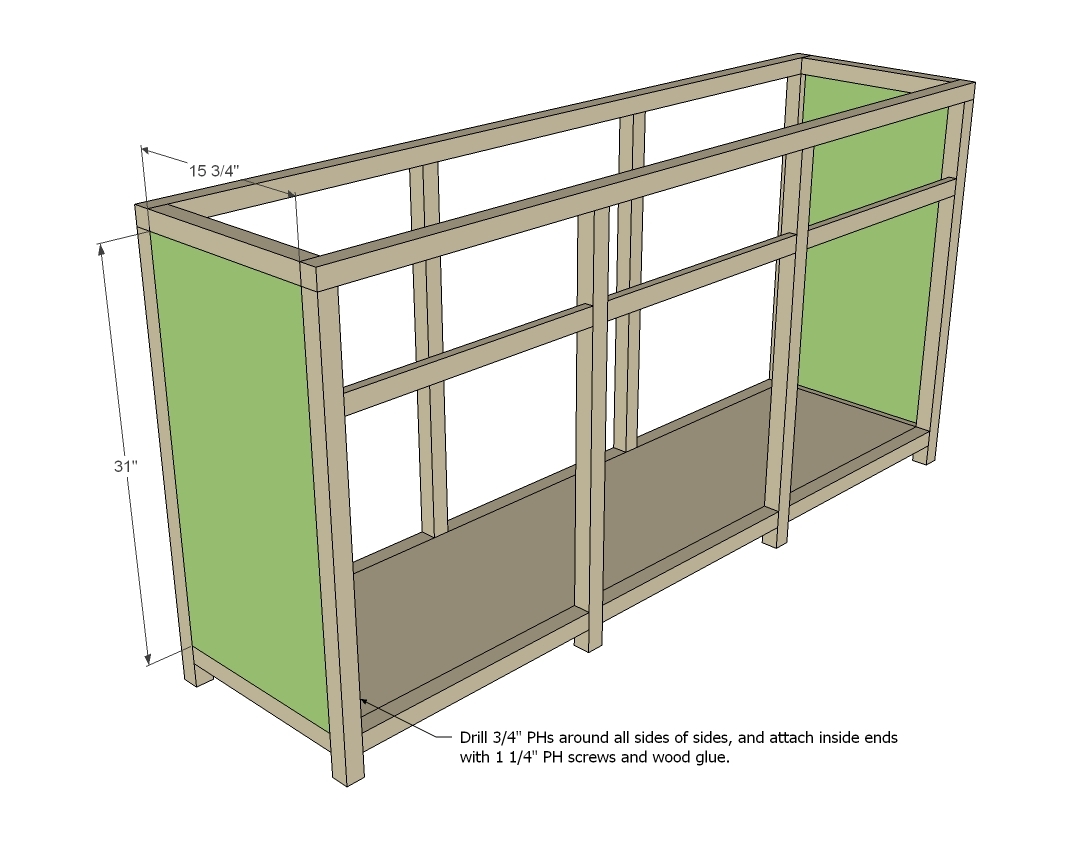
And then sides. Check everything for square here.
Step 7
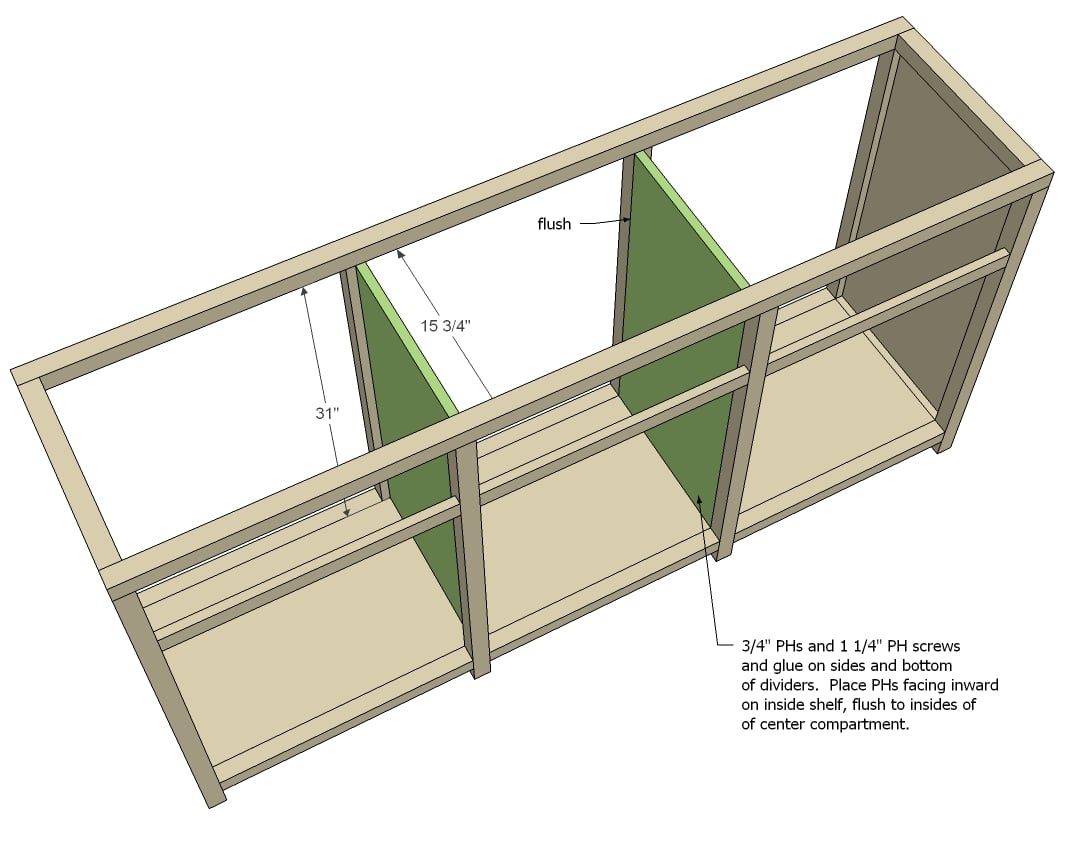
And then add the dividers. Keep dividers flush to inside compartment.
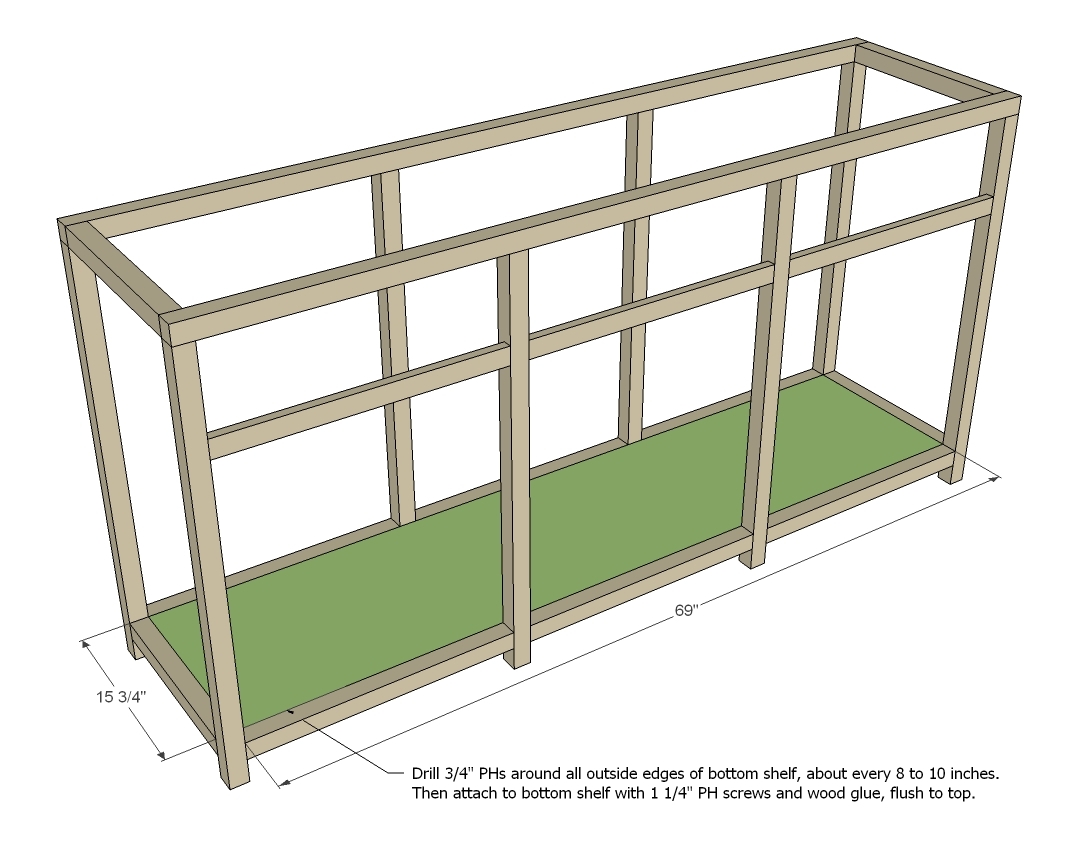
Step 8
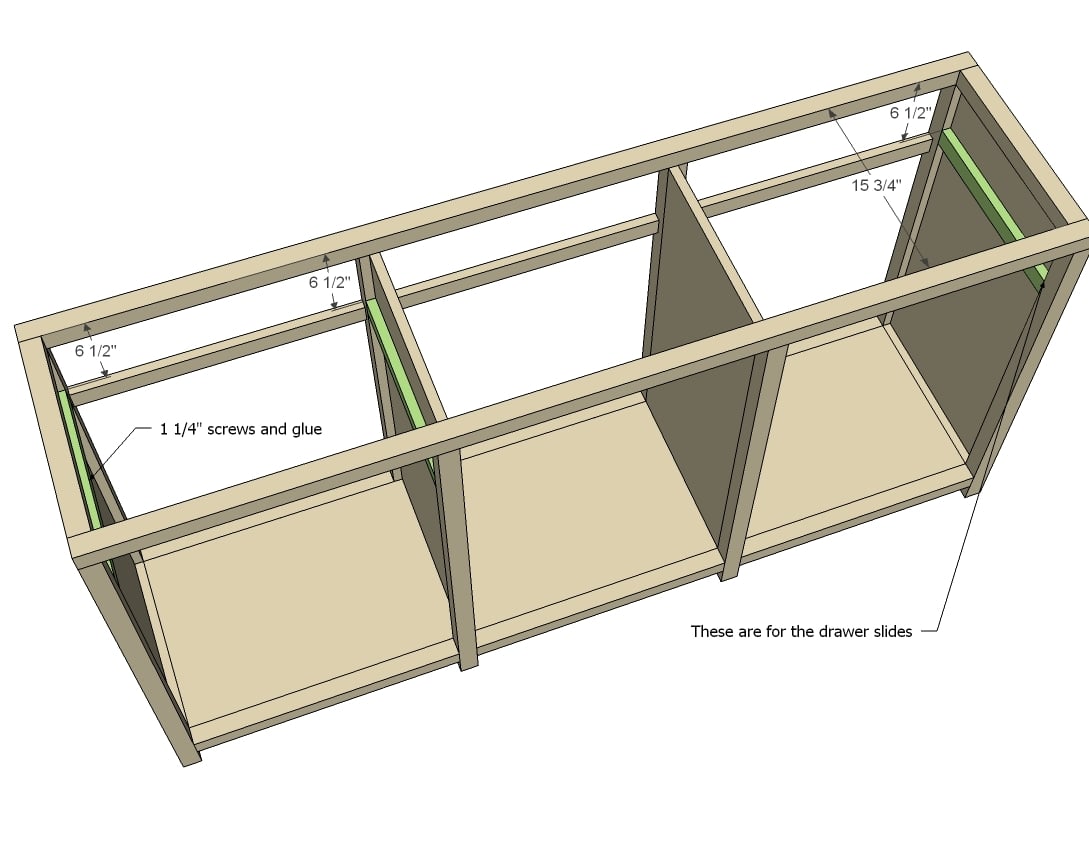
These guys are for attaching your drawer slides to later on. They only go on the outer compartments, and are not needed on middle compartment.
Step 9
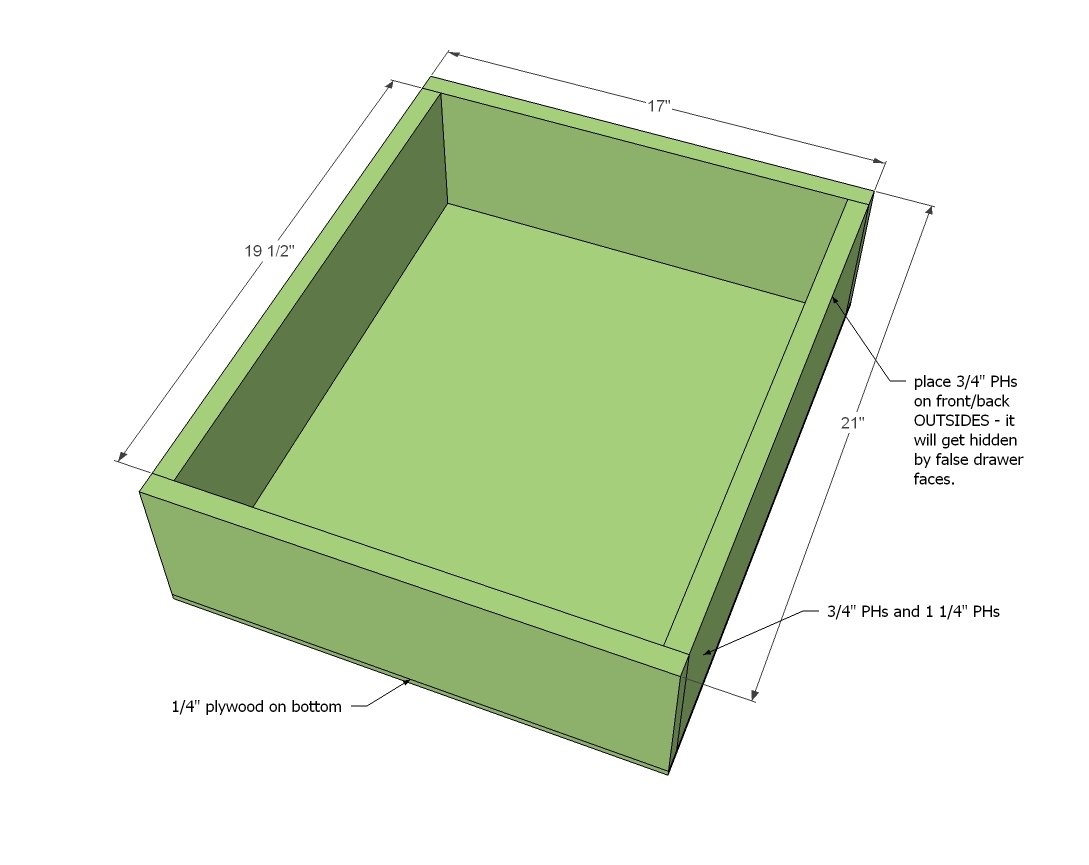
You'll need to build three drawers. A note on drawers - build to suit the finished opening of your cabinet and your drawer slides. The measurements I give are for a perfect build with perfect boards for drawer slides that use 1/2" space. Build to suit your cabinet for best fit.
Step 10
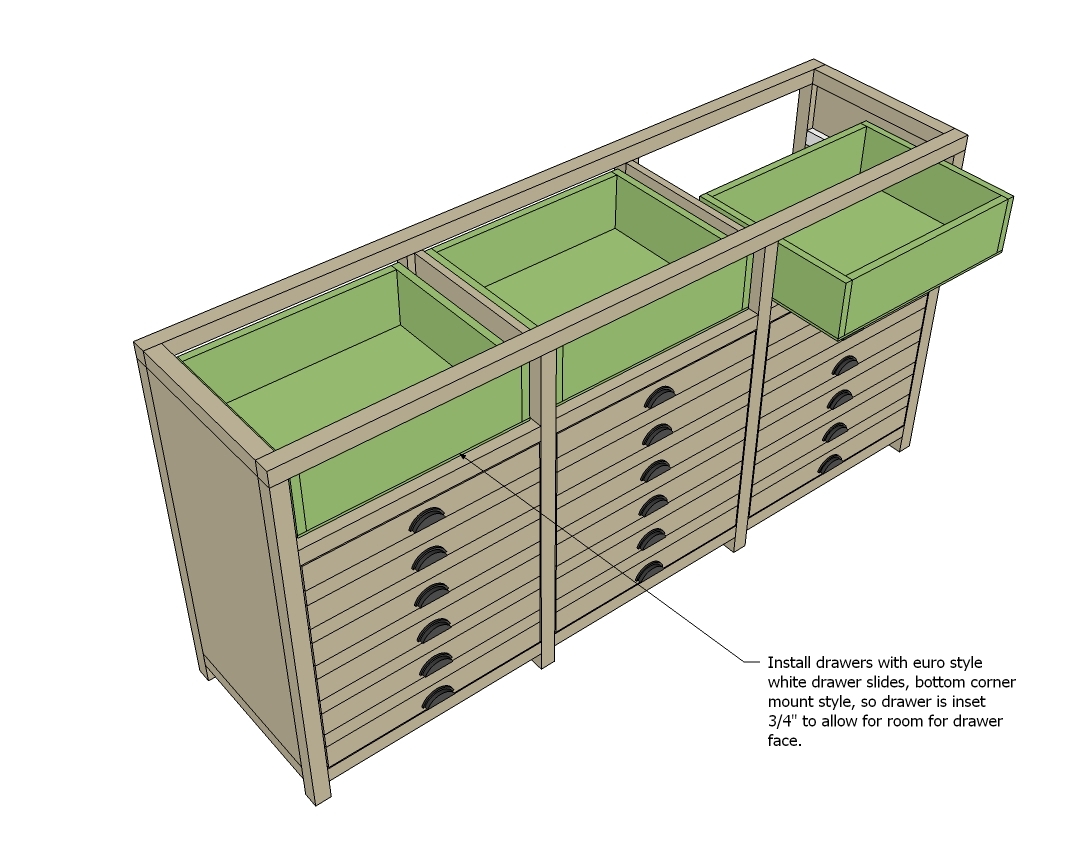
Install the drawers so they are inset 3/4" on the front to allow for the drawer faces. They are nice deep drawers!
Step 11
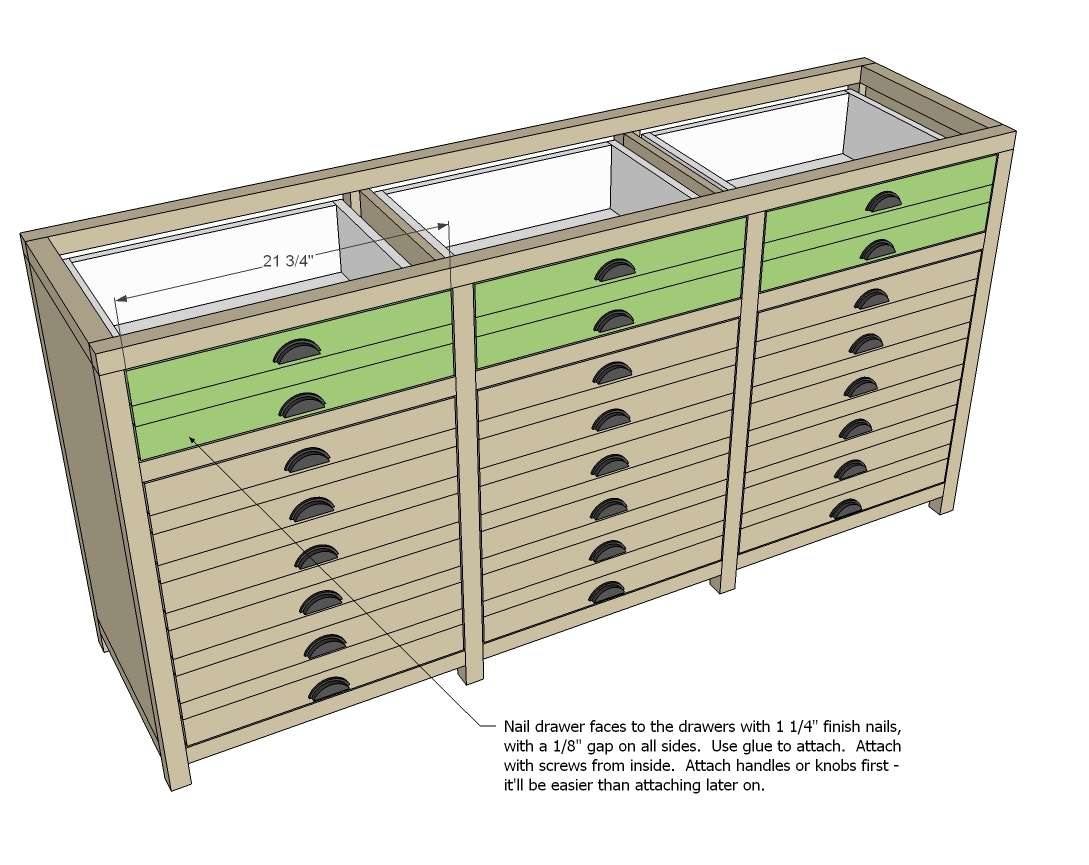
And then attach the drawer faces to front. Keep an even 1/8" gap around all sides of drawer faces.
Step 12
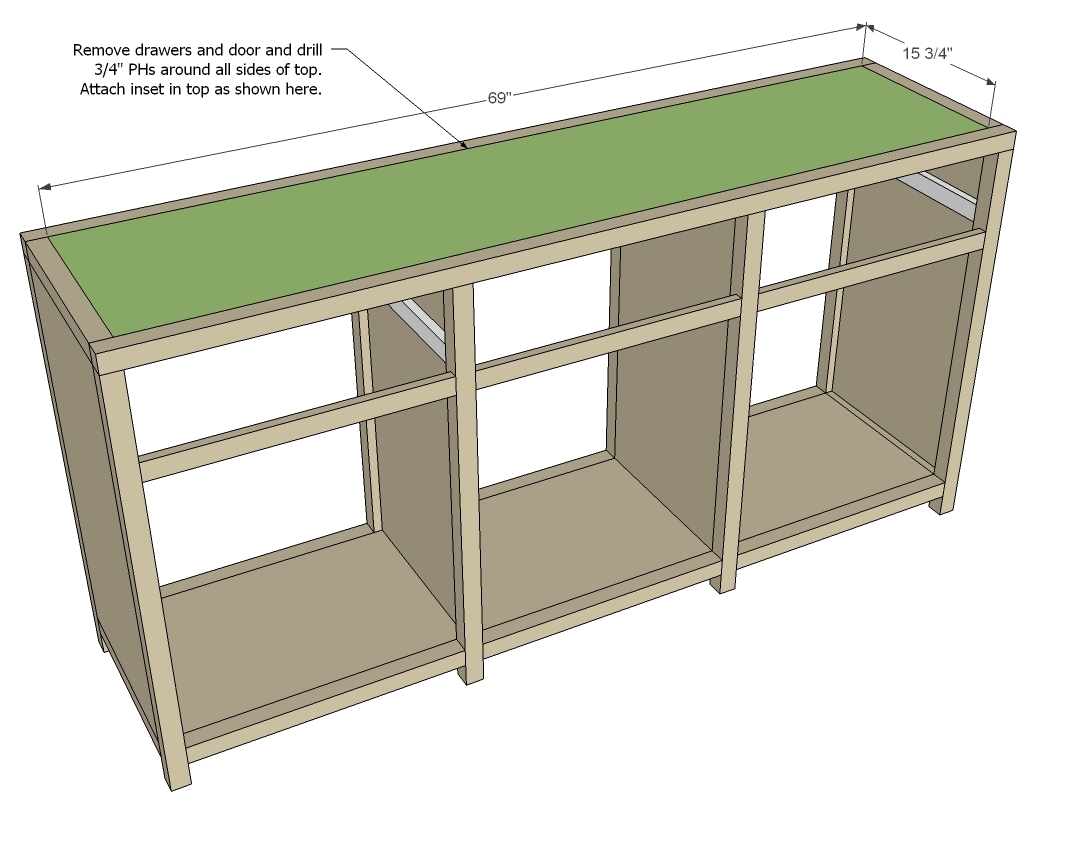
And finally add the top!
Step 13

You can also add shelves, either fixed or with shelf pins.
And then if you want to put a back on, simply cut a piece of 1/4" plywood to the overall back size minus 1/2" and nail and glue on.
It is always recommended to apply a test coat on a hidden area or scrap piece to ensure color evenness and adhesion. Use primer or wood conditioner as needed.

Comments
MichelleC
Mon, 10/01/2012 - 14:16
In Love!!!
This is going on "the list"! It is GORGEOUS!!!!!
birdsandsoap
Mon, 10/01/2012 - 15:29
Talk about taking advantage
Talk about taking advantage of those "nesting" instincts! This turned out beautiful. I love the pulls and the illusion of all those drawers. Such a timeless piece. Well done! I was planning on building a dresser and painting it white, but you are lulling me over to the "dark side" with your beautifully stained finish!
spiceylg
Tue, 10/02/2012 - 07:39
Wow
What a beautiful build and 9 months pregnant? Holy moly, that's impressive!
bhoppy
Tue, 10/02/2012 - 08:21
Beautiful!
This turned out absolutely gorgous! Never underestimate the power of nesting instincts:-)
Kate (not verified)
Tue, 10/02/2012 - 08:35
I can't believe she did that
I can't believe she did that 9 months pregnant! I'm only 5 and a half months and struggling just to finish my simple changing table (I found I just couldn't work on it as long every night as I'm used to). It looks gorgeous, and I love the plans!
Mindy (not verified)
Wed, 10/10/2012 - 18:36
Drop fronts?
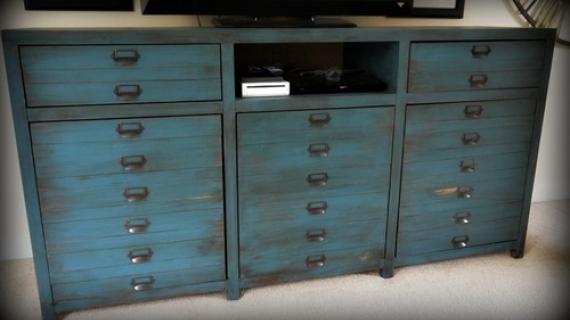
Do you think this could be revamped with drop fronts instead of drawers to hide tv components?
Gloria (not verified)
Fri, 12/07/2012 - 14:26
My daughter loves this chest.
My daughter loves this chest. My husband is making it for her for Christmas but we cannot read the measurements that are with the photos. I cannot find wnywhere to make them bigger to see the numbers. Do you have a suffstion>
Linnie B (not verified)
Tue, 12/25/2012 - 16:32
Click on the photo to
Click on the photo to enlarge:)
Gloria (not verified)
Fri, 12/07/2012 - 14:34
My daughter loves this
My daughter loves this console. My husband is building it for her for Christmas. We cannot read the dimensions that are on the photos. Any suggestions.
Gloria (not verified)
Fri, 12/07/2012 - 14:39
printer's console
My daughter loves this console. My husband is building it for her for Christmas. We cannot read the dimensions on the photos. Any suggestions
leeannraye
Tue, 02/09/2016 - 18:25
Hinges
Can someone please direct me to the type of hinges to use? I bought some inset hinges but they don't appear to work. I've never felt so confused about hinges.
CassieM
Tue, 01/12/2021 - 08:24
Hinges for this cabinet
For those of you who have made this, where did you get hinges and what kind? I can’t find inset face frame hidden hinges that work.