

Free plans to make bunk beds for American Girl or 18" dolls.
NOTE: We've been holding our little one extra tight these last few days. I've banned the news in our home, fearful our little one will become fearful of a place she loves and trusts - her school, and fearful that I will break down in front of her and not have the words to explain why. We are angry and sad and broken too, but cannot forget to love and cherish our own little ones, and continue to do what we can to give them the happiest childhood possible.
With Christmas so close, there's a few more toy plans I'd like to get posted in time for your Christmas mornings. If you don't have time to build and finish, consider cutting out and gifting as a kit like we did with Grace's Simple Doll Bed Kit.
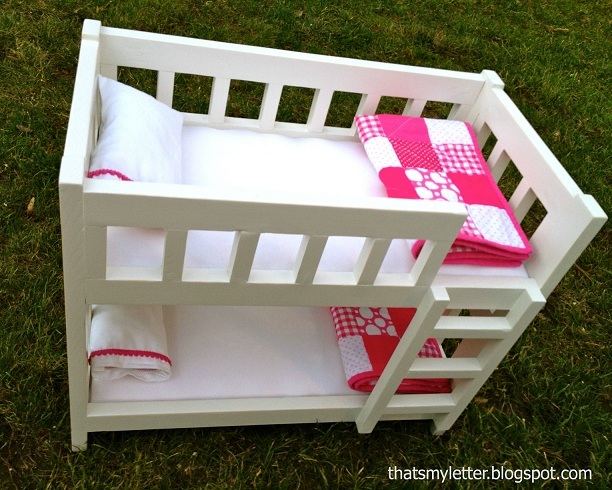
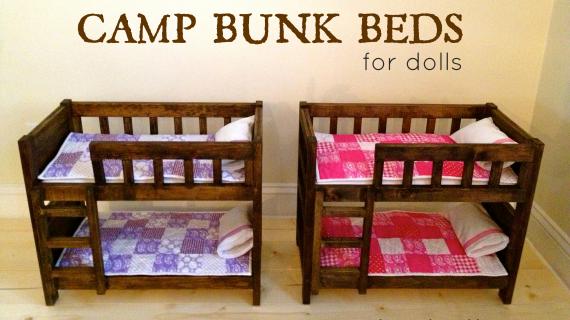
My friend Jaime from That's My Letter requested a Doll Bunk Bed styled like a camp bunk bed, so we got to work on a plan to fit her design needs.

image from That's My Letter
Isn't it darling?
This one is a little more challenging because to get this look, you'll need to work with 1x1 material (look for it in the dowel section, as moulding, or try the wood craft aisle of stores like Joanns, Hobby Lobby or Micheal's or rip 1x2s in half to make 2 1x1s) which doesn't give you a whole lot to attach too. Try hot glue or quick drying glue as an alternative for the smaller pieces.
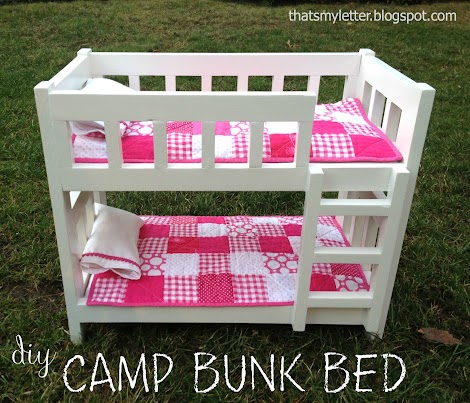
Image from That's My Letter
Of course much of this bed's cuteness is the quilt and pillows, right? Jaime also put mattresses together. Please take a second to read Jaime's build post here for lots more pictures and details on this doll bunk bed project.
Thank you Jaime!!!!
PS - Got single doll beds and want to turn them into bunks? Here's a quick tutorial on how to do that with supplies you already have at home!
Those doll bed plans are here.
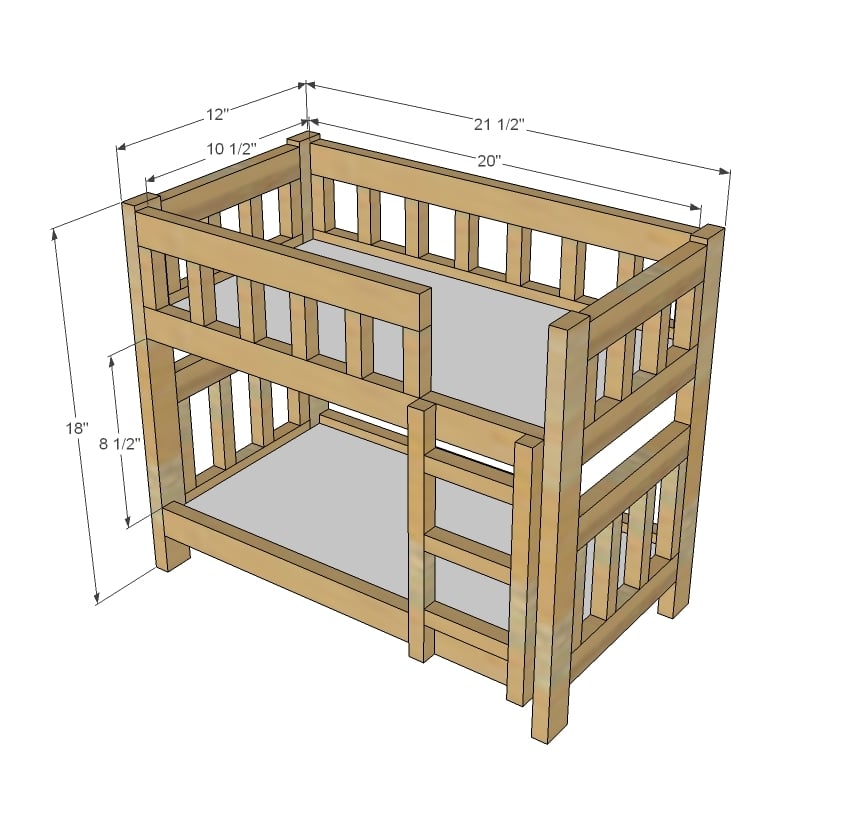
Preparation
4 - 1x2 @ 8 feet long 2 - 1x1 @ 8 feet long (if you have a table saw, a 1x2 can be ripped in half) 21” x 20” - 1/4” plywood Wood glue 2” trim screws or finish nails Optional 1” or 1 1/4” pocket hole screws
8 - 1x2 @ 9” long 22 - 1x1 @ 2 3/4” long 8 - 1x1 @ 4 3/4” long 4 - 1x2 @ 18” long 5 - 1x2 @ 20” long 1 - 1x2 @ 14 1/2” long 6 - 1x2 @ 10 1/2” long 2 - 1/4” plywood @ 10 1/2” x 20” 2 - 1x1 @ 11 1/2” long 3 - 1x1 @ 4” long


Please read through the entire plan and all comments before beginning this project. It is also advisable to review the Getting Started Section. Take all necessary precautions to build safely and smartly. Work on a clean level surface, free of imperfections or debris. Always use straight boards. Check for square after each step. Always predrill holes before attaching with screws. Use glue with finish nails for a stronger hold. Wipe excess glue off bare wood for stained projects, as dried glue will not take stain. Be safe, have fun, and ask for help if you need it. Good luck!
Instructions
Step 1

Glue and clamp the headboards and footboards together - you'll need to make two of each.
Step 2

Then attach with glue to the legs. You'll need to make two of these - one for the top and bottom.
Step 3

Now this is where your main weight is - for example, a child decides to sit on the bed .... so I suggest attaching with glue and screws here. A 3/4" PH underneath with 1 1/4" (try fine thread screws to prevent wood from splitting or 1" PH screws) will do the trick.
Step 4
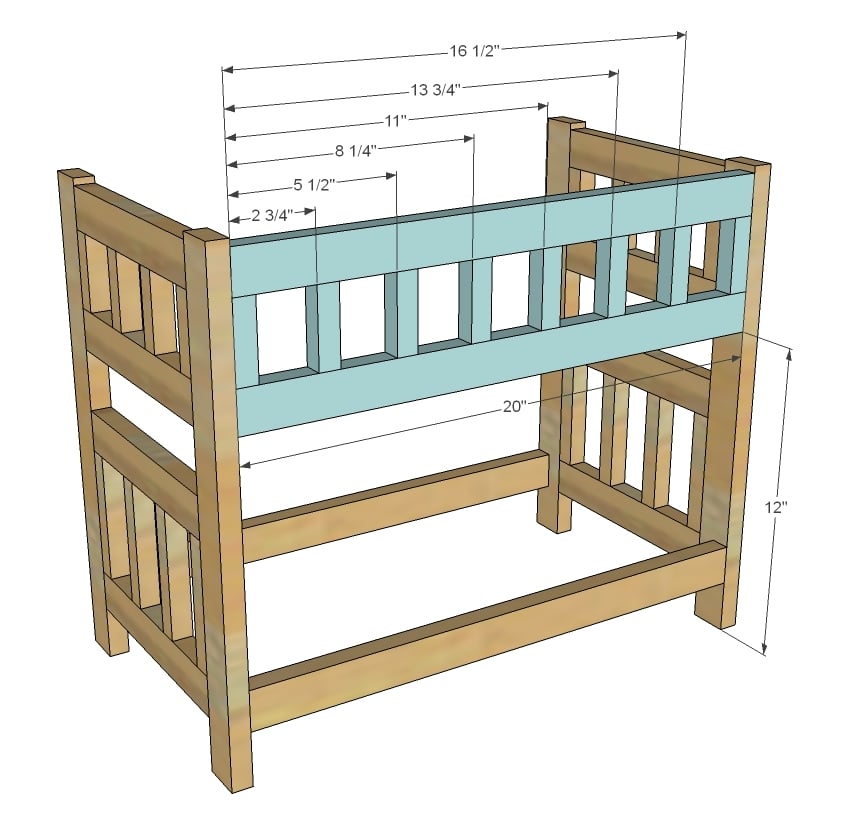
Build the top railing with glue and let dry. Then attach to legs with screws or nails.
Step 5

Step 6

Now I know this is a doll bed, but I have kids in my house, and I know they are rough on little furniture. So I added these supports underneath for the mattress. Attach the footboard/headboard to the end ones for added support, and don't forget the glue!
Step 7

Make the ladder with glue and let dry. Then attach to the bed with glue.
Step 8

You can use scrap plywood or even heavy cardboard for the mattress bottom. I loved how Jaime made her mattresses by attaching foam and fabric to the plywood. You can go check out how she did that here. Thanks Jaime!
It is always recommended to apply a test coat on a hidden area or scrap piece to ensure color evenness and adhesion. Use primer or wood conditioner as needed.
Comments
kara (not verified)
Tue, 12/18/2012 - 08:02
love!
Super cute project.... my next click will be to see how you guys made the little quilts and pillows. My little etsy shop has handmade clothes for 18 inch dolls, now I'm definitely inspired to go stitch up a few more! :)
http://www.etsy.com/shop/MilkPailCrafts