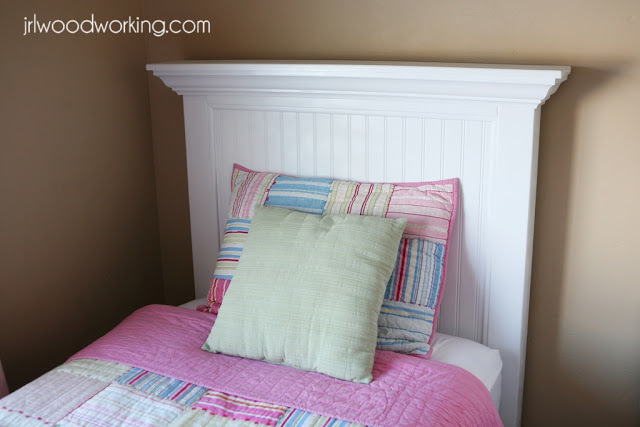


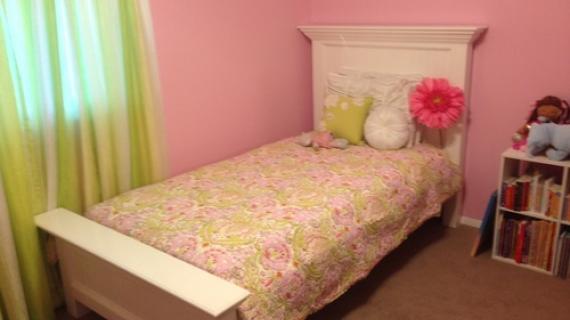
We built this beautiful headboard for our daughter’s twin size bed. The beadboard headboard with a crown molding cap was our first official woodworking project. We only had a cheap miter saw and a borrowed circular saw.
I looked at a lot of different headboards online and really like the beadboard with a crown cap. I drew up a picture of what I wanted and TJ did some calculations and figured out what supplies we would need. I wish I had pictures of the progress, but I don't. We spent the weekend building and painting the headboard. It was a lot easier than I imagined and a fairly quick project.
We drilled a hole through the 4x4 post, then used bolts to attach the frame to the headboard. It worked perfectly. I was so impressed with my talented husband throughout the whole process. This was his first ever furniture/woodworking project. We were very limited with the tools we had, yet he still made it work. He's a perfectionist and he did everything the right way and didn't take a single shortcut. Not only that, but he made the entire headboard off of a measly picture I drew.


Note: If the back of the headboard is going to be visible, it may be a good idea to cover the MDF with a 1/8 inch hardy board.

Preparation
4 x 4 x 8 Douglas Fir S4S Lumber
1 x 3 x 6 Select Pine Lumber
3/4 in. x 49 in. x 97 in. Medium Density Fiberboard
32 sq. ft. Beadboard White V-Groove Panel
Woodgrain Millwork WM 49 3-5/8 in. x 8 ft Crown Moulding
7/16 in. x 3/4 in. Composite Plastic Baseshoe Moulding
(2) 3 1/2” x 3 ½” (4”x4” nominal) Douglas Fir Posts at 48”
(2) 2 1/2” x ¾” (3” x 1” nominal) Pine at 32 ½”
(1) 32 ½” x 30 ¾” Piece of ¾” MDF
(1) 44 ½” x 6” Piece of the ¾” MDF
(1) 32 ½” x 24 ¼” Piece of the 1/8” Beadboard Sheet
(1) 8’ piece of 3 5/8” crown cut to fit
(1) 10’ piece of ¾” x 7/16” shoe molding cut to fit
Cut the 4x4 post in half to form two 4-foot equal pieces (doesn't have to be exact, just equal). Cut two 32 1/2 inches pieces of the 6-foot 1x3. Cut the 4x8 MDF sheet inches at 32 ½ inches by 30 ¾ inches for the main back piece and cut a 44 ½ inch by 6 inch piece for the top piece. Cut the bead board 4x8 sheet at 32 ½ inches wide by 24 1/4 inches tall. Make sure the beads run vertical the 24 ¼ inch way. The crown and shoe moulding can be cut to fit the finished dimensions after it is assembled.


Please read through the entire plan and all comments before beginning this project. It is also advisable to review the Getting Started Section. Take all necessary precautions to build safely and smartly. Work on a clean level surface, free of imperfections or debris. Always use straight boards. Check for square after each step. Always predrill holes before attaching with screws. Use glue with finish nails for a stronger hold. Wipe excess glue off bare wood for stained projects, as dried glue will not take stain. Be safe, have fun, and ask for help if you need it. Good luck!
Instructions
Step 1
Drill the proper pocket holes on the 1x3 piece and the MDF back piece with your pocket hole jig.
Step 2

Take your 4 foot 4x4 posts and lay them on a flat surface on the floor. Place the 1x3 pieces at the right locations (so they lay flat on the floor and flush with the front of the posts) and then screw the pocket hole screws in.
Step 3

Lay the 32 ½ x 30 ¾ MDF back piece on top of the 1x3 and flush with the top of the posts and screw the pocket screws into the posts.
Step 4

Attach the top piece centered on it on the frame (approx 2 ½ inch hang over on the sides). Attach it with some pocket holes from the inside face of the post or some finish nails or screws going down into the posts.
Step 5

Step 6

Cut the crown molding to fit around the top of the headboard.
Step 7
Place the headboard next to your Hollywood frame and trace the holes for the bolts. Use a drill to drill a hole larger than the bolts.
Step 8
Paint the headboard with high quality furniture paint and then apply a clear coat of polyurethane.
Step 9
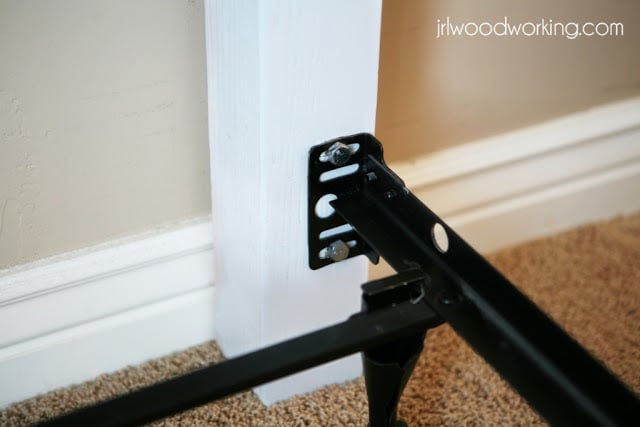
Bolt the headboard to the frame and enjoy the beautiful beadboard headboard.
It is always recommended to apply a test coat on a hidden area or scrap piece to ensure color evenness and adhesion. Use primer or wood conditioner as needed.

Comments
c-e-fogus
Mon, 03/18/2013 - 11:27
Queen Size?
I need to make a queen size headboard for our guest room. Can someone give me some sizes for those dimensions? Thanks!