

Based off Ana's Barn Beam Ledges but with added width, depth, and supports.
Preparation
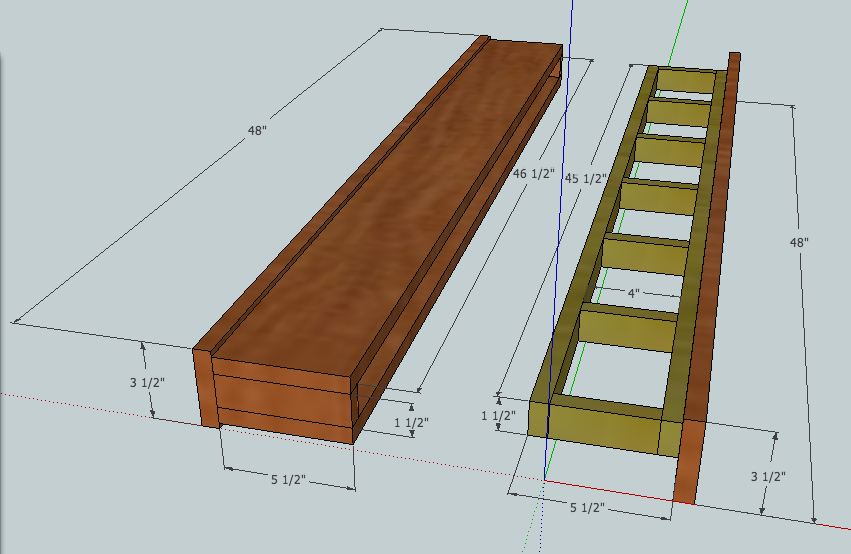
1 8' 1x4
1 8' 1x6
2 8' 1x2
2 1x4 @ 48" (just shy of 48″ to account for the saw blade and both pieces from 1 1×4)
2 1x6 @ 48" (just shy of 48″ to account for the saw blade and both pieces from 1 1×6)
2 1x2 @ 45 1/2"
2 1x2 @ 5 1/2"
7 1x2 @ 4"


Please read through the entire plan and all comments before beginning this project. It is also advisable to review the Getting Started Section. Take all necessary precautions to build safely and smartly. Work on a clean level surface, free of imperfections or debris. Always use straight boards. Check for square after each step. Always predrill holes before attaching with screws. Use glue with finish nails for a stronger hold. Wipe excess glue off bare wood for stained projects, as dried glue will not take stain. Be safe, have fun, and ask for help if you need it. Good luck!
It is always recommended to apply a test coat on a hidden area or scrap piece to ensure color evenness and adhesion. Use primer or wood conditioner as needed.

Comments
romanweel
Mon, 02/04/2013 - 13:30
Looks good to me!
I think it looks like a good, well-thought-out plan. I'm no expert or anything, but I think five mid-supports in the skeleton may be overkill? At 45", I don't think you probably need more than 2 (not counting the end ones, of course). Also just my opinion, but I think 1/2" may end up being too much wiggle room on each side, and 1/4" would still be pretty roomy.
I'm not gonna pretend I know what's technically correct, but I would use 1 1/4" screws (because they will end up 1/2" into the second piece of 3/4" stock, just be sure not to sink them too deep or they will poke out the other side).
Great plan! Can't wait to see it finished!
KimTheBuilder19
Mon, 02/04/2013 - 18:47
I plan on making the changes
I plan on making the changes you suggested, they make sense to me! Thanks so much!
stevencbyers
Sat, 06/21/2014 - 06:50
how the?!
If you fasten the skeleton to the wall how the heck are you going to have the shell slide down on the back side that's attached? You'll have screws between the skeleton and the wall and then?
mebohn
Sat, 06/21/2014 - 17:49
Well..
to respond to the comment above, I made Ana's barn ledges 6 feet long with key holes and they're very sturdy. You do not need to build them into the wall if you don't wish to.
stevencbyers
Mon, 06/23/2014 - 14:55
me too.
That's how I ended up solving the problem. But I was still curious how that worked.