

Build your own modular locker family entryway system for way less! Free plans for single locker cabinet from ana-white.com
Do you have a cluttered garage?
Don't we all, right? As charged!
Well, my dear friend Gina from Lady Goats has been on a mission to organize her garage over the last month. She's been doing an amazing job, and I've been following along.
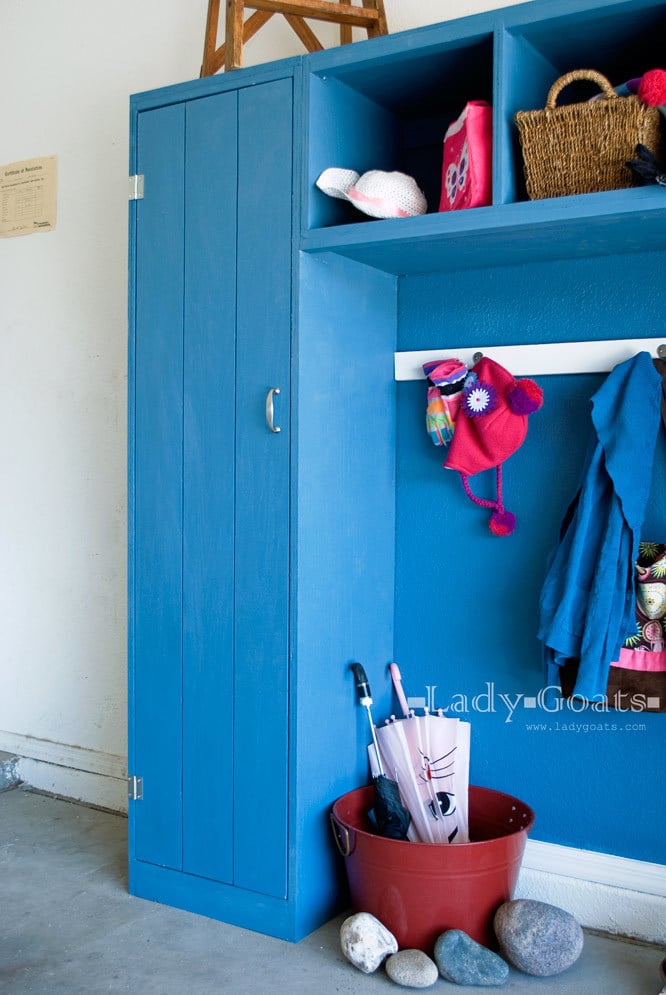
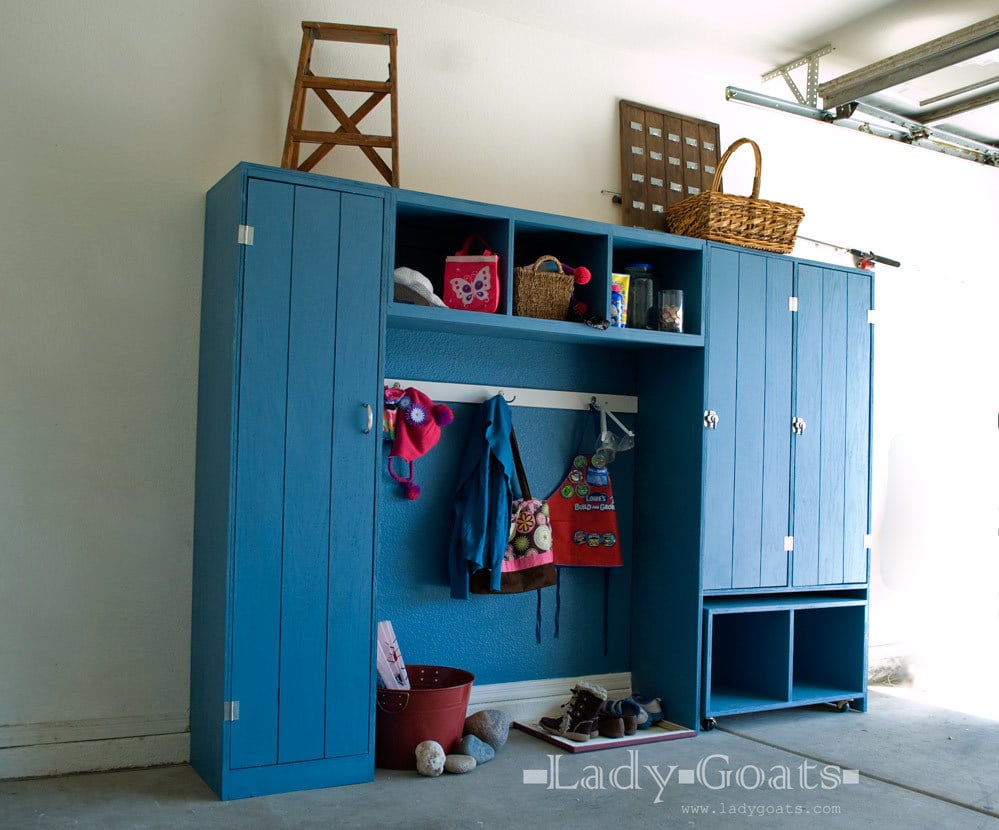
Part of her garage organizing mission was to create a mudroom in the garage. One with lots of storage and a pull out bench that could be used for sitting on to remove stubborn (but stylish!) boots.
I was so excited that she asked me to draw up plans for a Pottery Barn Inspired Modular Family Locker/Entryway System that wouldn't cost $2200 and be custom fit for her space and family needs.
Here's what Gina built for just $200!
Don't you just love DIY?
We'll be posting all the plans so you can also make your own DIY mudroom for way less, starting today with the classic locker. That's the great thing about these plans, you can customize your own mudroom by picking and choosing what you want for your space and family needs.
But before we get to the plans, please take a second and stop over and check out Gina's post and see lots more pictures and details on how she built this mudroom!
Thanks Gina!!!

Preparation
For each locker you will need:
1 sheet of 3/4" hardwood or cabinet grade plywood ripped into 15 3/4" wide strips
1/3 sheet of 1/4" plywood for back (you'll need to buy a whole sheet but one whole sheet will cover 3 lockers)
1 - 1x3 @ 4 feet long (more if adding shelf hooks)
1 - 1x2 @ 4 feet long (more if using as shelf supports)
1 set hinges
1 handle or knob
shelf pins
hooks if desired
Can be built with pocket holes (use 1 1/4" screws) or 2" countersunk screws or finish nails and wood glue.
2 - 3/4" plywood @ 15 3/4" x 68"
1 - 3/4" plywood @ 15 3/4" x 17 1/2"
1 - 3/4" plywood @ 15 3/4" x 16"
2 - 1x3 @ 16"
2 - 1x2 @ 16"
1 - 1/4" plywood @ 68 3/4" x 17 1/2"
Shelves are 15 3/4" x 14 1/2" (note shelves are 1/4" less in width than interior to enable easy placement at different heights with recommended shelf pins. You can also support with 1x2 boards @ 14 1/2" long - see in plans)
1 - 3/4" plywood @ 15 3/4" x 63 3/4" (door)


Please read through the entire plan and all comments before beginning this project. It is also advisable to review the Getting Started Section. Take all necessary precautions to build safely and smartly. Work on a clean level surface, free of imperfections or debris. Always use straight boards. Check for square after each step. Always predrill holes before attaching with screws. Use glue with finish nails for a stronger hold. Wipe excess glue off bare wood for stained projects, as dried glue will not take stain. Be safe, have fun, and ask for help if you need it. Good luck!
Instructions
Step 1

Have your plywood ripped into 3 strips 15 3/4" wide by 8 feet long. It is very important that the rips are this width, as the door is set to this width and will not fit right if your rips are off. If you are building multiple units or this entire set, please read Gina's post for a cutting diagram and plan your cuts to conserve plywood.
Once you have the pieces ripped and cut, if you are using shelf pins, drill them now. It's much easier than later on. Then attach top shelf and bottom shelf as shown in diagram above.
Step 2

Next add the bottom supports. This helps to square things up and just looks nice.
Step 3

Add top supports as well.
Step 4

Attach back with finish nails at least 1" long and glue. Nail to all plywood edges.
Step 5

Step 6

For hooks, add a 1x3 board to support hooks on top inside.
Step 7

Cut decorative lines in door face. Sand and fit in opening. Attach with hinges, leaving an even gap around all sides of the door.
It is always recommended to apply a test coat on a hidden area or scrap piece to ensure color evenness and adhesion. Use primer or wood conditioner as needed.
Comments
Juanita_r
Wed, 02/20/2013 - 19:25
Incredible! So inspired right now!!!
WOW! You two are amazing. can't wait to see the rest & i am so inspired and pumped to organise my lot!! Thanku again for another awesome plan and build!
Pam the Goatherd
Wed, 02/20/2013 - 21:30
What do you use to make the
What do you use to make the decorative lines in the locker doors?
The tall locker is exactly what I've been thinking of doing in my bathroom to store my broom, mop, bucket and jugs of cleaners!
In reply to What do you use to make the by Pam the Goatherd
Lady Goats
Thu, 02/21/2013 - 18:39
Door
Hi Pam! That's a great idea! The grooves in the door panels were cut using my table saw (though I noticed that Ana suggested you use a circular). For the table saw, I had to take off all blade guards/kickback... thingy and I'm not sure that's recommended, so go the safe route and use a circular :-p