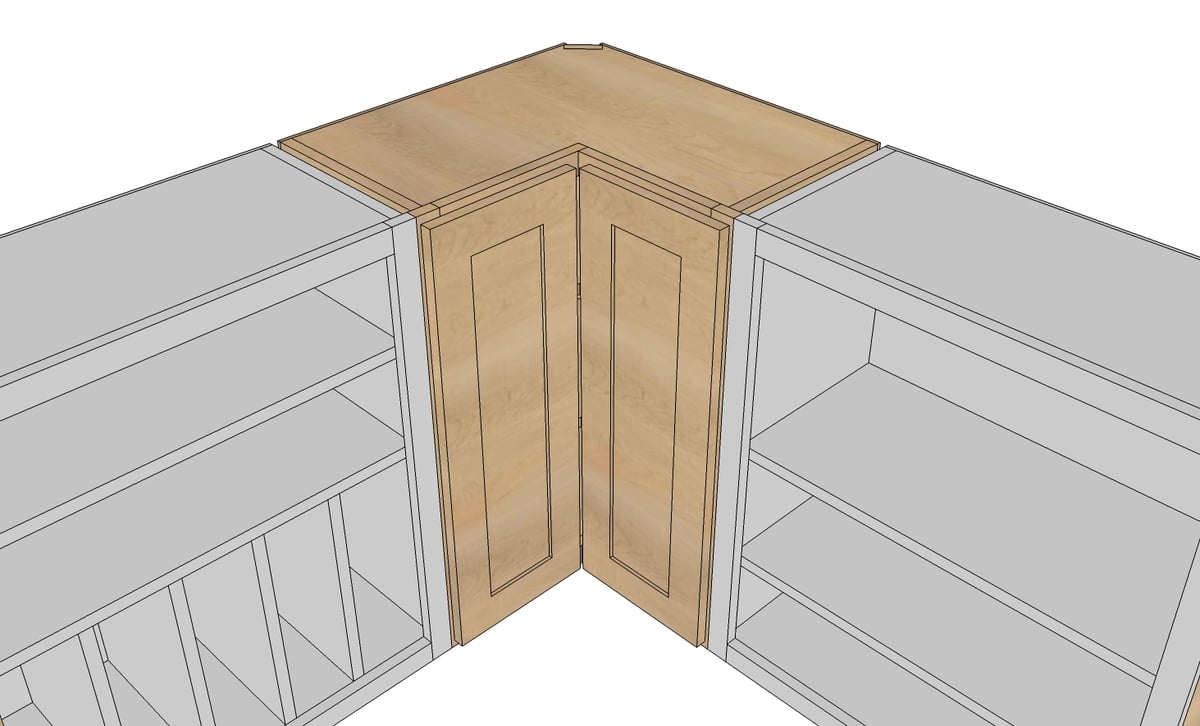


Free plans to build a wall cabinet pie cut corner with double folding doors. This style gives better access to the corner countertop space and is easier to build than the angled door cabinet. Free plans from Ana-White.com
Preparation
1 sheet 3/4" plywood ripped into 1 strip 22 3/4" wide x 8 feet long AND 1 strip 11 3/4" wide x 8 feet long (might as well rip the remaining strip 11 3/4" wide and use it for more wall cabinets)
1/2 sheet 1/4" plywood for backs
2 - 1x2 @ 8 feet long in matching hardwood species
1 - 1x3 @ 30" in matching hardwood species
2 - 1 1/4" overlay face frame concealed euro style hinges*
2 - pie cut hinges for attaching doors together*
Screws for hanging cabinet wall and attaching face frames to neighboring cabinets
Doors or materials to make doors as shown in plan
*see comments
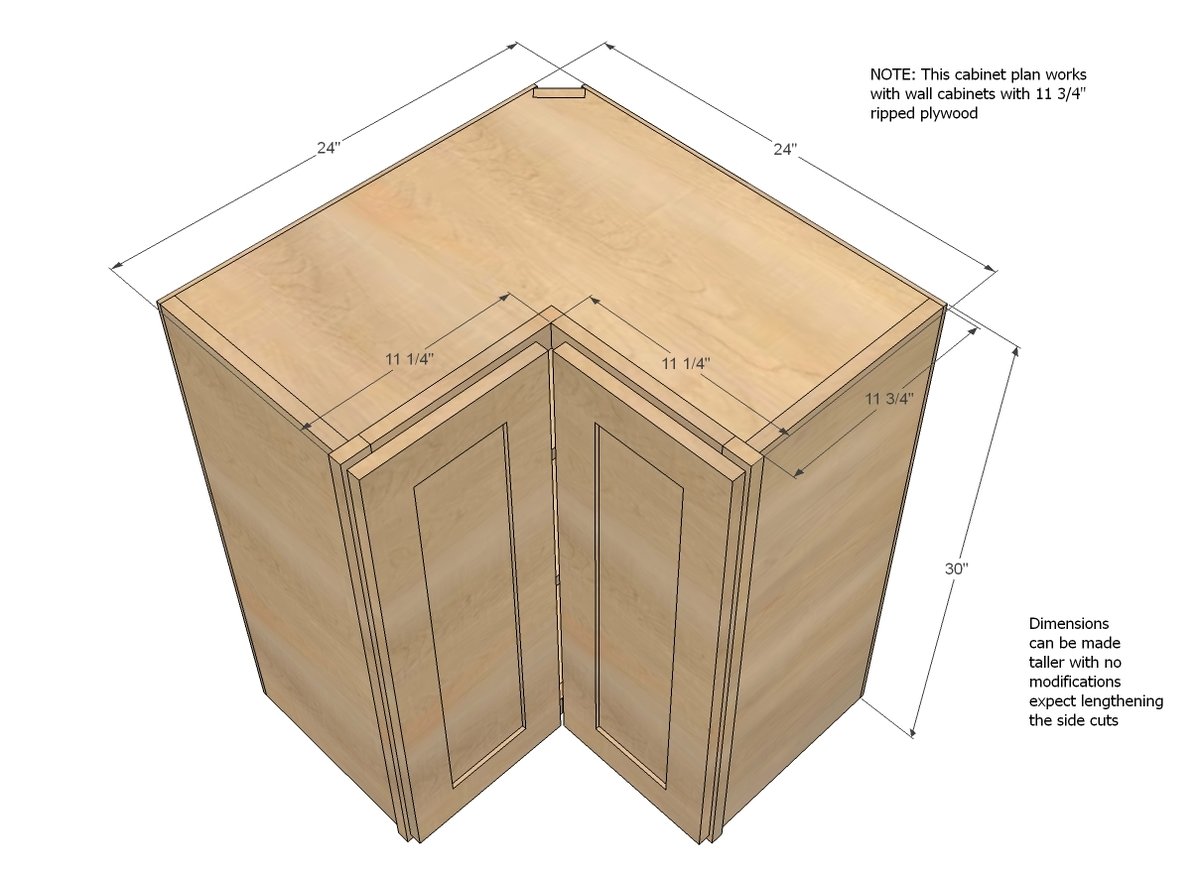
4 - 3/4" plywood 22 3/4" x 22 3/4" (cut these from the ripped strip 22 3/4" wide)
2 - 3/4" plywood 11 3/4" x 30" (cut these from the ripped strip 11 3/4" wide)
1 - 1x3 @ 30"
2 - 1x2 @ 21" (longest point measurement, one end is cut to 45 degree bevel - for heavier loads, consider cutting four more for placement under all fixed shelves)
2 - 1/4" plywood @ 30" x 22" (backs)
FACE FRAME
2 - 1x2 @ 30"
2 - 1x2 @ 10 1/2"
2 - 1x2 @ 9 3/4"


Please read through the entire plan and all comments before beginning this project. It is also advisable to review the Getting Started Section. Take all necessary precautions to build safely and smartly. Work on a clean level surface, free of imperfections or debris. Always use straight boards. Check for square after each step. Always predrill holes before attaching with screws. Use glue with finish nails for a stronger hold. Wipe excess glue off bare wood for stained projects, as dried glue will not take stain. Be safe, have fun, and ask for help if you need it. Good luck!
Instructions
Step 1

First cut all of your shelves as shown in diagram.
Step 2

Next, drill pocket holes in all shelves and sides as shown in diagram, and then attach shelves to the sides.
Step 3

Attach back 1x3 to the back keeping shelves level. Countersink screws and use glue.
Step 4

These guys are for hanging the cabinet later on. For heavier loads, I suggest more braces under the remaining fixed shelves. Attach with glue and screws - try 3/4" pocket holes on back sides.
Step 5

Step 6
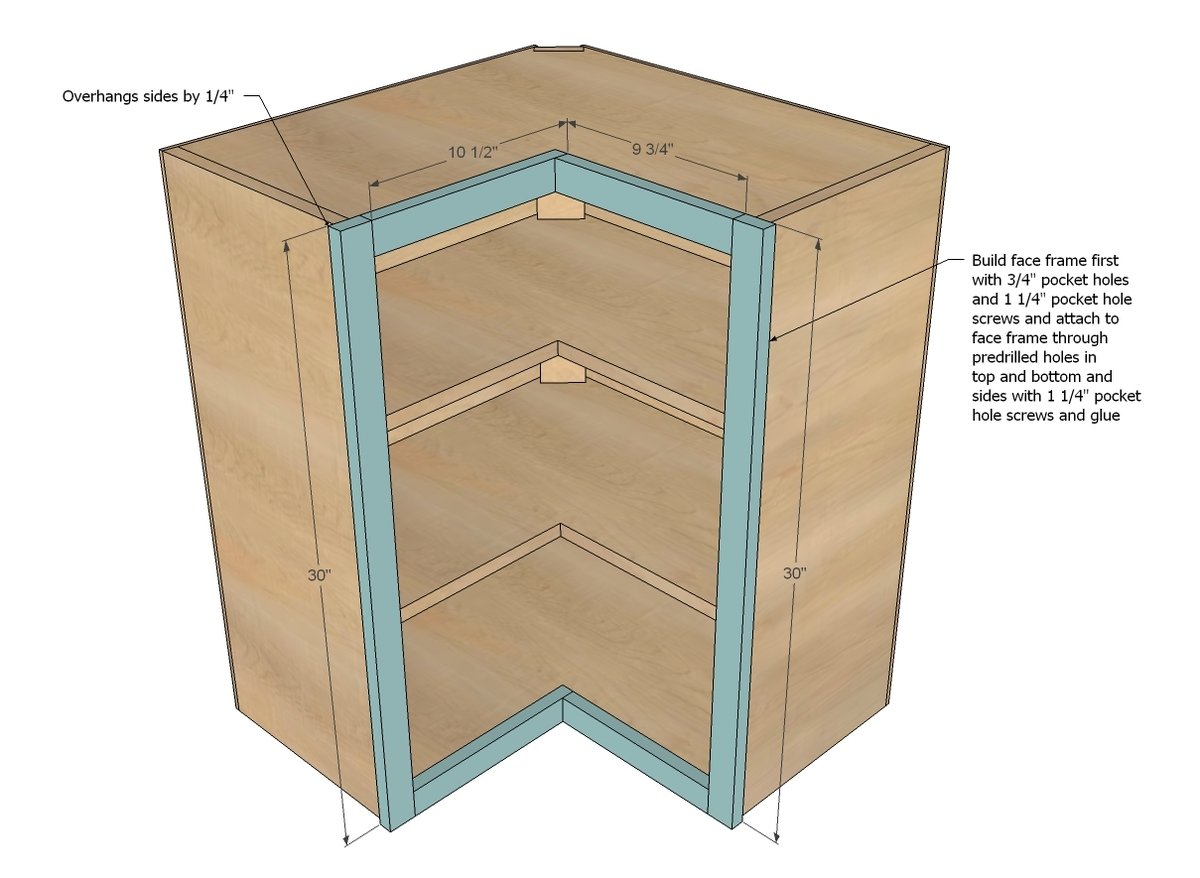
Build your face frame separately with hidden 3/4" pocket holes on back side. Then attach to carcass using the predrilled pocket holes from step 2.
Step 7

For standard full overlay doors with 1/2" reveal between doors/drawers, door size is as shown above. When you hang the doors, adjust so 1/4" of the face frame is revealed on the ends of the face frame, 1/2" on tops and bottoms.
Step 8

For my kitchen cabinet, these hinges were used to hinge two doors together.
Step 9

And these concealed hinges, although a 1 1/4" overlay face frame euro concealed hinge would do the trick too.
Step 10

And here's my corner base cabinet, just for reference.
It is always recommended to apply a test coat on a hidden area or scrap piece to ensure color evenness and adhesion. Use primer or wood conditioner as needed.
Comments
Linda7
Fri, 02/08/2013 - 13:47
Beautiful cabinet plans!
Thank you for the concise, easy-to-follow plans, Ana. One question about the door hinges, just for clarity in my mind...the hinges that you say "hinge two doors together" are used instead of, say, a piano hinge? Then you use a different type of hinge (Euro-style?) to attach the two doors to the cabinet? Thank you for any clarification. I don't understand the myriad of hinge types available.
Ana White
Fri, 02/08/2013 - 14:32
Pie cut hinge
Hi Linda, thank you! You'll need some way of attaching the two doors together. A piano hinge could work, but the hinge pin would show, and there's no way of controlling the exact gap between the doors to get your 1/4" reveal on the edges. The hinge you'll need for attaching the two doors together is called a Pie-cut Corner Hinge
Hope this helps! Ana
Ana White
Fri, 02/08/2013 - 14:36
Hinge Kit
Rockler actually sells the whole she-bang kit for the two sets you'll need! http://www.rockler.com/product.cfm?page=21290&site=ROCKLER
Linda7
Fri, 02/08/2013 - 14:53
Thank you for the reply!
Thank you for the reply! I will head over to Rockler right now and check it out. You've been most helpful!!
trailsingr
Sat, 02/09/2013 - 18:06
Nice!
You make these seem so straightforward. I will be so amazed if I can master making cabinets: I think I'll try some out for my basement before I take on the kitchen.....
shells
Mon, 02/11/2013 - 06:29
LOVE!!
I'm going to attempt my own, but I'm having some trouble deciding on the type of ply to use. Many forums say you need A1, some say "cabinet grade" (don't even know what this is) and some DIY say B4 is fine....what did type did you use? and did you find the sheets were fairly flat (not bowed), I'm thinking about frameless and a bit nervous about bow in the plywood, and where did you find your 1/4" ply (is that maple?) for the door pannels?....sorry about the million questions- excited to start this!
tracysmith
Tue, 02/12/2013 - 07:52
Ana - is there any special
Ana - is there any special way to join the cabinets together? Are there special screws or do you just use regular ones screwed through the 1/2" spacer that's between the cabs. I'm building these lovely cabinets for my laundry room and I'm just unsure as how to keep them snugged up to each other. Thanks for your help with this in advance!
TARA-L
Sat, 03/28/2020 - 18:18
Measurements
I want to say first I love all of your plans and projects! But I’m having trouble with this plan , the shelf is 22-3/4” each side then adding 3/4 for the side and 1/4” for the face frame. Where is the 24” coming from. Is it 1/2 for the face frame overhang? I must be missing something here.