


Free easy plans to build a media hutch from Ana-White.com. Features crown moulding and three top cubby shelves and one adjustable shelf.


Hi Everyone! So glad you loved our newest media suite plans! If you are looking for a simple media center with lots of storage, this might be the one for you!
Uncle Bill built this media hutch, and he added a few details to make it perfect for their space. Like the console, he built the hutch 6" wider (for a 48" width) than called for in the plans. He also ripped strips of 1x2s down to 3/4" wide, and attached to the face of shelves and around the top to finish out the project. He really did a beautiful job on this project!
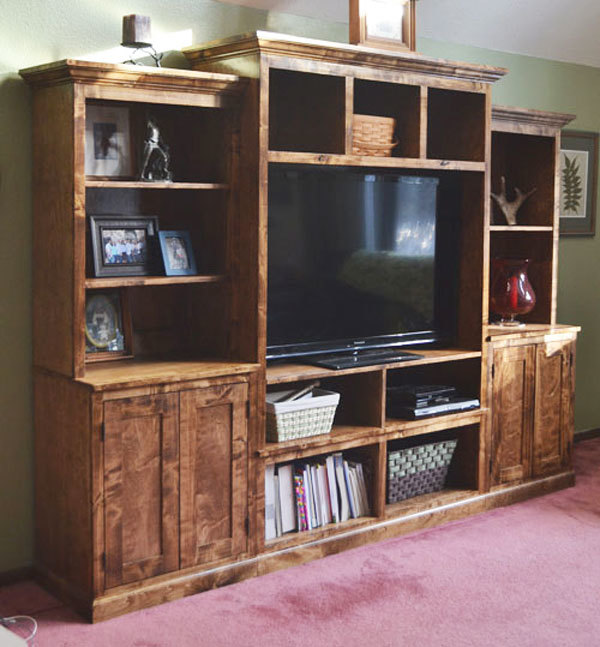
The console looks taller, but that is not the case. What Uncle Bill did here was place the adjustable shelf under the tv instead of above it like shown in the diagrams. And because the tv weighed quite a bit, he cut another divider, and placed it under the bottom shelf. This created two very nice spots for media controllers and more storage, and raised the tv height.
When you build, you should always make it your own! We also used PureBond Formaldehyde Free Plywood in Birch to match the Alaska Birch face frames. This is a healthy, economical, and much easier way to build than wrestling with expensive solid wood throughout the project. If you haven't already, take a second to check out PureBond Plywood.
Of course, the plans follow! And we'll be posting a few more plans in this collection so you can get the entire media suite, without going broke!
Disclosure: All opinions expressed in this post are my own. I do however work with Columbia Forest Products and PureBond Plywood.

Preparation
1 sheet of 3/4” plywood ripped into strips 15 3/4” wide (referred to as 1x16 in this plan)
3/4 sheet of 1/4” plywood
1 - 1x3 @ 4 feet long
1 - 1x4 @ 8 feet long
1 - 1x2 @ 10 feet long
Recommend 1 1/4" pocket hole screws and 1 1/4" finish nails
1 - 1x16 @ 46 1/2” (Top)
2 - 1X16 @ 55 3/4” (Sides)
2 - 1X16 @ 14 3/4” (Dividers)
2 - 1X16 @ 41 1/2” (Shelves)
1/4” PLYWOOD 56 1/2” x 43” (Back)
1 - 1x4 @ 41 1/2” (Base support)
FACE FRAME
1 - 1x3 @ 46 1/2”
1 - 1x4 @ 40”
2 - 1x2 @ 55 3/4”
Crown moulding cut to fit. Crown must be no wider installed than 1-3/4” and no taller installed than 3”.


Please read through the entire plan and all comments before beginning this project. It is also advisable to review the Getting Started Section. Take all necessary precautions to build safely and smartly. Work on a clean level surface, free of imperfections or debris. Always use straight boards. Check for square after each step. Always predrill holes before attaching with screws. Use glue with finish nails for a stronger hold. Wipe excess glue off bare wood for stained projects, as dried glue will not take stain. Be safe, have fun, and ask for help if you need it. Good luck!
Instructions
Step 1

Start by building the main box. Note that the top overhangs the sides for the crown. We do this so the top is solid for extra storage up there as well.
I recommend drilling adjustable shelf pin holes now on the insides. Another option is to drill 3/4" pocket holes on the underside of the adjustable shelf and then just finish it as a shelf. When you install your tv, you can attach the shelf at the desired height with pocket hole screws.
Step 2

You'll need something at the bottom base to keep the sides from splaying out.
Step 3

Next, attach the back. Use 1 1/4" finish nails to attach to the side boards. To attach to the base board, you'll need to use nails less than 1" long or they will poke through the other side.
Step 4

Next, build your face frame. Then attach face frame to front of cabinet.
Uncle Bill also ripped 1x board down and used them to trim out fronts of shelves and dividers, just to give it that finishing touch and for consistency. Painters, you could probably fill the plywood edge and sand well and paint.
Step 5

It is always recommended to apply a test coat on a hidden area or scrap piece to ensure color evenness and adhesion. Use primer or wood conditioner as needed.
Comments
cathryn
Thu, 03/07/2013 - 10:14
Great Plans!
Perfect timing, we are hoping to build an entertainment center to house not only the tv and components but maybe also some of the in wall speakers. Turns out the wall we want to use is a shear wall and we want an easier way to mount the in wall speakers and handle all the wires without chopping tons of holes in the structure. Our plan is no where near done yet so these plans help so much.
Can I ask: how are the wires managed? Are the holes in the shelves or on the back of the unit?
claydowling
Thu, 03/07/2013 - 10:36
Plywood and solid wood
Good high quality plywood such as Ana used is a real joy to work with. If you can't find purebond easily, talk to a local lumber yard. Even if they can't get purebond, they can find another formaldehyde free cabinet grade plywood, and you can get it in most common domestic wood species. Absolutely great stuff.
If you're adventurous you can also get solid wood without breaking the bank, but you'll have to hunt. There are half a dozen small timber operations around me with excellent prices on wood. You'll have to dig on the internet to fine them, but they're worth it. I just purchased premium wood at a non-premium price for my wife's china cabinet from a local supplier.
jrbamberg
Mon, 03/25/2013 - 13:19
Crown moulding
Where and what kind of crown moulding did you get? Is there birch crown moulding at Home Depot? If I wanted to stain this project it would make sense to have all the same type of wood so the finish and grain matches. Birch plywood, birch trim, birch moulding correct? When I go to Home Depot online I see a lot of moulding that is already prefinished or has primer on it. Please fill in the hole in this wonderful plan for me. Thank you.
pacefamily6@gm…
Sun, 10/23/2016 - 19:26
changing plan dimensions
What do you recommend as the best way to alter these plans to fit my space? I keep looking at it and it's just a few inches too long. My wall is 98.5", so I need to shorten the cabinets on the ends or the center piece. In doing this by only a couple of inches to get it into my space, I know that changes everything on the shopping list and what I'll need and the cut list. Is there an easy way to do this? I am guessing that I'm going to have to go through the plans and just go piece by piece shortening everything to the length and width that I need. If there's an easier way, I would love to know! Thanks so much! Your site is very inspirational!