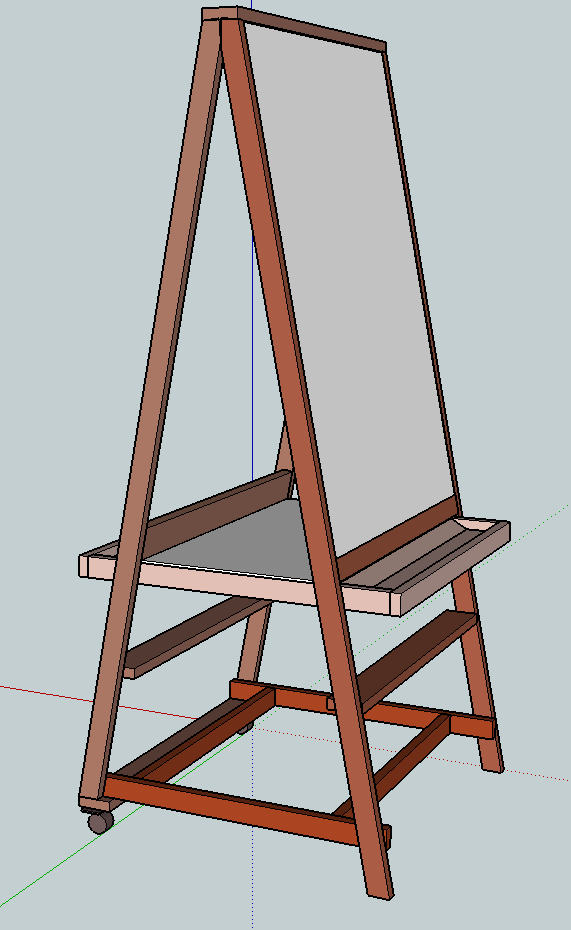


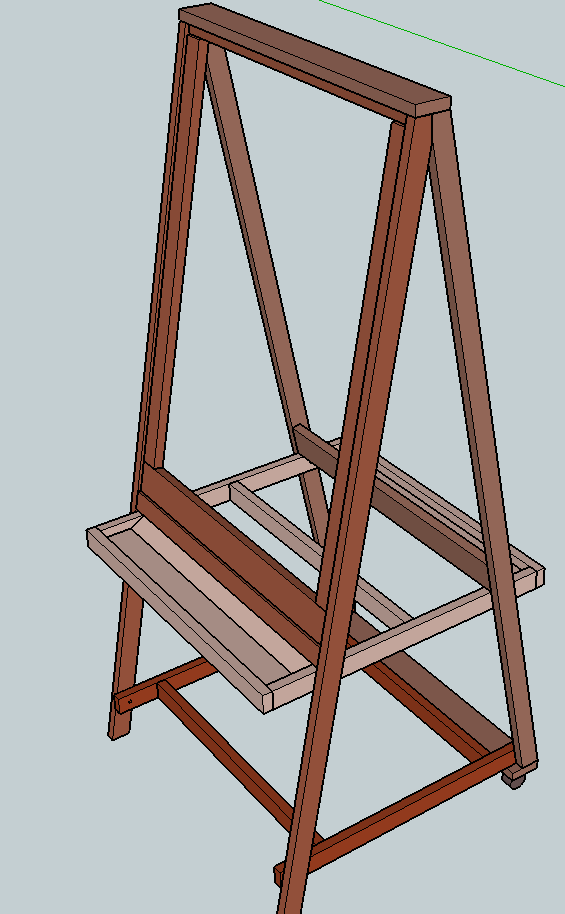
I saw a comment on here that teaching easels were too expensive for teachers on a budget. So I designed this to be low cost, adaptable to more features later, and able to fit in the average car.
It only has a whiteboard on one side, but the other side could easily be covered with another surface, and all manner of clips and hooks can be attached. It includes a shelf, and two levels of rails to hold 15" plastic tubs. It uses just 2 wheels, so it can be moved easily but is stable as soon as you put it down. And it separates into 4 main pieces for transport.
If you have Sketchup installed, you can download the Sketchup file to view the parts in detail.
Preparation
7 @ 1×2 x 8′
2 @ 1×3 x 8′
1 @ 3/16 x 24 x 48 White Marker Board or Melamine
2 @ 1.5″ swivel casters
10 @ 2″ bolts & nut
2 @ 1×2 x 57.5 legs front – angle both ends parallel
2 @ 1×2 x 54.5 legs back – angle both ends parallel
2 @ 1×2 x 31.25 top sides
4 @ 1×2 x 24 tray fronts, whiteboard base, top
2 @ 1×2 x 23.125 bottom sides
8 @ 1×2 x 22.5 bottom and tray
2 @ 1×3 x 25.5 Bottom & top
4 @ 1×3 x 24 cross pieces
1 @ 1×3 x 22.5 tray bottom
1 @ 3/16 x 24×34.5 Whiteboard
1 @ 3/16 x 24×13.5


Please read through the entire plan and all comments before beginning this project. It is also advisable to review the Getting Started Section. Take all necessary precautions to build safely and smartly. Work on a clean level surface, free of imperfections or debris. Always use straight boards. Check for square after each step. Always predrill holes before attaching with screws. Use glue with finish nails for a stronger hold. Wipe excess glue off bare wood for stained projects, as dried glue will not take stain. Be safe, have fun, and ask for help if you need it. Good luck!
Instructions
Step 1
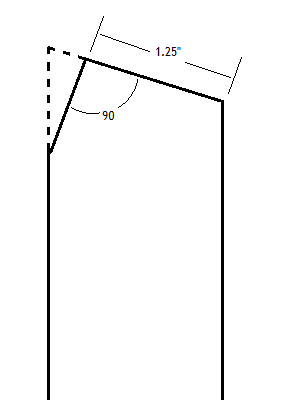
After cutting both ends at an 11 degree angle (from of a right angle), a second angle needs to be cut at the top of each leg. Measure 1 1/4″ from the obtuse angle (greater than 90 degrees) across the end grain. From there, make a line perpendicular to the end grain. Cut along that line.
Step 2
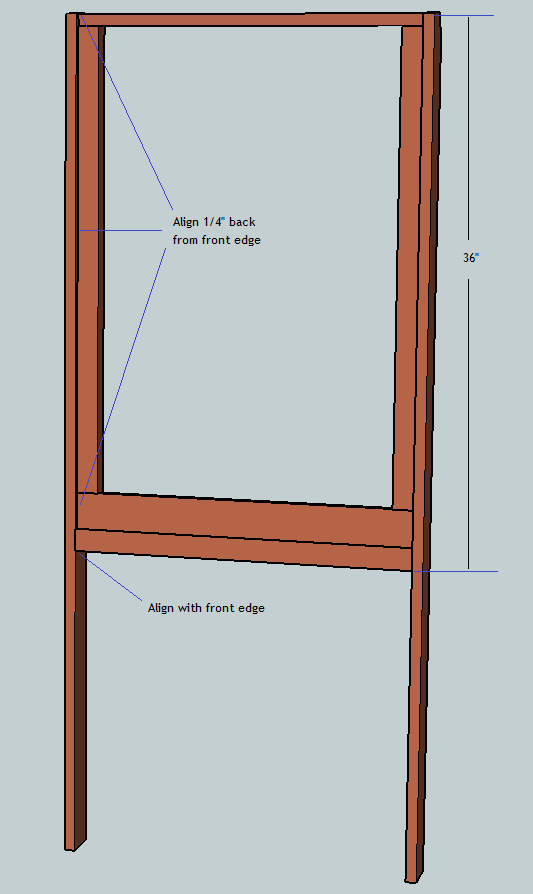
Measure down 36″ from the same obtuse angle and make a mark. Make another mark at 44″. Make matching marks on both legs. Note: the edge on the obtuse angle at the top and acute (pointy) angle at the bottom is the front edge.
Attach the sides together with a 24″ 1×2 spanning them, with the bottom edge aligned on the marks at 36″. The face of the 1×2 should be flush with the front edge of the legs.
Now attach a 1×3 between the legs, directly above the 1×2. This piece should be set back 1/4″ from the front edge of the legs. Use 2 screws on each end, either through the legs into the ends, or using a Kreg jig through the 1×3. This piece is important for structural rigidity.
Now attach the top piece (24″) between the legs, flush with the end grain at the top. The edge of the top piece should be 1/4″ back from the obtuse angle. It will stick out 1/2″ on the back. Use glue and one screw on each side.
The lower rail, at the 44″ mark, should be installed later.
Attach the side supports to the inside of the legs, aligned 1/4 back from the front edge, even with the 1×3. The top will not align exactly with the bottom edge of the top rail, due to the angle.
Step 3
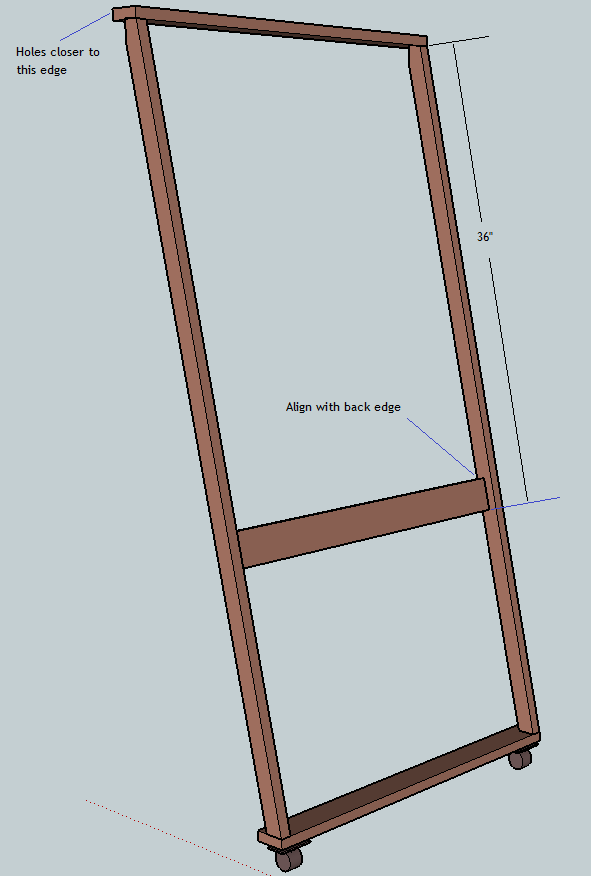
The top of each leg needs to be cut the same as the front legs, by measuring 1 1/4″ from the obtuse angle, and making a right angle from the end grain. The same marks are also needed at 36″ and 44″. Use a 1×3 to attach the legs at the 36″ mark, this time aligning the face with the back edge of the legs. Use 2 screws in each end.
Now attach a 25.5″ piece of 1×3 to the bottom of the legs, with the corners aligned to the acute angles. Use glue and 1 screw through the 1×3 into the end grain of each leg.
The top piece should have two 1/4″ holes drilled, each one 3 1/2″ from each end. They should be off-center, 1″ from one edge, and 1 1/2″ from the other edge. Connect the top piece, aligning the edge that is 1 1/2″ from the holes with the obtuse angle. Use glue and 1 screw through the top into the end grain of each leg.
Attach the wheels to the bottom rail. The lower rail will be installed later.
Step 4
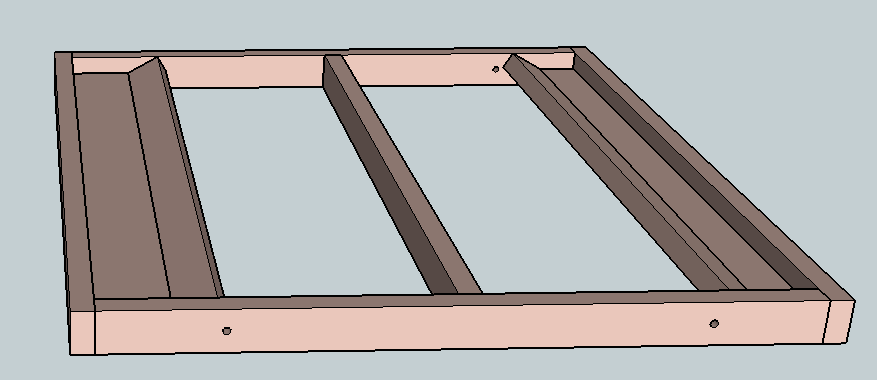
Starting with the two 22 1/2″ pieces for the sides, drill 1/4″ holes 4″ from one end, and 3 1/2″ from the other end of each piece, centered across the width. Install a 1×3 between them, flat, with the face flush with the bottom edge of the sides, and the edge aligned to the ends of the sides. Install a 1×2 at the other end, also flat. Use glue and one screw through each side piece into the end grain of the cross pieces.
Now attach 24″ 1×2 pieces that will serve as the front of each tray, on opposite sides. These can just use glue and nails.
Insert two more 1×2 pieces between the side rails, with the face tilted up at a 30 degree angle. The edge of these pieces should just touch the back edge of the bottom piece, completing the “tray”. Glue and nails are sufficient for these pieces.
Install one more center rail between the side rails to support the shelf. This one should get a screw in each end, along with glue.
Step 5
Step 6
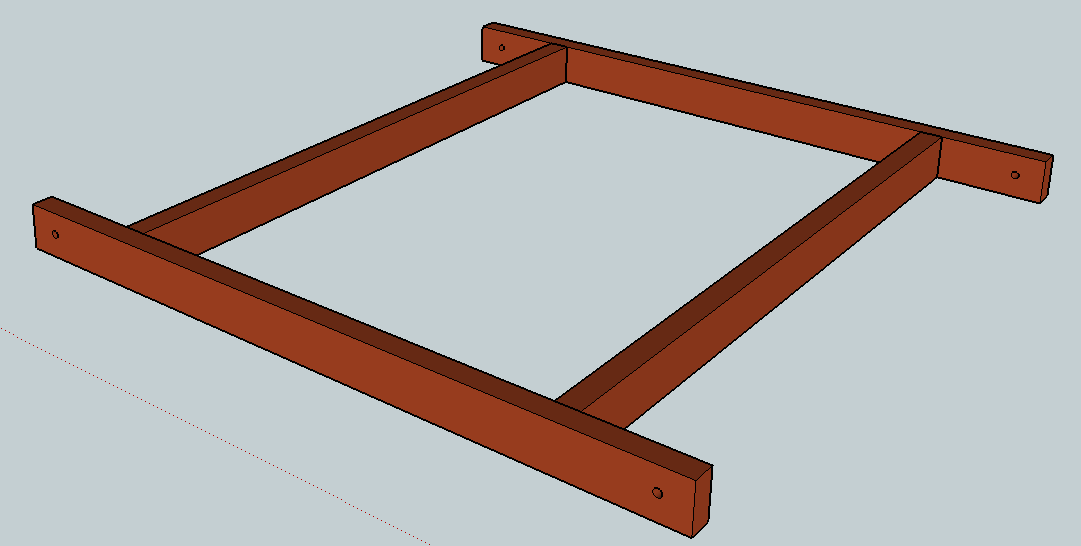
Assemble the front and back frames with the structure on its side, sliding the top rail of the front frame under the top rail of the back frame.. Keep the feet 24″ apart. Mark through the holes on the top rail, on to the top rail of the front frame. Drill holes in the top rail of the front frame, and insert bolts. Do not tighten yet.
Stand it up, making sure the wheeled feet are blocked. Set the bottom frame on top of the wheel rail, with the ends aligned with the edge of the wheel rail. Mark through the holes into the legs, and drill. Install bolts.
Align the front legs so the bottom frame is level, and the bottom corner of the side rails aligns with the edge of the legs. Mark the holes, drill, and install bolts.
Align the tray under the cross supports. It will stick out 1″ farther on the front than it will on the back. Mark, drill, and install bolts.
Step 7
The whiteboard can be glued into the front frame. One screw could be used in each corner for additional strength.
The smaller piece of whiteboard can be nailed or glued to the tray for the center shelf. It will need to be slightly off-center.
The lower rails can be installed to hold another layer of plastic tubs. Use the marks on the legs at the 44″ mark, or adjust as needed so that the distance between the inside edge of the two rails is slightly wider than the body of the tubs you will use. Glue and a screw on each end should be used to secure them. If the tubs will hold significant weight, small pieces of scrap 1×2 could be attached to the inside of the legs immediately below these rails for additional support.
The bolts can be removed to separate into 4 pieces for transport, and easily reassembled on site.
It is always recommended to apply a test coat on a hidden area or scrap piece to ensure color evenness and adhesion. Use primer or wood conditioner as needed.


Comments
chosmith19
Thu, 08/08/2013 - 09:42
Thanks!
I was the person who requested these plans. Thank you so much! To go from $300 to $50 is amazing I can't wait to get started.
sassyarmygirl
Tue, 06/07/2016 - 06:59
Ideas
Trying to think of how I can incorporate this into an artist easel to hold my canvas. I will think of something.
mike_leggett_
Mon, 08/22/2016 - 20:28
Teaching easel upgrade
Thanks so much for your site and plans for the teaching easel. My daughter is a second grade teacher and asked me to build her one. I made a few simplifications to the design and hope I can pass them along without taking away from the original post. The first big shortcut is using the pre-framed 24x36 dry erase board available from Staples. It's attached with three 1 1/4" screws down each side through the legs. This eliminates building an inner frame for a bare sheet of dry ease board which is harder to find anyway. I will be getting her a second board for the other side and will mount it the same way. Second adjustment is at the top where the two sides can be joined with two 1x2" hinges and no need to cut the uprights at 11 degrees, just cut them square. At the bottom of the legs, just round the bottoms of the front two instead to the 11 degree cut and they will slide better on all surfaces. In the back I used two wheels from an old scooter and just mounted them with 1/4-20 bolts with nuts and washers. Almost any old wheels will work and having them fixed instead of swiveling makes it easier to move the easel around. I only used 5 1"x2"x8' and 1 1"x3"x8' pine so it ended up lighter and the cost was a bit less.