

DIY plans for a folding lap desk from Ana-White.com

Hi everyone!
Don't you love hand making Christmas and Holiday gifts for your loved ones? It's just so special to handmake gifts, and can often be so much more affordable than buying. That - and you can customize the gifts too! So every gift you give can be unique and personal.
This year, to help you have a Handmade Holiday, I'm teaming up with my friend Jaime from That's My Letter to bring you a new gift plan each week!

It's going to be like Christmas every Friday!!!
We are trying to keep the cost of materials as low as possible and the projects simple, so we can all pile the gifts up under the tree. Many of the projects will use scrap lumber.
So stay tuned and check back every week for new project plans!
I can't tell you how excited I am about the first project in this series!
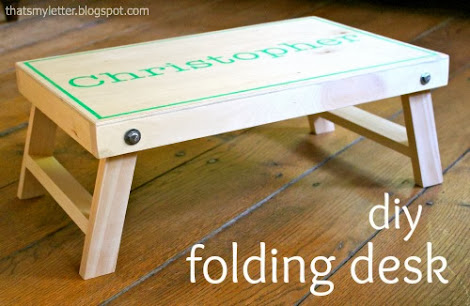
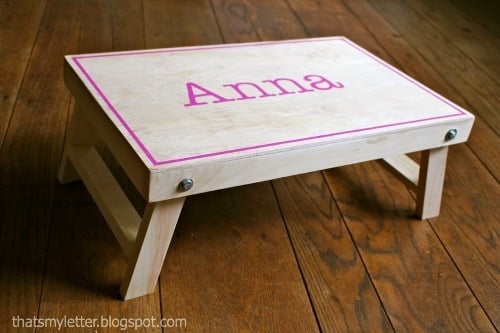
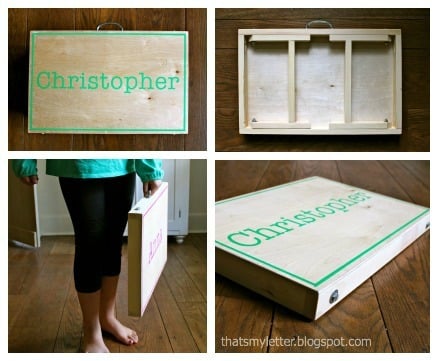
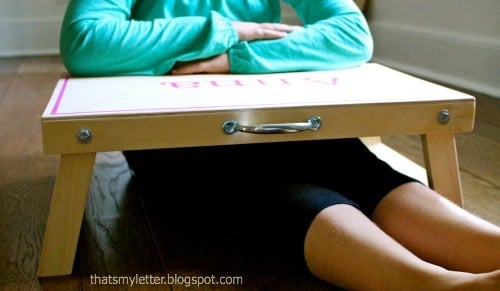
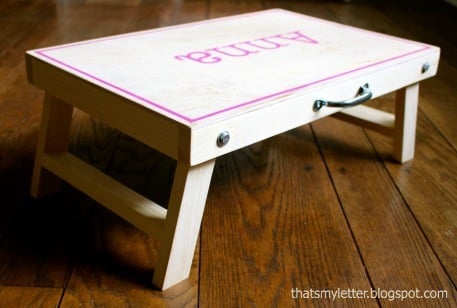
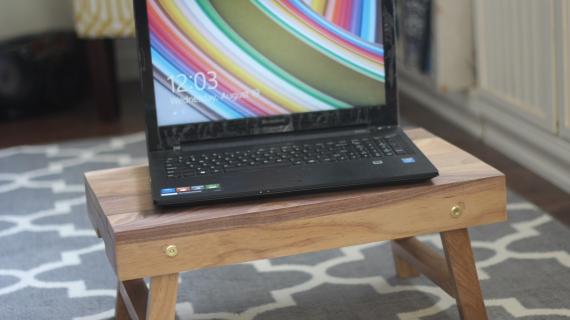
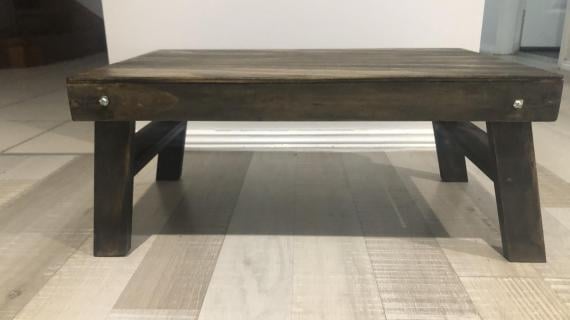
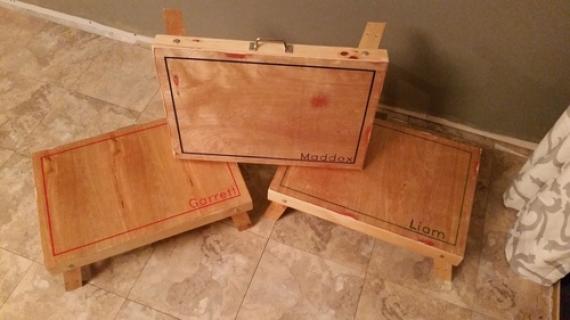
It's a little lap desk,
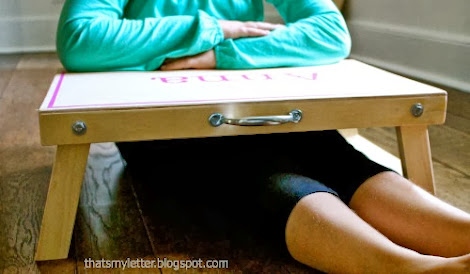
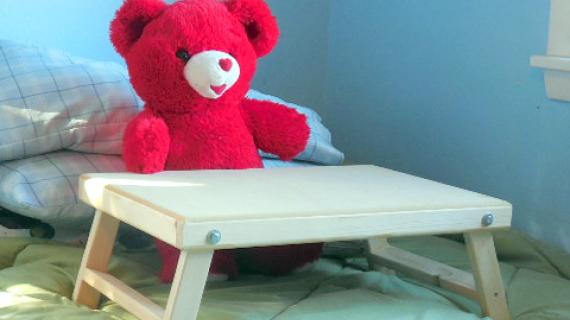
Perfect for creativity, playing school, family movie night, or tea parties in bed.

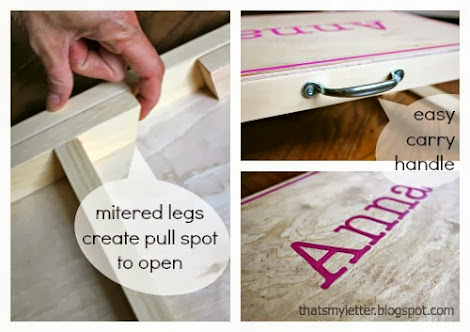
And then when not in use, the little desk neatly folds flat to be put away. How about using a handle as a hook, and hanging on the wall? You could even use a chalkboard for the top, so when not in use, it doubles as a wall chalkboard!
Know anyone on your list that might love this? Well, of course, we got you covered with the free, step by step plans following!
But please take a second first to check out Jaime's building post here, she's got lots of tips and step by step pictures! Thank you Jaime!
And don't forget to check back next week for another inexpensive building project perfect for your Handmade Holiday!
Happy Building!
Ana
Preparation
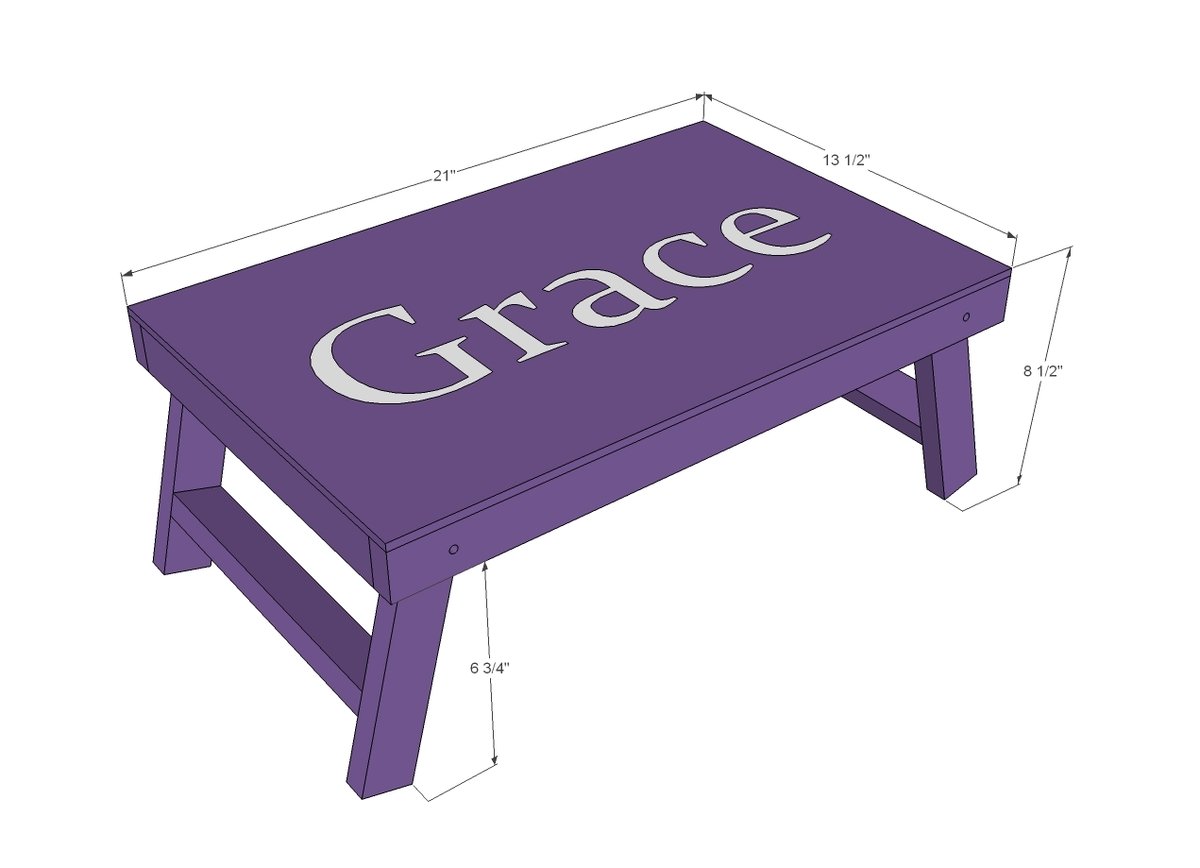
10 feet of 1x2s Plywood for top 4 bolts, 2 1/2” length, with washers and nuts You may also need a catch or hook/eye closure to keep legs folded closed for transporting Handle if desired
2 - 1x2 @ 21” 2 - 1x2 @ 12” 2 - 1x2 @ 10 1/2” 4 - 1x2 @ 8 1/4” (top end is cut to point 45 degrees angle and bottom cut at 15 degree angle - see in plans) Top is 13 1/2” x 21”


Please read through the entire plan and all comments before beginning this project. It is also advisable to review the Getting Started Section. Take all necessary precautions to build safely and smartly. Work on a clean level surface, free of imperfections or debris. Always use straight boards. Check for square after each step. Always predrill holes before attaching with screws. Use glue with finish nails for a stronger hold. Wipe excess glue off bare wood for stained projects, as dried glue will not take stain. Be safe, have fun, and ask for help if you need it. Good luck!
Instructions
Step 1
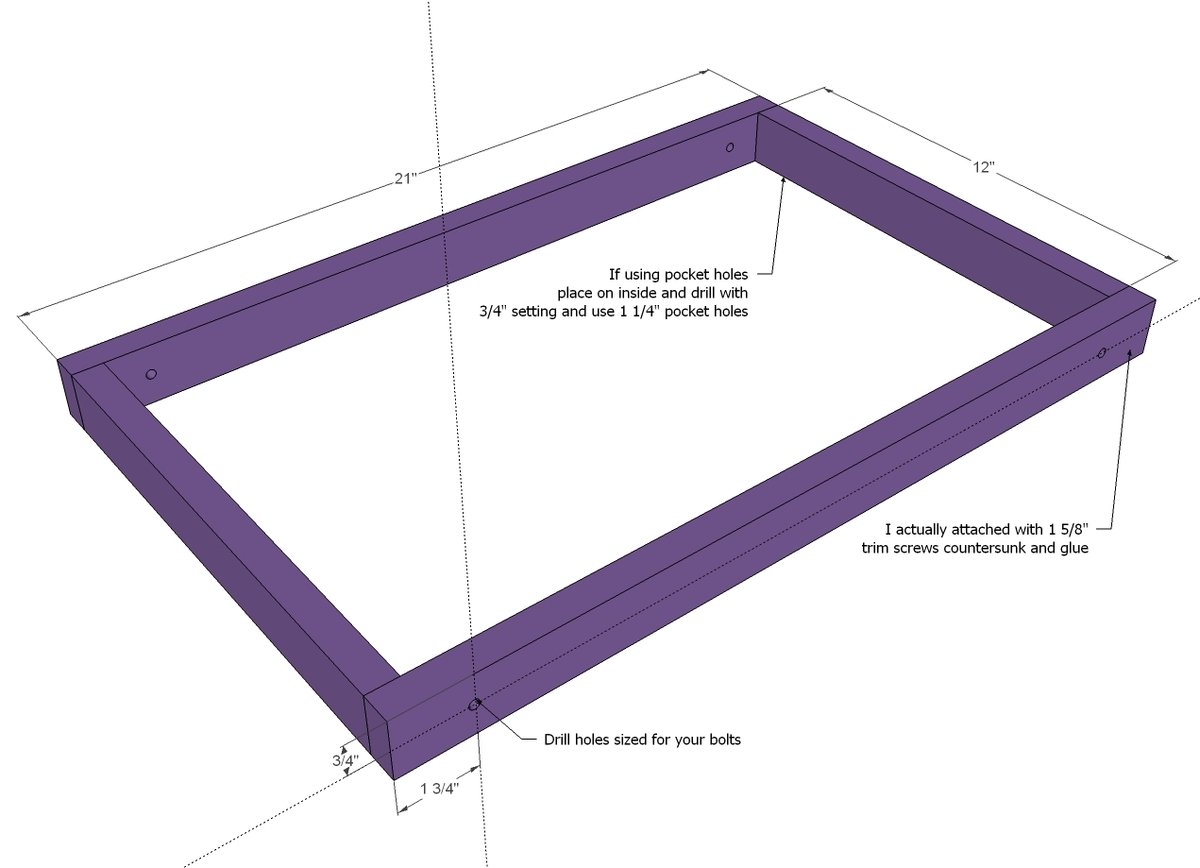
First, mark the location of your bolt holes on the 1x2s that are 21" long. Drill the holes sized for your bolts. Take the 1x2 frame boards, and build your frame. The frame can be nailed and glued, screwed, pocket holed - it's your choice. The top plywood piece will really help hold everything together.
Step 2
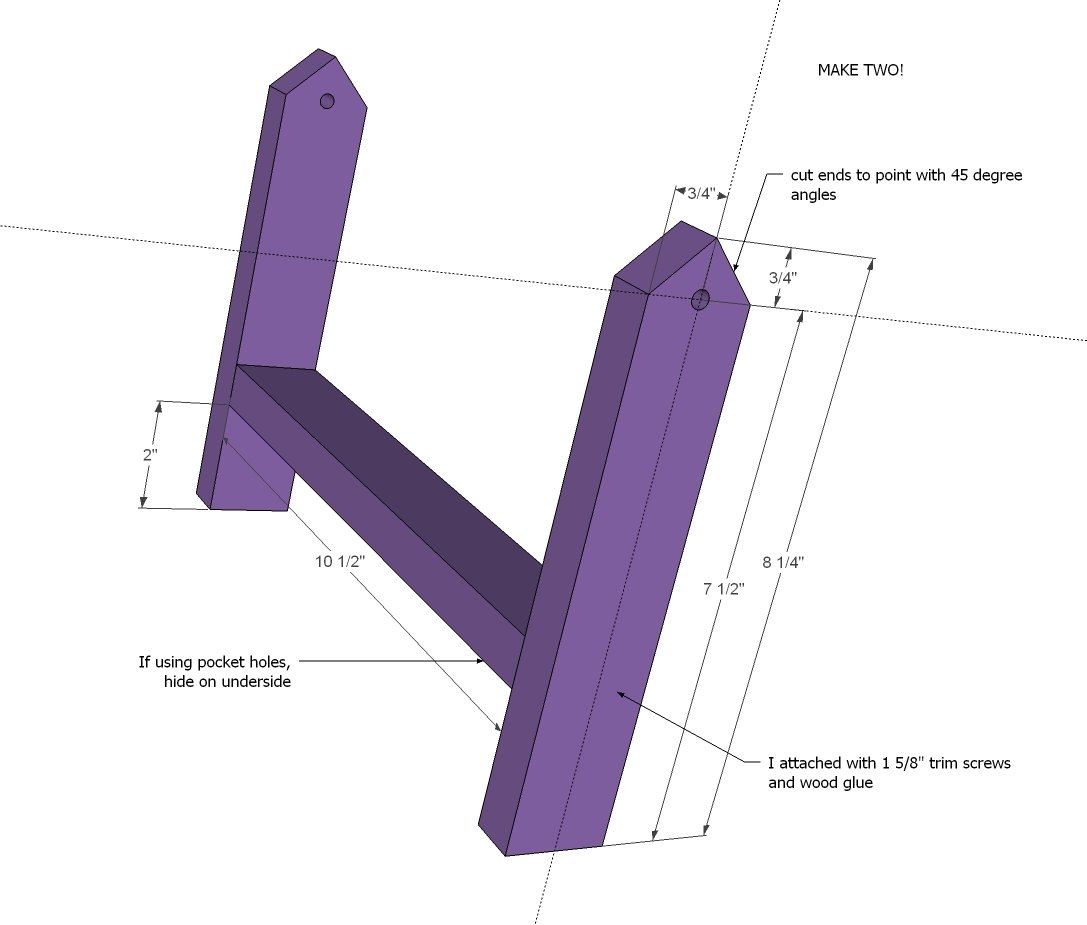
Next, build your two leg sets and drill matching holes for bolts in the tops of the legs.
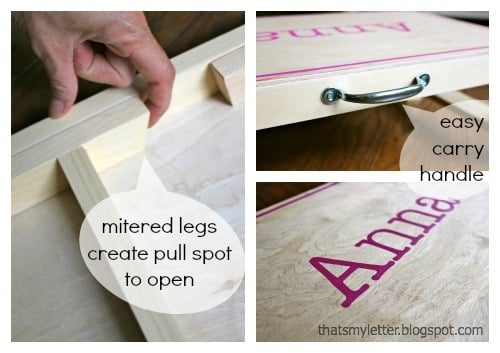
NOTE: Jaime recommends mitering the bottom corner at 15 degrees too to help the table stand better when open -

And also act as a finger pull for opening the table.
Step 3

Then use the bolts to attach the legs to the frame.
Step 4

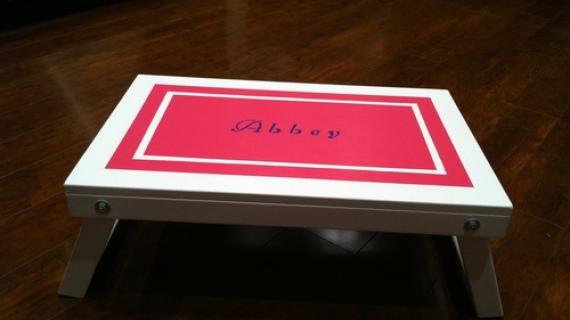
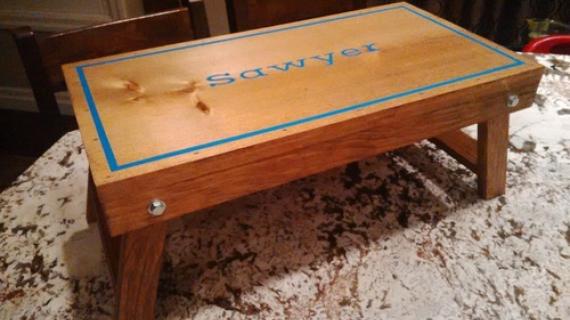
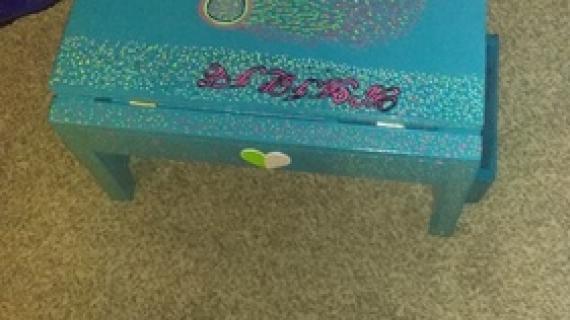
Glue and nail smooth plywood or other material to the top. Add a handle and personalize as desired! PS - Don't forget the pretty bow!
It is always recommended to apply a test coat on a hidden area or scrap piece to ensure color evenness and adhesion. Use primer or wood conditioner as needed.


Comments
Jim W
Fri, 10/18/2013 - 12:32
Thanks!
Really looking forward to the weekly new gift plans! Great idea. Thanks!
DoryEllen
Fri, 10/18/2013 - 13:56
Name on top
How did you do the name and border on top? I love it and I think my nieces would enjoy these, especially personalized as their names are not common.
In reply to Name on top by DoryEllen
jaimecostiglio
Fri, 10/18/2013 - 14:07
name on top
DoryEllen - I painted the names using acrylic. See the full tutorial at the bottom of my post here: http://thatsmyletter.blogspot.com/2013/10/f-is-for-folding-desk.html
You could also use adhesive vinyl lettering too.
Good luck, your nieces will love the desks.
Jake
Sat, 10/19/2013 - 04:50
Recess the Top?
What do you think about using MDF for the top and 1x3s for the top frame then recessing the MDF producing a nice border by the frame? A little extra work for sure but it would be nice, I think.
In reply to Recess the Top? by Jake
jaimecostiglio
Tue, 10/22/2013 - 20:26
border edge
Great idea Jake. Just be sure to leave enough clearance on the bottom side for the legs to fold in but that would definitely work. Please share your brag post if you do build and include the modifications. The framed edge would sure keep pens and markers from sliding off the edge!
jkeenan2929
Sat, 10/19/2013 - 10:36
Can't wait to see some brags,
Can't wait to see some brags, bring them on people! And if someone happens to modify this plan to fit an adult ;)
In reply to Can't wait to see some brags, by jkeenan2929
jaimecostiglio
Tue, 10/22/2013 - 20:33
Fits an adult
Hi Jess, the plan does fit an adult as is (I gave it a test run :)). Perfect for breakfast in bed or doing paperwork on the couch. You could make the legs a bit longer (maybe 1.5") if you need more clearance which would still allow for folding flat into the back. Looking forward to seeing some brag posts soon!
tricia.flores
Mon, 10/21/2013 - 08:59
Love this
I love this idea of a new plan each week for handmade gifts! Please please please make one of them a wagon! I want to make one for my little girls.
In reply to Love this by tricia.flores
jaimecostiglio
Tue, 10/22/2013 - 20:29
New plans each week
Thanks Tricia. Ana and I have compiled a great list of gift builds, both big and small, so be sure to check back every Friday. As of now we don't have a wagon but it's a great idea and I'll be sure to add it as a possibility (or even for a future plan).
Mrswhetstone
Wed, 11/06/2013 - 17:24
I built this today and I had
I built this today and I had to cut the shorter top frame pieces down to 12" from the 13" it says in the cut list. Also, I am going to go to the store and buy 2 1/4" bolts instead of 2 1/2" bolts that are in the shopping list. I don't know if it was my mistake, or if the tutorial needs some tweaking but I thought this could possibly save someone else a headache.
Great plans though! I made this as a trial run because I want to build 6 more of these for my nieces and nephews for Christmas. I think it will be great for coloring or doing homework or even working on a laptop in front of the TV.
Thanks for the great gift idea!
CreativeChaos
Sun, 11/10/2013 - 13:23
Bolts?
I need help with this plan please. I spent all afternoon dealing with this. I can't get the cap nuts to stay tightened down on my bolts when rotating the legs up and down. I drilled 1/4" holes for 1/4" bolts and used 2" long bolts. Am I missing something? Should the bolts rotate with the legs? I wondered if the holes should be bigger like 3/8". Your picture looks as if the nuts are flush with the inside of the leg and washer, so I thought 2 1/2" bolts would have been way too long.
saomkinar
Sat, 12/21/2013 - 21:02
Change the size of your bolt Nuts
More than likely, if your bolts aren't tightening and moving around, it is because your nuts are too big for the bolts. When you bought the nuts you could have bought 1.5 inch instead of 1 inch. It will depend on the size of the bolt. I'm not talking about the length (i.e. 2" long), I'm talking about the diameter of your 2" long bolt. Hope this helps. I had a problem similar to this with another project, when my nuts would not hardly go on the bolt, then I realized that my nut was too small for the bolt.
DoryEllen
Fri, 11/22/2013 - 13:41
Handles
I saw that you have front mounted handles. Where can I find these?
Darriantryon
Fri, 10/24/2014 - 19:01
How to easily get the name on straight???
I'm wanting to build about 13 of these as Christmas gifts but cant see how I would get the name centered on the table. Would appreciate any tips anyone has on this matter. THANKS!!!
Lisa Azbill
Mon, 07/25/2016 - 07:30
Can't Wait to Start!
So happy to find this site! We have 12 grandchildren, and are raising 2 of them. Not to mention 6 kids with spouses. Christmas is very expensive and so depressing for me, never having enough money to go around. But I have power tools & with yall's help I can make Christmas be GREAT this year! Can't thank you enough!!