
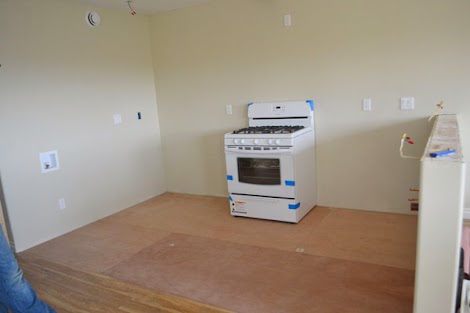
Seven sheets of PureBond plywood and $200 in popular boards.
Yep, that's what it took to take this blank space ....
And turn it into this:
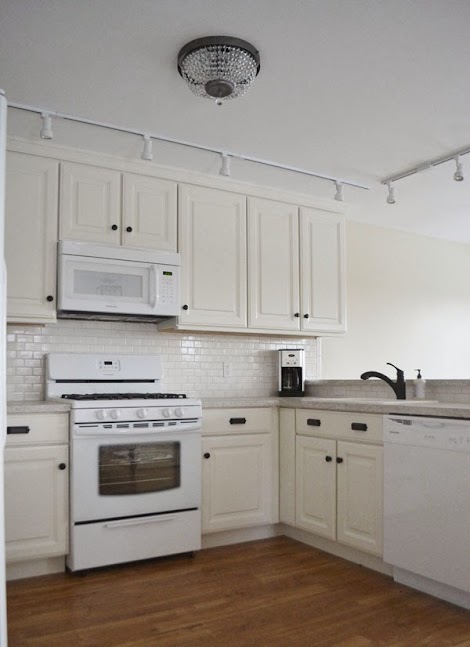
Well, at least to build all those cabinets!
I'd love to know how to make a dishwasher out of plywood, but I'm going to stick to cabinets for now.
The Ram and I spent about a week building the cabinets, and honestly, the building was the easy part. Once we got all the steps down, we were throwing together cabinets in about an hour!
Here's how we built the base cabinets:
We opted to use PureBond Formaldehyde Free Plywood because it's non-toxic and it's made right here in North America! We choose a prefinished plywood (it's special order) in maple, so no finishing out the insides of the cabinets! The plywood is beautiful and so smooth!
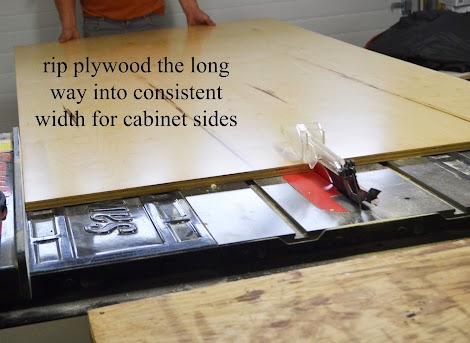
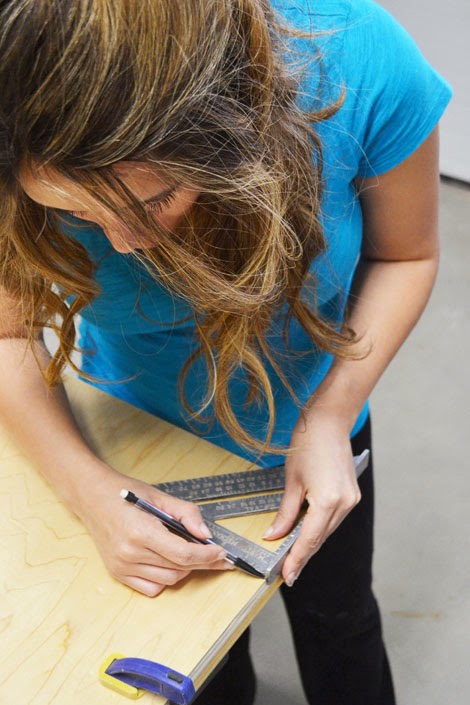
We first determined the depth we'd like the cabinets to be at - for us, with the full overlay doors and the back plywood panel, and the face frames subtracted out, we opted for a 22 1/4" wide rip.

Since I was seven to eight months pregnant while building these cabinets, I could not catch the plywood pieces as they were pushed through the tablesaw. The Ram modified our work table so it's the exact height of the table saw deck, so the table could do the work I couldn't.
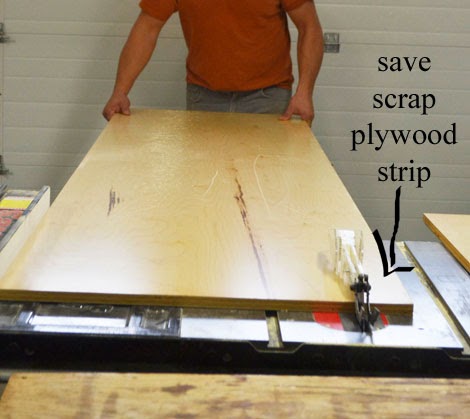
Then we ripped again the remaining piece so we've now got two strips 8 feet long, 22-1/4" wide. That leaves a little extra strip (about 3-1/2" wide) that we save for blocking and bracing.
For the sheets that had an imperfections - like this one has a few scratches - both sides of the PureBond Plywood are finished, so we just place the good side on the inside.
If you don't have a tablesaw at home, you can order plywood from PureBond that is in different sizes - check with them - or have your local home improvement store make the rips for you. But make sure you stress that it is crucial that the plywood rip width is consistent.
Another great option is to use the Kreg Rip-Cut - it's a miracle tool that fits on a circular saw and will give you very nice rip cuts with a circular saw. I thow a thin piece of foam underneath to support the sheets as I cut them.

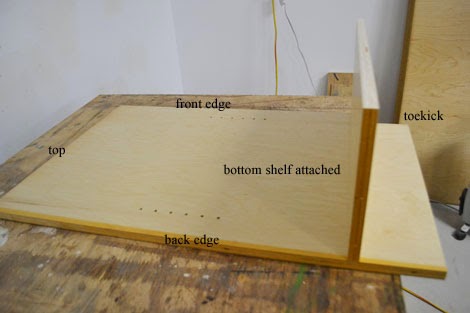
From the strips ripped 22-1/4" wide, we then cut sides 34-1/2" long. This is standard base cabinet height. We also cut bottoms and shelves out of the strips - this varies depending on the width of your cabients. I will be putting together plans for different base cabinets, to give you exact lengths to cut bottoms and shelves at.
Now on to the side panels ....

We took two side panels (22-1/4" x 34-1/2") and clamped them together
And then marked out the toekicks on the bottom,
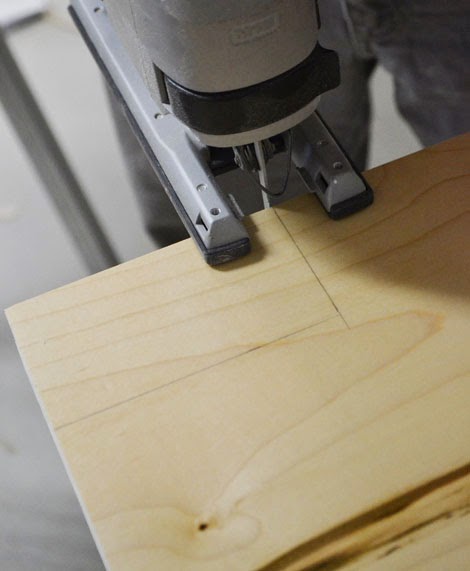
And then used a jigsaw to cut out the toekick,

Take your time and use the right jigsaw blade and ....

You can get a very nice cut with a jigsaw.
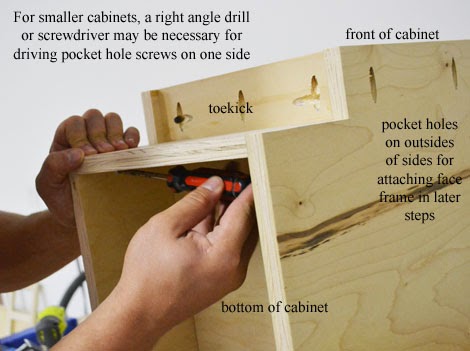
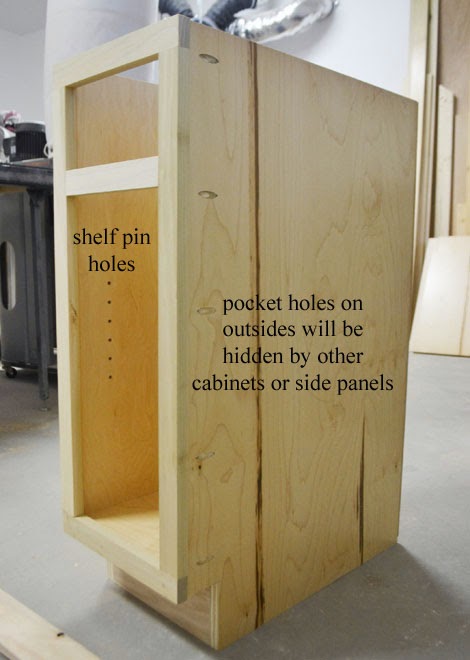
After the toekick is cut, there's two things we do to each of the panels before assembly. We drill shelf pin holes for adjustable shelves on the insides, and drill 3/4" pocket holes on the outsides for attaching the face frames.
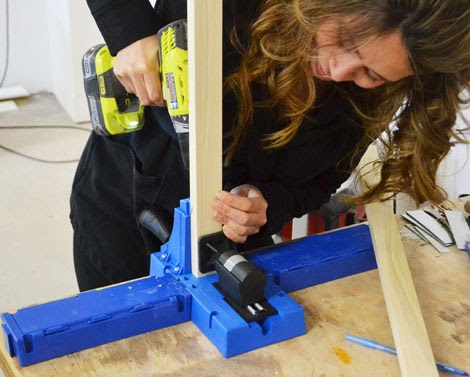
For the shelf pins, we used a Kreg Shelf Pin Jig,

Because we thought shelves would never be placed flush to bottom of cabinets, we decided to start our shelf pins about 8" from the bottom of the cabinet. So we cut a wood block 8" long, and used it as a pattern for starting the shelf pin holes.

And then just drilled one set of shelf pin holes in the center of the base cabinets. NOTE: Remember that the shelf pins need to be drilled on the insides, so in mirror on the two side panels. We actually marked all of our panels with big Os for outside (placing the prettier side inside) so we wouldn't mess up.
It's much easier to do this now, than later on trying to reach inside a cabinet - especially those smaller ones!
Once the shelf pin holes were drilled, we just have the pocket holes to drill on the outsides for attaching the face frames at the end.

We used the Kreg Jig to drill pocket holes on the outsides, about every 8" or so, along the outside edges (see the big O?). When the cabinets are installed, the neighboring cabinet hides the outside, so this is a slick way of attaching face frames without having to hide nail holes or pocket holes on the inside.

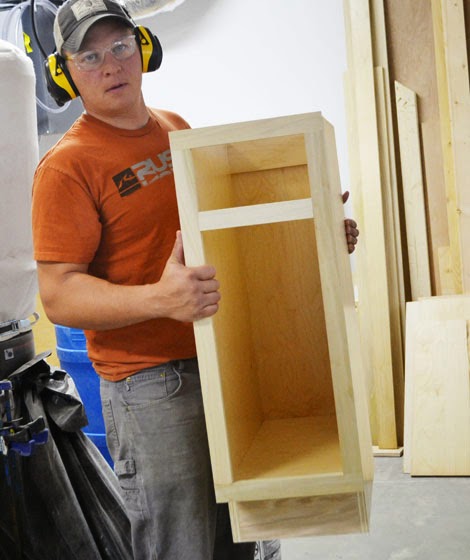
Here's a finished side panel (it's upside-down here). After the first cabinet was built, we got into production mode where we made up all the left sides and right sides, and then just had a big stack of side panels to go into assembly mode with.
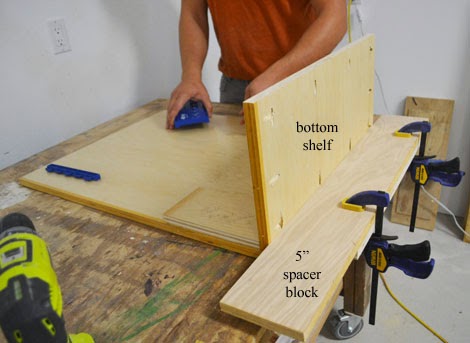
For assembly, we planned the cabinets so there was a 5" space under the bottom shelf, consistent on all base cabinets. So we cut a 5" spacer block and used it as a guide on all the cabinets.
The bottom shelves really only need pocket holes along the 22-1/4" wide edges to join to the sides.
Then we attached the bottom shelf to the side with 1-1/4" pocket hole screws.
So it looks like this from the back, with the shelf pins on the insides.
Normally, we'd have gone ahead and attached the other side in the same manner, but because this cabinet is a narrow one, we decided to attach the front base support next.
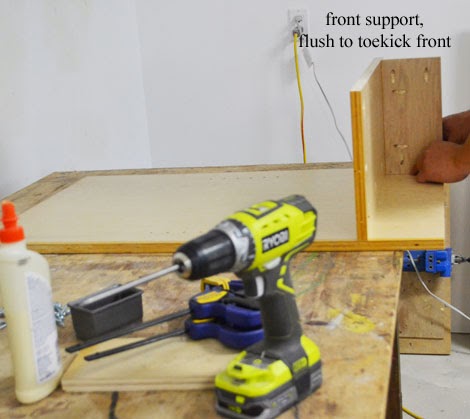
ATTACHING FRONT SUPPORT
Because the front support will get covered with a finished toekick later on, we opted to use unfinished plywood (it's cheaper) for this piece. It just gets attached with pocket hole screws too.
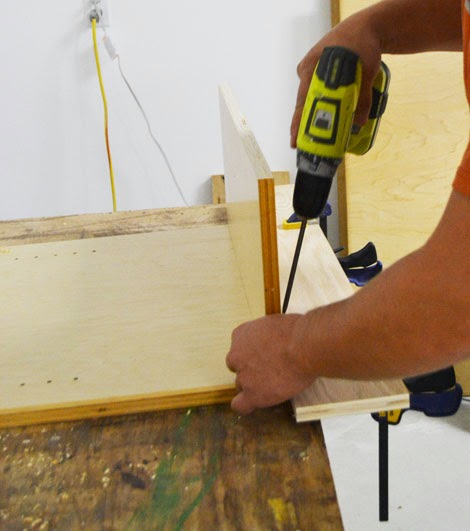
ATTACHING REMAINING SIDE
We don't have a right angle drill (Santa, I've been good!) so we had to use a screw driver to tighten up some screws on this narrow cabinet to attach the remaining side, but this is only an issue with cabients less than 15" wide.

ATTACHING ADDITIONAL BACK SUPPORTS
We also added a back support made from the scrap piece of ripped finished plywood (as it will show inside the cabinet) and a second support at the base along the back.
I'll detail all this in plans for those of you building kitchen cabinets.

The cabinets were plenty sturdy without a back, but I wanted to finish the back out just to make the cabinets nice inside for Mom. So we applied glue along back edges,
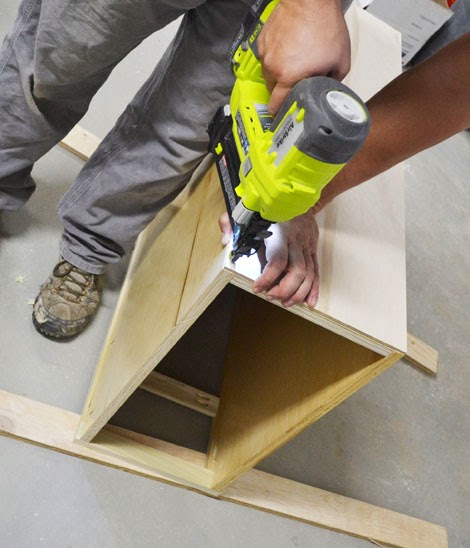
And then tacked the back on with 3/4" finish nails. We again used prefinished 1/4" PureBond Plywood for the backs.
That WAS my nailer once upon a time!
I'm glad he likes it too :)
Once the main carcass is complete, we can move on to the face frame.
Since we plan to paint, we used poplar boards, and cut them to length. Then drilled 3/4" pocket holes as needed.

This was the first project I used the K5 on ... and it's awesome!!!
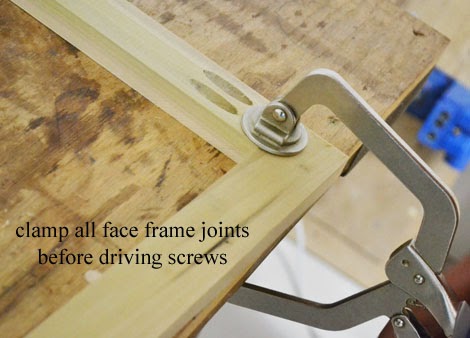
When building face frames, we always clamp the joints - it's just such a better joint if you do! No guess work, finger crossing, hope this works out - it's just clamp, drive the screw, and done!

We built the basic square outline of the face frame first,

And then went back and added additional rails for between drawers/doors,

Again, attaching with pocket holes.
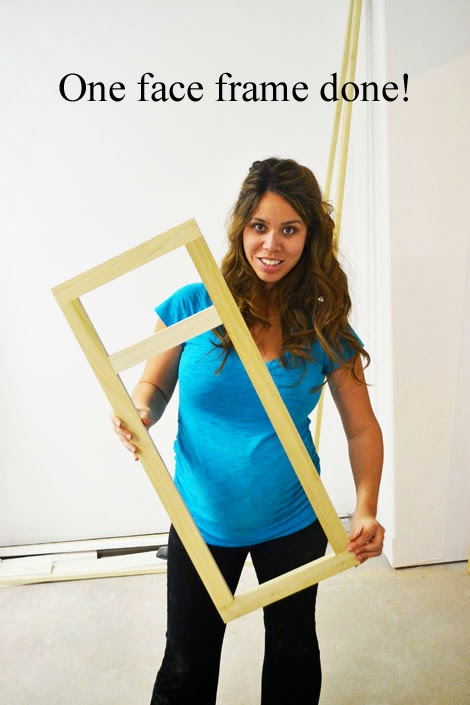
If there's anywhere you want to do a good job on cabinets - it's the face frame. Of course you want to do a good job building the carcass and everything - but it's that face frame that is a absolute must for perfection and precision.

Once the face frame is done, we layed it face down on the table.
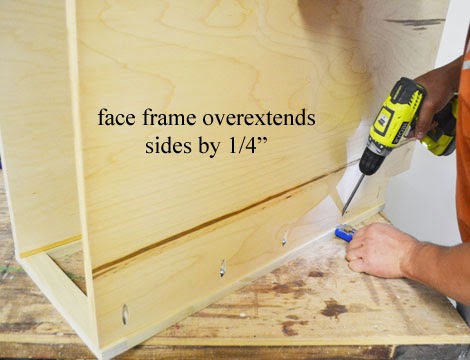
And then set the cabinet on top, with the face frame overextending the sides by 1/4", and attach it using the predrilled pocket holes and 1-1/4" pocket hole screws.
We do this for two reasons.
1. If your walls aren't perfectly square, you have some wiggle room between cabinets, but the face frames will still line up perfectly.
2. If you were at all "off" on building the carcass, the face frame will forgive you.
NOTE: We did not glue our face frames to the carcass at this step because we later removed them and painted them, and then replaced the painted face frame, gluing that time.
And then just flip the cabinet over,
And it's done!!!
The inside is fully finished, so all we have to do now is paint the face frame, throw a door and drawer in, and it will look like this:
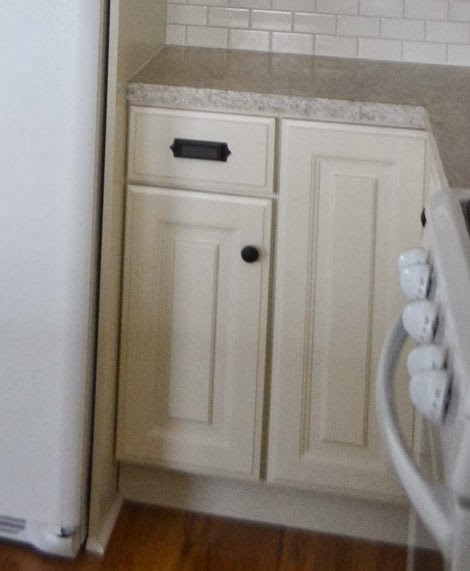
Yep, that's the same cabinet!
I will of course be sharing step by step plans for standard sized base kitchen cabinets over the next bit - so stay tuned for that!
Happy Building!
Ana
Comments
ksmith311
Thu, 11/14/2013 - 15:35
I've been waiting for you to
JoanneS
Thu, 11/14/2013 - 15:50
Marvelous!
CassieD
Thu, 11/14/2013 - 18:23
Whaaatttt?
UlrikeDG
Thu, 11/14/2013 - 23:12
I think I'm more impressed
Tsu Dho Nimh
Fri, 11/15/2013 - 06:29
Ratchet screwdriver -
Tsu Dho Nimh
Fri, 11/15/2013 - 06:36
DIY Prefinished Plywood :)
Marybaileycole
Fri, 11/15/2013 - 07:24
Holy WOW
In reply to Holy WOW by Marybaileycole
Marybaileycole
Tue, 11/26/2013 - 12:09
follow up
liquid6
Fri, 11/15/2013 - 07:53
Drawers
In reply to Drawers by liquid6
Ana White
Fri, 11/15/2013 - 10:37
Drawer Tutorial
pblomberg
Sun, 11/17/2013 - 11:41
Excited to see the newest
stevendhall
Sun, 11/17/2013 - 15:36
cabinet doors
orangesugar
Tue, 11/19/2013 - 07:06
Sawstop
orangesugar
Tue, 11/19/2013 - 07:06
Sawstop
KLHA
Thu, 01/16/2014 - 08:32
base cabenit depth
emilybear75
Fri, 05/09/2014 - 14:55
base cabinet depth
bowersrd
Sun, 02/22/2015 - 18:17
Plywood Size
Just one thing I am confused about. In the seven sheets you said it took, at home depot, they have varying sizes and it seems you all used large pieces. The largest I can order is 4x4 Maple Plywood by PureBond.
Is this the correct size? Thanks for any help!
In reply to Plywood Size by bowersrd
Ana White
Mon, 02/23/2015 - 12:29
size
No you would need the full 4x8 sheets, should be available off the shelf?
bowersrd
Tue, 02/24/2015 - 08:02
Size
Did you special order from Home Depot? I contacted them and two stores have said that they do not order 4x8. I have been searching somewhere that sells prefinished maple in 4x8.
Thanks!