


tutorial for industrial pipe bed from Ana-White.com


Happy Friday Folks!
I can't tell you how excited today to share these brand spanking hot off the press plans with you today!!!
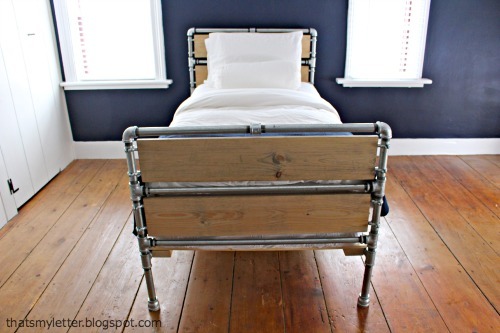
My dear friend Jaime from That's My Letter wanted to collaborate on a industrial style bed for her son's room, so we hatched a plan involving screw together iron pipes and wood slats. And this is what Jaime came up with!
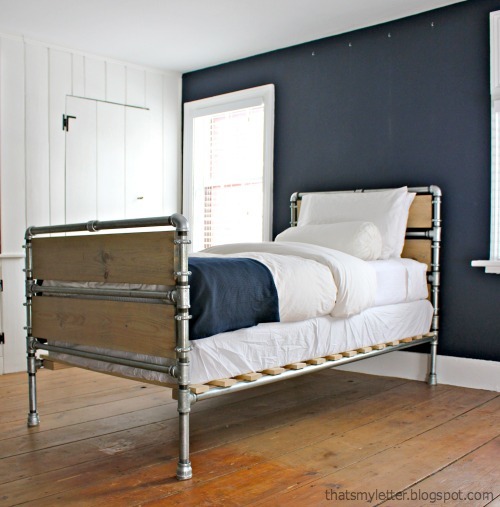
What could be better than a bed made of iron pipes? Why one with some wood mixed in too!
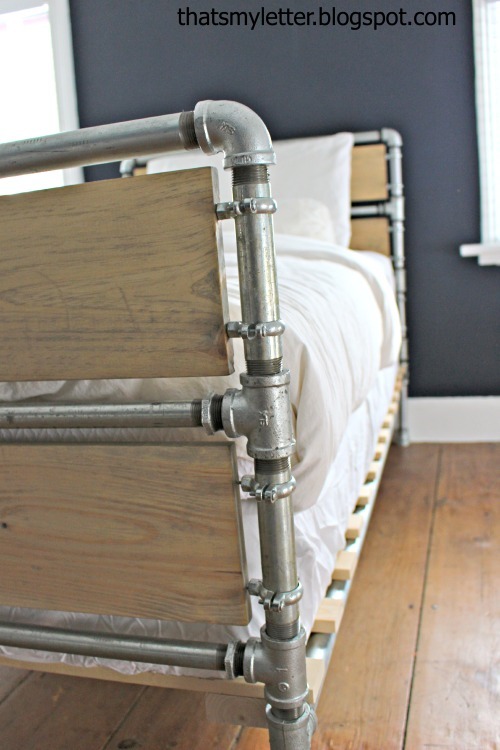
This is truly a one-of-a-kind unique piece, that you can only get by DIY-ing!

Are you smitten or what???
Jaime has been so generous to share these plans with you below - seriously, this one really is all her and her step by step instructions are meticulously detailed - so please, take a sec to stop over and check out her building post and say THANK YOU for this awesome tute!
Thanks Jaime!!!
Plans follow!
Have a great weekend. XO Ana + FAM

Preparation
Shopping List
2 – 1x8x8 pine boards
1 – 1x8x6 pine board
2 – 2x4x8 studs
8 – 1x3x8 furring strips
2” wood screws
1 ½” wood screws
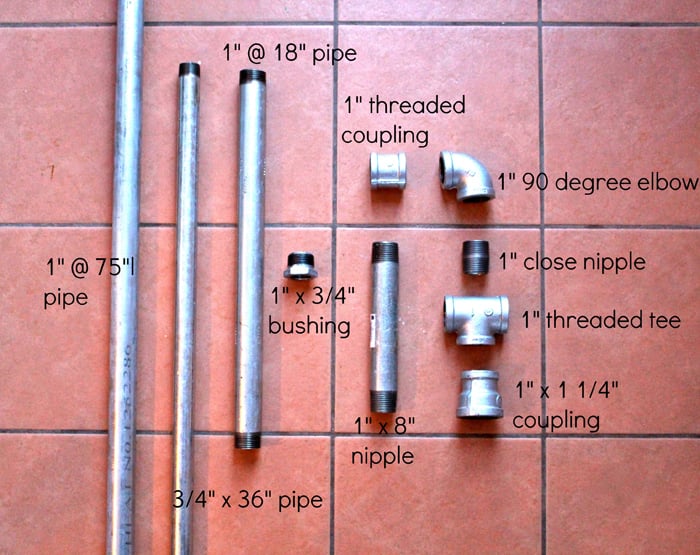
ALL GALVANIZED STEEL:
*2 – 1” pipe @ 75”l
*4 – 1” pipe @ 18”l
5 – ¾” pipe @ 36”l
14 – 1” nipple @ 8”l
4 – 1” close nipple
14 – 1” threaded tee
4 – 1” 90 degree elbow
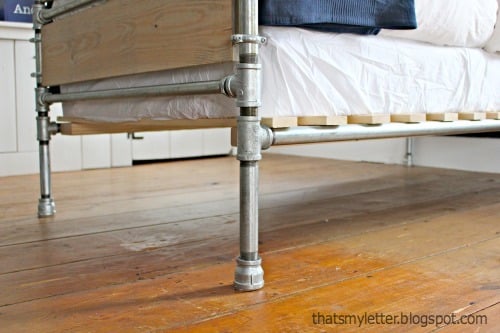
4 – 1” x 1 ¼” coupling (feet)
2 – 1” threaded coupling
10 – 1” x ¾” bushing
20 – 1” split ring pipe hanger
http://www.homedepot.com/p/Cramik-Enterprises-1-in-Galvanized-Split-Rin…
*cut to length and threaded at hardware store
WOOD CUT LIST
5 – 1x8 @ 37 ¾”l (wood slats)
2 – 2x4 @ 74”l (platform supports)
16 – 1x3 furring @ 41 ¼”l (mattress supports)


Please read through the entire plan and all comments before beginning this project. It is also advisable to review the Getting Started Section. Take all necessary precautions to build safely and smartly. Work on a clean level surface, free of imperfections or debris. Always use straight boards. Check for square after each step. Always predrill holes before attaching with screws. Use glue with finish nails for a stronger hold. Wipe excess glue off bare wood for stained projects, as dried glue will not take stain. Be safe, have fun, and ask for help if you need it. Good luck!
Instructions
Step 1
Notes: No glue was used on any pipes or pipe-to-wood connections. Only hand tighten until your are confident of pipe placement, it took me multiple tries to get it all connected just right – lots of screwing and unscrewing to figure out the proper connections - but that’s the beauty of working with pipe.
The most difficult portion will be connecting the siderails to the footboard and headboard since the pipe screws together in the same direction on both ends (if you’re screwing in one end essentially you are unscrewing the other end simultaneously). Follow the step by step instructions carefully.
Step 2

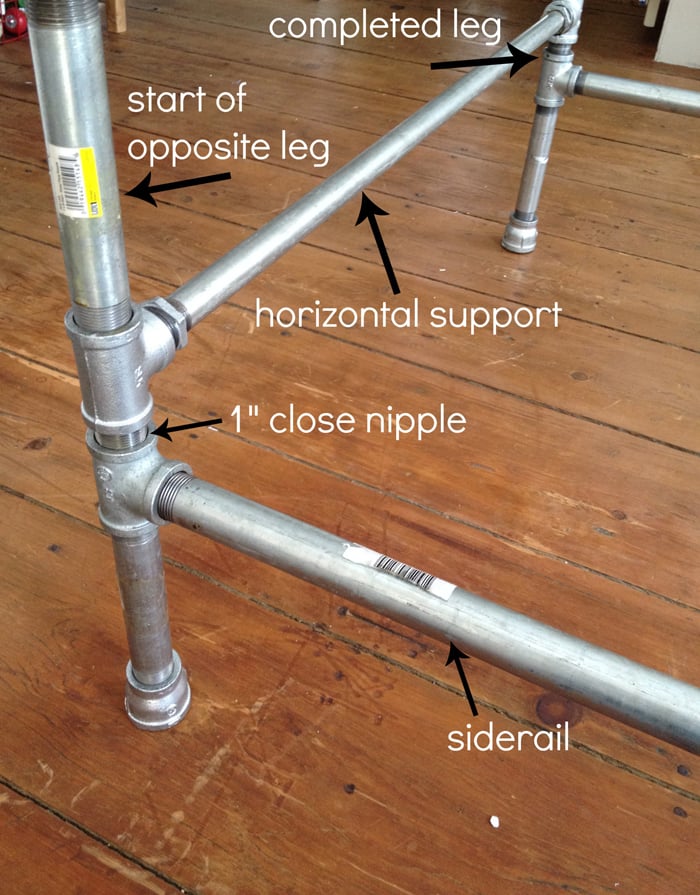
Build only one leg of the footboard as shown by screwing the pieces together until snug.
Step 3
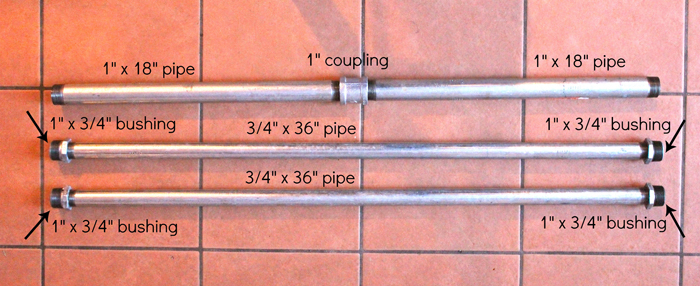
Prepare horizontal pipe support pieces as shown.
Step 4
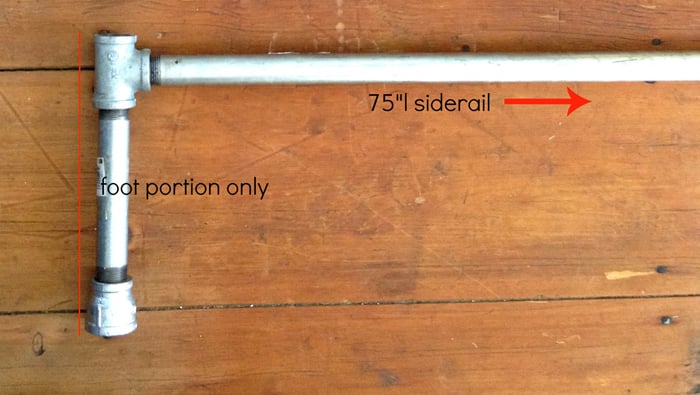
Prepare ONLY the foot portion of the other leg (1 x ¼ coupling, 1” x 8” nipple and 1” threaded tee) and connect 1” x 75”l pipe to this foot portion only.
Step 5
Step 6
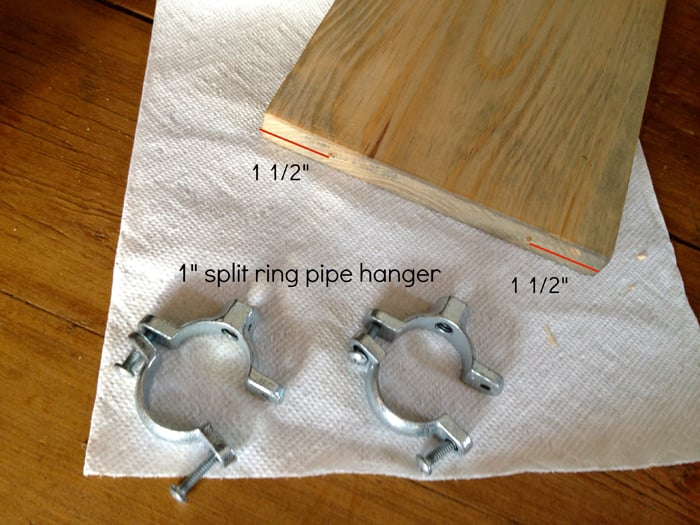
Prepare wood slats. Predrill 1 ½” from outer edge for 2 split ring pipe hangers.
Step 7
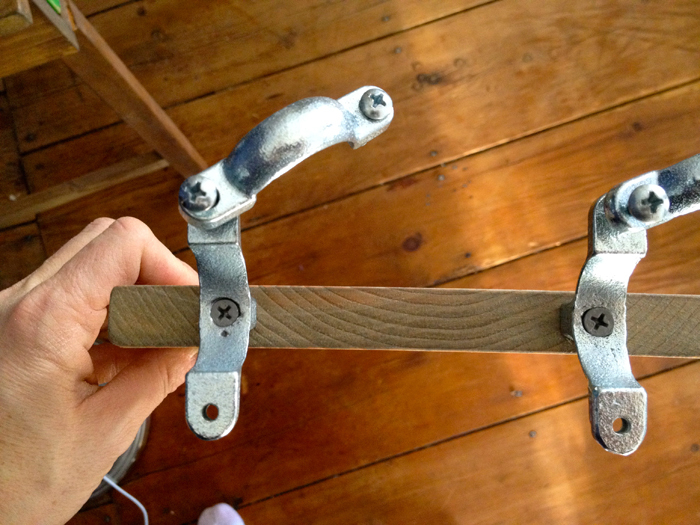
Attach pipe hangers using 2” wood screws, be sure hanger is perpendicular to wood board
Step 8
On the footboard slip one end of wood slat into completed leg side of footboard then with other end of wood slat in place screw in the next 1” x 8” nipple pipe piece. DO NOT TIGHTEN PIPE HANGERS YET.
Step 9

Screw on next tee piece then screw next ¾” horizontal support pipe piece:
• Tip: screw horizontal pipe all the way into the completed leg side first then connect to other leg. It’s a give and take with the horizontal pipes and bushing pieces because they all screw in the same direction, eventually they will get tight just keep working back and forth from one side to the other.
• The paper towel wrapped around the joint is preventing oil from dripping onto the floor. (The ¾” x 36” pipe is a stock item but my Home Depot was out at the time therefore I had to have those pieces cut, when they cut the pipe they use a thick dark oil which seeps a bit once settled.)
Step 10

Center wood slat between horizontal pipes with even spacing on both top and bottom then secure pipe hangers to pipes with equal pressure on both screws.
Step 11
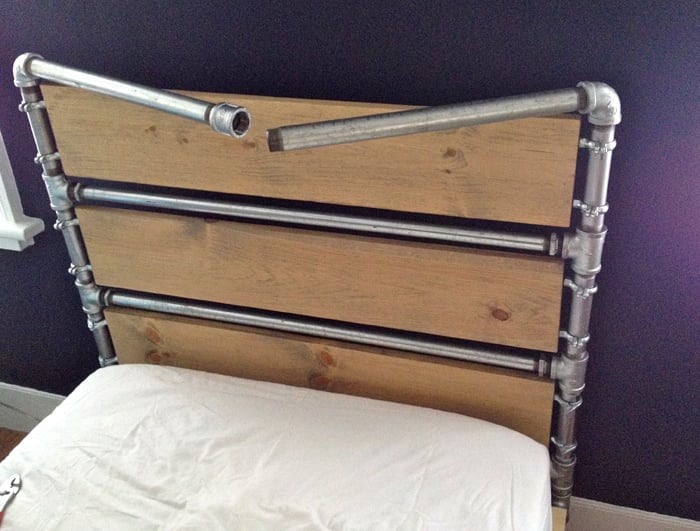
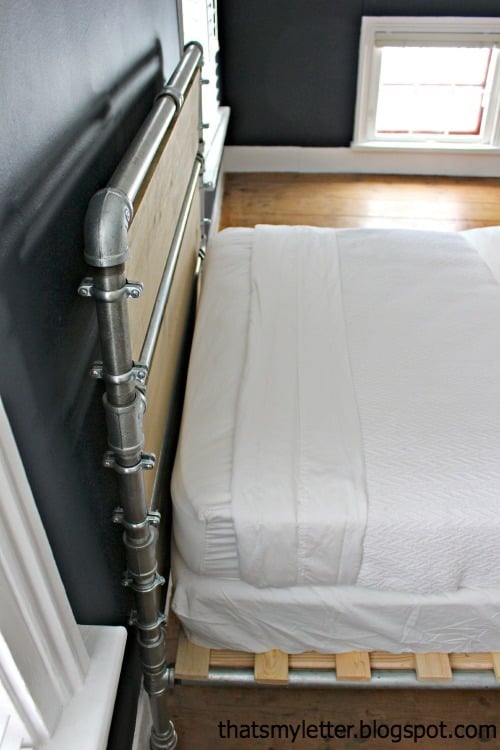
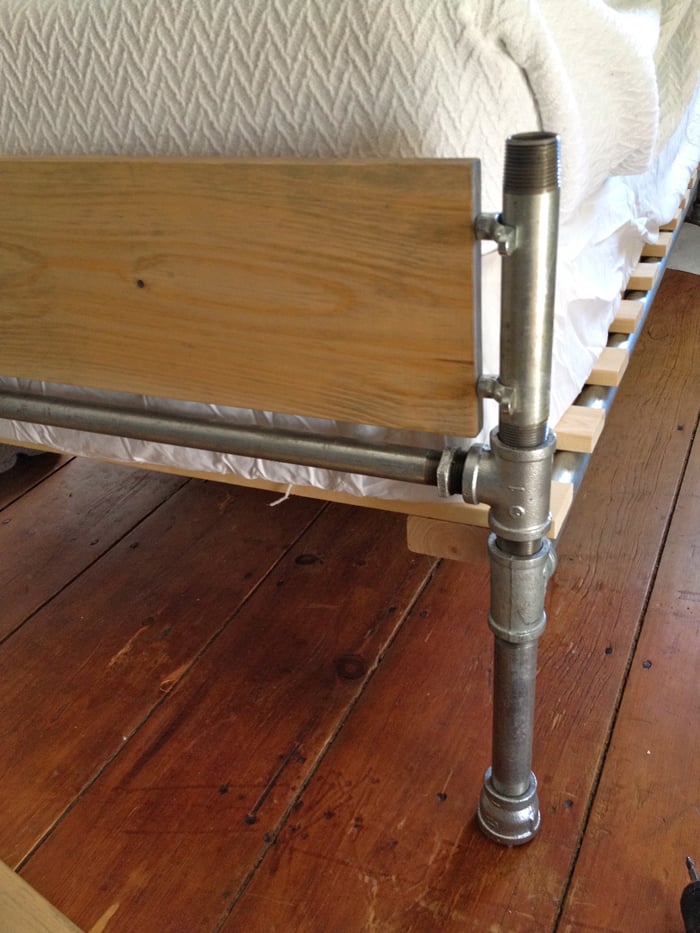
Prepare the next wood slat and repeat the process adding another 1” x 8” nipple. On top of the nipple screw in one 90 degree elbow. On the open end of the elbow screw in one 18” piece of 1” pipe and on the completed leg side screw in the other 18” pipe with a coupling. Tighten the pipe hangers and screw together the middle portion of the coupling and pipe.
(headboard pictured above but we’re finishing the footboard)
REPEAT steps 8 – 11 for the headboard.
Step 12

Build the mattress platform. Attach cross supports to studs using countersink and 1 ½” wood screws.
Step 13

Add mattress and bedding!
For more pics, info and details, please take a second to visit Jaime at That's My Letter.
It is always recommended to apply a test coat on a hidden area or scrap piece to ensure color evenness and adhesion. Use primer or wood conditioner as needed.
Comments
DecorSanity
Sun, 02/23/2014 - 10:07
This bed is so creative, and gorgeous!
Wow, I am super impressed Jaime & Anna. A lot of times we do knock-offs, which is awesome because the pieces are classic, but you've come up with something totally original and awesome! I love the combo of the pipe and the warm wood. It looks stunning on that wood floor Jaime. Great job!!
Daisies and Crazies
Tue, 02/25/2014 - 15:03
So hip!
I. LOVE. THIS.
Carpenters_Daughter
Thu, 08/28/2014 - 22:19
This is so creative!!
This look is awesome! This is totally outside of the box for me. My husband and I want to adapt it to make a futon that converts to a bed for our craft/guest room. Any ideas on how we can make this work?
babcockam
Fri, 10/17/2014 - 10:06
Cost of Project
I Love this bed! I would like to make 2 of them for a couple teenage boys. Can you tell me the rough cost for 1?
Thank you!
daemon82
Thu, 09/10/2015 - 17:21
cost for pipe bed
We were really interested in building this project, but we priced it out at our local hardware store and it came to around $300. It's really cool looking, but I don't think we'll end up doing it.
Jethro
Wed, 09/20/2017 - 11:09
Want a Kit For This?
Apologies for coopting this post, but I think it's useful information: if anyone wants the parts or a lit for this project, I have them. And I'll customize to suit your requirements too. BEST OF ALL, my pipe is already cleaned and painted.
Jethro
Wed, 09/20/2017 - 11:13
Want a Kit For This?
Would anybody like a kit for this? I have a little store that sells already cleaned and painted iron pipe parts (at about the same price as the big box guys sell their nasty greasy stuff), and I'm wondering if anyone would like to see this project turned into a kit?
Jgill
Sat, 01/27/2018 - 10:38
interested in kit
HI! I would be interested in a kit for this. Please send details to jagcagdesign@gmail.com
swanwhitecurtain
Fri, 02/23/2018 - 13:24
Tee fittings and bushings
To cut down cost, instead of buying 1" tee fittings and then 1"x3/4" bushings to accomodate the 3/4" horizontal pipes, could you buy 1" tee fittings that reduce to 3/4" in the center? Would that be any different?
In reply to Tee fittings and bushings by swanwhitecurtain
barbara-kramer…
Fri, 03/11/2022 - 13:31
Because you’re using two 18”…
Because you’re using two 18” x 1” with a coupler, you would come up short on the 36” x 3/4” without the bushings. The coupler adds about 1/2” length (depending on how much you tighten it) but you’ll compensate for that extra length with the bushings.