
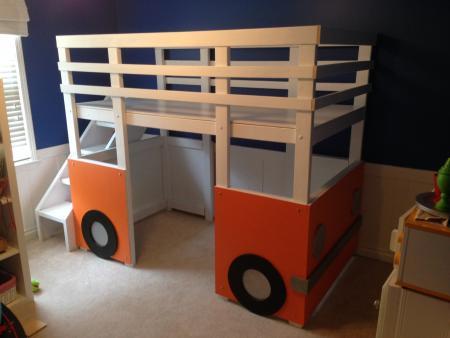

Dream kids beds can come true! This DIY surf bus or van loft bed is easy to build with step by step plans, including diagrams, shopping list and cut list. Average cost: $225 in materials
Kevin modified this bed plan for his son, and built it (including paint, hardware, etc) for about $225 with basic tools - circular saw, drill, jigsaw, and a pocket hole jig.
Here's from Kevin:
"I wanted a design that could be easily moved without totally destroying it, hence the lag bolt design. I built the bed in our garage, painted it, then took it apart to move upstairs into the bedroom. I did this mostly because I was working on it in the evenings after the twins were in bed.
Also, I am a civil engineer and have a professional engineering license that would allow me to design a bridge or skyscraper – needless to say this thing is sturdy! I didn’t want to worry about it falling down if the whole family was up in it."
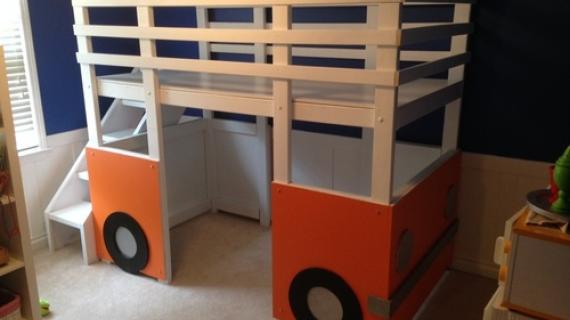
Also check out Kevin's brag post here.

Preparation
3 sheets of 1/4" to 1/2” plywood, paneling or MDF (this is just decorative cover of the bus part)
16 - 2x4 @ 8 feet long
5 - 1x3 @ 8 feet long
3 - 1x4 @ 8 feet long
2 - 1x6 @ 10 feet long
2- 1x2 @ 8 feet long (for front grill)
8 - Lag bolts (4” bolts) – the bed deck is easily removable (can also just use 3" screws to attach together)
2-1/2" pocket hole screws
1-1/4" finish nails or screws (for attaching plywood)
2" wood screws (for attaching upper rails)
BED PLATFORM
2 - 2x4 @ 39"
2 - 2x4 @ 72"
3 - 2x4 @ 36"
1 - 1/2" plywood or MDF @ 39" x 75"
BED LEGS
8 - 2x4 @ 73"
8 - 2x4 @ 17"
4 - 2x4 @ 39" (end supports)
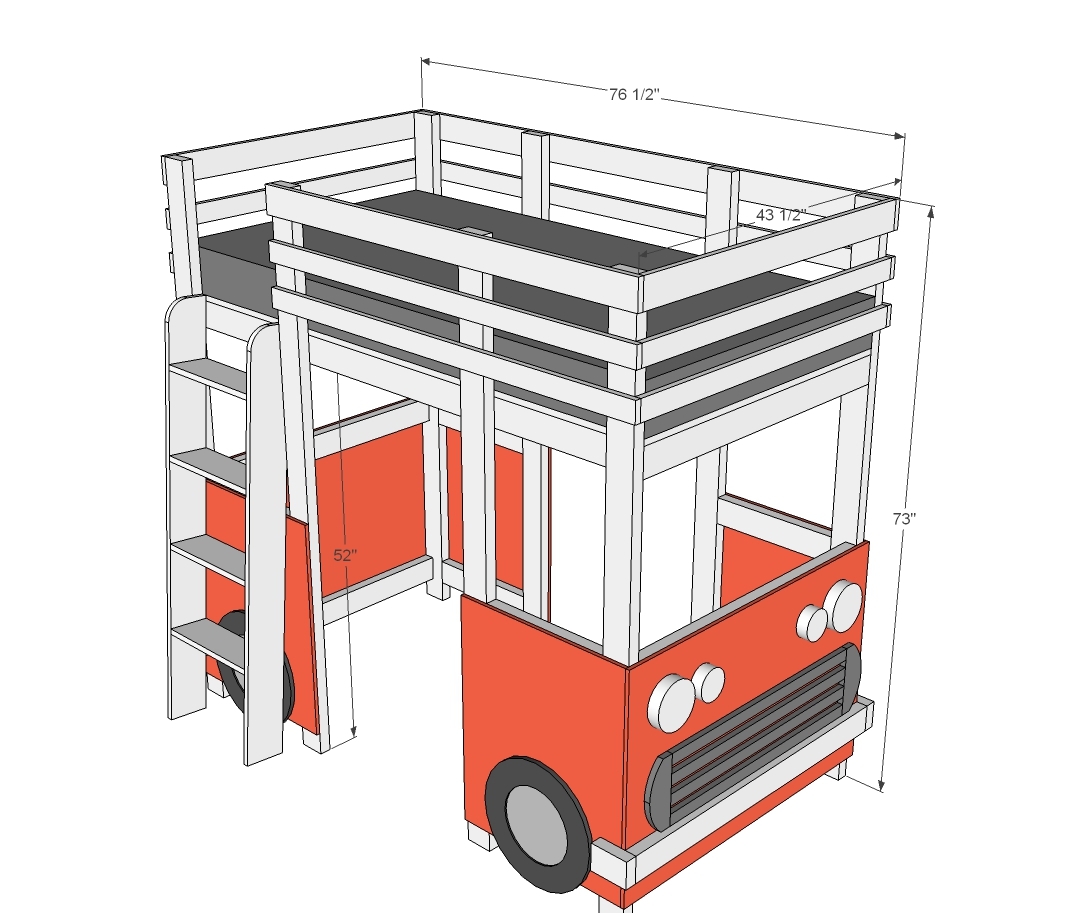
UPPER RAILS (measure and cut to fit)
1 - 1x4 @ 75"
2 - 1x3 @ 75"
1 - 1x4 @ 54 1/2"
2 - 1x3 @ 54-1/2"
1 - 1x4 @ 42-3/4"
2 - 1x3 @ 42-3/4"
1 - 1x4 @ 43-1/2"
2 - 1x3 @ 43-1/2"
BOTTOM PLYWOOD
4 - 1/2" plywood or MDF @ 29" x 24"
2 - 1/2" plywood or MDF @ 29" x 43"
LADDER
2 - 1x6 @ 56-1/2" (shortest point measurement, bottom end cut at 5 degrees off square)
4 - 1x6 @ 15-1/2"
ACCESSORIES
Wheels are 16" diameter circles cut from the plywood scraps
Grill is 4 - 1x2 @ 32" and 2 - 1x4 @ 9"
Bumpers are 2x4 - cut to fit Headlights are 4" and 6" rounds (can cut from plywood or try craft stores for precut wood rounds)


Instructions
Step 1

Frame up the bed platform with 2x4s. Use 1-1/2" setting on your pocket hole jig to drill holes, and attach with 2-1/2" pocket hole screws.
Step 2

Attach 1/2" plywood or MDF to top of framing. Use either glue and 1-1/4" finish nails or 2" wood screws.
Step 3

Build four legs as shown in diagram with 1-1/2" pocket holes and 2-1/2" pocket hole screws.
Step 4

Mark each of the leg sets at the height you want the bed. Then attach the bed platform to the legs from the inside with 2-1/2" screws or lag bolts.
Step 5

Step 6

Next attach the end rails to the legs and side rails with the 2" wood screws.
Step 7

Drill 1-1/2" pocket holes on each end of the 2x4 bottom supports and attach with 2-1/2" pocket hole screws.
Step 8

Cover the base of the bed in plywood or MDF - use the 2" wood screws if you need the pieces to be easy to disassemble. Otherwise you can use nails and glue.
Step 9

Cut the wheels out of scrap plywood and attach to side panels. Use a single bolt in the center if you'd like those wheels to spin.
Step 10

Cut to fit bumpers for the front and back.
Build the grill with 3/4" pocket holes and 1-1/4" pocket hole screws and attach with finsih nails and glue to front.
Headlights are 4" and 6" rounds that can be cut from plywood.
Step 11

For the ladder, attach the rungs on underside with 3/4" pocket holes and 1-1/4" pocket hole screws and glue. Round top edge with jigsaw. Attach with screws to inside of 2x4s on bed.

Comments
dbovill
Tue, 04/08/2014 - 13:22
Side Stairs
This plan includes the details for the ladder but the bed is picture with the side stairs. Do you have the plans for those as I'd rather have those for my three year old.
Kevin Jehl
Thu, 04/10/2014 - 04:55
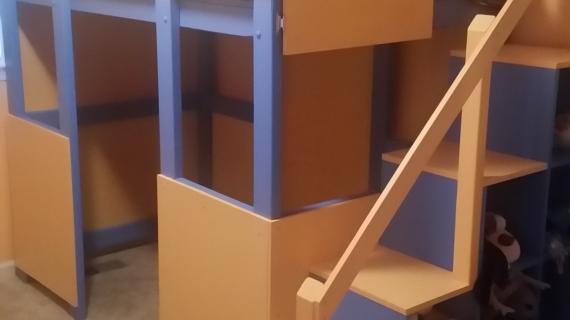
Stairs
I made the stairs with some leftover 3/4" birch plywood that I had laying around from a built-in bookshelf project I'd done. (although MDF would work just fine too)
The plywood was 11" wide. All I did was cut it at 45 degrees (because I had a carpenter's square that allowed an easy cut at that angle) at a length that would square it with the floor and top of loft deck. I then squared off the overhang.
After that I just added steps, in my case 5 steps felt like the right number (again, done with leftover plywood scraps).
I trimmed it out with simple trim and then painted it white.
Sorry I didn't keep any measurements, the ladder was basically just thrown together quickly!
Livia
Fri, 08/08/2014 - 17:13
Paint
I love your bed! Planning on making one for my sons' car themed room. Curious about what type of paint you used and if you painted the boards prior to building? Thanks so much and great job!
Livia
Luciana-
Sat, 02/06/2016 - 21:40
kreg jig?
I do not understand what a kregjig is? what exact kregjig did you use for the bed? and is there any other safe way to make this bed without using that special tool? also, I wondered if you have more detailed steps showing where the screws/bolts are and how they are applied. Thanks for the share.
Luciana-
Sat, 02/06/2016 - 22:37
Thanks
Thanks for the nice plans, Do you happen to have a more etailed plan of where the screws are placed and what size?