


Tips on building a tabletop from Ana-White.com
Instructions
Step 1
Build Tabletop First
Build your tabletop before your table base, if you can. Because board widths can vary, sometimes your tabletop comes out a little smaller (or bigger) than you intended. If your base isn't built yet, you can alter the base size to fit the tabletop you built.
Of course, you can always cut down a too big tabletop, or add more boards to make a small tabletop larger.
Step 2
Plan Your Tabletop to Minimize Scrap
If you are building a table without a plan, consider designing your tabletop size so there's minimal board waste. For example, you can get three 31-3/4" cuts out of an 8 foot long board. Or two 47-3/4" long cuts out of an 8 foot long board.
That said, if I had to choose between less scrap boards and getting the tabletop size that perfectly fits my space, I'd go for the perfect tabletop size. Just because it's scrap doesn't' mean it's waste.
Step 3
Find the Happy Medium on Board Widths
Consider building your tabletop out of boards about 6" wide (1x6 or 2x6), or close in size (I use x4 and x8 boards on occasion). If you go smaller, you'll be adding more joints, which means more pocket holes and more sanding. If you go with a wider board, the board itself may cup over time, creating high and low points on your tabletop. I personally find x6 boards to be that happy medium.
Step 4

Cut Your Boards Long
Cut your boards a little long. Then when you go to assemble your tabletop, build it so one end of the boards are flush, but the opposite ends are long (and most likely uneven). Then when you finishing joining your boards, you can go back and trim the uneven long ends for a perfect tabletop.
TIP: To save on cutting when your tabletop is 48" (or half the length of your boards), simply cut a 8 foot board in half. Join the boards, with the cut edges flush, and then trim the uncut factory ends off square.
TIP: To help you attach boards square on one end, clamp a square board to your tabletop, perpendicular to the tabletop boards. As you assemble the tabletop, keep one end of the boards flush to the clamped board.
Step 5

Preventing Cupping
That square board you are about to build a tabletop with used to be part of a round tree. Over time, your boards may cup, meaning the center of the board - widthwise - may rise or fall inward, simply because the grain of the wood is curved. To prevent your entire tabletop from cupping one way, alternative the end grain of your boards.
Step 6

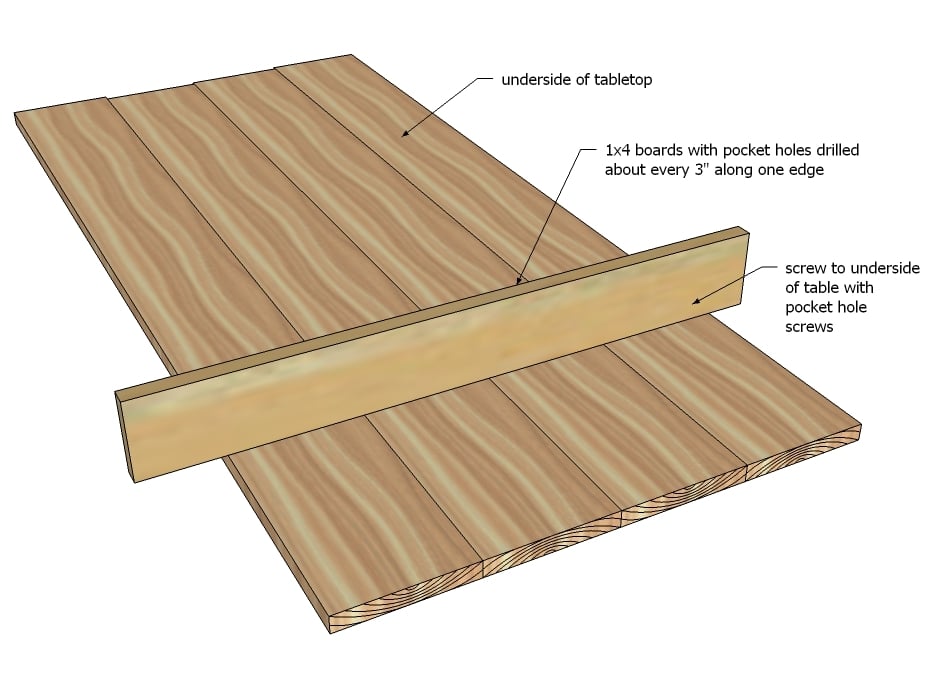
Use Pocket Holes to Join Board on Underside
I wish we all had a joiner and a planer and a biscuit joiner at our disposal - but the good news is you can still use a pocket hole jig to build a very nice tabletop (the same tool you'll use to build the table's base).
Drill pocket holes along one edge of all but one of the boards. Start with the board that has no pocket holes and work outward, attaching with pocket holes. Use clamps to ensure your joints are even, and work off a level surface.
Use glue between the boards, but make sure you wipe off excess glue (glue will prevent stain from soaking in).
Step 7
Strongbacks
We call them strongbacks and we use them on every tabletop we build. It's just a scrap strip of 3/4" plywood, with 3/4" pocket holes drilled about ever few inches. The strongback is attached to the bottom of the tabletop as the glue dries. The square edge of the plywood prevents the tabletop from warping or cupping as it dries. Then we remove the strongbacks (and save them for the next tabletop) when we attach the tabletop to the base.
TIP: If you are concerned about cupping, consider cutting to fit permanent strongbacks, hidden on the underside of your tabletop.
Step 8
Sanding
Sanding is definitely a dirty word around here. If you are sanding a tabletop, you are going to come back covered in sanding dust.
We use a belt sander for the first sanding, using the belt sander to minimize any differences in height between boards. Be careful to only sand in the direction of the wood grain. Any cross marks might not be discernible until you go to stain the tabletop.
After the belt sander, we finish the tabletop with a palm sander in a fine grit sandpaper. Of course, I sand between coats of poly too, so don't put that sandpaper away just yet.
Step 9
Attaching the Tabletop
I love being able to use pocket holes to attach a tabletop from the underside, so no screw holes are showing. This works great for projects that have plywood sides or large aprons, or small tabletops.
But when you get a much larger tabletop (especially ones with small aprons or no plywood underneath)- you've got more opportunity for movement. A small cupping across each board can become substantial across an entire tabletop. Consider attaching your tabletop with tabletop fastners. You just make a small cut in the aprons with a circular saw, insert the tabletop fastner (also called Z-Clip) in the cut, and attach other end to the underside of the tabletop.
It is always recommended to apply a test coat on a hidden area or scrap piece to ensure color evenness and adhesion. Use primer or wood conditioner as needed.
Comments
freefromburdens1
Wed, 05/14/2014 - 18:37
Great post. Thanks. I really
Great post. Thanks. I really needed this.
Veronica
dmcarwin
Thu, 05/15/2014 - 15:41
Love this!
I really love this post, especially the strong back part! Good to know! Pinned!
Hokulani1
Tue, 05/20/2014 - 08:33
table fasteners
Great tips! I'm not quite clear when to use table fasteners. I've built your farmhouse table a couple of times which I would think is larger and has no plywood underneath. I assume I didn't need them for it since you didn't mention it. Do you have an example of a project that would need them? Thank you!
DonAndStaci
Wed, 05/10/2017 - 09:19
Make it last
If you want your table top -- any table top -- to actually ast without bowing/cupping/twisting, you MUST attach it in a manner that allows for seasonal wood movement. Wood is an organic product, and it naturally expands and contracts with changes in temperature and humidity. I'll post link below to a couple of options that you can cheaply buy which will allow you to securely attach a tabletop while still giving the wood the flexibility to move with the seasons. When you buy decently-made furniture at a store, they all accommodate for this one way or another. Don't just screw the top down to the legs or the skirt...you'll regret it later on.
Z-fasteners:
http://www.rockler.com/table-top-fasteners
Figure-8 fasteners:
http://www.rockler.com/desk-top-fasteners
There are YouTube videos that show how to attach tabletops using both of these tried and true methods. If you don't have a router or a biscuit joiner to make the holes for the z-fasteners, you can always use a drill. For the figure-8's, you need to recess them so they're flush with the apron...so for that, you would need to use a router. If that's not somethig you can do, I suggest sticking with the Z-fasteners. Best of luck!