


Free DIY plans to build small modern rolling storage cart - ana-white.com


DISCLOSURE - I'm super excited to partner with The Home Depot to host and design plans for the DIH Workshop. I am being compensated for my work, but all opinions, giddy squeals and enthusiasm are my own.
I can hardly wait!!!
Tomorrow night (Thursday, August 21, 2014), from 6:30-8:00, is the Home Depot DIH Workshop - Rolling Storage Cart!!!

I'll be hosting the Midtown Atlanta Home Depot Workshop in person! Yep, we flown across the world, to get to build with you Atlanta folks!
As part of this workshop, I've been asked to build my own custom version of this cart.
But before we get to my version, let's enjoy the versions made by some of my blog friends, who will also be hosting this workshop in their local areas:
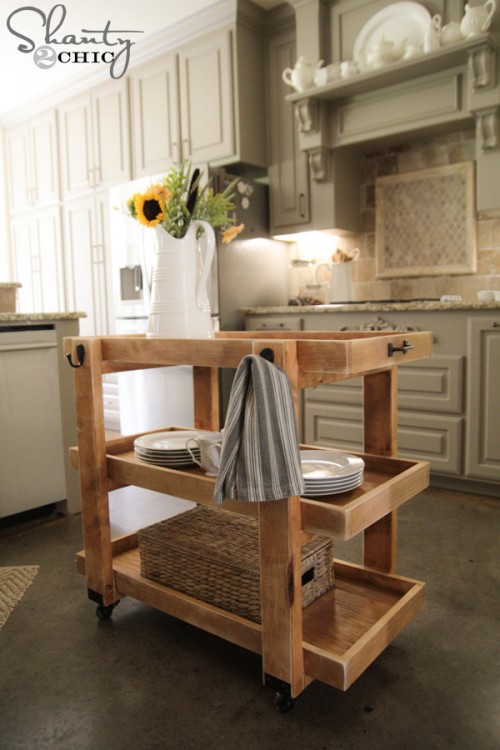
- Whitney and Ashley of Shanty 2 Chic will be at the Live Oak Home Depot in San Antonio. I love their stained version with hooks and handles!
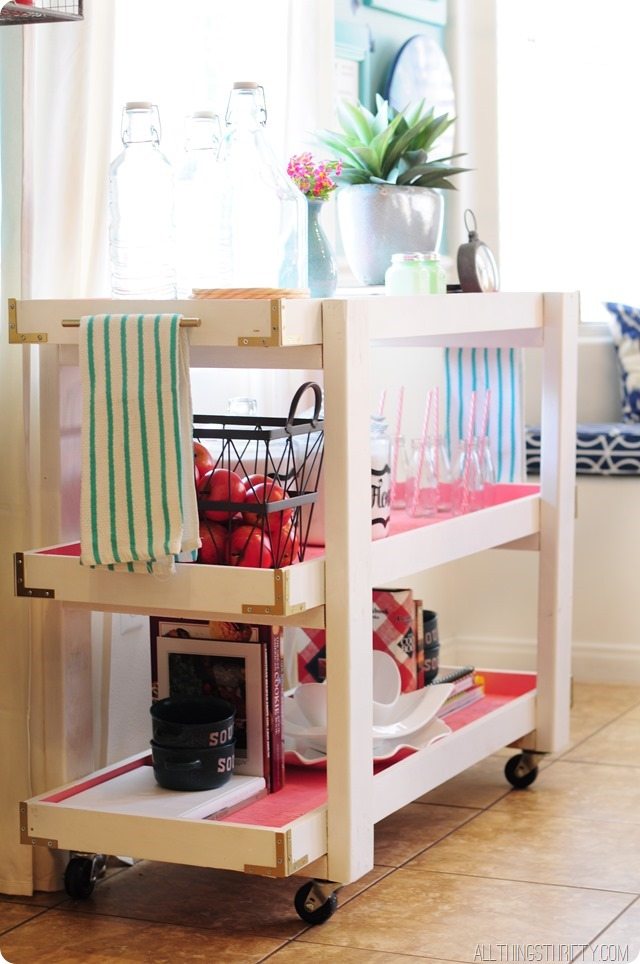
- Brook Ulrich of All Things Thrifty will be at the West Valley City Home Depot in Salt Lake City. Brooke added pink shelves and hardware at the corners for kitchen storage as well.
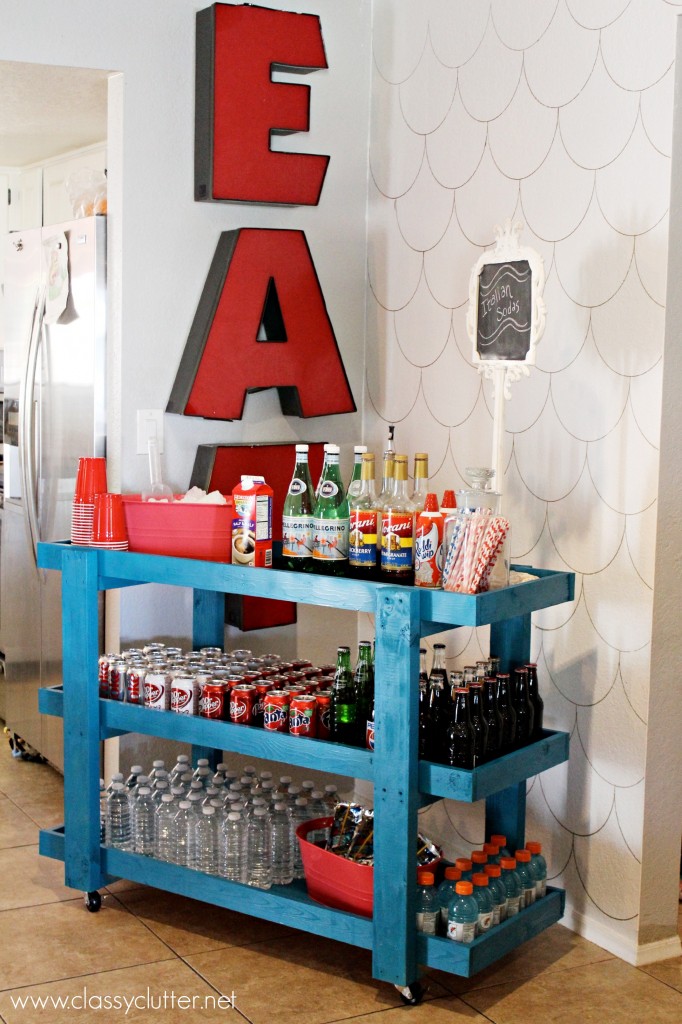
- Mallory and Savanah of Classy Clutter will be at the Strongsville Home Depot in Cleveland. I love the blue and chalkboard shelf on their beverage cart variation.
And don't forget - a few more of my blog friends will be hosting this workshop at their local Home Depots:
- Randi of Dukes and Duchesses will at the North Ft. Worth Home Depot in Ft. Worth
- Kim of Too Much Time on My Hands will be at the Brighton Home Depot in Denver
- Kelly Rowe of Live, Laugh, Rowe will be the Edwardsville Home Depot in the St. Louis area
And of course, at all Home Depots across the country, the workshop will be held by knowledgeable associates, so please register and join in on the fun!
I can't wait to see the variations you all come up with!!!!! Please share!
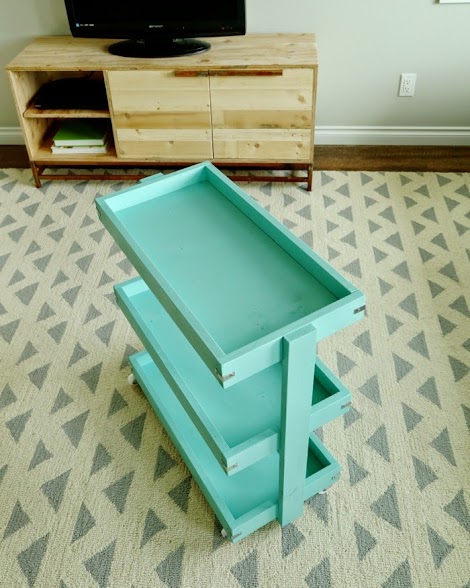
And now for my version ....

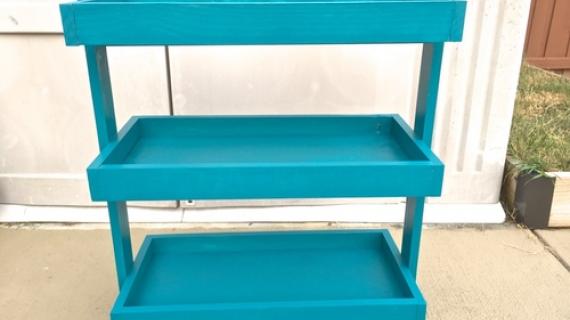
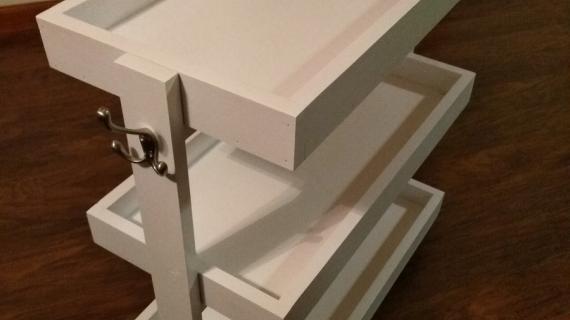
I decided to go smaller in overall size (the shelf bottoms are 1x12s, 24" long)

And instead of the two "ladder" end pieces, as done on the larger cart, I decide on just one, but rotated to run lengthwise.

Was going for a mint green color, but it ended up more of a turquoise,

And I kinda love it.
I had intended to use it as a narrow end table.

You know, to roll into that awkward space between the wall and the sofa.

But we all know what really happened to it.
That is my fault. The girl loves anything turquoise. I should have known!
This cart was so easy to build.
After cutting all the boards (plans and cut list follow)

I marked both ends at the same time with a square (marking where the "ladder" rung pieces tie into the sides).
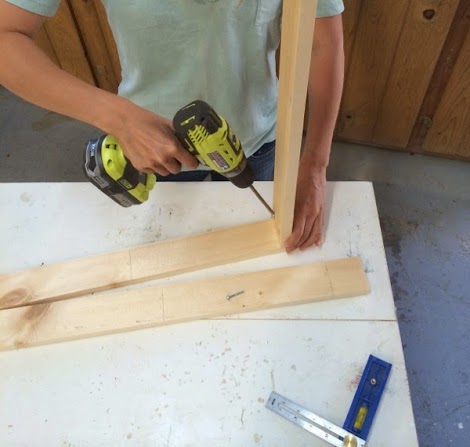
Then I just used my Kreg Jig to make pocket holes and attach the "rungs" to the end pieces. (You could also use countersunk screws too).

That's the main ladder piece. Now I just have to make the three shelves.

A little glue,

And I nailed 1x3 around the outsides of the shelves.

Then I placed the shelves inside the "ladder"

Centered them up,
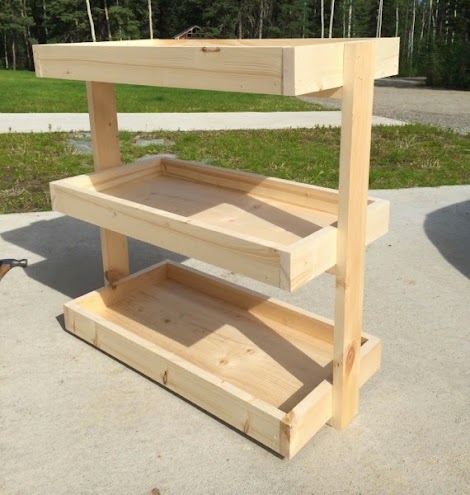
And secured in place with screws.
After paint and hardware,

She's ready to roll!!!
I spent about $25 on lumber and casters (I'd recommend better casters than those ones) for this cute little solid wood cart!
Check out the plans following!
And make sure you register to join us tomorrow night for the Home Depot DIH Rolling Storage Cart Workshop!
XO Ana + Family

Preparation
4 - 1x3 boards, 8 feet long
1 - 1x12 board, 6 feet long
1-1/4" pocket hole screws (12)
1-1/4" finish nails
1-1/4" screws (for attach shelves to frame - could also use pocket hole screws)
wood glue
4 caster wheels
3 - 1x12 @ 23-1/2"
6 - 1x3 @ 23-1/2"
6 - 1x3 @ 12-3/4" (measure and cut these to fit after step 1)
2 - 1x3 @ 26-1/4"
3 - 1x3 @ 25" (measure and cut to fit after step 2)


Please read through the entire plan and all comments before beginning this project. It is also advisable to review the Getting Started Section. Take all necessary precautions to build safely and smartly. Work on a clean level surface, free of imperfections or debris. Always use straight boards. Check for square after each step. Always predrill holes before attaching with screws. Use glue with finish nails for a stronger hold. Wipe excess glue off bare wood for stained projects, as dried glue will not take stain. Be safe, have fun, and ask for help if you need it. Good luck!
Instructions
Step 1

I recommend doing the shelves first (lessons learned!) so you can measure the shelf, and make the ladder frame piece to fit. So attach 1x3s to the sides of the 1x12s with glue and 1-1/4" nails or staples.
Pocket hole lovers can also attach from underside with 3/4" pocket holes and 1-1/4" pocket hole screws.
Step 2

Measure and cut to fit the side 1x3s, and attach as you did in step 1.
Step 3

Measure the length of the shelves, and cut the 3 - 1x3 "rungs" to this length (I'd cut a hair longer so it's easy to slide your shelves in.
Construct the frame.
Step 4

Position the shelves inside the frame, and attach on underside with 1-1/4" screws and glue. I also attached to side frame with nails and glue for added support.
Step 5

It is always recommended to apply a test coat on a hidden area or scrap piece to ensure color evenness and adhesion. Use primer or wood conditioner as needed.
Comments
Ltrain266
Wed, 08/20/2014 - 11:18
Rolling Cart Workshop
Signed up for the class here in Stockton, CA. Can't wait to share my pic when my cart is all done!! Thanks for the opportunity to build something new!!
Guerrina
Thu, 08/21/2014 - 10:58
Rolling Cart Workshop
Signed up locally here in Waterford, CT. Always enjoy these workshops with a couple friends - our monthly Girls Night Out! Hoping they let us make a few of the full size ones! Frustratingly, they often have us make a few of whatever is planned in groups and then pull names to see who receives or they really downsize the product plan.
Nermie
Thu, 08/21/2014 - 19:49
Storage Cart DIY Workshop
At my first Home Depot workshop and we ladies are loving it! Thank U for a wonderful, versatile design.
Now to add power tools to all of my wish lists -- Christmas, B-day, and Mother's Day!
Mary Helen
Fri, 08/22/2014 - 13:05
Rolling Cart Workshop in Houston, TX
I had been super excited about attending this class all month. Sadly I was the only one that attended the workshop in Houston, TX. Sad :-( The instructor was super nice but not prepared for giving the class. He said they had asked him at the last minute to do the class. I was hoping to see the cart being made as he taught the class. Good thing I know how to follow instruction and will attempt to make the cart on my own.
moonhopping
Tue, 08/26/2014 - 10:22
No instructor
I was so excited for this project. At 39 week pregnant I made darn sure not to be in labor. Come heck or high water nothing was keeping me from going. And the high water part was real, on my way to my local HD we had a flash flood warning. My poor hubby forgot I was going and agreed to work late. So after he barely survived making a pregnant woman mad I paid the $20 for a baby sitter and was on my way. I get to the store and they didn't have the workshop, just the cart on display. I am so upset, all I got from the 4 people I spoke to both in the store and at the corporate head quarters is oh its some one else job. But I think this will be one of my first projects once I can use my power tools again. I need 4 of these to store all my crafting building and sewing toys.
In reply to No instructor by moonhopping
Ana White
Tue, 08/26/2014 - 14:29
Hi Moonhopping, I am so sorry
Hi Moonhopping, I am so sorry to hear of about your experience. So much good comes of these workshops, and so many stores go above and beyond, but unfortunately, a few isolated stores may fall short. I am so sorry to hear yours was one of these stores. Please accept my deepest apologies. Ana
Kelly M
Wed, 09/03/2014 - 12:17
Media Stand in the background
Hello Ana,
This is a great cart, and I love the teal! However, what really caught my eye was the media stand in the background of your photos. Is that something that you've built and have plans for? I wasn't able to find the plans on your site and I was hoping you could share them if you have them!
Thanks!