


Built in loft bed plans from Ana-White.com featured on HGTV Saving Alaska
Well, we still haven't heard back yet from HGTV ....
And going through this plan is making me hopeful all over again - it was so much fun getting to work with real families, to make their home better!
We've already shared the desk system plans with you (you can find the CPU base plans here and the bookshelf base plans here),
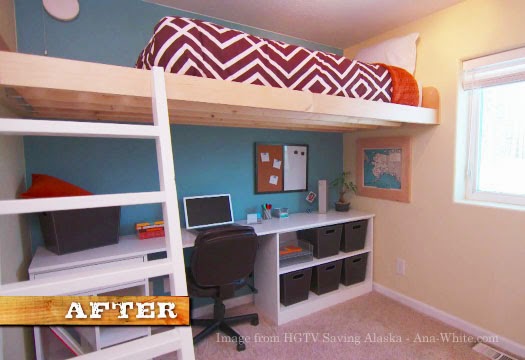
And today, I'm so excited to finally get to share the loft bed plans with you!
Now this should have been the easiest loft bed ever. And it will be for you too.
Unless you live in a super insulated home in Alaska.
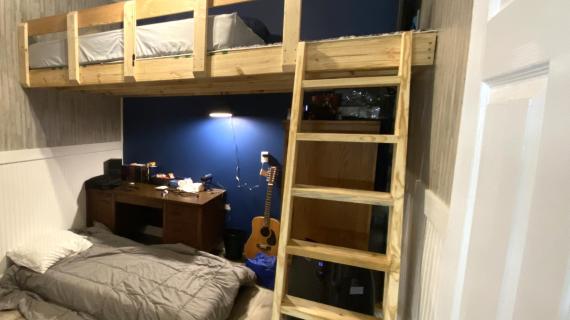
To make this bed easy to build, I decided to just build a mini floor inside the room (see plans following), using the studs in the walls as supports for the loft bed.
What they didn't show in the episode (and we didn't know until we started building) is the walls in this house aren't standard. On the inside of the home, over the standard framed walls, an additional layer of 2x boards was run horizontally every 32", and then an additional layer of foam insulation placed between the horizontal boards.

That meant to tie the loft bed directly into the horizontal studs, we'd have to hang the bed at 32" (too low) or 64" (too high by the time we added the framing). We needed the bed to be hung lower to give enough headroom.
We almost scrapped the loft bed idea ..... but at the last minute, I came up with a plan to use plywood to frame the walls around the loft bed out, making it look like we meant to wrap the walls in plywood. You know, to protect the walls around the bed and add style points. Not because I needed to cheat the bed down somehow 
 Then it got easy. We just used hangers to hang the loft bed floor joists. Slid boards into those, topped it with 1x6s,

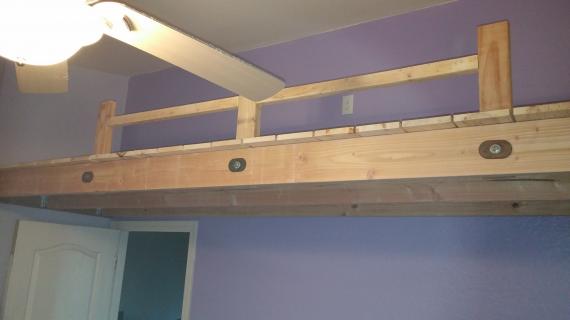
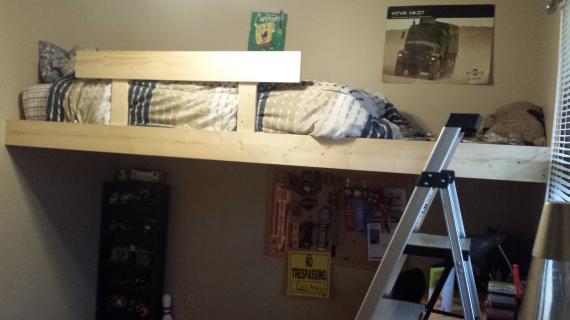
Trimmed the front out and gave it a good sanding and sealed it with clear coat,

And suprised ourselves at how we actually liked the bed better with the plywood surround!
You know what they say, right? When life gives you super insulated walls with horizontal studs, well, you make a modern loft bed!
You'll find the plans following for this project! Enjoy!
XO Ana + Crew
NOTE: Guardrail is recommended for this bed.
Preparation
We used 2x4s to span about 8 feet. For longer spans, you may wish to use 2x6s for additional support.
2 Joist Hangers per Stud and screws for hanging joist hangers
Screws long enough to attach 2x4s to studs in the wall (we used 4" screws)
1-1/4" finish nails
wood glue
2 - 2x4 @ desired width of bed MINUS 3/4" (wall cleats)
Studs are length of bed MINUS 3"
1x6 decking boards are cut same length as wall cleats
1x6 front trim is full width of front of bed (cut to fit)


Please read through the entire plan and all comments before beginning this project. It is also advisable to review the Getting Started Section. Take all necessary precautions to build safely and smartly. Work on a clean level surface, free of imperfections or debris. Always use straight boards. Check for square after each step. Always predrill holes before attaching with screws. Use glue with finish nails for a stronger hold. Wipe excess glue off bare wood for stained projects, as dried glue will not take stain. Be safe, have fun, and ask for help if you need it. Good luck!
Instructions
Step 1

Hang wall cleats securely to studs in walls, to as many studs as possible, using 2 screws per stud.
Step 2
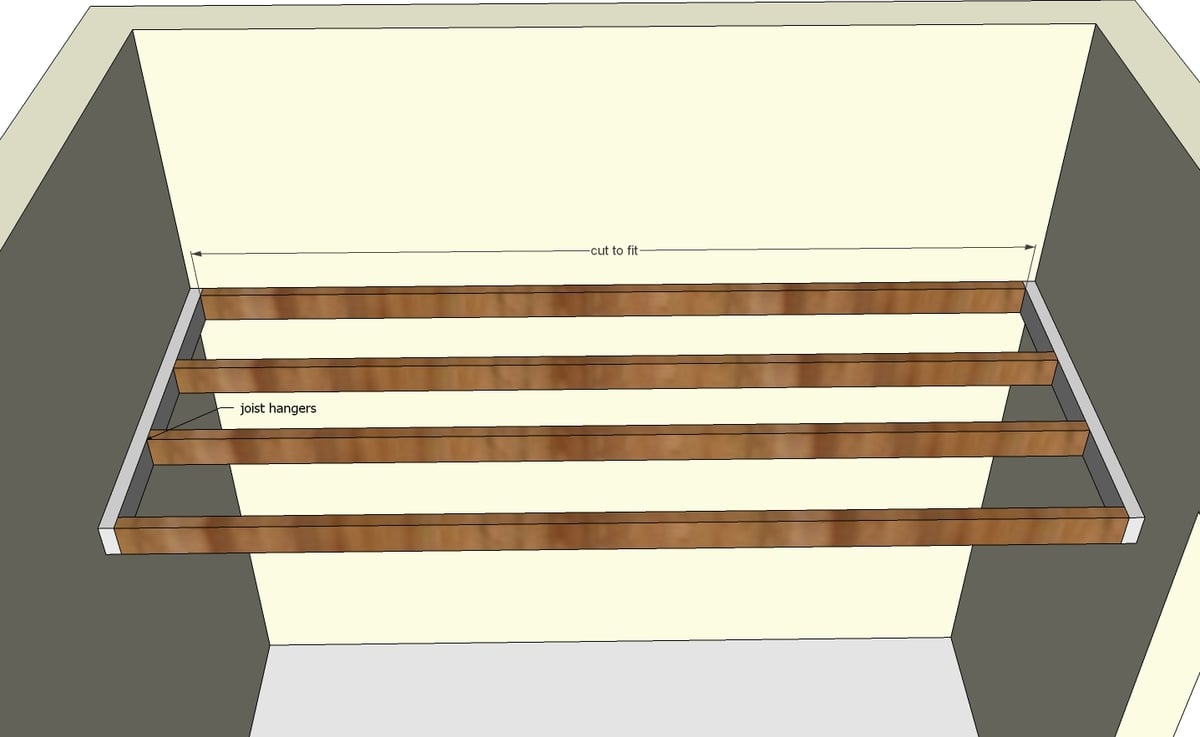
Use joist hangers to hang the studs to the cleats.
For added support, we also attached the back 2x4 to studs in the wall.
Step 3

1x6 decking was then layed on top of the framing, and nailed down with 1-1/4" finish nails and glue.
Step 4

The front was then trimmed out with a 1x6 board. We left a slight lip to the top to prevent items from rolling off bed.
A guardrail is also recommended to prevent injury.
It is always recommended to apply a test coat on a hidden area or scrap piece to ensure color evenness and adhesion. Use primer or wood conditioner as needed.


Comments
dhuff44
Mon, 09/22/2014 - 19:02
If I have standard 8'
If I have standard 8' ceilings, what would be a good height to hang the bed for adequate room under and above the bed? What was the floor to bottom of 2x4 on the bed you built?
SowsEar
Mon, 11/10/2014 - 06:26
Typical clearance for a bunk/loft bed...
I was just doing research on this myself, since we were considering building a loft for our eldest. You can run a search via Google for "standard bunk bed clearances". I've found that if you aim for a 28" - 32" clearance from the ceiling of your room down to the top surface of the mattress, you should be good. From there, work your way down, because the thickness of the mattress would affect, from there, where the loft would be positioned.
For example: if the mattress you're using is 12" thick, guestimate that (for a 32" clearance) the bottom supports would be roughly 44 - 46" from the ceiling... which would give a clearance underneath of roughly 60". That's a little low, but still comfy for a sitting area (as long as you remember to duck when you stand up, lol). Hope that sharing what I've found help you out!
ashcan1020
Thu, 12/11/2014 - 06:03
Trouble with directions
Does anyone know why I cannot see steps 6-27?
Ana White Admin
Thu, 12/11/2014 - 11:58
Step 4 concludes the plan
Those are all the steps needed:)
Musketeer
Mon, 06/01/2015 - 14:50
Appropriate Maximum length
Hello. What would you suggest, should the maximum length before putting in some kind of support?. My son's room is 13 x 15.
Thanks
whyNOTbuildit
Fri, 07/24/2015 - 15:18
Ladder?
I'm a newbie to this buiding stuff.....any plans available for the ladder for this loft bed? I like the one in the pic. TIA!