Hi Ana
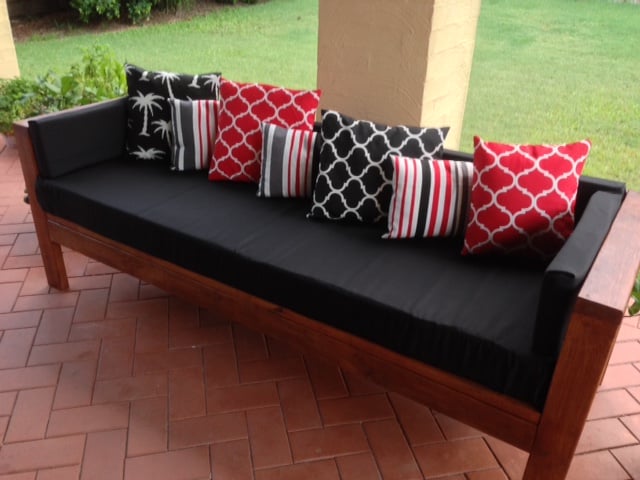
I would like to share my experience making this Outdoor sofa (see attached link). http://ana-white.com/2014/07/plans/outdoor-sofa-2x4s-ryobi-nation
The sofa is supposed to be made using 2x4 boards, but these are not a standard size in Australia so I substituted with 90 x 45mm pine boards. No other changes to measurements were necessary. I followed Ana's instructions and definitely recommend using wide clamps to hold the base when screwing together. I only had short clamps so was rather difficult keeping everything firmly in place when drilling the screws in.
Next step was preparation for staining. I used Cabot's pine filler to fill major holes, knots etc, then sanded lightly paying extra attention to the arms.
I stained using Cabot Exterior Varnish Stain (teak colour). This turned out a beautiful warm colour that I just love.
Finally the cushions....
For the base I purchased a 5inch thick foam single mattress (on sale $61 so worked out to be really cheap foam). I measured to fit base and cut using an electric knife - worked a treat! I had enough left over to do a cushion along the back plus two small side cushions to go along the arms.
Next step was covering the base and side cushions. I purchased some outdoor Decorating fabric from spotlight as sofa will be exposed to some QLD weather. For the base, I used a similar process to the Censational Girl box cushion cover using Velcro instead of zips.
http://www.centsationalgirl.com/2012/10/simple-sew-box-cushion-cover/
For the side and back cushion I made up 3 sides of the cover, then inserted foam and sewed the last end closed (cheating I know but just too awkward to do proper box ends).
Lastly, the throw cushions.....these were really easy I made envelope cushions from a single piece of fabric....once again no zips (hoorah!). They only took 10minutes each to make and look great. See tutorial below.
http://thehappyhousie.com/simple-speedy-stuffed-sewing-tutorial-diy-envelope-pillows/
My first build so extremely happy with the result!
Comments
Ana White Admin
Fri, 01/09/2015 - 12:06
Beauty!
You did an amazing job on your first build! Thanks for sharing!
Pam the Goatherd
Fri, 01/09/2015 - 17:12
Beautiful! I love that color
Beautiful! I love that color scheme and was going to ask where you bought the fabric, but it's probably not available here in the US.
Jennyec
Fri, 01/16/2015 - 03:08
Thanks Pam, the fabric is a
Thanks Pam, the fabric is a water and fade resistant polyester and was very easy to ses as it is not heavy like a canvas. I bought it from Spotlight here in Australia so may not be available in US. There doesn't seem to be a lot to choose from here in Australia (at least doe inexpensive fabrics) in comparison to US on-line stores such as Fabric.com.
Melaverty
Tue, 03/17/2015 - 04:28
Plan query
well done your project Jennyec -looks great and I'm going to attempt for my 2nd project.... I'm just a bit confused about the total timber needed for this project as my reading of the plans is 11 - 2x4x10' - did you use 11 pieces of 90x45mmx2.4m? Thanks heaps
juriona
Mon, 04/20/2015 - 10:10
Awesome!
Thanks so much for taking the time to post about your experience building this. You've given me courage to try. Nice job!