Hi guys, Jacob here.
If I write a post, it's gotta start with a cool picture of Alaska.

We spotted these big bulls on the drive to the cabin site. They are going to be some nice bulls by hunting season.

So about that cabin. It's sure coming along!

We did get a ton done last week! Make sure you follow Ana on Instagram - she's been sharing live progress photos.
But none of this would have been possible without already having a foundation in. I put a foundation in last summer.
All the winter before putting the foundation in, I was doing research and trying to figure out the best way to put a foundation in remote Alaska. I have built cabins before, but not with soil conditions like Paxson Lake.
Let's not forget three things - we have a baby, the build site is off the road system, and no heavy equipment can be used. That and I'm still young - 36 at the time - let's just say digging a foundation with a shovel is a little bit tougher than it was ten years ago. So I've been research all different sorts of ways to put in a remote foundation. We'll get to that in a minute.
Since we bought the property in the winter, we only had clues as to what the soil might be. By looking at the trees, I knew the soil wouldn't be great - small, black spruce is an indication of mucky soil. I had also talked to other cabin owners in the area, and they had all confirmed my suspicion that I would be working with less than ideal soil for the foundation.
But I needed to dig a test hole just to see exactly what I had on this piece of property.

The first day I just removed the top soil. I found alot of very large boulder rocks with a clay layer around them. The ground is still going to be frozen underneath the vegetation layer, so I wanted to see what happens when the ground thaws.

The ground was frozen about a foot deep, so we left the hole and decided to come back the next day and see what the hole looked like when the sun heated it up.

The next day, I returned to the hole I dug, and it was solid muck. Not the best news I've ever had.

The more I stomped around, the deeper the muck got.

Then I pounded a rebar stake into the hole, hitting lots of rocks and lots of muck. And more bad news - I couldn't find a bottom to the muck.
At this point, I was still optimistic about the soil. The water could have been just because the soil around the hole is still frozen, so the water had no where to drain.
I had done quite a bit of research over the winter about Helical Piles or Pier posts. The are sometimes called "screw piles" too. They are basically giant screws that are drilled inot the ground and your foundation sits on top.

Everything I had read about the Helical Piles is that they are perfect for mucky areas, and can even be installed under water. The screws lock into the soil, well below the frost layer, so your foundation won't heave and jack when the ground freezes and thaws. It seemed like the perfect solution for our remote build site with it's less than ideal soil.
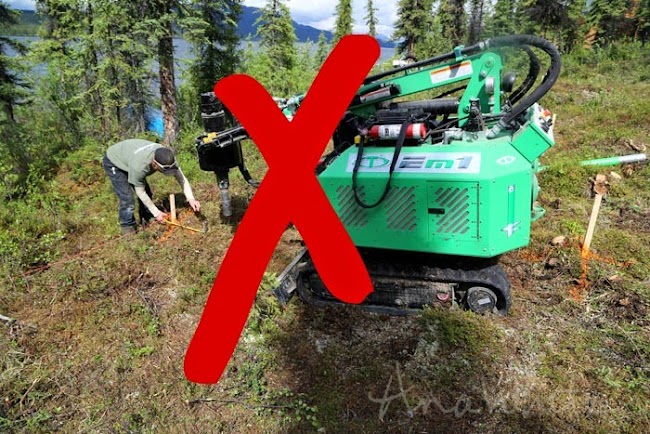
There's only a few companies that do these foundations in all of Alaska. I started calling, and it just happens that one of the companies was doing a foundation nearby. So I asked them to come to my site and do a test drill.

The machine is really small and lightweight and with some manuevering, was able to get to the cabin location.

But when they went to drill, the machine had a hard time getting around the giant bolders under the moss. It was very hard for machine to drill, as he tried to snake the screws past the giant boulder rocks while keeping the screws pile plumb. He just kept drilling and drilling, dodging boulders, and couldn't find a bottom.
They thought perhaps using a bigger screw pile could work, but were concerened because they were hitting big boulders, that when finished, the piles would not line up or be accurate. Bigger screws would provide more flotation in the mucky soil, but would be harder to accurate drill in with the large boulders. And it would also get alot more expensive.
The screw piles were a great idea, an awesome techonology - but with the combination of my mucky soil and big boulders, they just weren't going to work on this piece of property. So it was back to the drawing board for me.
So I went back and talked to a couple of other cabin owners, and they all told me the same two things -
- You have to have a floating foundation that just sits on top of the soil.
- Your foundation is going to sink, Jack and heave with the temperatures, so be prepared to make adjustments
Using the advice of the other cabin owners, I thought, why not design into the foundation a system where I can plan on the foundation sinking and heaving with freezing and thawing, but instead of shimming the foundation constantly, have a system that I can adjust the height of the foundation. I can't beat the extreme Alaska climate, but I can be prepared for it.

Here's what I came up with.
- I'll pour concrete pads every 6-8 feet. These pads will provide flotation on the mucky soil. The size of the pads are determined by the size needed for a footer for the size foundation I'm creating.
- Then I'll drill a hole in the middle of the concrete pads, and thread a big all-thread through the center.
- Ill add a large nut and washer plate to the middle of the all-thread on top of the concrete pad.
- Then to the top of the all-thread, I'll weld on a bracket that holds the upright posts.
- As the foundation sinks, I can turn the nut, which moves the all-thread up or down, adjusting the foundation as needed.

The first step is to layout the foundation on the ground. I used rebar stakes and string line. Since I'm on a sloping lot, I had to use a transit to make sure I was accurately placing the stakes in a level plane.
Our cabin itself is going to be 30 feet wide x 24 feet deep. Of each side will be 8 foot decks. I decided to do the foundation for the decks at the same time.
Then its time to dig.

Those boulders the screw piles didn't want to get around weren't any more fun for me to dig up.

I didn't have to dig deep though - just enough to remove the vegetation layer and create a level pad for the forms.

For the forms, I precut my form boards back home in the garage, and hauled in just the cut boards on my ATV,

And then assembled the forms at the site. This worked pretty well, especially since I have 18 forms to put in.

I built this ATV trailer so it would hold six five gallon buckets. Then I hauled in gravel, by the five gallon bucket on the trailer.

That way I could get the buckets of gravel very close to the pads,

And then just pour the gravel right from the trailer into the holes I'd dug.

After leveling out the gravel I placed the form on top, and then pounded concrete stakes on all four sides of the form. Then I just used a level to level up the form, nailing into the stakes to keep the forms level.

I had precut rebar back home, so all I had to do on site was place the rebar in the form, elevate on rebar chairs and tie in place.

We are finally ready for concrete.
So about that concrete. I had thought about buying a mixer and mixing concrete on site, but after doing some figuring, I realized two things - either way, I'd have to haul the concrete on site, and also haul more gravel to mix with the concrete. So we called the nearest concrete plant - about 75 miles away - and got a quote for delivering concrete to the road. It was alot more reasonable than we had thought, so we decided to go that route.

The concrete truck can get close, but not to the site. So we made up a few more atv trailers, and by the five gallon bucket,

Hauled the concrete to the site. My dad and uncle and I hauled the concrete,

My cousin helped dump the concrete buckets into the forms, and Ana helped screed the concrete.

It was a very intense couple of hours.

But this is what will hold up our entire cabin, so well worth the extra effort to bring in the concrete.
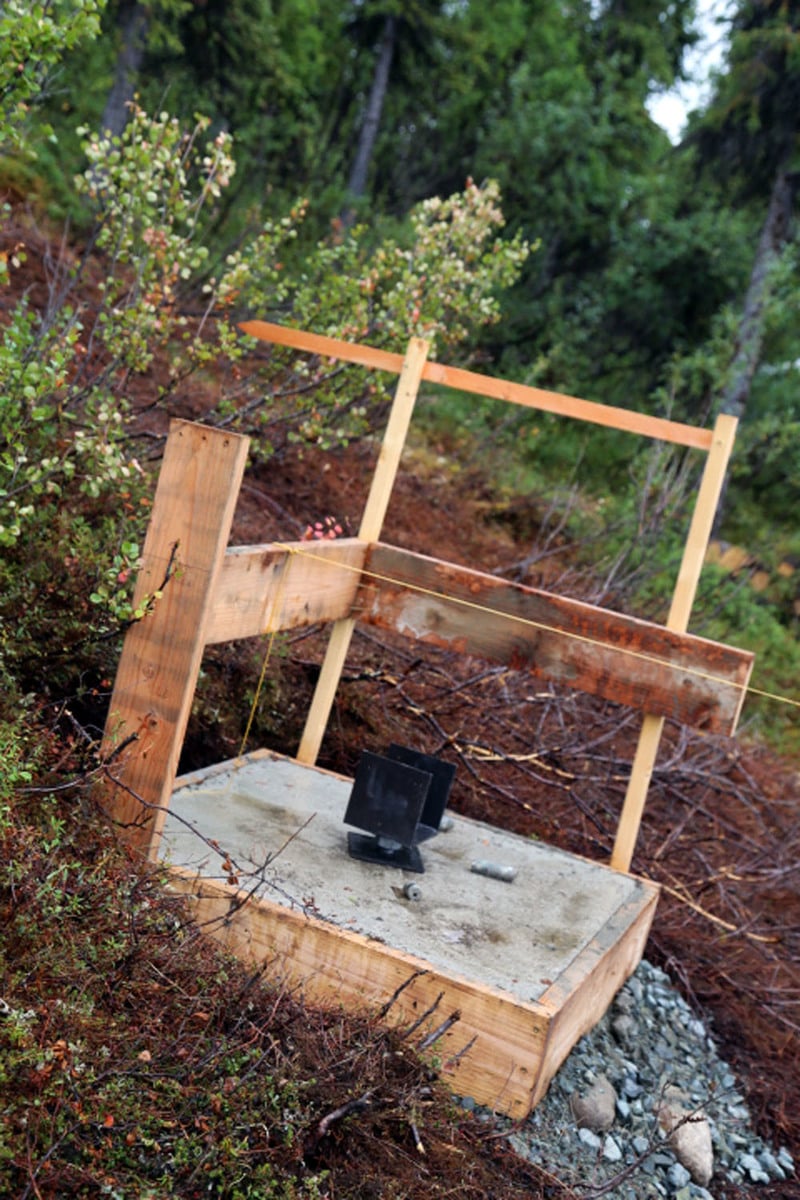
Once the concrete cured, I started laying out where to drill the holes for the all-thread brackets to fit.

I drilled the outer holes first, adjusting for square. Once I had the four outer corners, from there I did string lines,
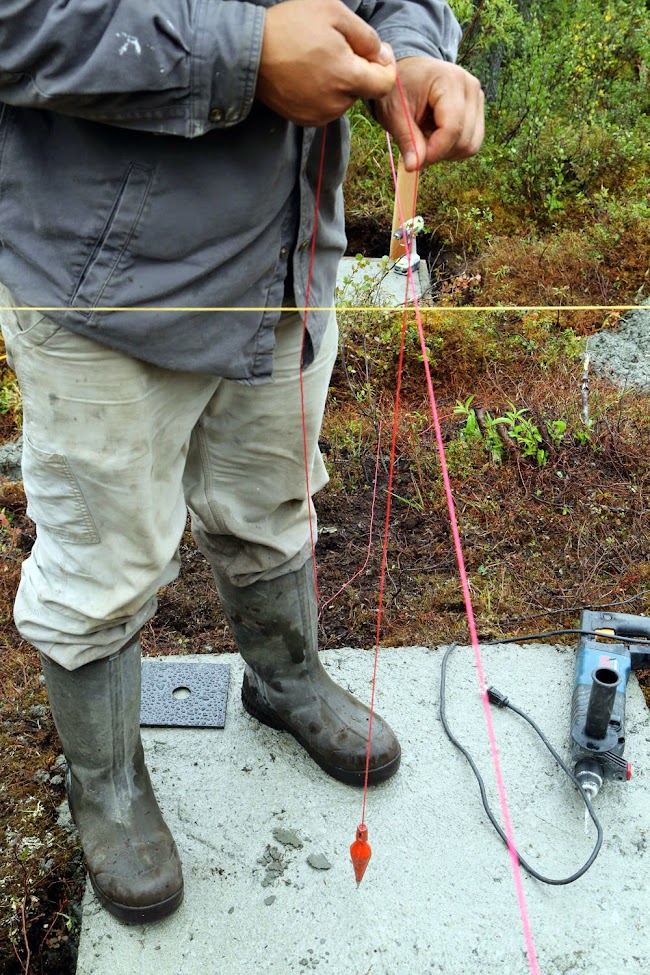
And used a plumb bob to find the middle hole locations to drill.

I rented a concrete core drill for drilling the holes for the all-thread.

Grace's job was to make sure every concrete pad had a square washer and the metal bolt with nut on it. That look says "Dad, I was playing in the lake!"

Here's a corner all done.

And one of the middle ones.
For there, I'll go up with upright posts - but we'll get to that in the next post.
So what do you think? Is this going to work?
Thanks so much for following along and reading!
Jacob
PS - Ana's been sharing our current cabin progress photos over on Instagram.
Comments
Jody Knowles
Mon, 04/20/2015 - 11:21
Jacob,
Jacob,
Thanks for sharing the progress and the pictures. You have done a lot of research and it looks like a great plan you have. I'm looking forward to seeing your cabin being built. I'm guessing you plan to have it completed by summer's end. Alaska is so much different than where we live in Texas. You have challenges we'd never even dream of. It's cool to see how you've addressed them. Also like seeing you carrying some protection while out there :-)
I'm sure you, Ana and the kids will really enjoy that cabin when it's finished knowing all the hard work that went in to it.
Take care, and please keep sharing the progress !
Jody
In reply to Jacob, by Jody Knowles
Jacob White
Mon, 04/27/2015 - 08:02
Hi Jody, thanks so much. We
Hi Jody, thanks so much. We are trying to get it finished up by end of summer, the framing is going alot faster than the foundation work did. Will keep sharing. Jacob
perchik
Mon, 04/20/2015 - 11:58
Curiosity
I'm asking this question purely out of curiosity (and not for actual want of doing this myself!)
To level out the house as the foundation shifts, you're just going to tighten/loosen the nuts right? How are you going to do that and how much weight is on each of those brackets? How often do you anticipate leveling the house--- is this a monthly thing? yearly? decadely?
In reply to Curiosity by perchik
Alley
Tue, 04/21/2015 - 03:32
Second!
I'll second this question.
gabriellus
Tue, 04/21/2015 - 11:46
third!
i KNOW you did all the due diligence, so i'm sure you're fine. but I have the same question as well.
my concern is the depth of the pads, and the grade of the land leading in to the lake. i'd think that with great heaving in the winter and sinking in the summer, that the pads would start to slide down the hill as a unit. maybe anchoring the foundation framing (4x6s as per the newer picture of the house framing) by steel cables to the high side of the hill would keep the slide from starting at all.
of course, I'm an admitted armchair engineer. what a fun looking project though. #jealous
In reply to Curiosity by perchik
Pam the Goatherd
Wed, 04/22/2015 - 20:27
I'm curious about this as
I'm curious about this as well!
chhelga
Mon, 04/20/2015 - 15:25
Well done :-)
You have my deepest respect.
Greetings from Austria
Alley
Tue, 04/21/2015 - 03:35
What a fantastic solution!
I really like this! Thanks so much for sharing your work. I'm curious... how steep is your slope? It's hard to tell from the pictures, but it looks pretty significant. Also... since I don't see you digging a well or a trench for a septic, I'm really interested to learn what your off-grid solutions are for utilities. And finally... it was really interesting to follow your costs with the MomPlex project. Would you mind sharing how much each step of the cabin costs?
PaulMJ
Tue, 04/21/2015 - 04:03
Wow
Fascinating. Thanks!
ThriftyGirl
Tue, 04/21/2015 - 10:46
Thanks for Sharing
Really enjoyed your post. Thanks for sharing.
marianne c
Tue, 04/21/2015 - 11:34
color me AMAZED!!
Greetings from Texas! I love your concept of adjusting the foundation when needed. My old pier and beam house in Houston is always shifting -- after drought one year then heavy rain the next year. Really cool post. Love seeing the process!! I will be checking in with ya'll!
bclute
Wed, 04/22/2015 - 10:01
Wow!
If Home Depot needed a commercial for their orange buckets ... this would be a great ad! Crazy!
Jacob White
Mon, 04/27/2015 - 08:19
Foundation Questions
Hi guys! We've been so busy working on the cabin site I haven't been able to respond to comments, I'm sorry about that. We've actually had to adjust the foundation already to put up walls and am so glad we put the extra effort in because the floor was several inches out of level. I'll do a post on that later on, still owe you posts on the floor framing.
The concrete pads aren't going anywhere, they are dug deeper than it looks and with the weight on them, the cabin won't slide down the hill. We will also cross brace between the uprights to tie everything together, so if there is any movement, everything moves together.
Hope this all makes sense. Thanks for reading, will be sharing more soon.
Jacob
3eskiemom
Sun, 07/12/2020 - 15:20
Where did you find your hardware
I also live in Alaska (Anchor Point) and I am planning a build. I just finished clearing and I have been looking for adjustable brackets. Did you make them yourself or buy them somewhere? I am hoping to do the same size cabin, I wish Timber frame but 90% will have to be doable by just me.