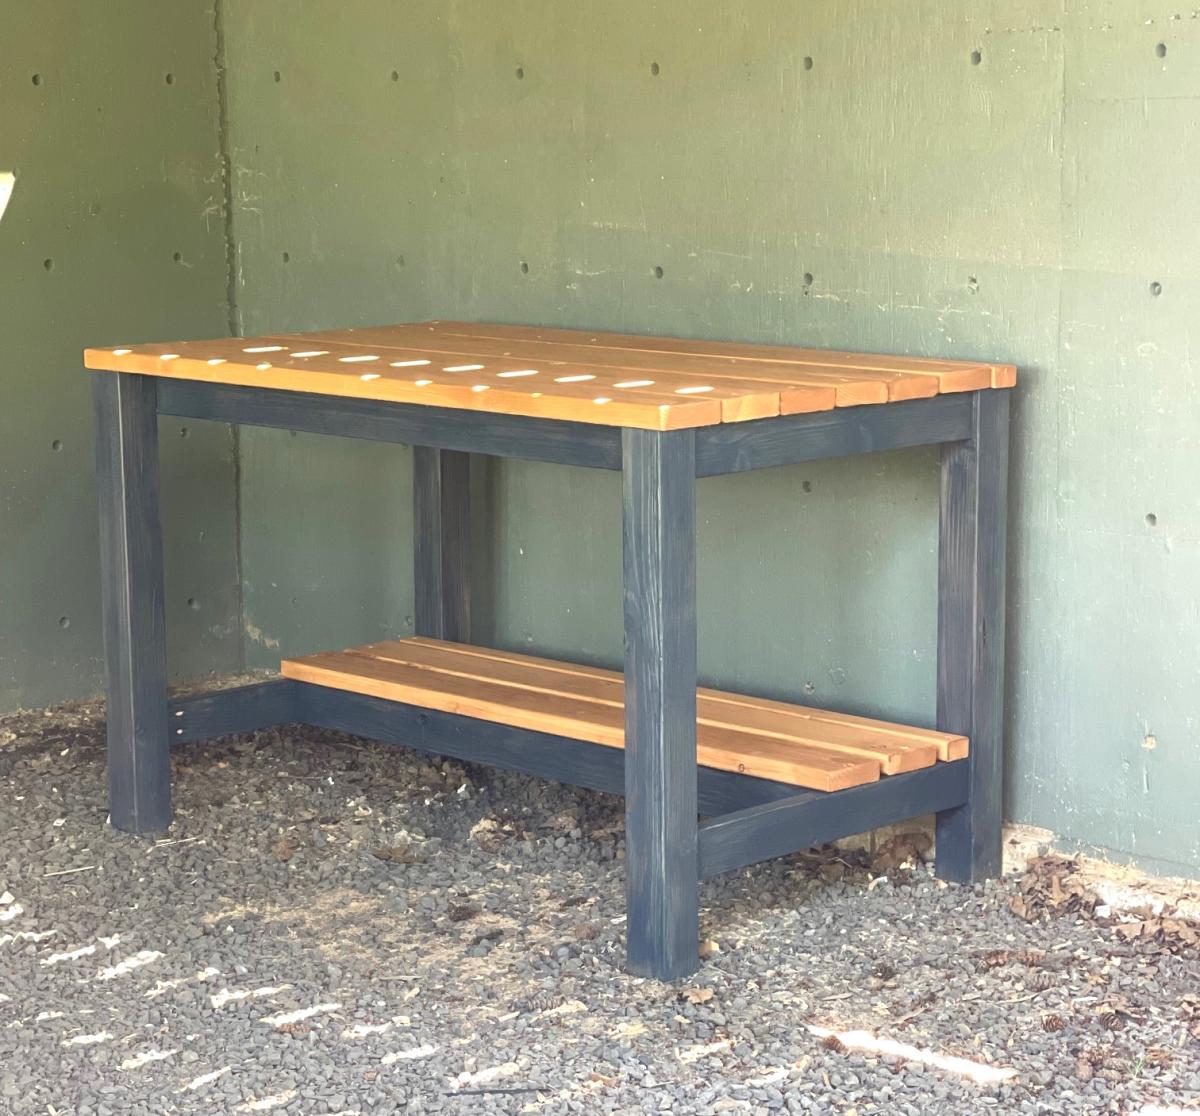
Sturdy Workbench with Shelf
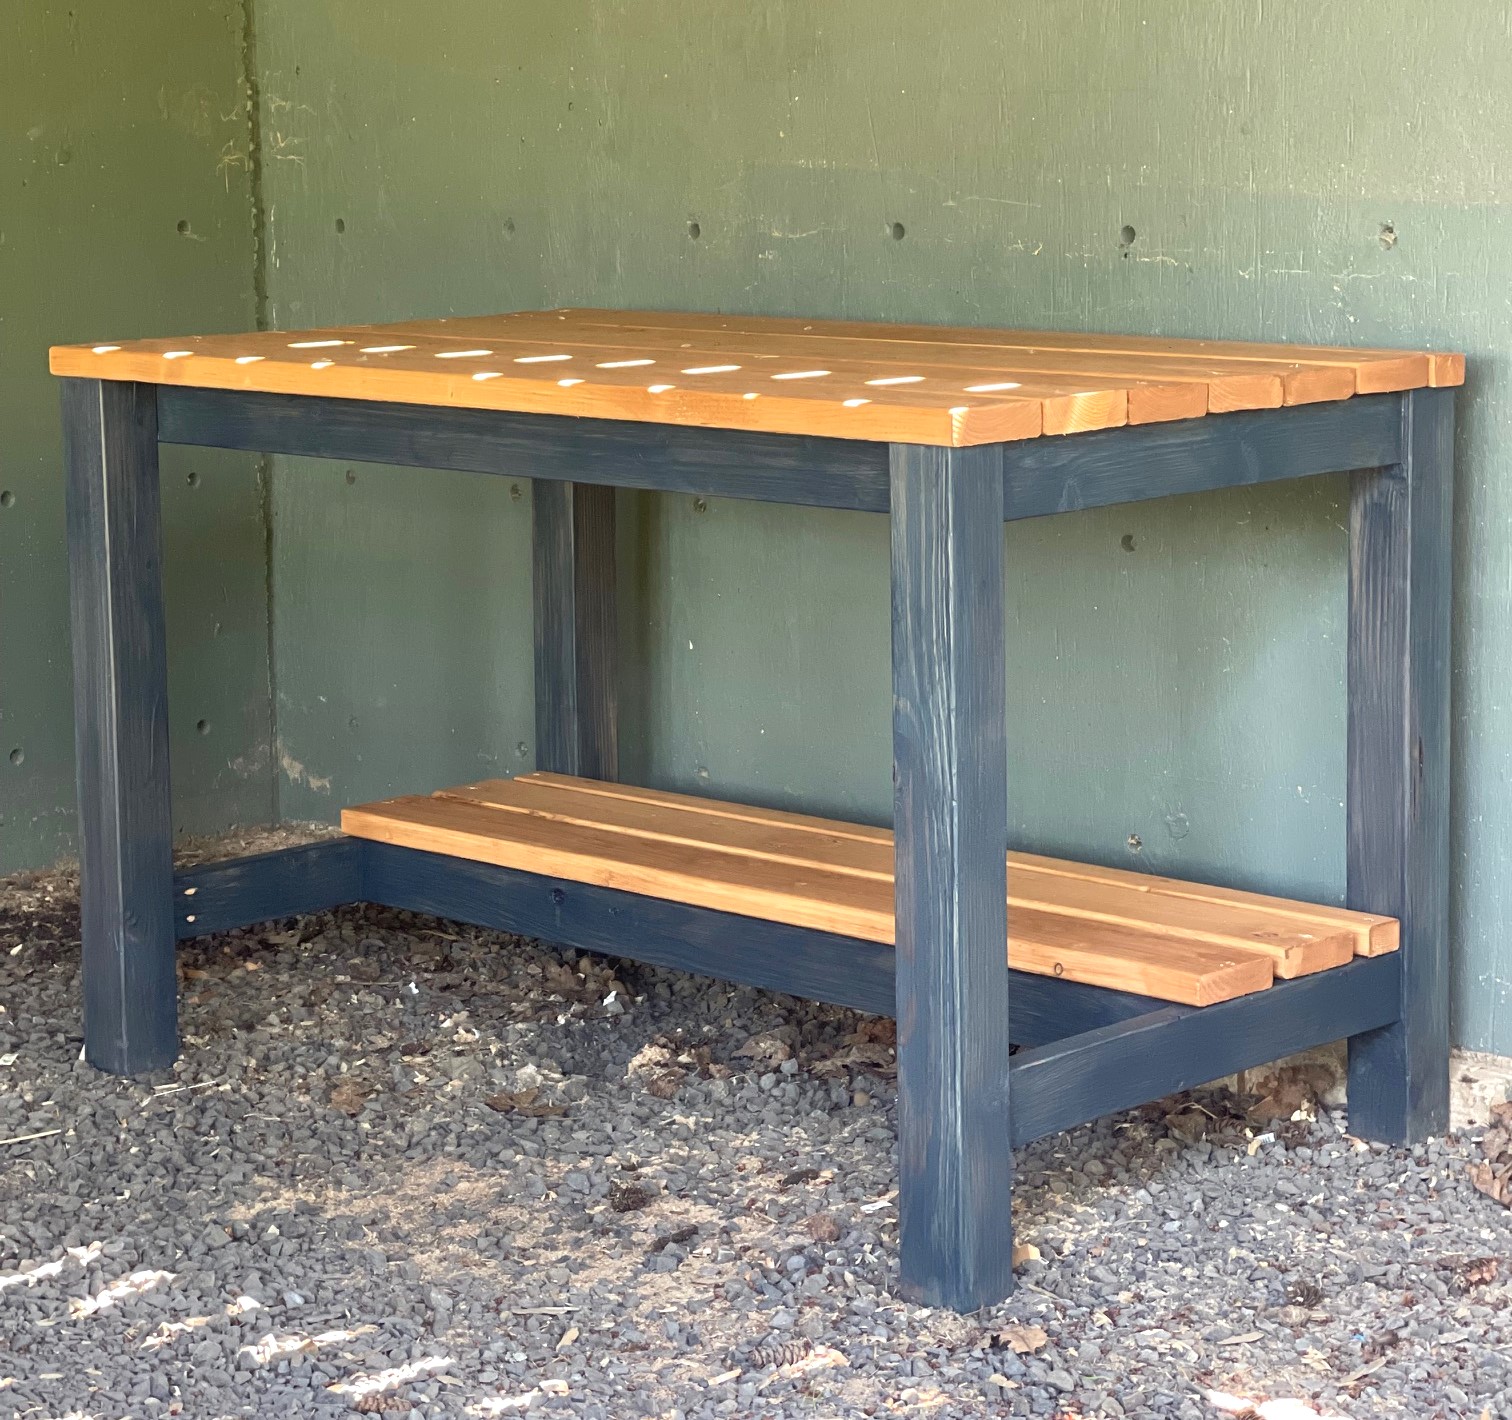
Wanted to build a sturdy workbench with 4x4 legs, so I used Ana's plans linked below with a few mods!
Built from Plan(s)
Wanted to build a sturdy workbench with 4x4 legs, so I used Ana's plans linked below with a few mods!
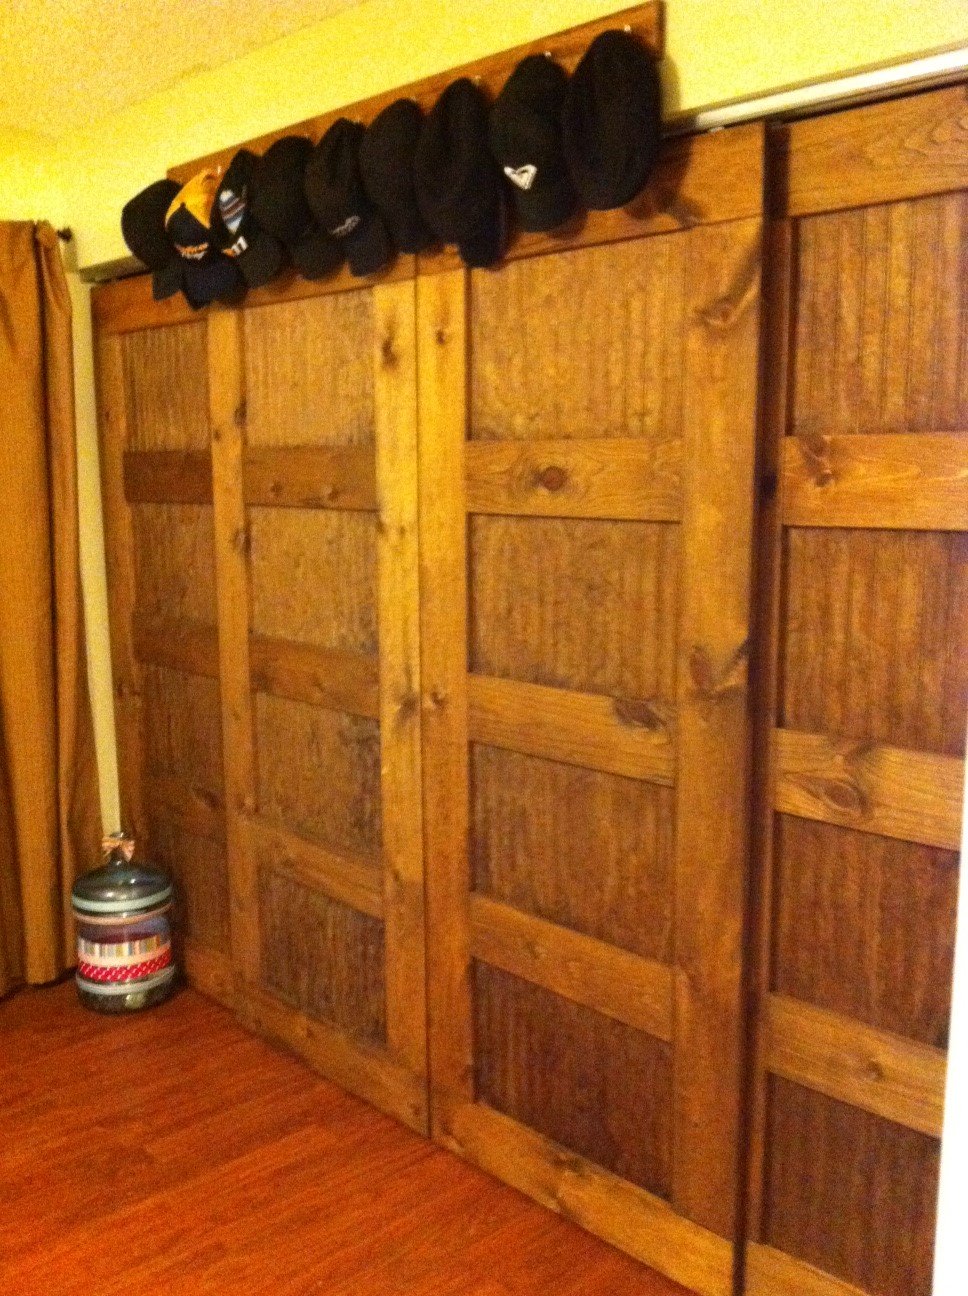
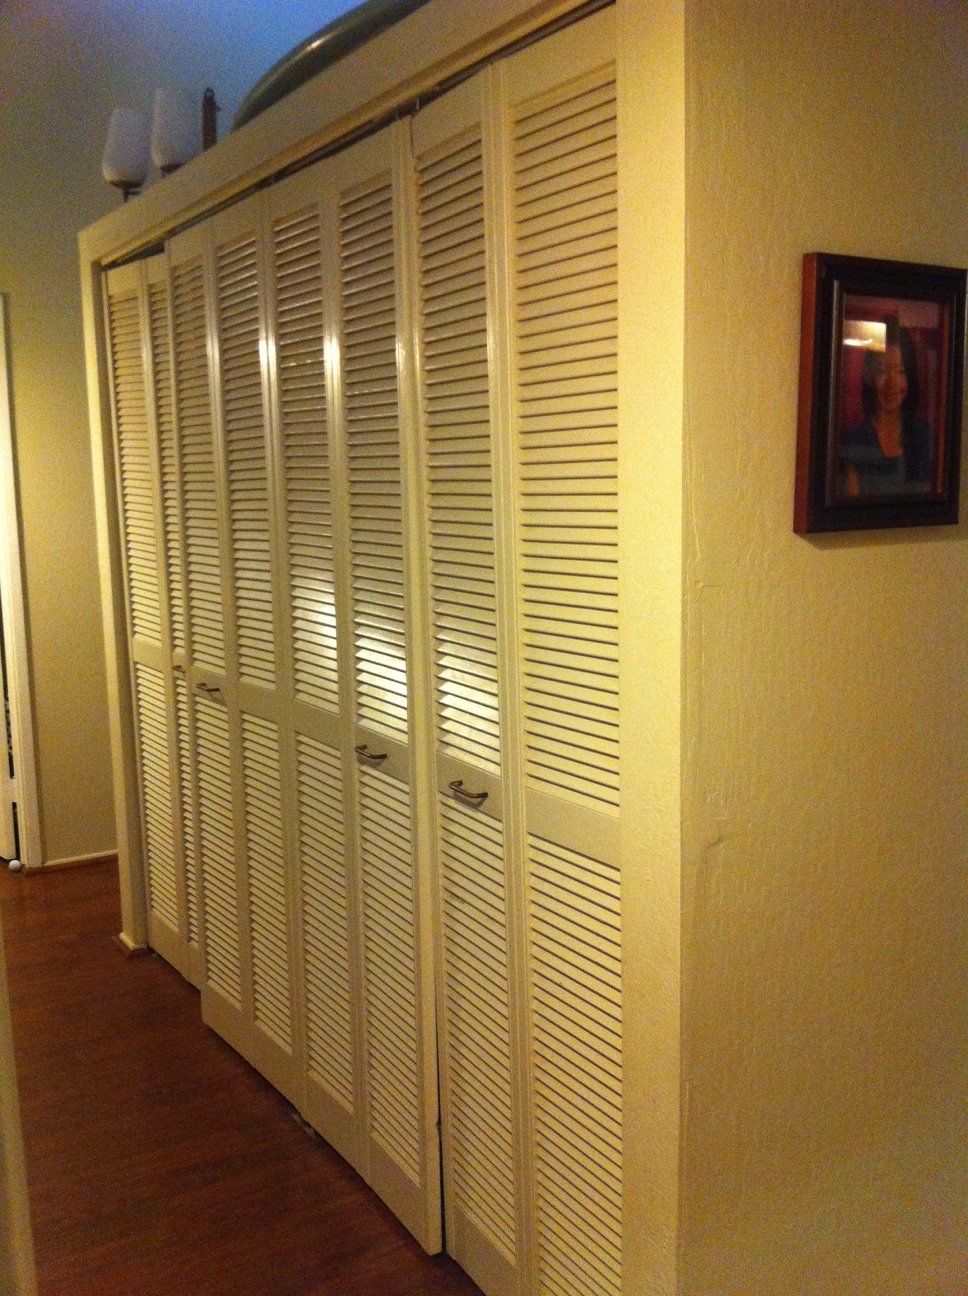
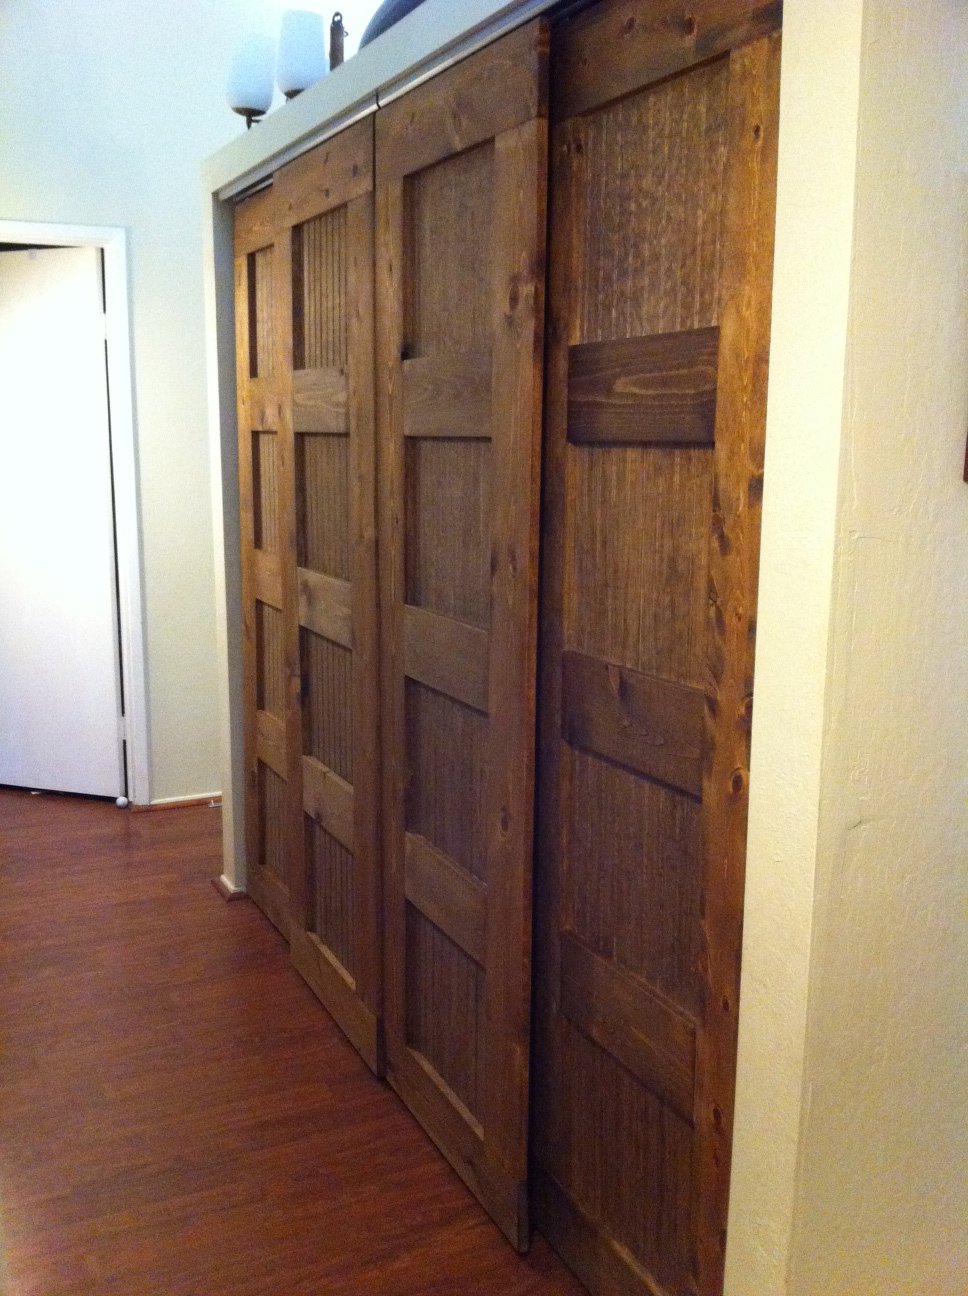
I loved the Idea of new closet doors and hated the idea of bi-folds. My house is crooked it seems. The doors don't sit straight and bi-folds always fall off their tracks. When I came upon the plans for Bypass Doors from Old Paint Designs I was hooked! I made 4 doors for the hallway in 1 day, oiled it with Danish Oil in Dark Walnut, hung it the next day and what a difference!! Glass is rather expensive in Hawaii and so is plexi-glass so I opted for Bead Board which gave it a more "country" feel instead of a more modern feel. I wish I could have used glass but the $150 price tag just wasn't fitting into my budget very well. My hubby loved the bypass doors so much he asked me to build them for our open closet. 2 days of work, 8 doors, 2 closets done!

Thu, 01/26/2012 - 13:48
Those turned out great. Love the bead-board and color.
Thu, 01/26/2012 - 23:24
Wow! Those turned out great! I love the idea of using beadboard - so creative!
In reply to Wow! Those turned out great! by oldpaintdesign
Fri, 02/17/2012 - 17:13
Thank you for your plans...love them. I've been asked to help a friend of mine build some doors for his house!
Tue, 08/28/2012 - 15:27
Great job on the doors! I am interested in doing this myself. I will have to make 4 doors for my closet as well since I have such a large opening. Can you tell me what the measurments of your closets are? Also what are the dimensions of the pine that you used? Thanks a bunch!
In reply to Bypass Closet Doors by Jilley27 (not verified)
Tue, 08/28/2012 - 18:44
My closet opening is about 8' across. Each door is 26" wide and 79" tall. I made them so the would have a 1" overlap on each side...
I used 1x6 @ 8' lengths of pine. I like the really knotty pine with lots of character! Have fun building! These were pretty simple to make once you get all the boards cut.
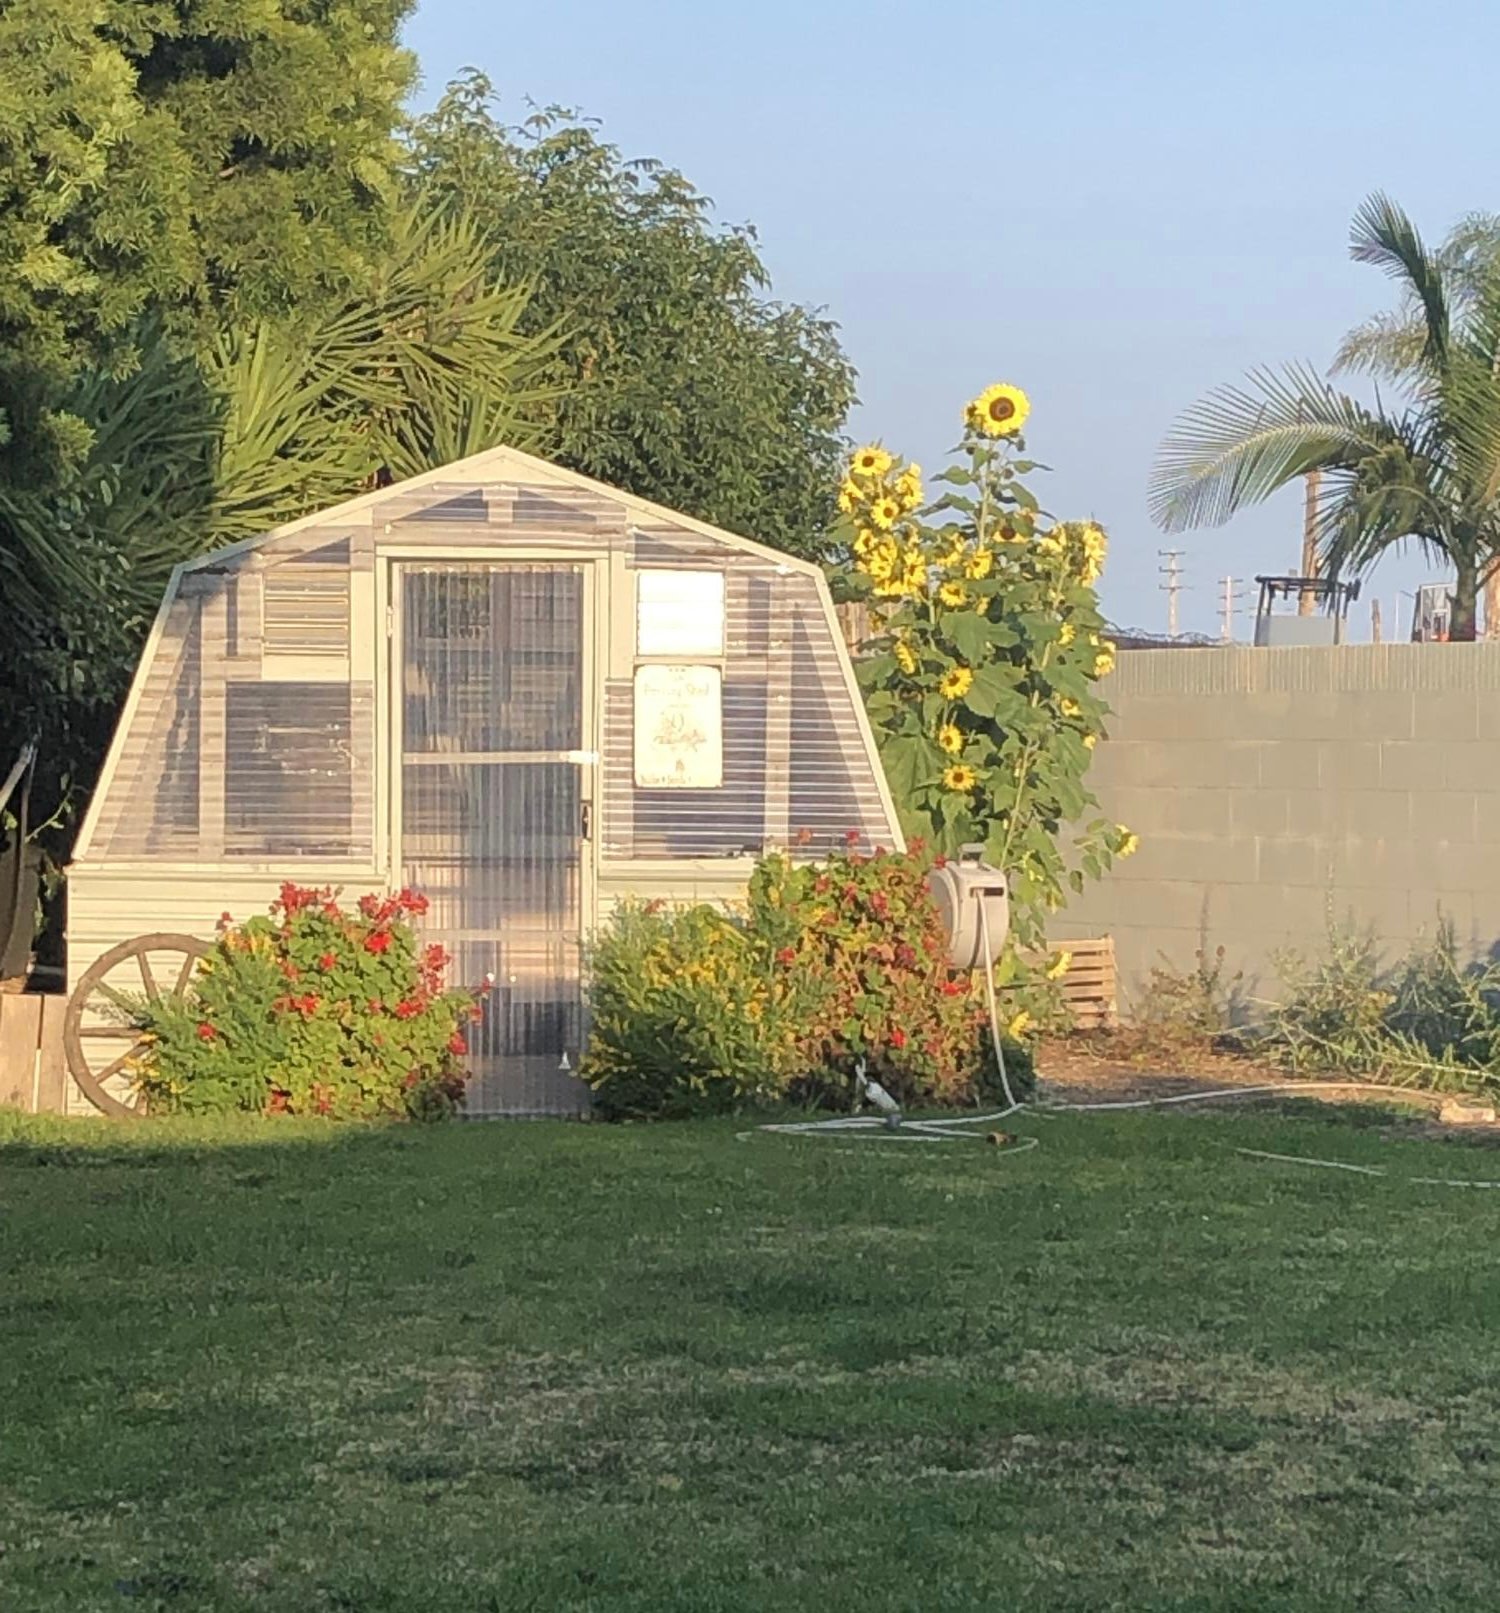
I saw this greenhouse built on the Justin Rhodes YouTube channel and immediately wanted my own. My husband was a champ at making my dream come true!
Tue, 04/09/2024 - 01:43
What a great idea! Building your own greenhouse can be a rewarding and cost-effective project. With the right planning and choice of materials, you can create a sturdy structure that will last you for years to come. In fact, a greenhouse is a great way to take care of your health because the crops grown there are undoubtedly of higher quality and healthier for you. Speaking of health, if you want to improve your health, consider using natural supplements such as mullein. Mullein supplements are known for their potential respiratory benefits and can promote overall well-being. You can find organic mullein supplements https://www.amazon.com/USDA-Organic-Mullein-Drops-Lungs/dp/B0CKBPTPRL on Amazon. Adding them to your daily diet can complement the peaceful environment of your greenhouse. So, whether you are a gardening enthusiast or just starting out, remember to take care of both your plants and your health!
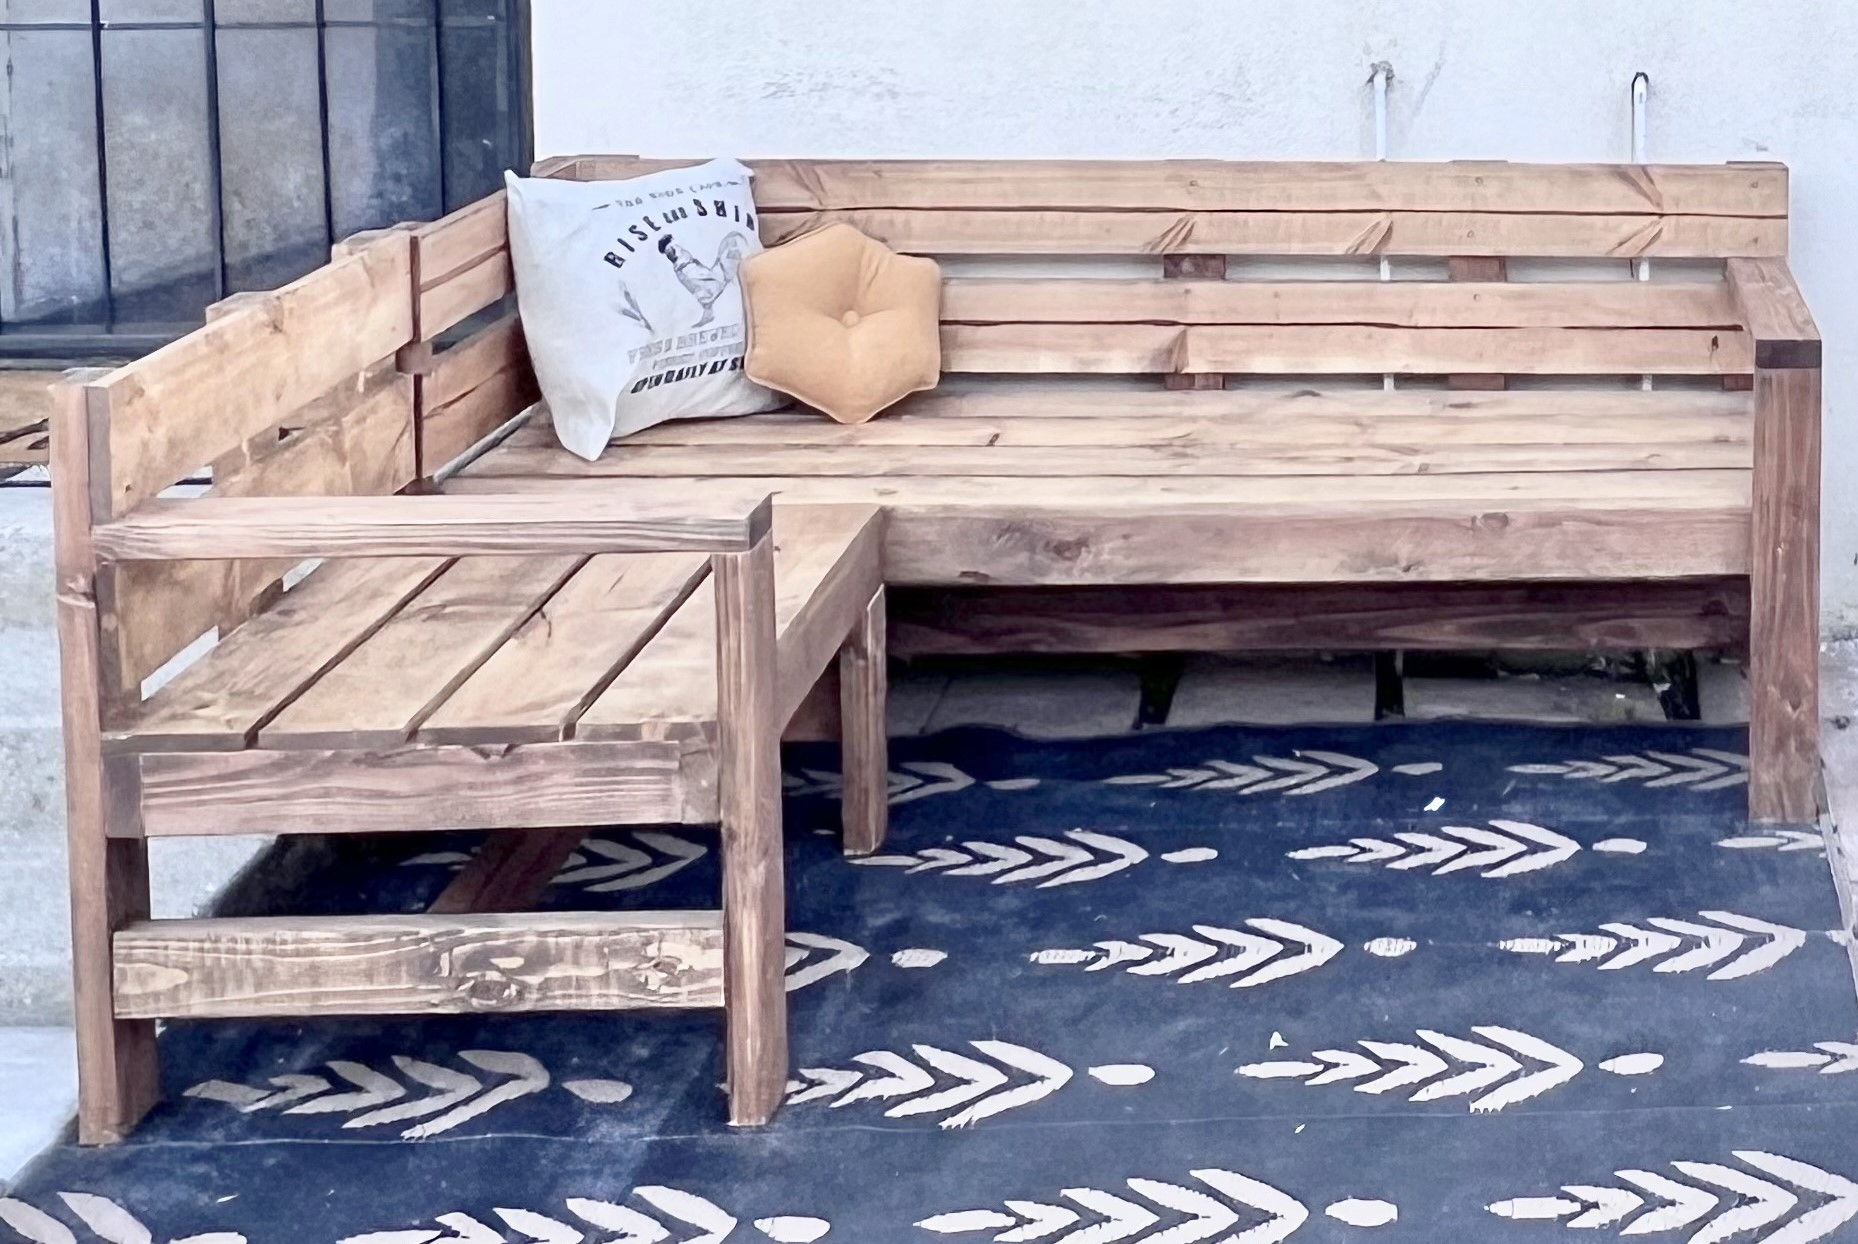
Modified to make an L shaped bench . Absolutely love it! Thank you!
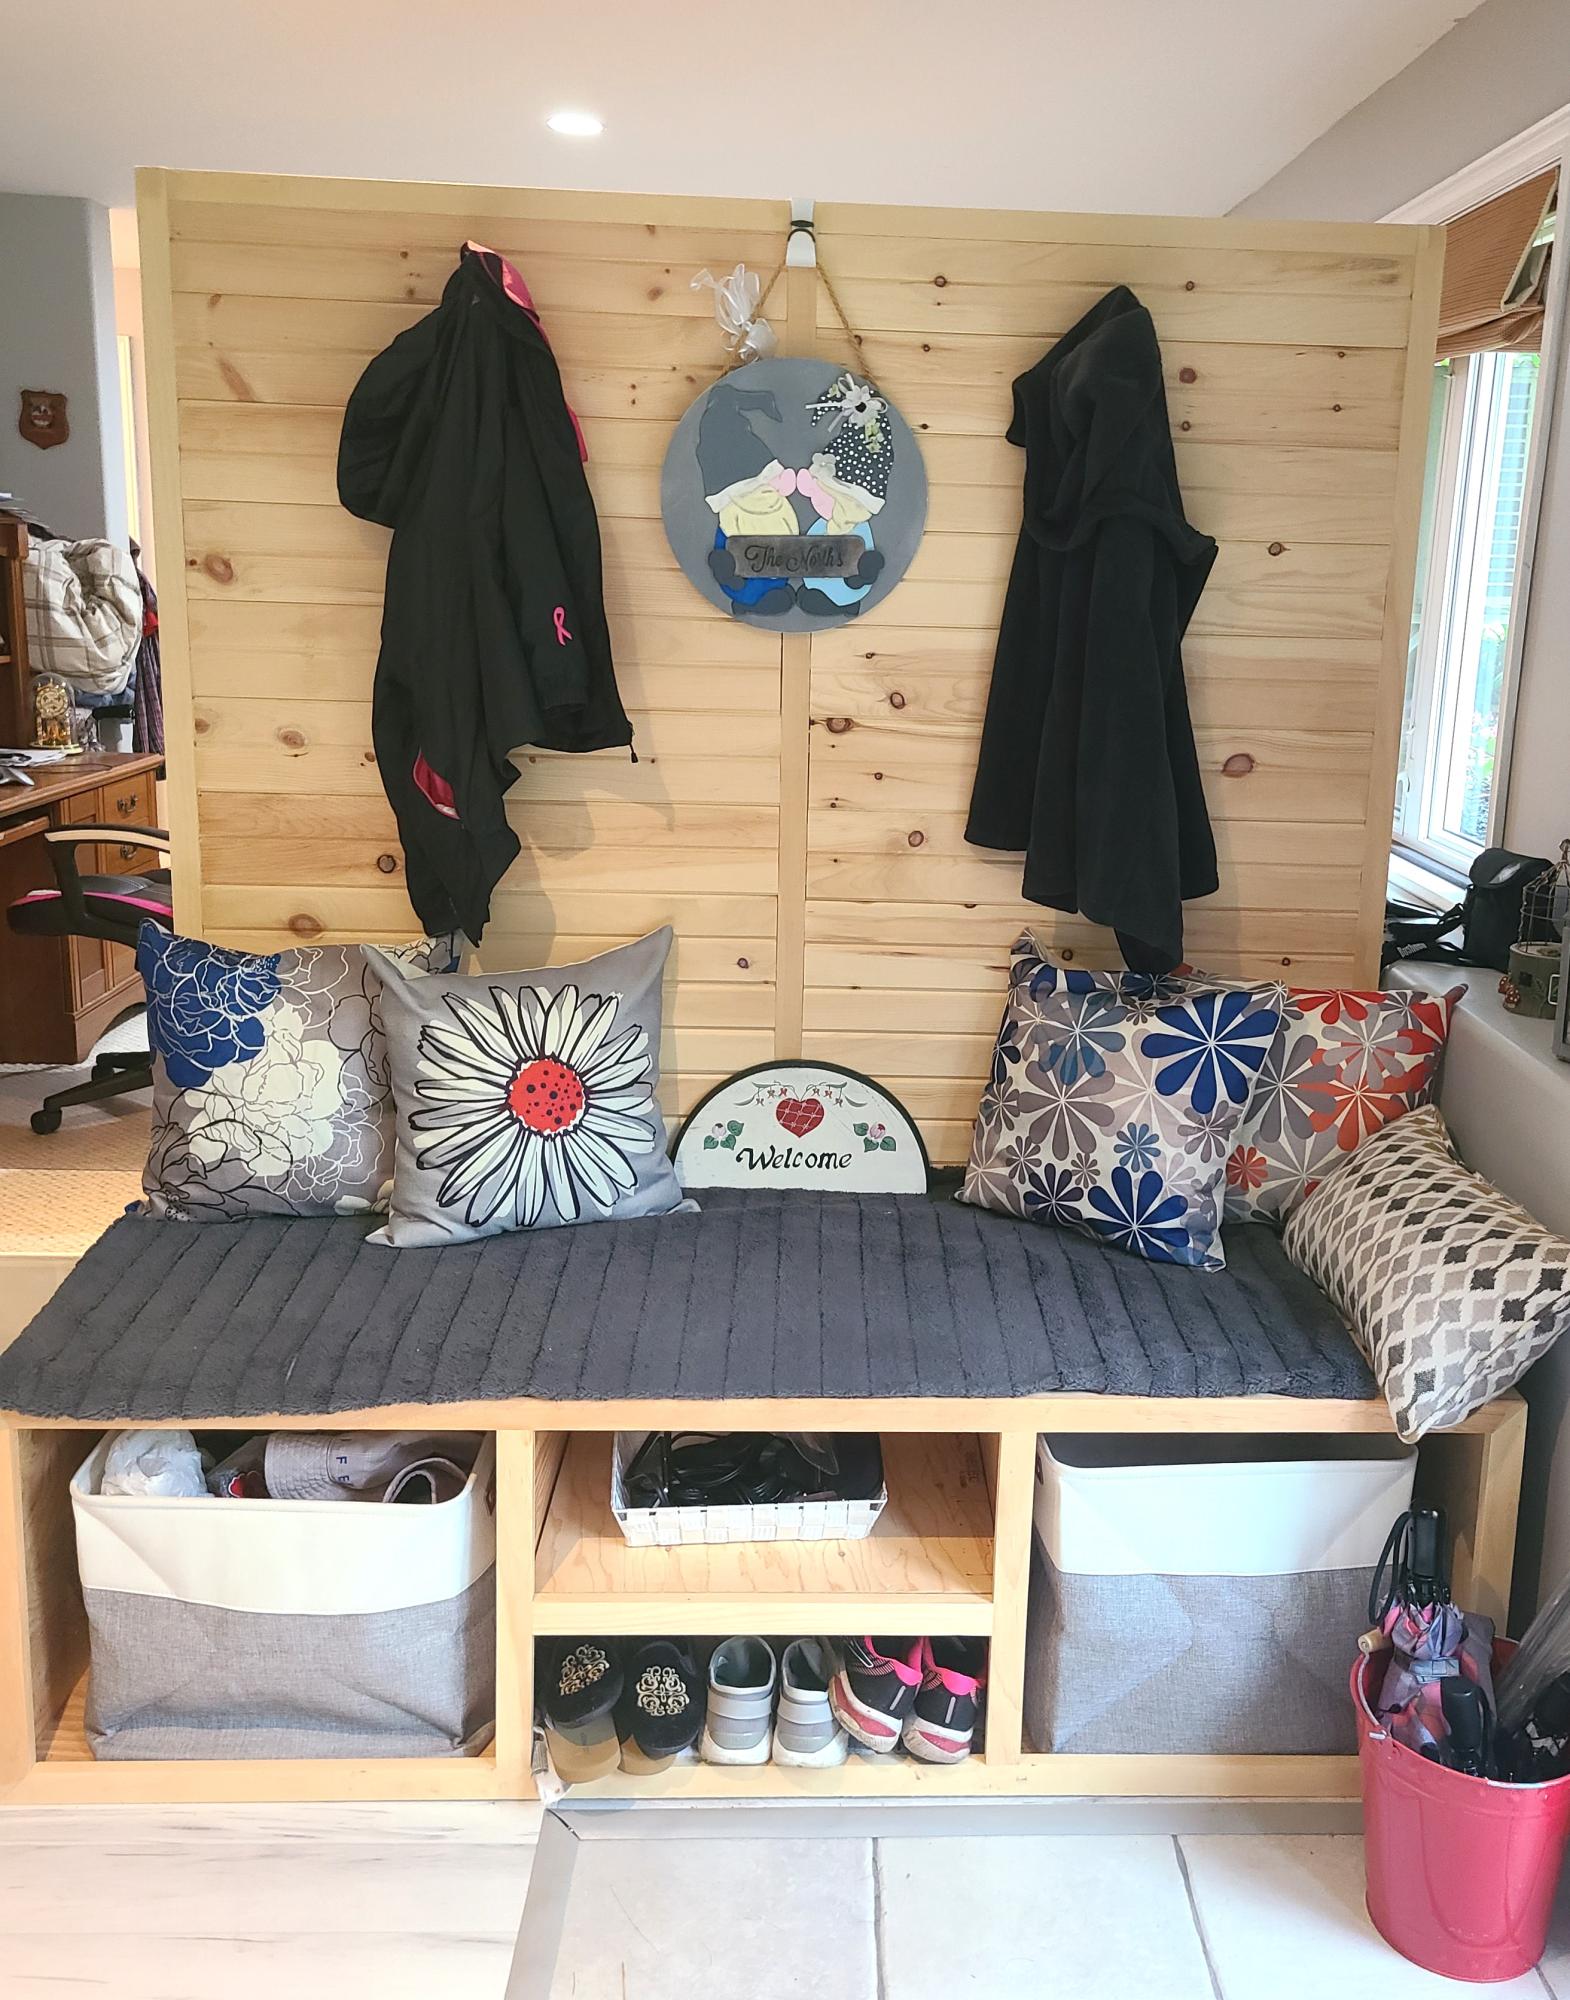
My first attempt at any furniture. My mother has been asking for one of these for a long time. I finally got to it
Todd North
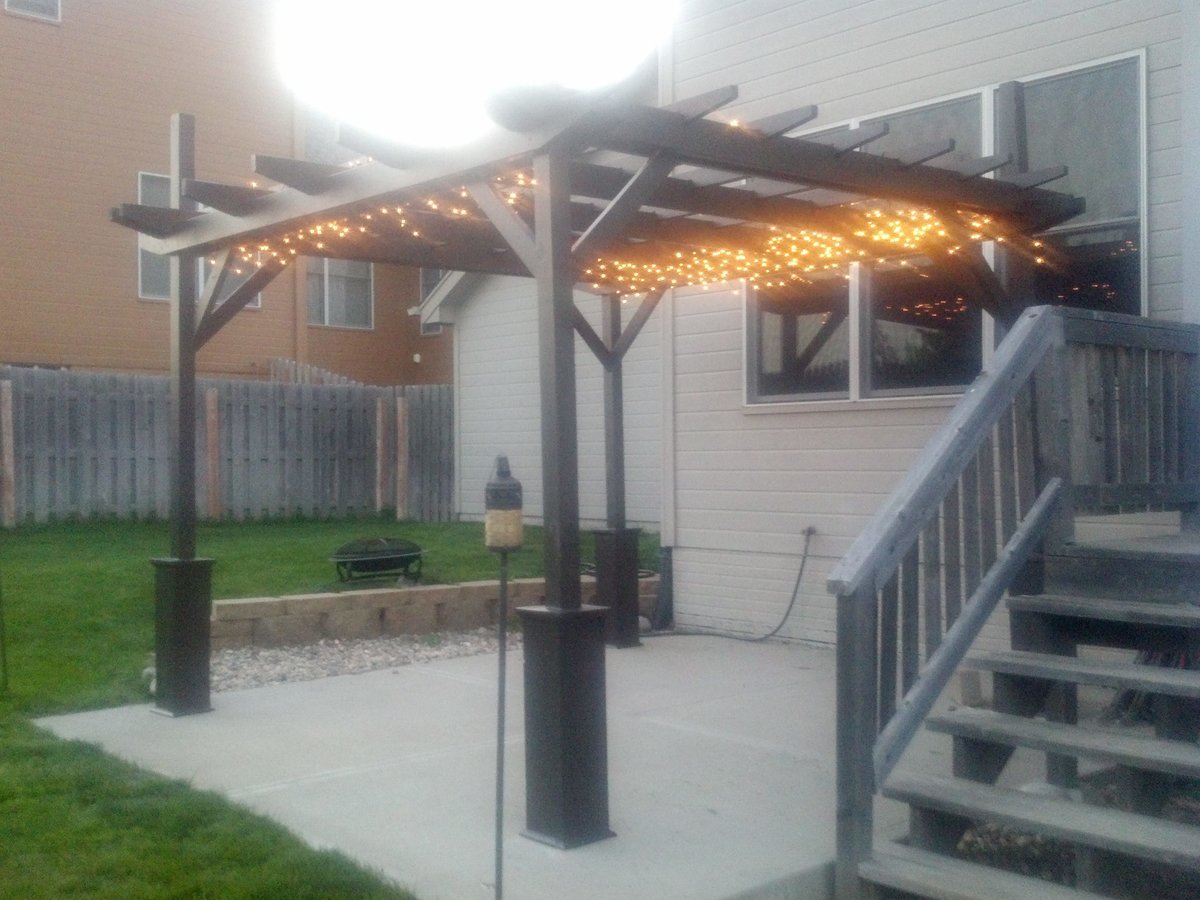
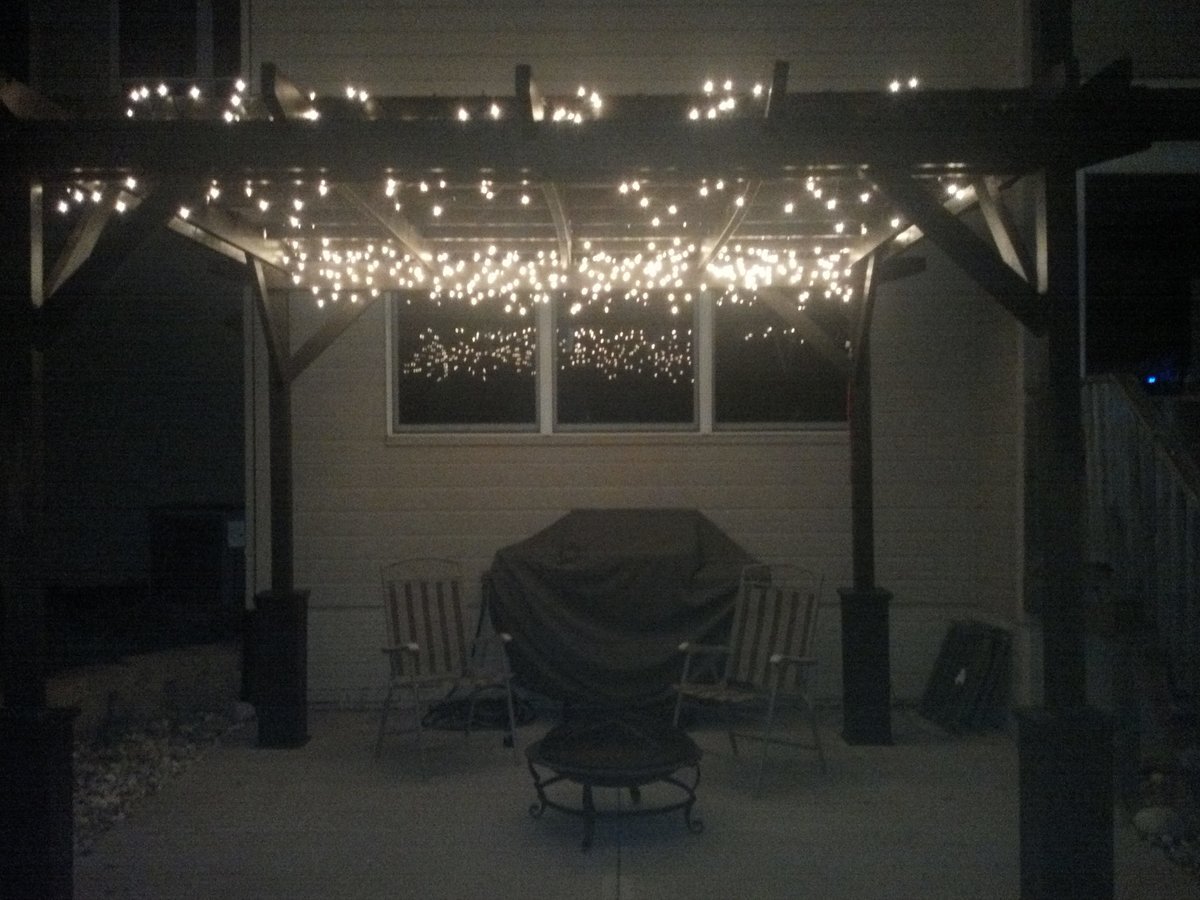
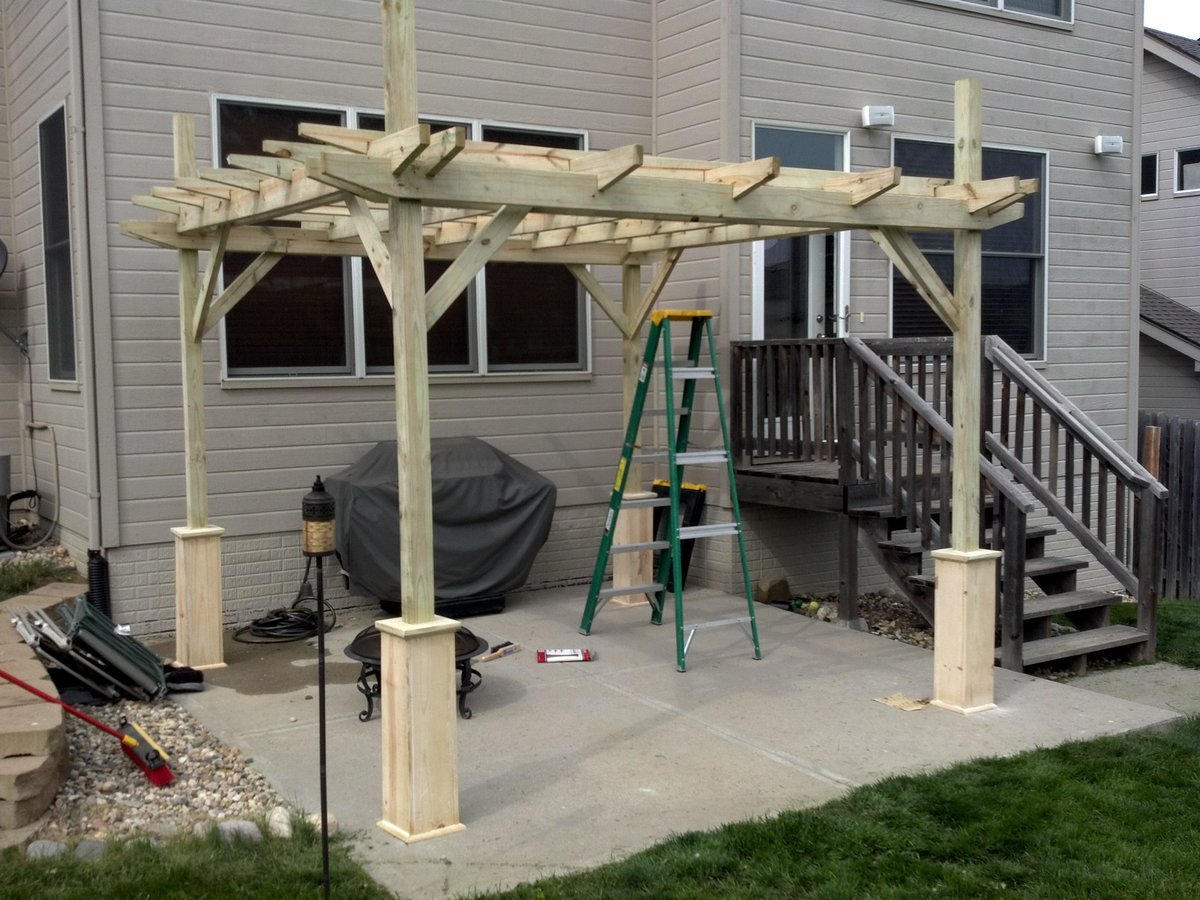
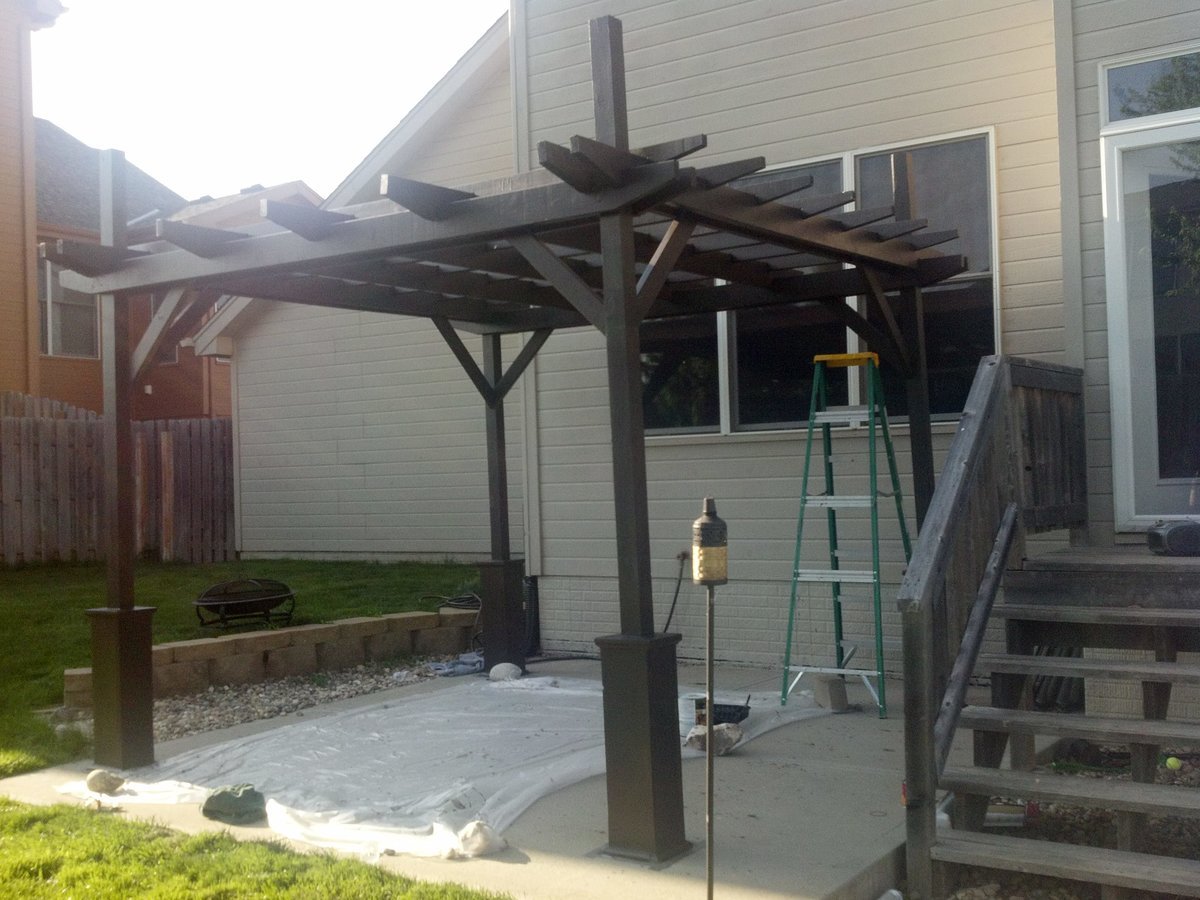
Thank you for the plans! They were easy to follow and my girlfriend and I are very happy how the pergola turned out. I used the 2x6's and 2x4's due to being in Nebraska with heavy snow and high winds often to give it more durability. I can't wait to start on the sectional. Total cost was about 350 dollars...so cheap in comparison to what they sell for.

Fri, 05/11/2012 - 10:16
Beautiful, I love the color you choose too!
PS - for a second, I thought the pergola was on fire! haha! Glad it's just beautiful lights!
Sat, 05/12/2012 - 05:22
Thank you Ana, I have had multiple people say it looks like it is on fire...hilarious :) We will be adding outdoor fabric over the top for shade and gathering outdoor curtains on the posts. Will take another pic when that is complete. This site is awesome and I will continue to support you as much as I am able.
Thanks for the comment Jade!
Thu, 05/17/2012 - 11:45
My husband is DYING to have a pergola. I showed him the plans and he is down to build and is really excited for it! That's our next project as soon as I finish our bed (haha!). Did you paint or stain this?

Fri, 05/25/2012 - 18:54
Great job! I want to build one too! The original plans say advanced, but on this post it says beginner.....watcha think? Can I do it? (so far I've made a picture frame and framed out some trimwork). Thanks for posting....btw, I love the twinkle lights!
Wed, 06/27/2012 - 17:00
You did an awesome job! I'll be showing my husband these pics and hopefully they will inspire him to make us one too! I'd love your modifications to the plans also since we have heavy snow etc.. up here in Quebec too. Thanks for sharing!
Thu, 09/20/2012 - 06:47
Im trying to build a 10x10 just like this but im trying to figure out exactly what wood dimensions I should order before i do. Im going to use cedar and I know i want to use 6x6 posts and I want to use 2x6 on top like yours but i cant figure out what exactgly I need to order. My wife wants me to do the decorative around the posts as well.
Please help!
Sun, 04/28/2013 - 11:27
Hi I was hoping you would share your plans with me I live in oregon I wanna make one of these but I plan on using 12 ft 4x4 posts putting them 3 ft in the ground and I like the way you used 2x4's and 2x6's id like to know the dimensions you used if you modified anas plan what was your spacing and what degree did you cut the outside piece's on the 2x4's and 2x6's I love the design you created from anas plan
Sun, 04/28/2013 - 11:29
oh I would also like to know how you did the cut out notches if you dont mind
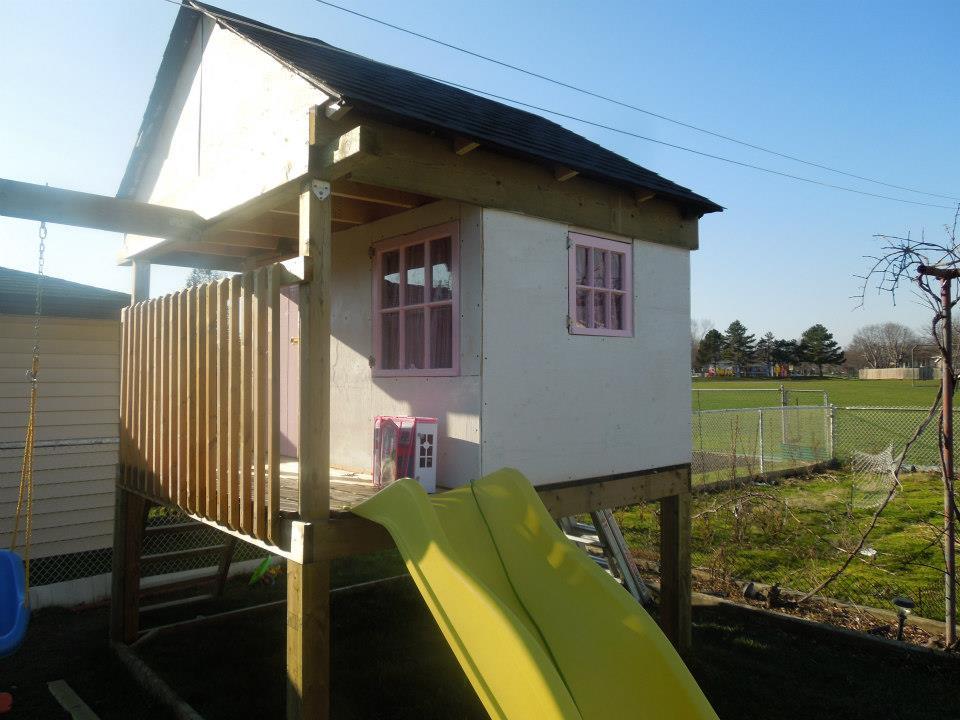
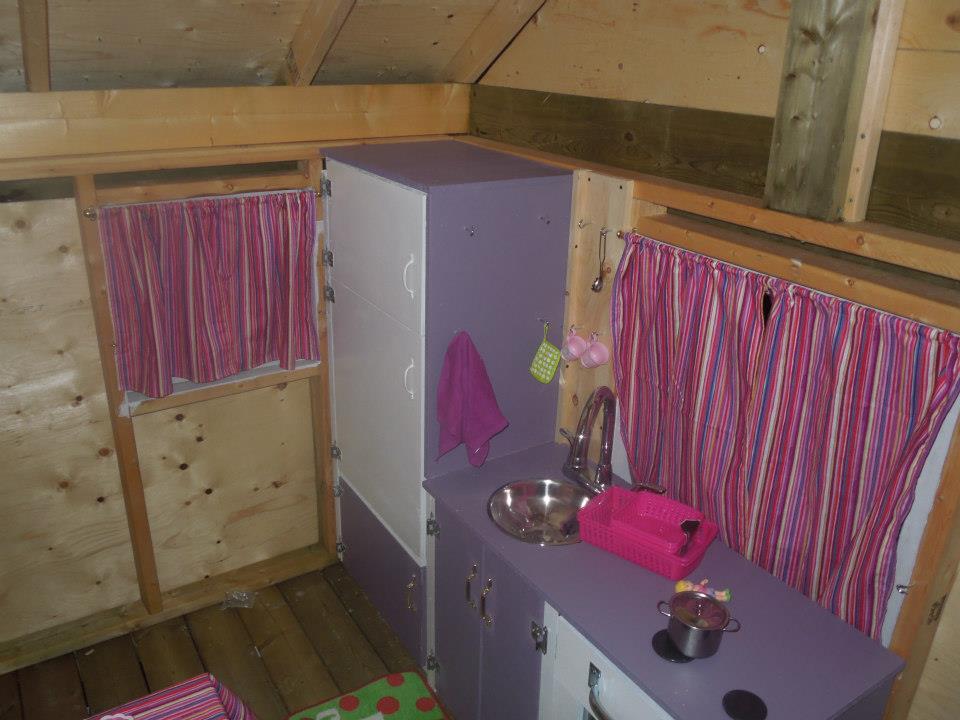
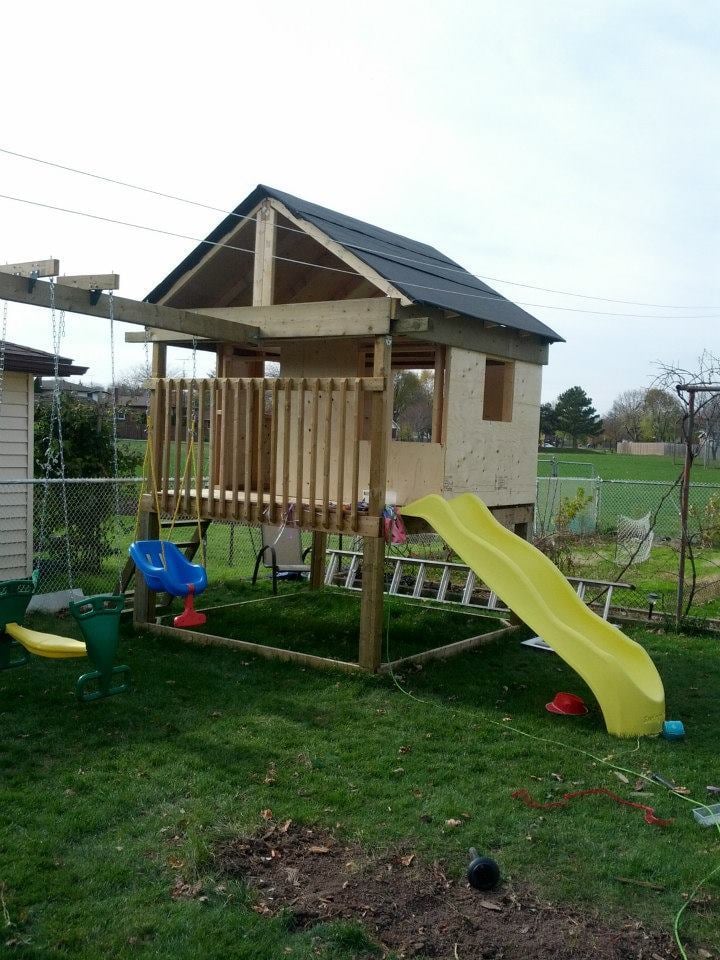
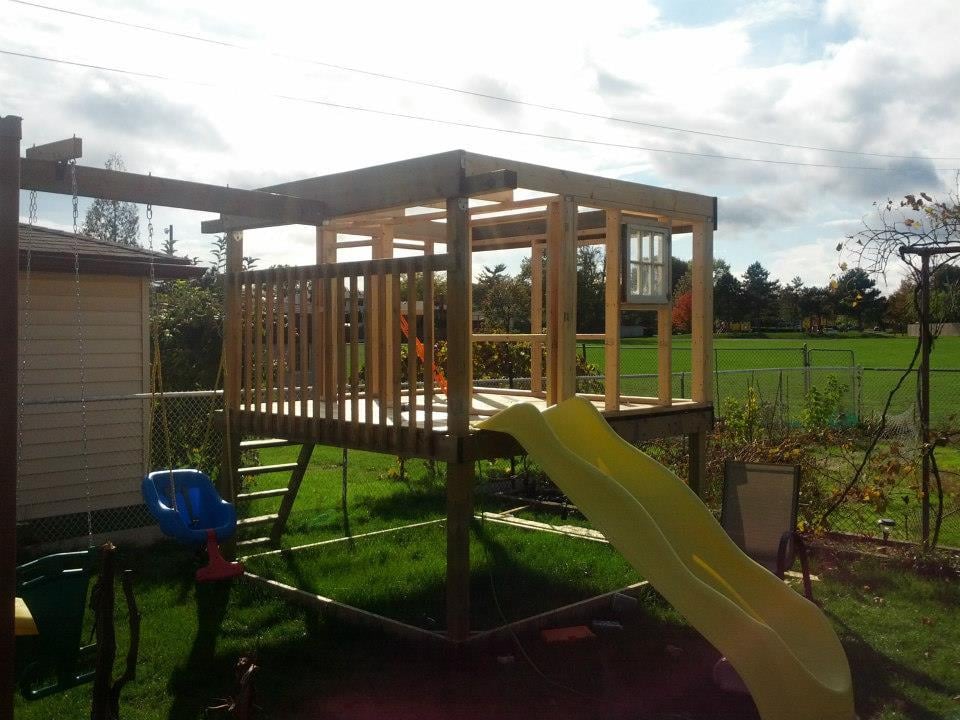
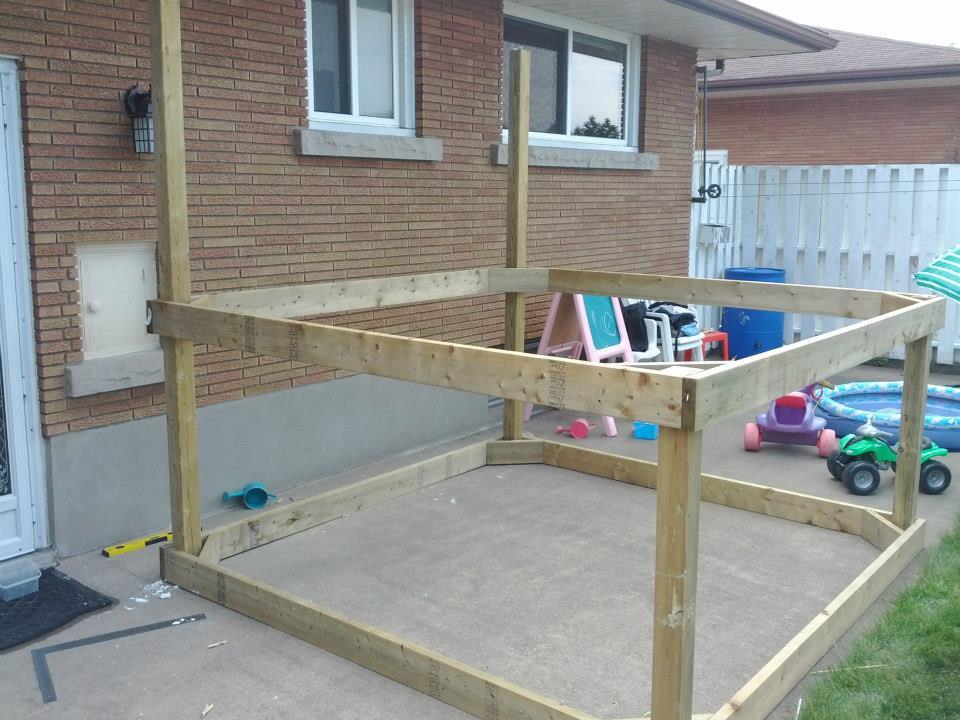
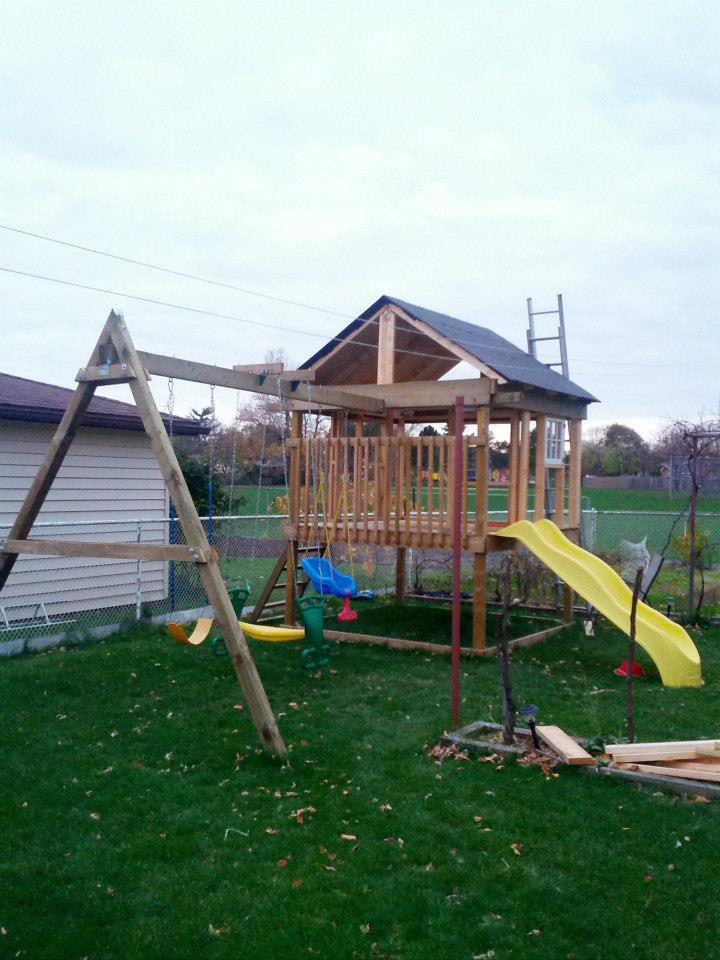
I combined a few different plans here, mostly the Playhouse deck, swingset.
I haven't finished it yet, this spring I want to finish the exterior as it's just primed plywood right now. Still going to add a window above the balcony (there is a loft up there).
I insulated the roof/ceiling and will insulate the walls when we finish it. In the bottom we'll be putting in a sandbox with a cover that folds up into benches.
It was a fun project and should give our girls many years of fun.
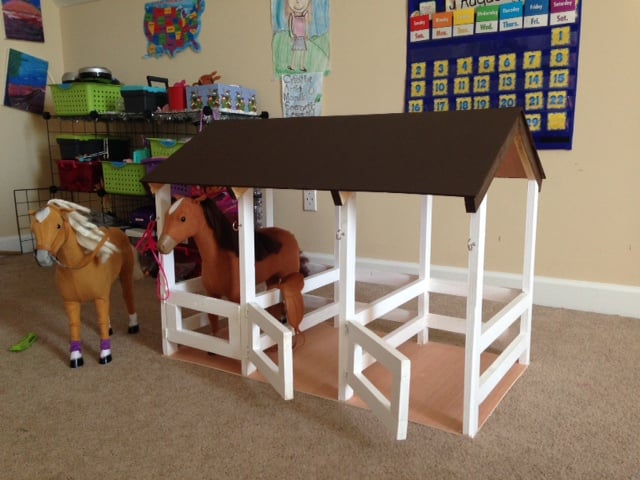
This was a Christmas gift for our three girls. They each have an American Girl-like horse. I saw all the stables in the brag section with double stalls. But I decided to make it into a triple stall instead. It didn't add much to the cost of the project and only took a little longer to complete.
I added some hooks on the outside of the stalls so they could hang the bridle. Our girls love it.
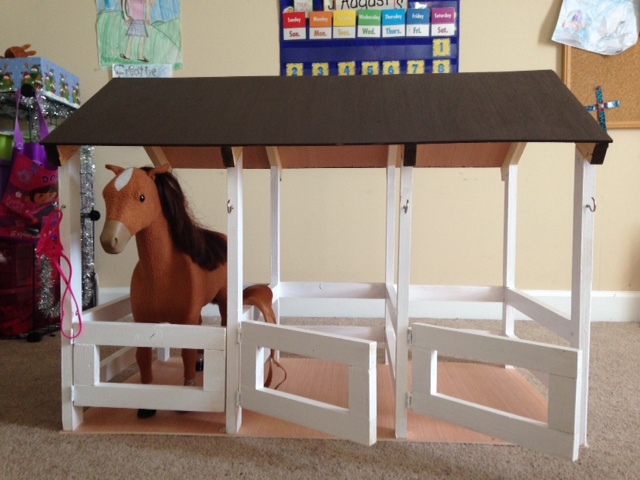
Thank you for all the wonderful plans!
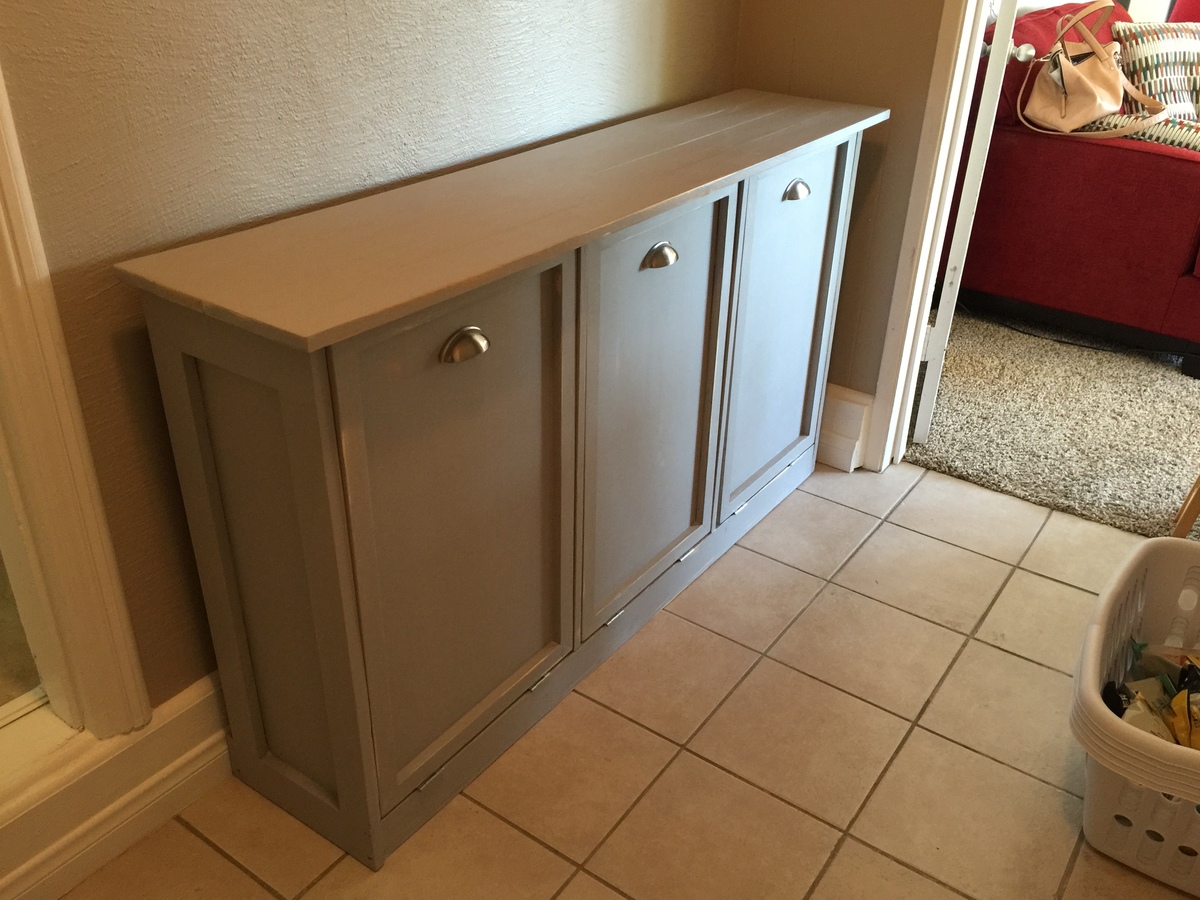
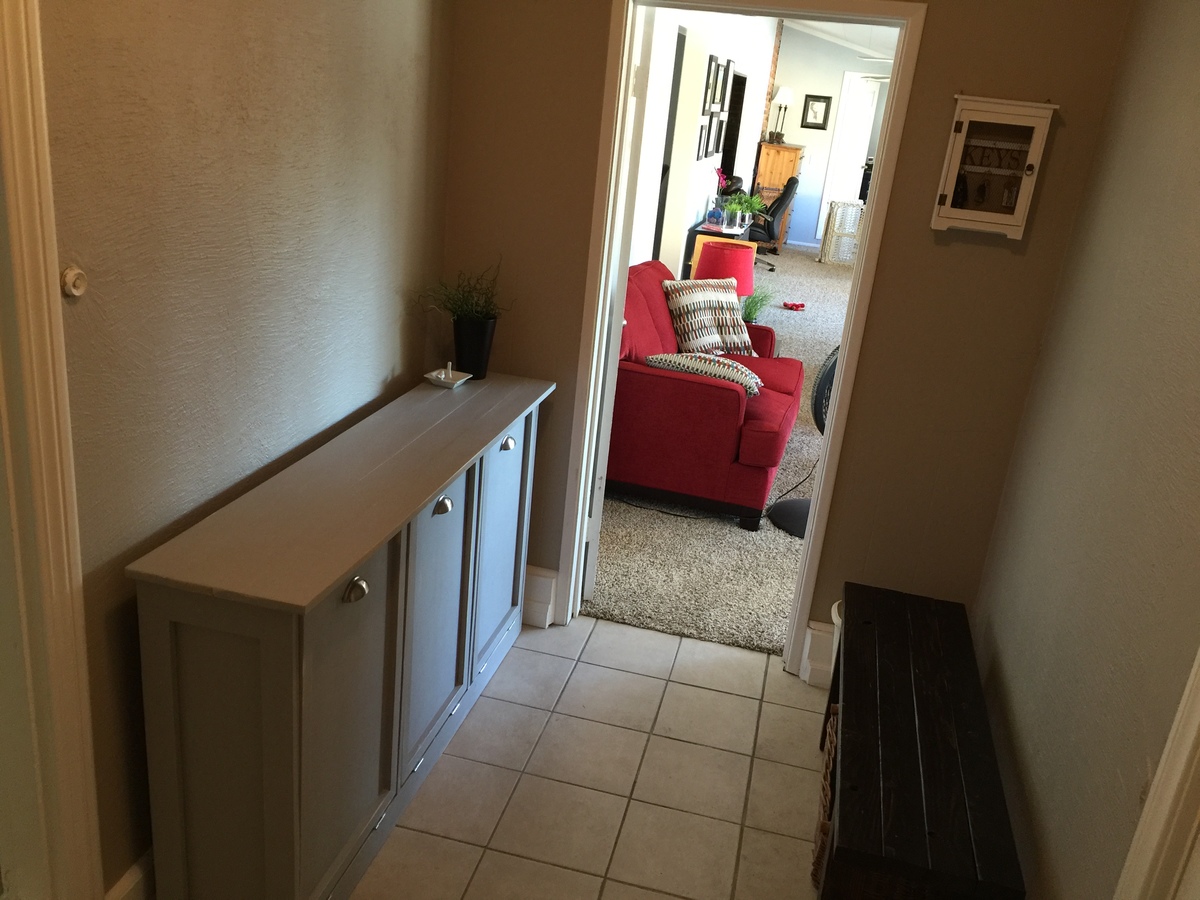
i used the modified plan of the tilt out waste bin that Shanty2chic put out as a three bin laundry sorter. It turned out great!
It is finished with chalk paint, lightly distressed.
Fri, 10/30/2020 - 10:44
Hi, you mentioned that you used the modified plan of the tilt out waste bin that Shanty2chic put out as a three bin laundry sorter. Can you share that please? Thanks!!

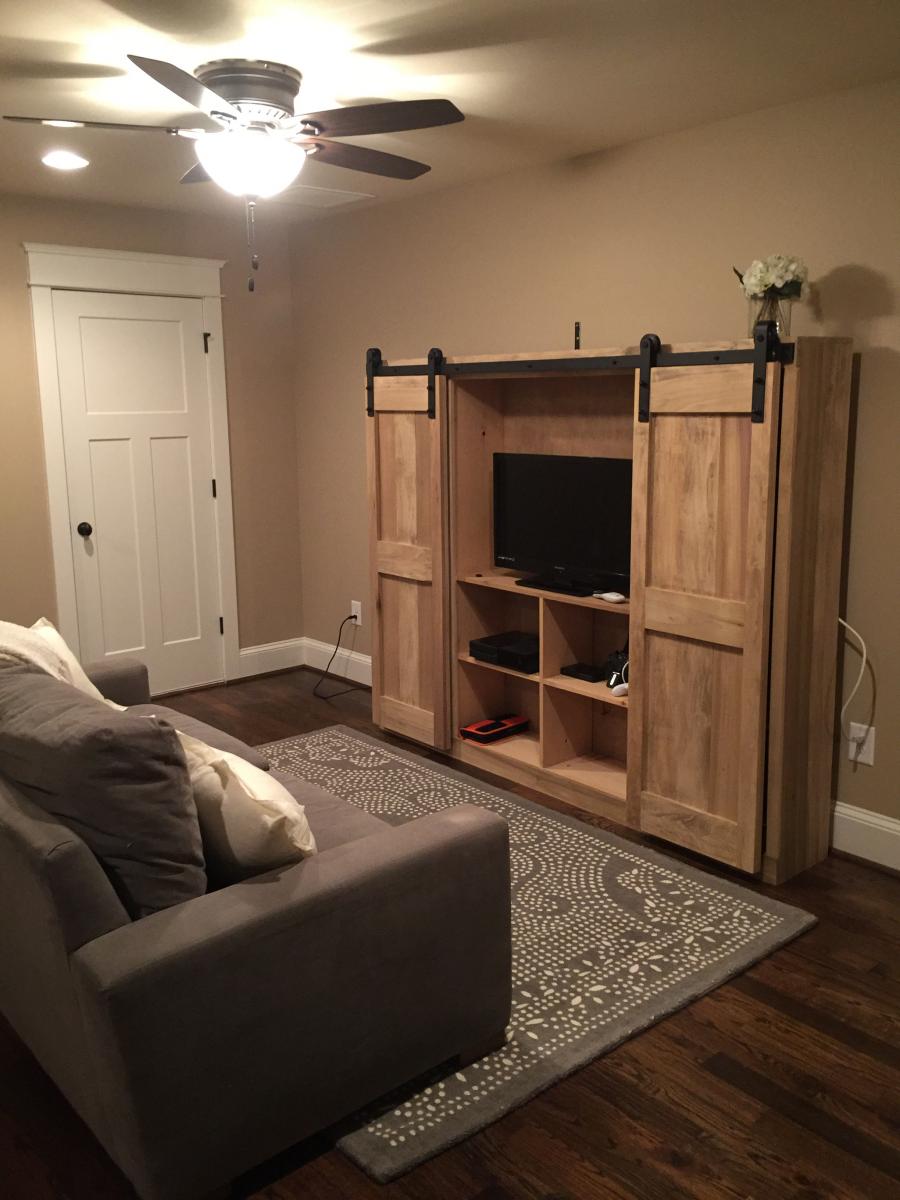
This Project took about a day and a half. Hardware was from amazon for about $70 plus another $30 for additonal rollers since the set only comes with metal bar and 2 rollers. Stained in Weathered oak. Its built with poplar wood. This was about $400 to build with all the hardware.
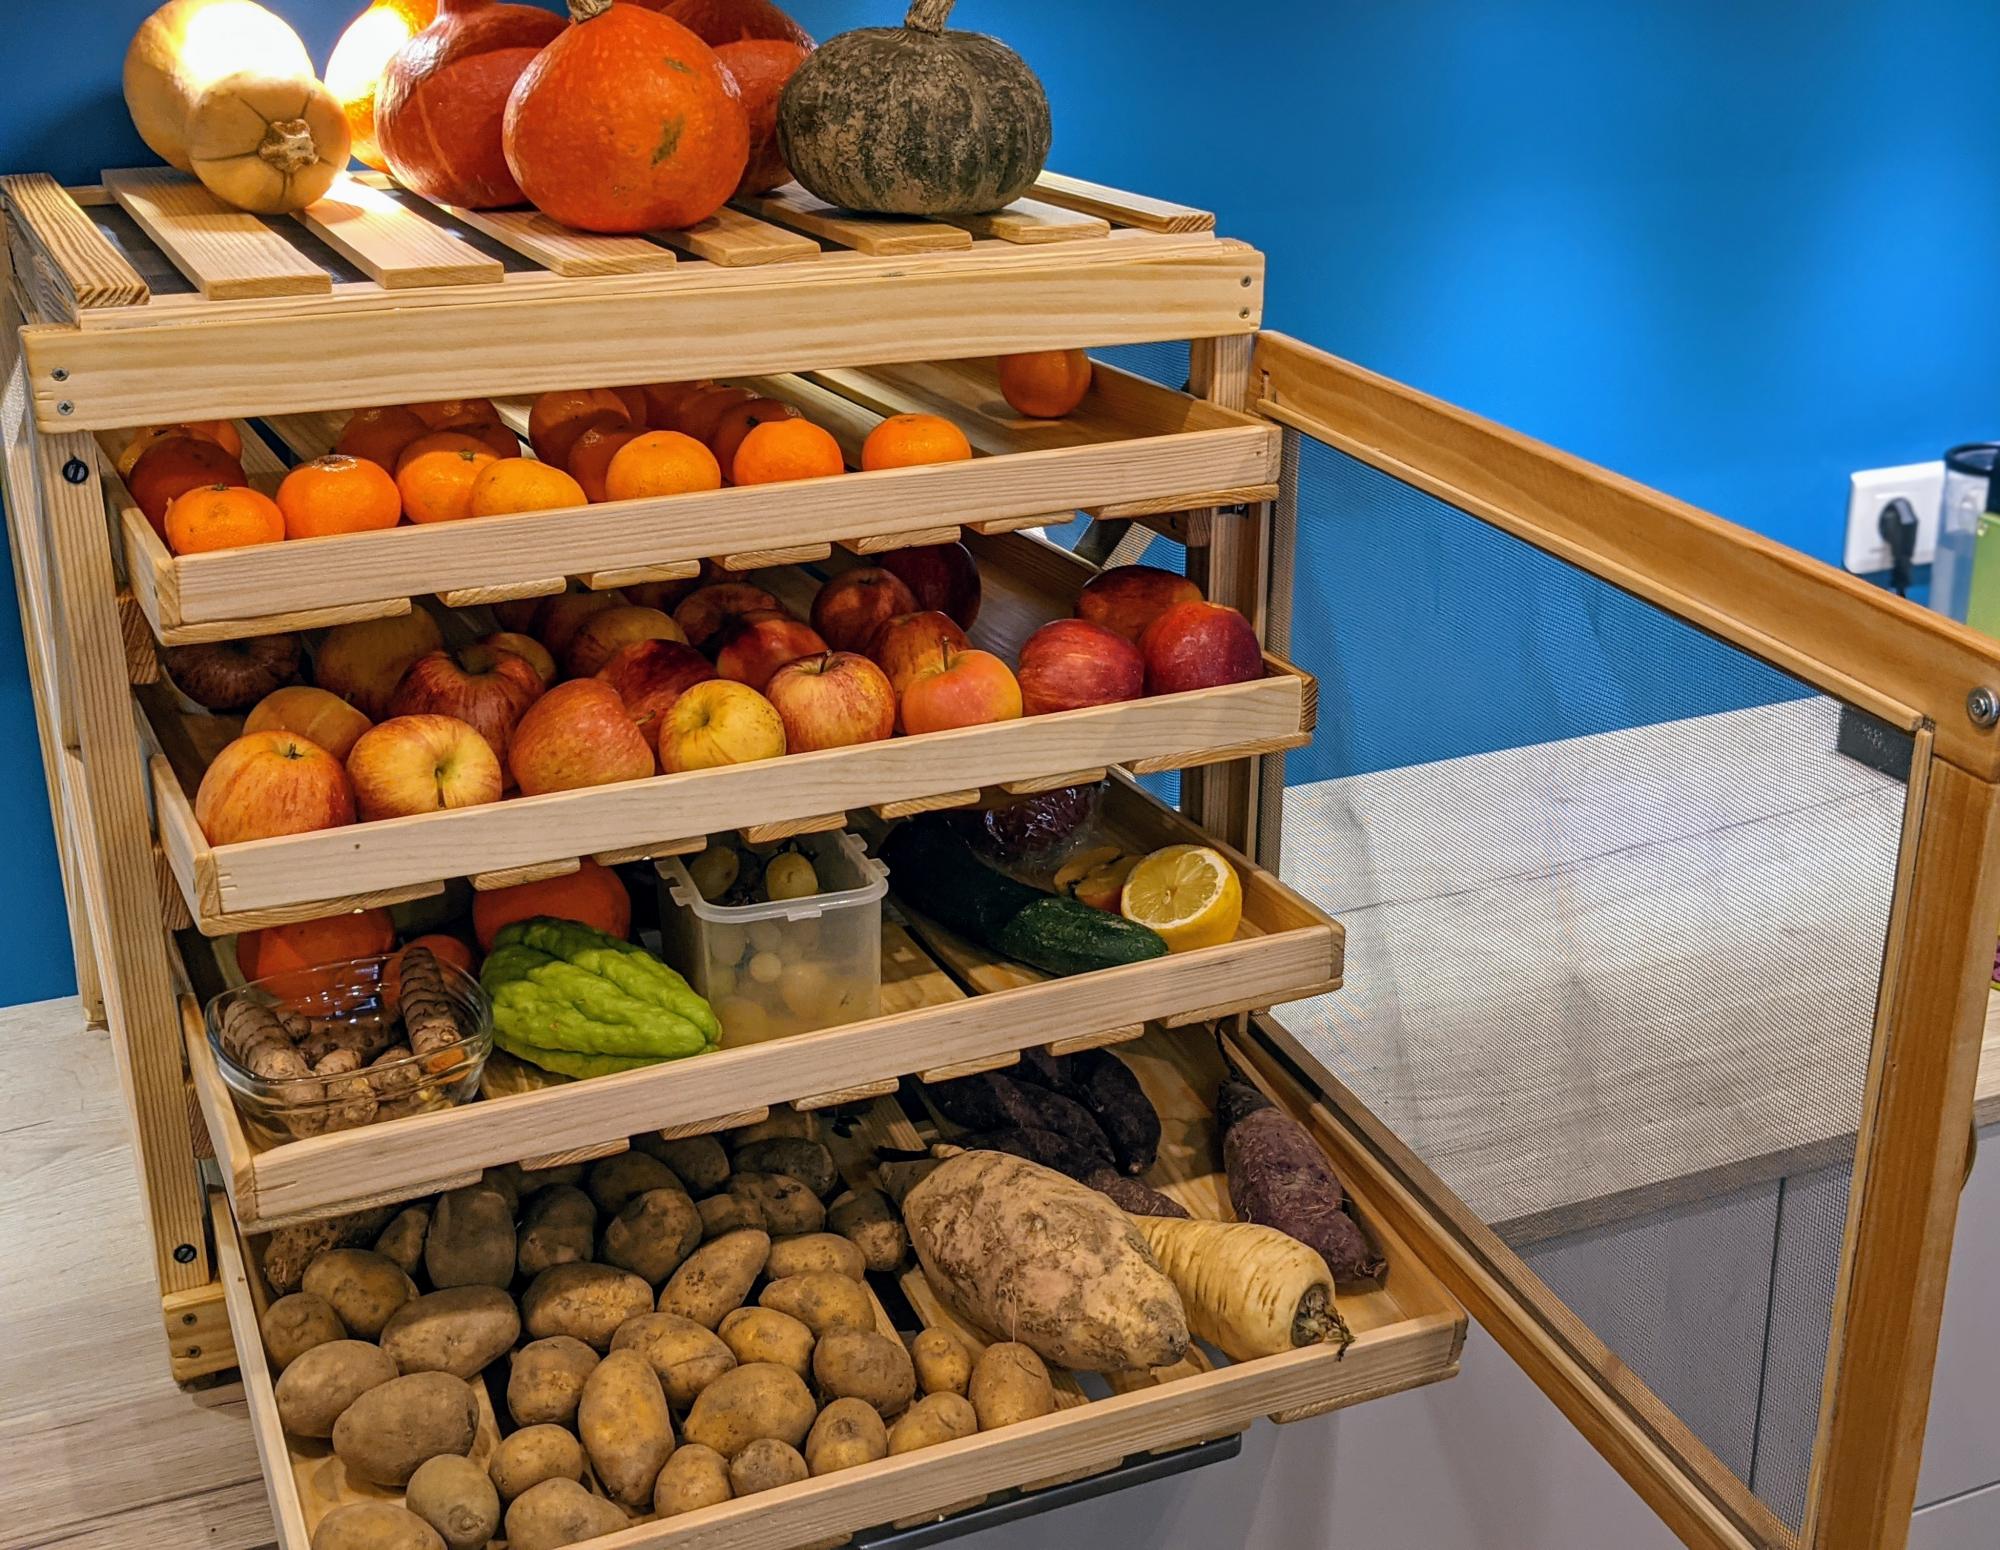
This is the application of the "Vegetable Rack with Slide Out Trays" from Ana White.
I just added a door and some mosquito net, to avoid midges in summer.
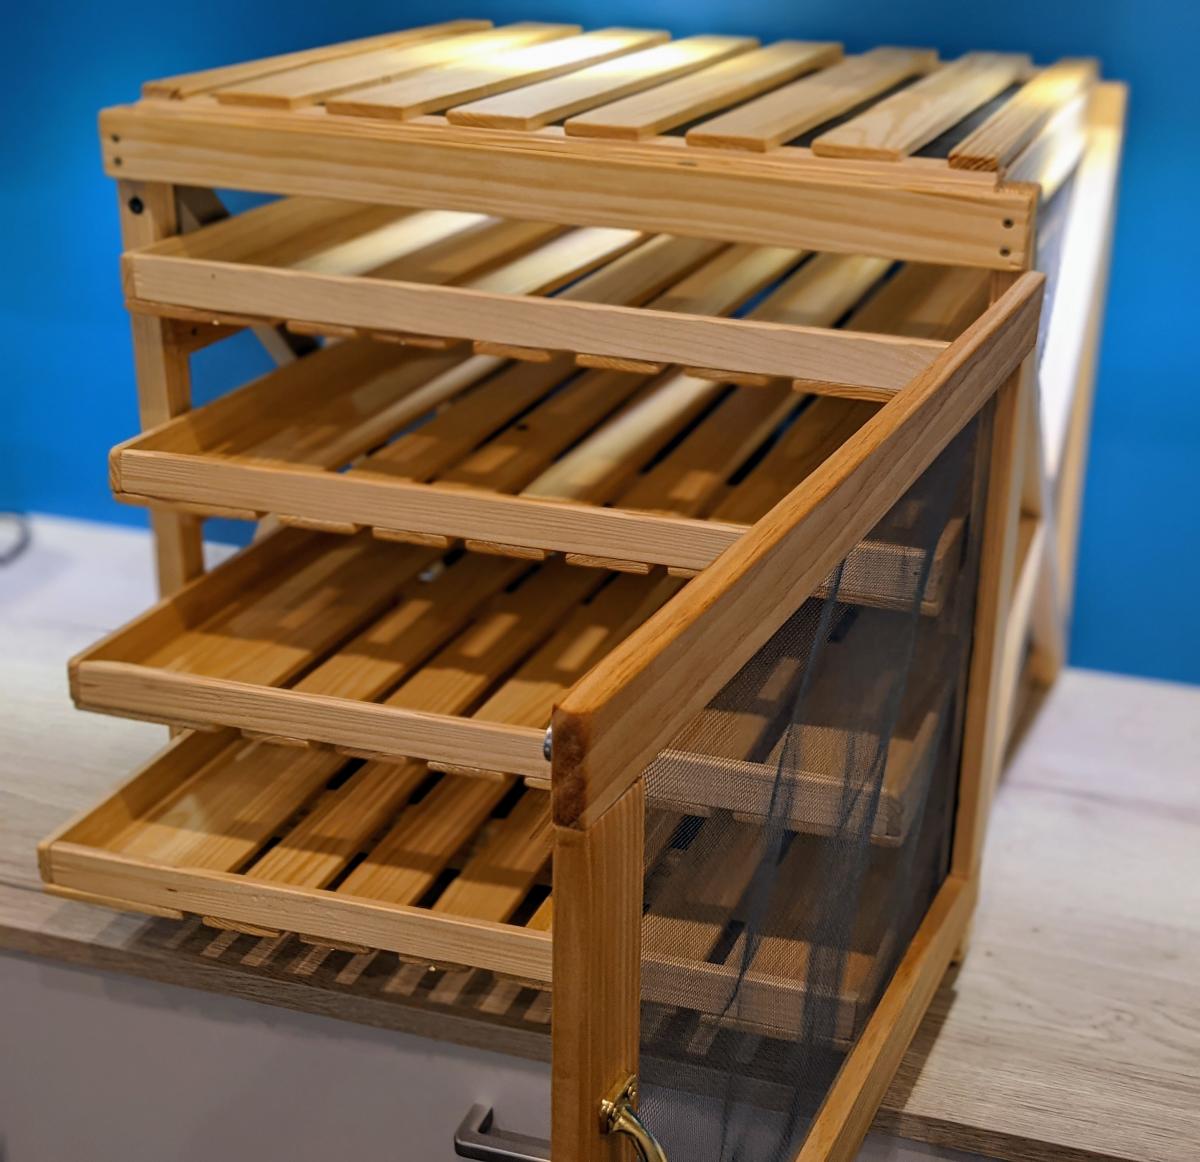
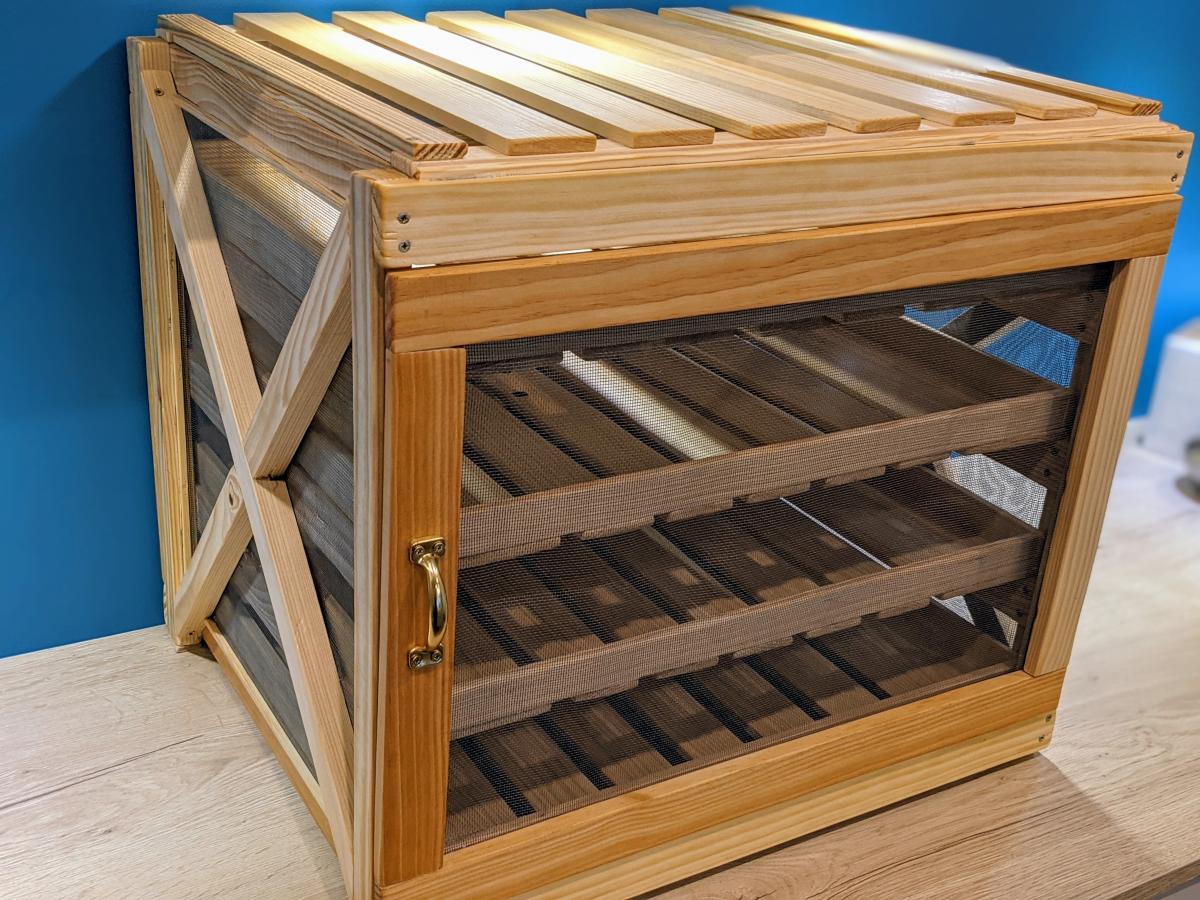
Just had to raise the top to make room for the Amazon purchased barn door rails

My father and I made this awesome poolside towel cabinet using the Benchmark Cabinet plans. A super easy 1 day build and it looks amazing on the patio. Bring on the pool weather!

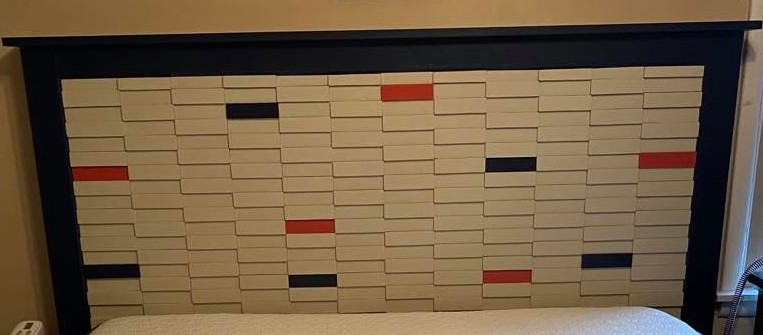
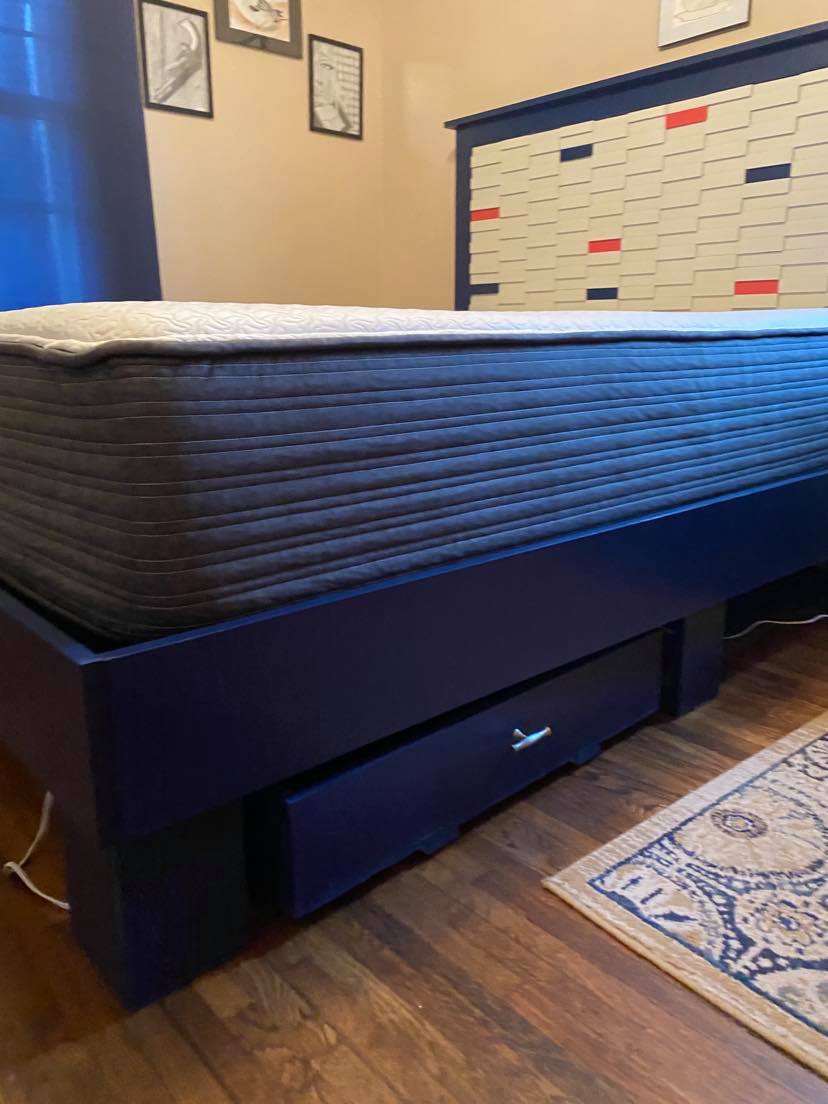
I have an adjustable bed frame so the rails are not supporting any weight. Each piece of wood in the headboard is 5.5 inches long and 1.5 inches tall. I used boards that were 1/2 inch thick and 3/4 inch thick and put them on in the checkerboard pattern. I have some navy blue and coral in my bedroom so I decided to paint a few block with those colors. I used poplar wood because I thought it would hold up better and it wasn't too expensive. It took a while to build because of cutting all of the individual blocks.
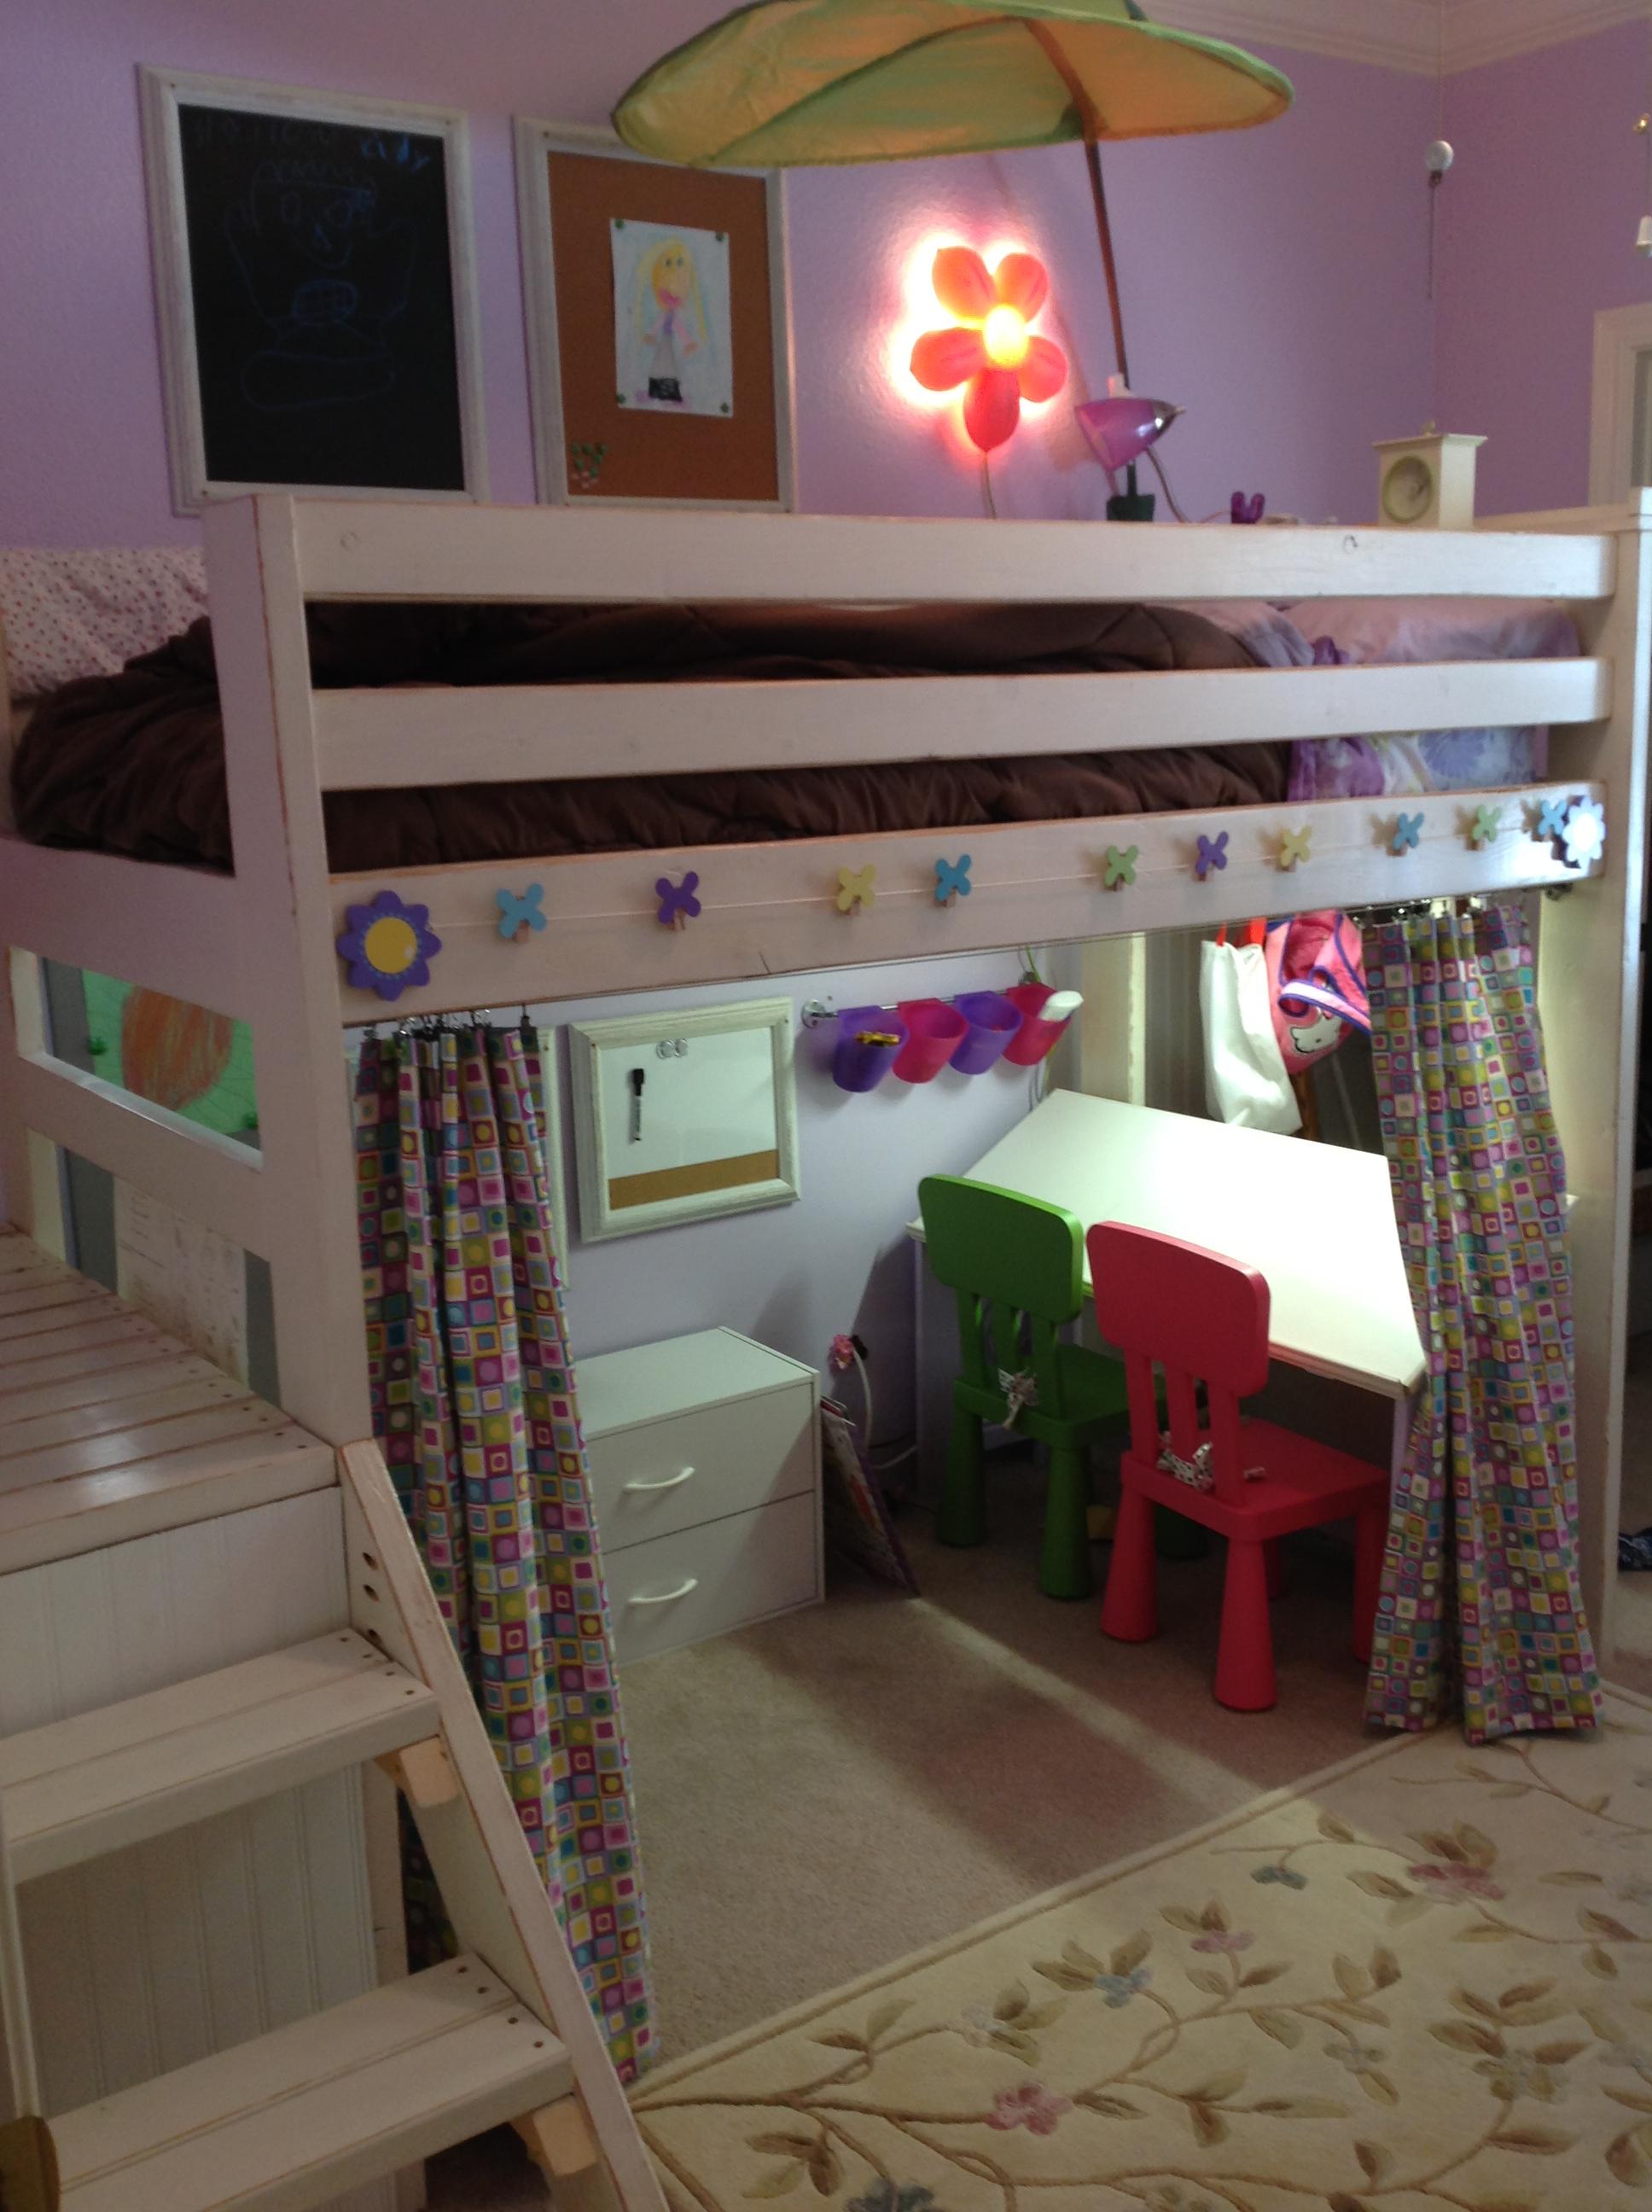
After I built my nephew's AT & T Park bedroom, I had to figure out what to create for my 5 year old niece, Maggie. She loves drawing, so I settled on an "art studio," where she can work and display her art.
The bed was created using Ana's Camp Loft Bed Plans. I narrowed the stairs by 4 inches as one of the other posts had done. I also put shelves under the stairs like another post I read on this site.
I built a small drafting-type desk for underneath using my new Kreg Jig (Man, I love that thing!). I also made some curtains to pull shut in case Maggie wanted to escape from the world. Chairs, storage containers, flower light, and leaf above bed are from Ikea.
I bought some cheap picture frames, and put a bulletin board in one and a chalkboark in the other for above the bed, and the string hanging across the front of the bed is from Target. It actually has clips to hang artwork.
I painted the bed using Ana's antique finish with the Minwax pen. It came out fantastic.

Tue, 02/26/2013 - 16:10
I love all the personal touches. You are so getting Aunt of the year:-)
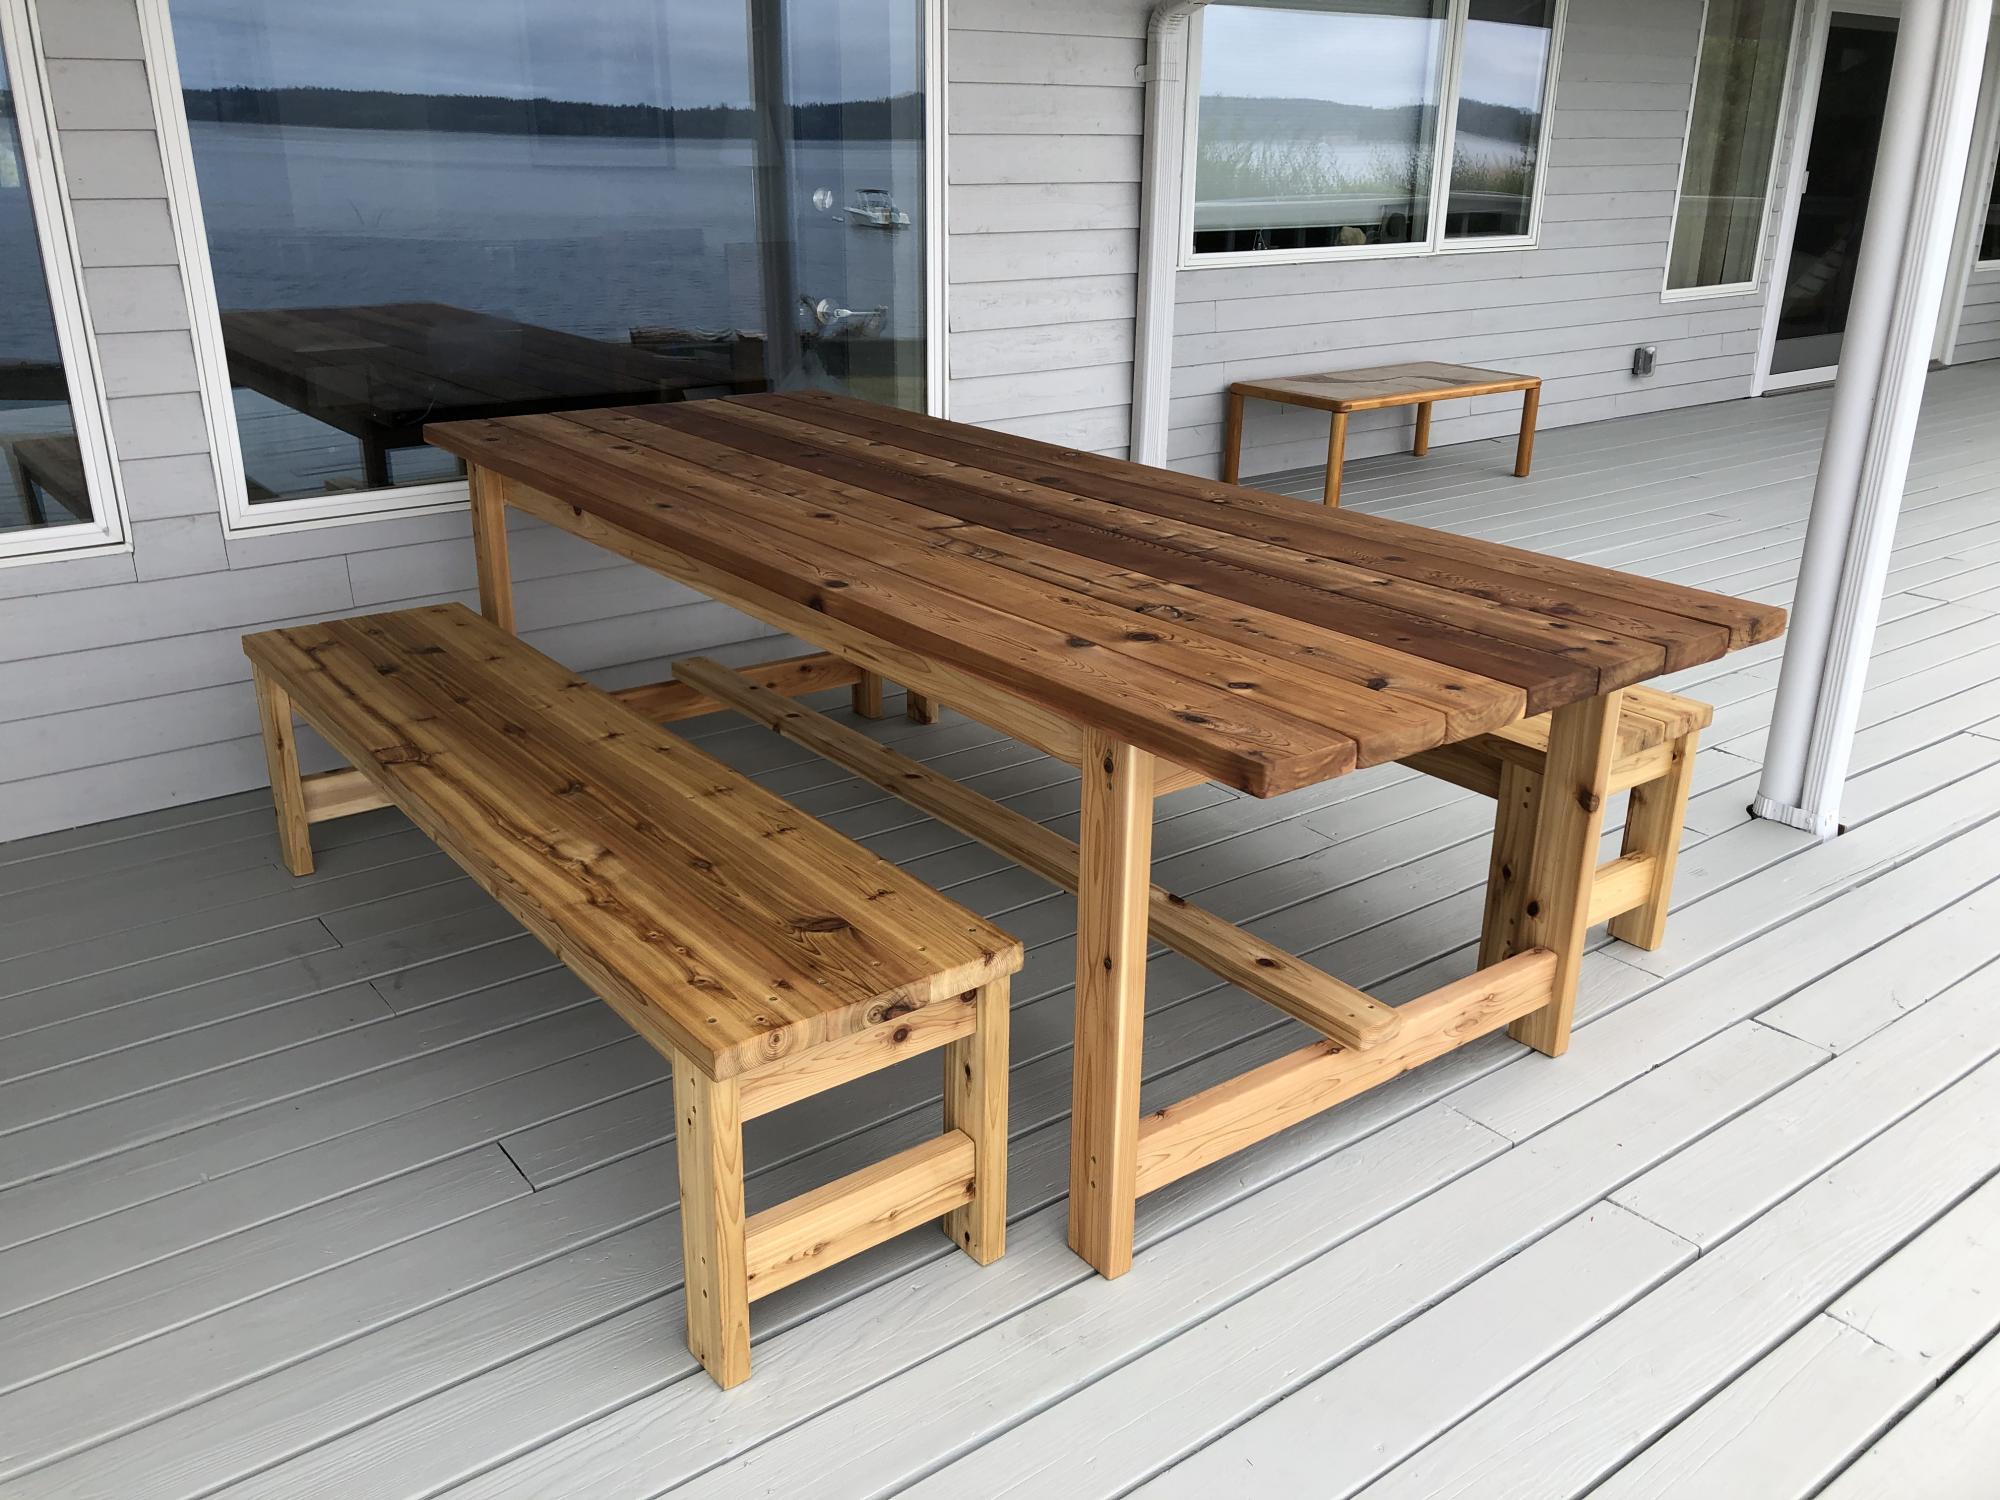
Built this deck dining table and benches from Lowes cedar, and the results way exceeded my expectations! The plans were so well written, it was easy to slightly modify (made both table and benches wider and longer) and the build was very simple. The clear directions helped give me the confidence to do this and we have got so many nice compliments. There was nothing this sturdy and simple even available to buy. I even built a coffee table and bar table after modifying the plans a bit. Thank you Ana!
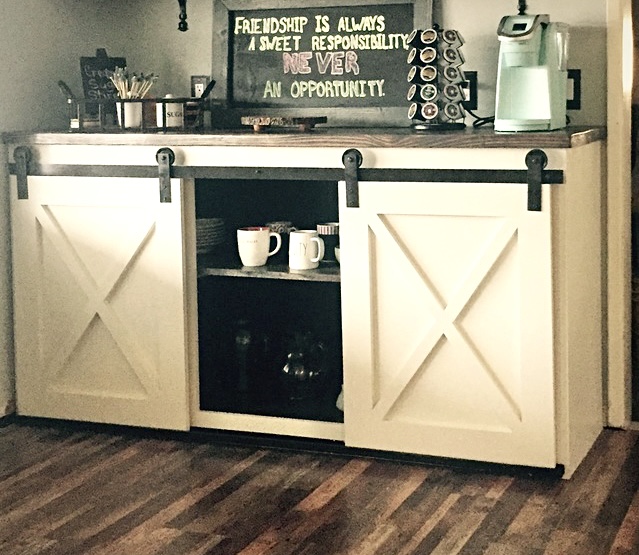
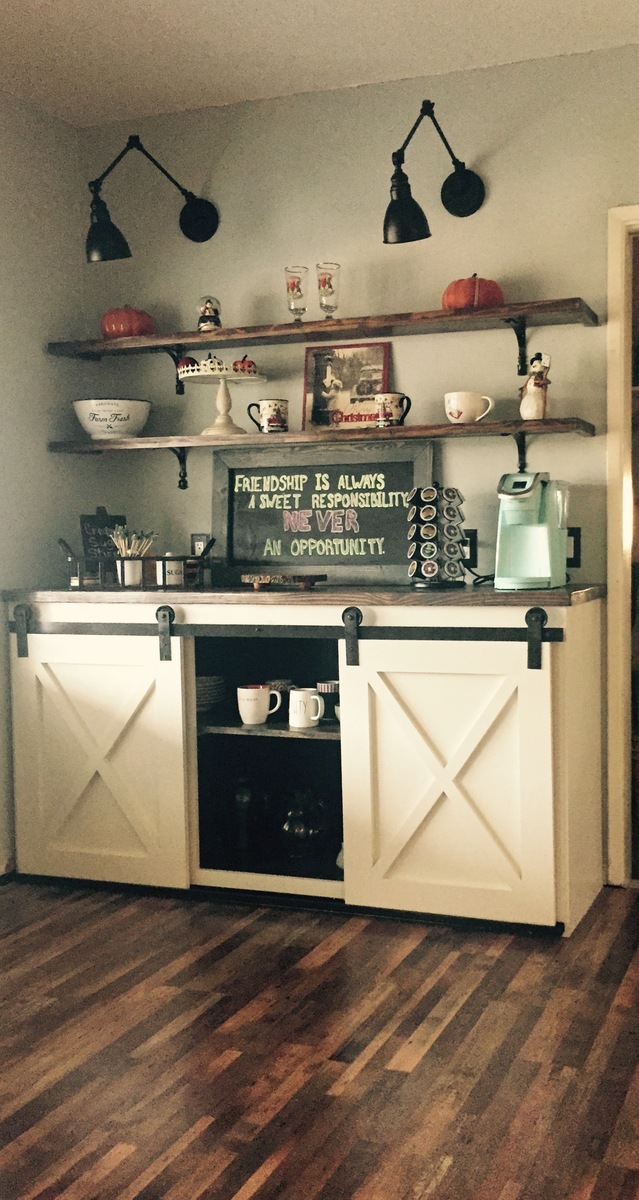
My husband building this using Ana White plans. I just love getting to put a bunch of different items almost as a display. I love this coffee bar and it is now almost the focal point in our dining room. I just love the presence it has in this room.
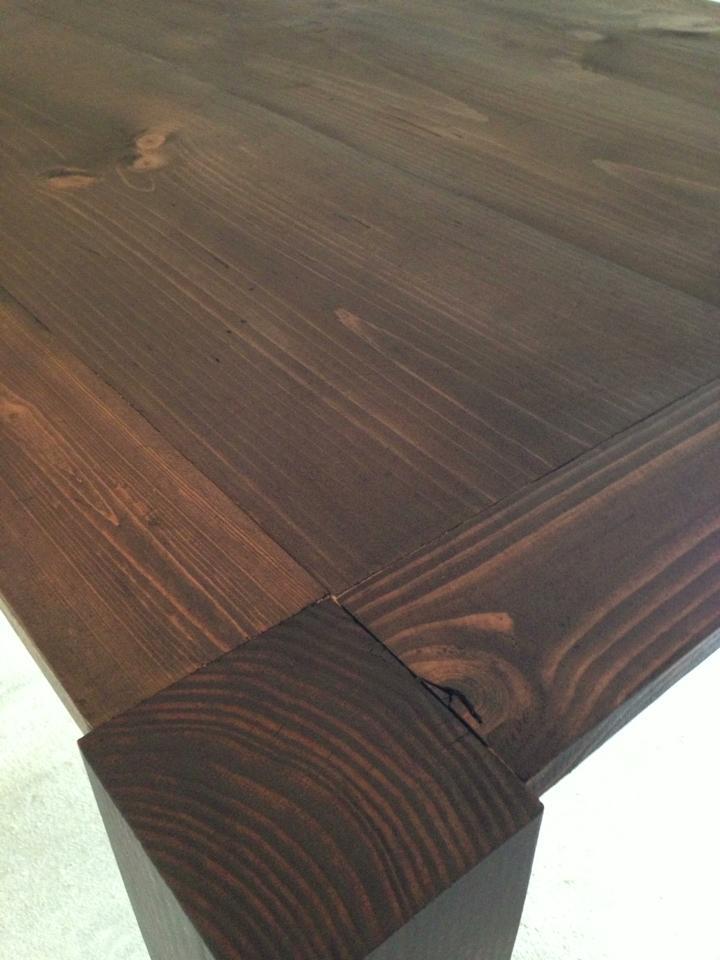
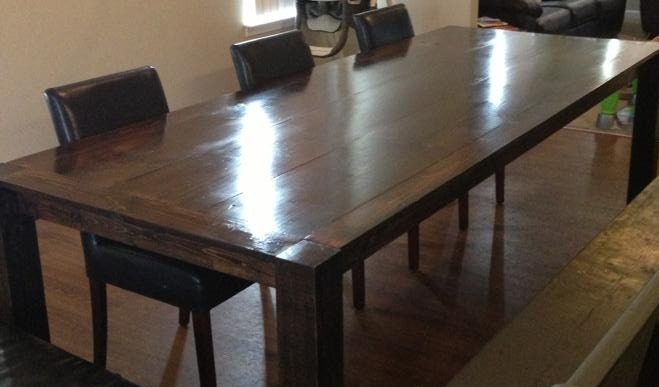
We needed a Dining table to fit our growing family and our friends. Combined ideas from the iTable, Farmhouse and Big Ur table plans. Used 8ft boards so with the breadboards it measures roughly 8ft 7in long. Rustoleum Kona stain. Only took the weekend to build. Thanks Ana!
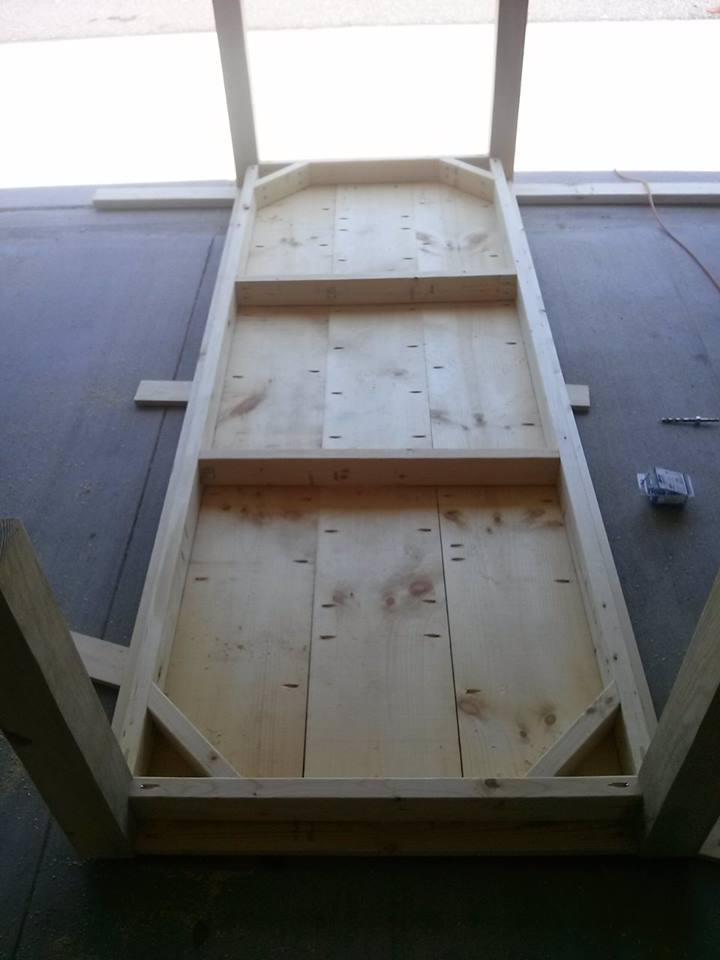
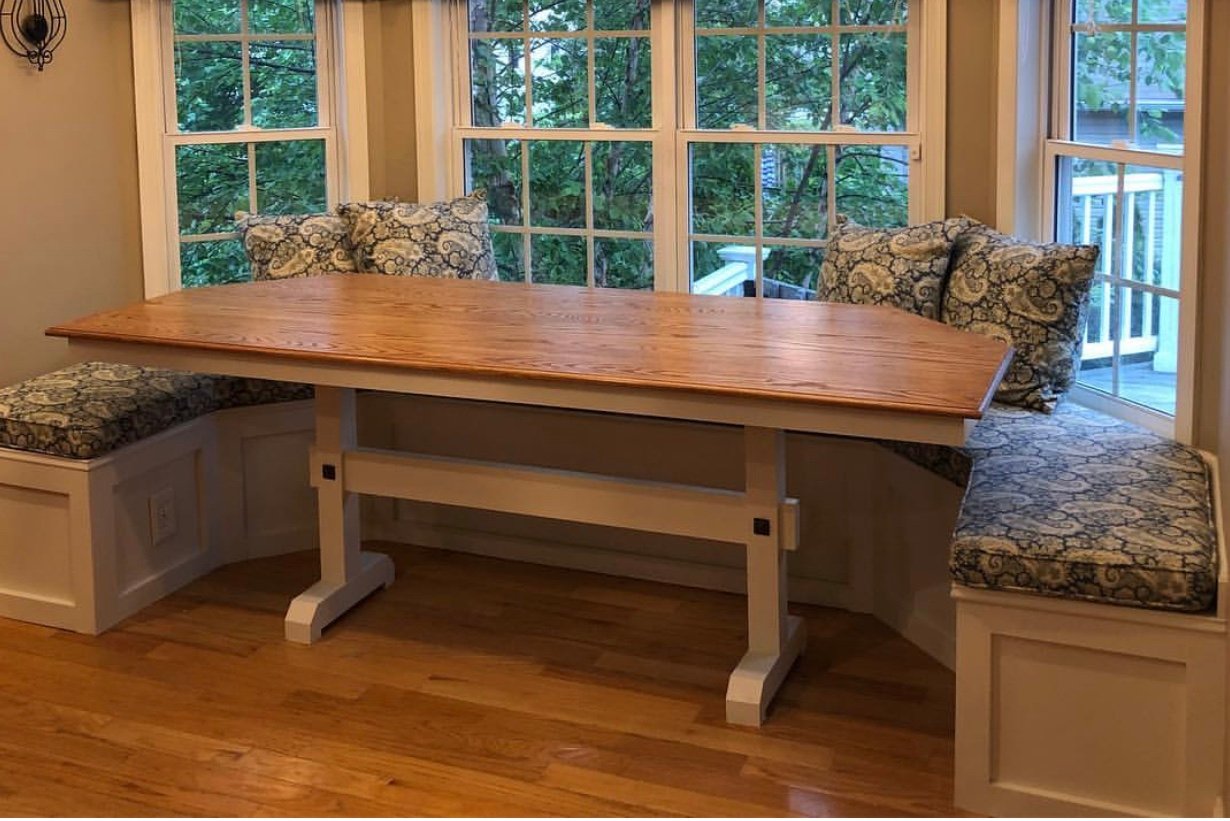
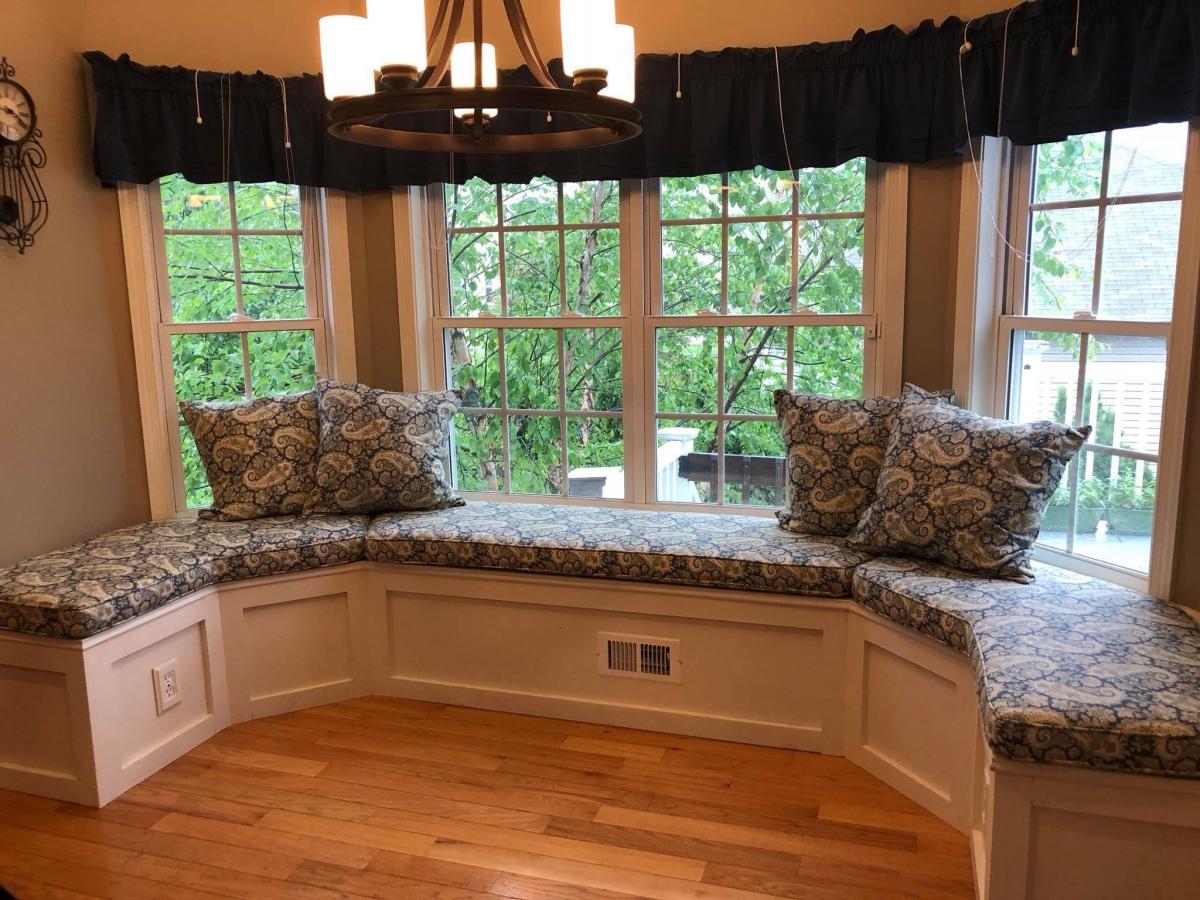
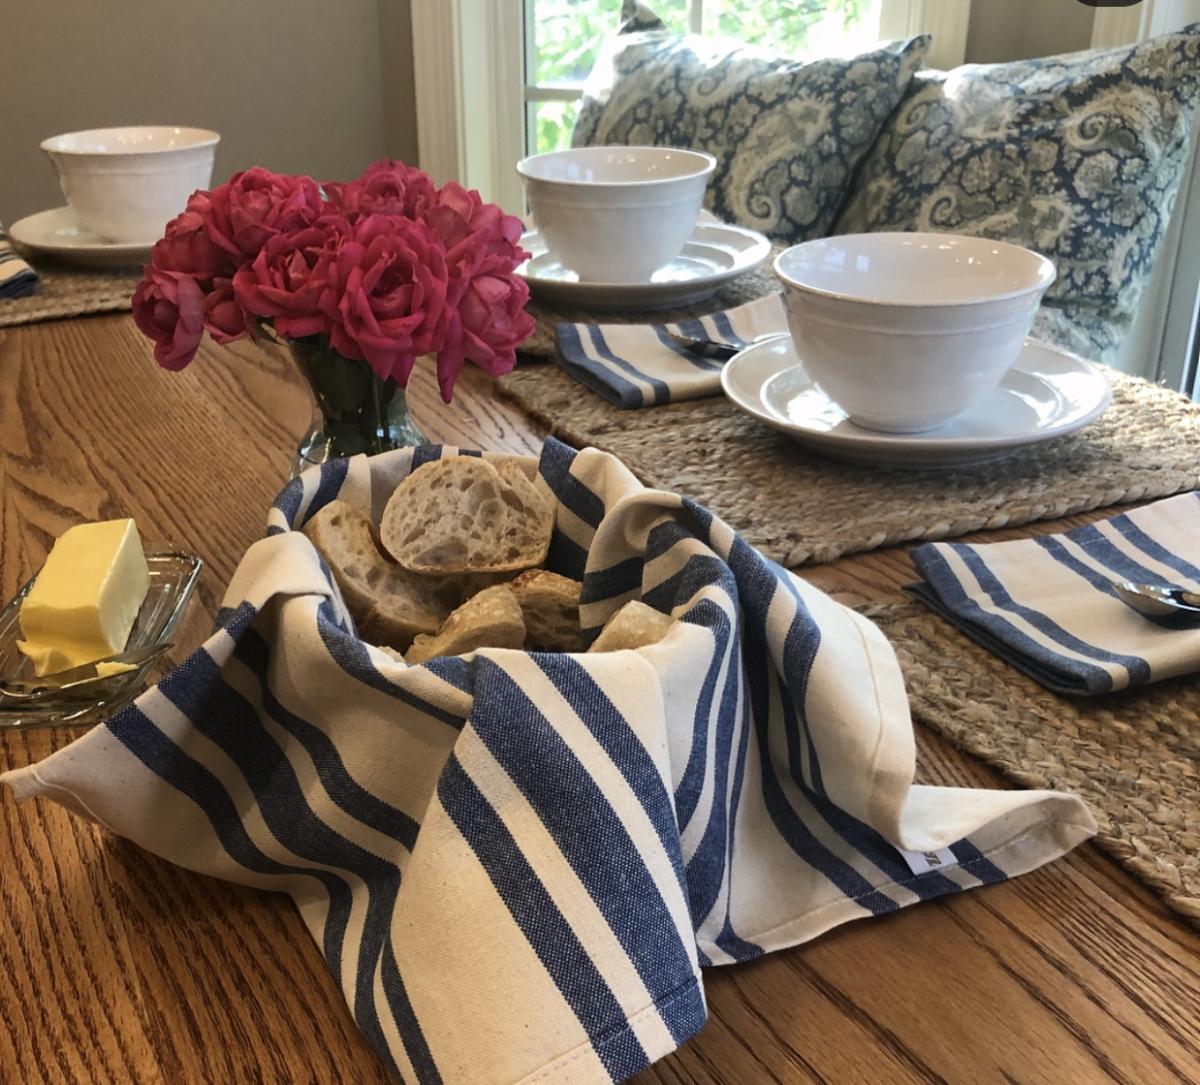
When we moved into our house, there was an empty breakfast nook. I built in the banquette seating, and then built the table out of oak. This was inspired by the Triple Pedestal Table (http://ana-white.com/woodworking-projects/triple-pedestal-farmhouse-tab…)
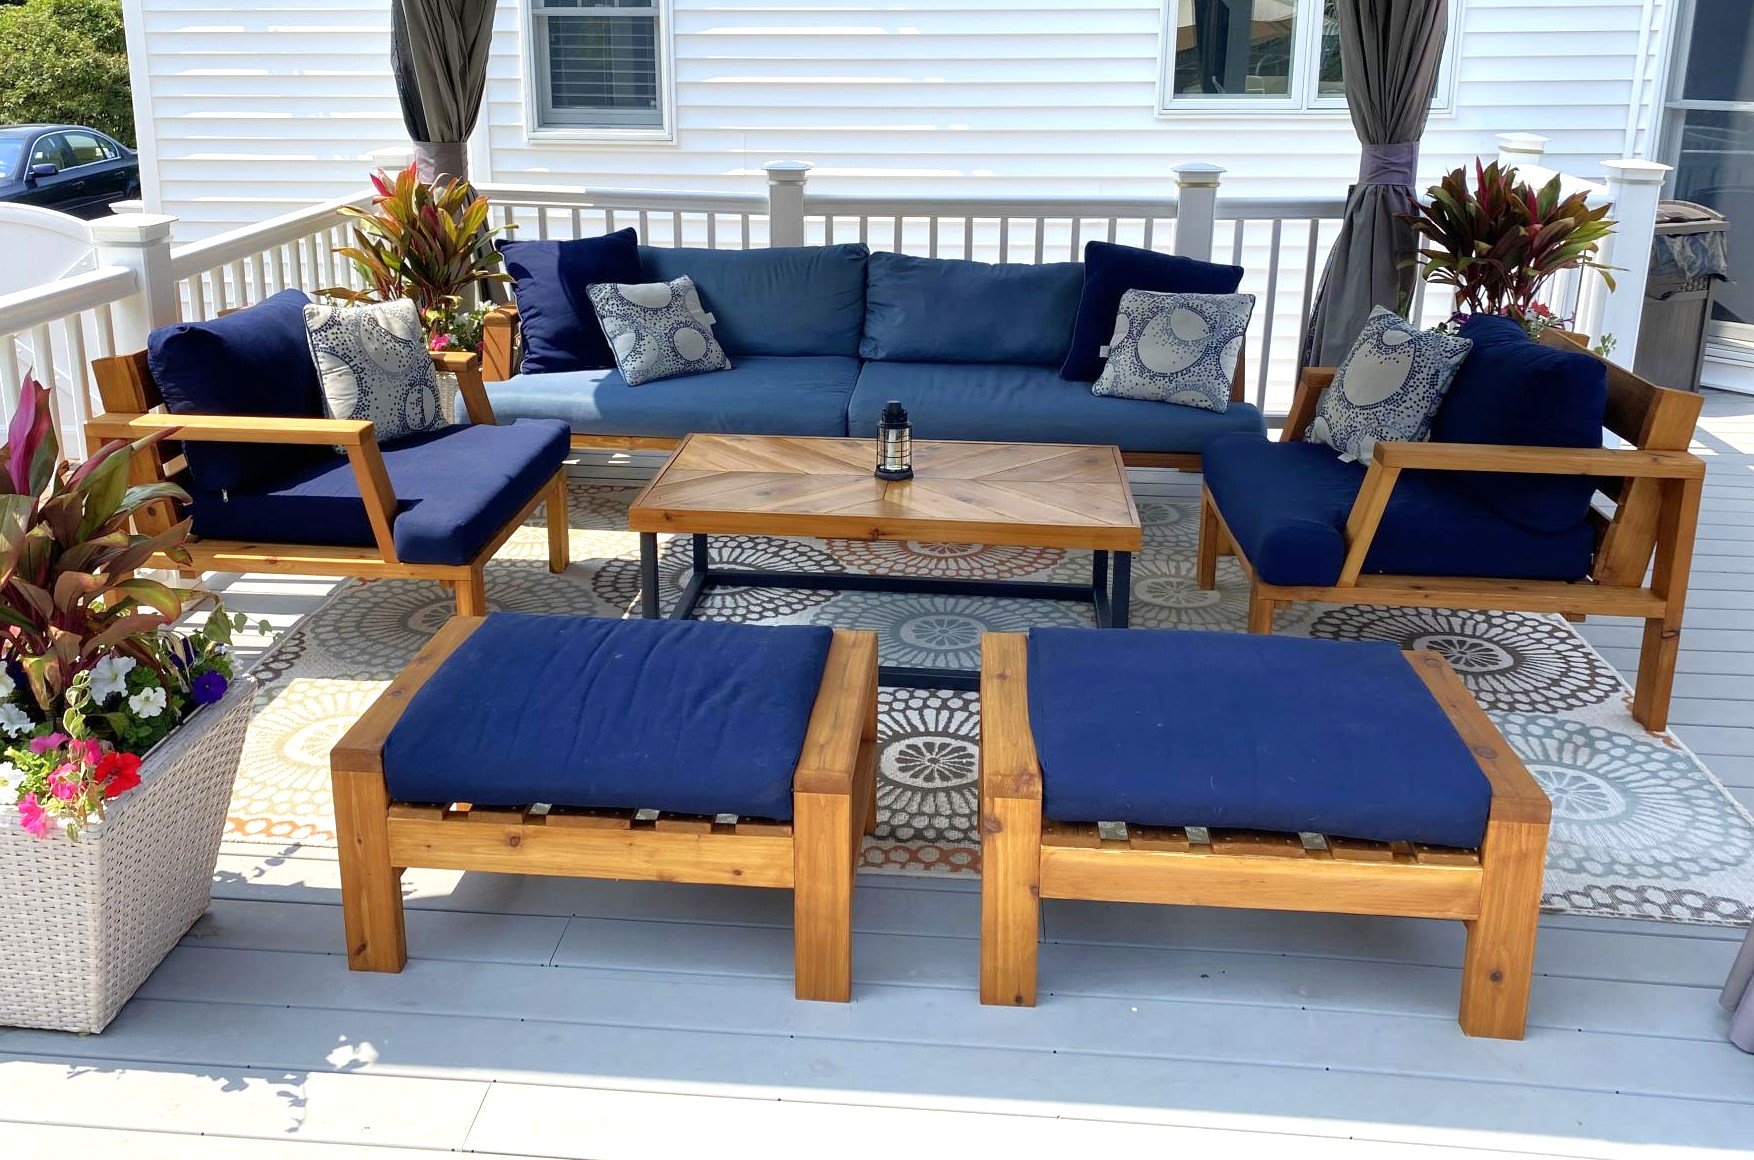
Our outdoor furniture from Costco was falling apart but the cushions were still in great shape so I decided to design the furniture around the existing cushion dimensions. I used all Cedar wood and stained it with Australian Timber Oil Honey Teak stain. The table design was from a picture I saw on another site.
Tue, 06/20/2023 - 12:56
Excellent idea to design the size around the cushions you had! Thanks for sharing ❤️
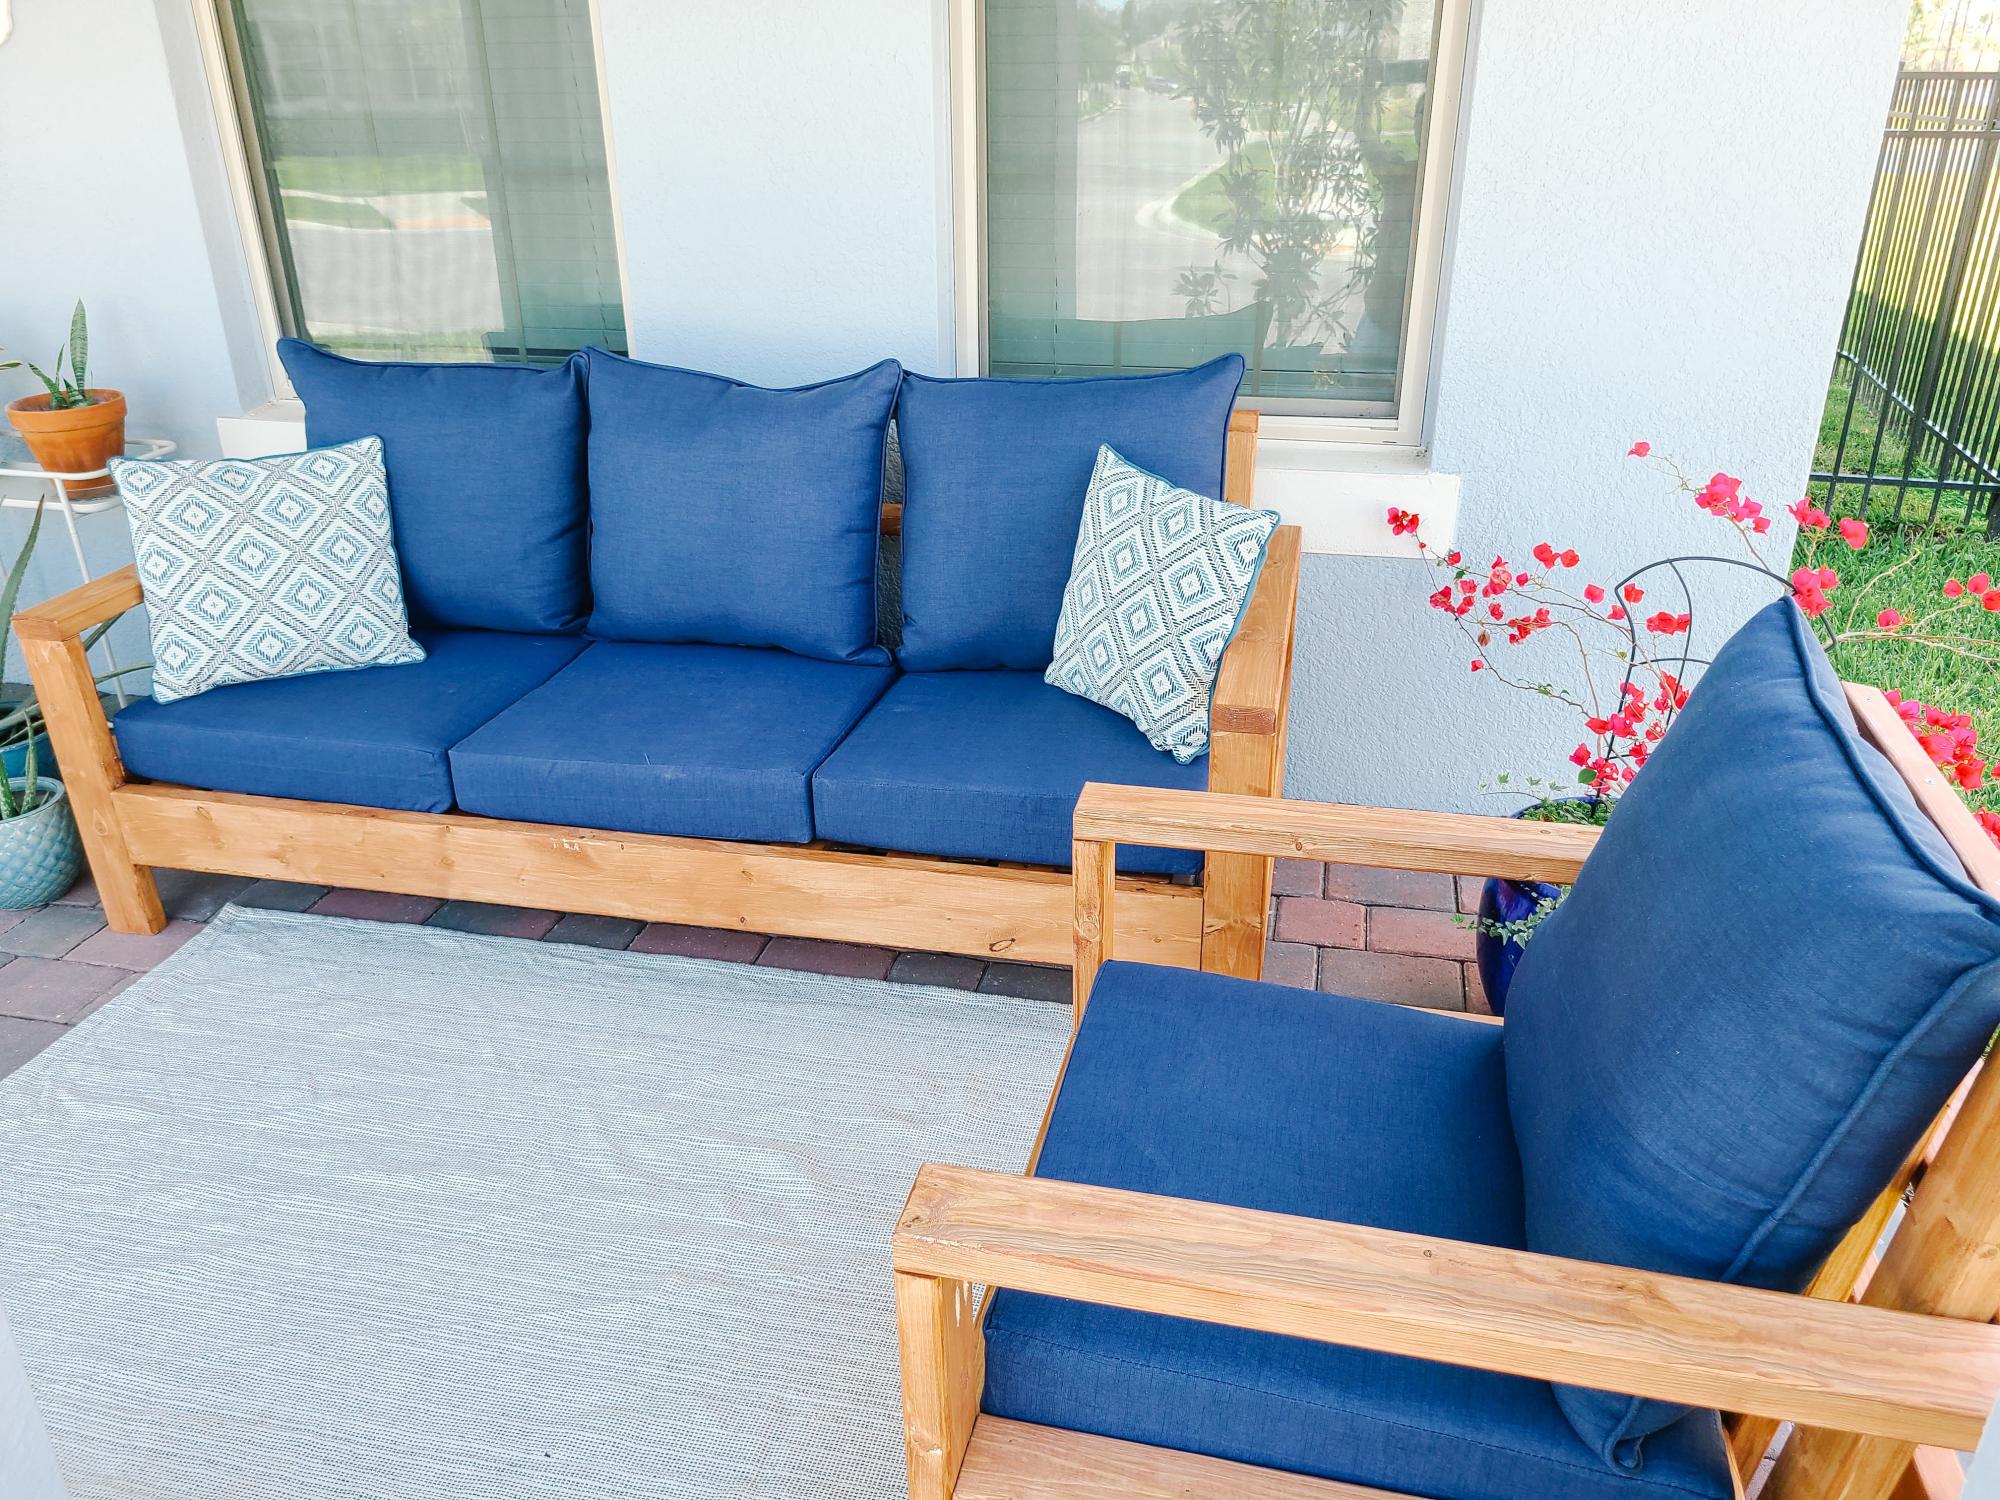
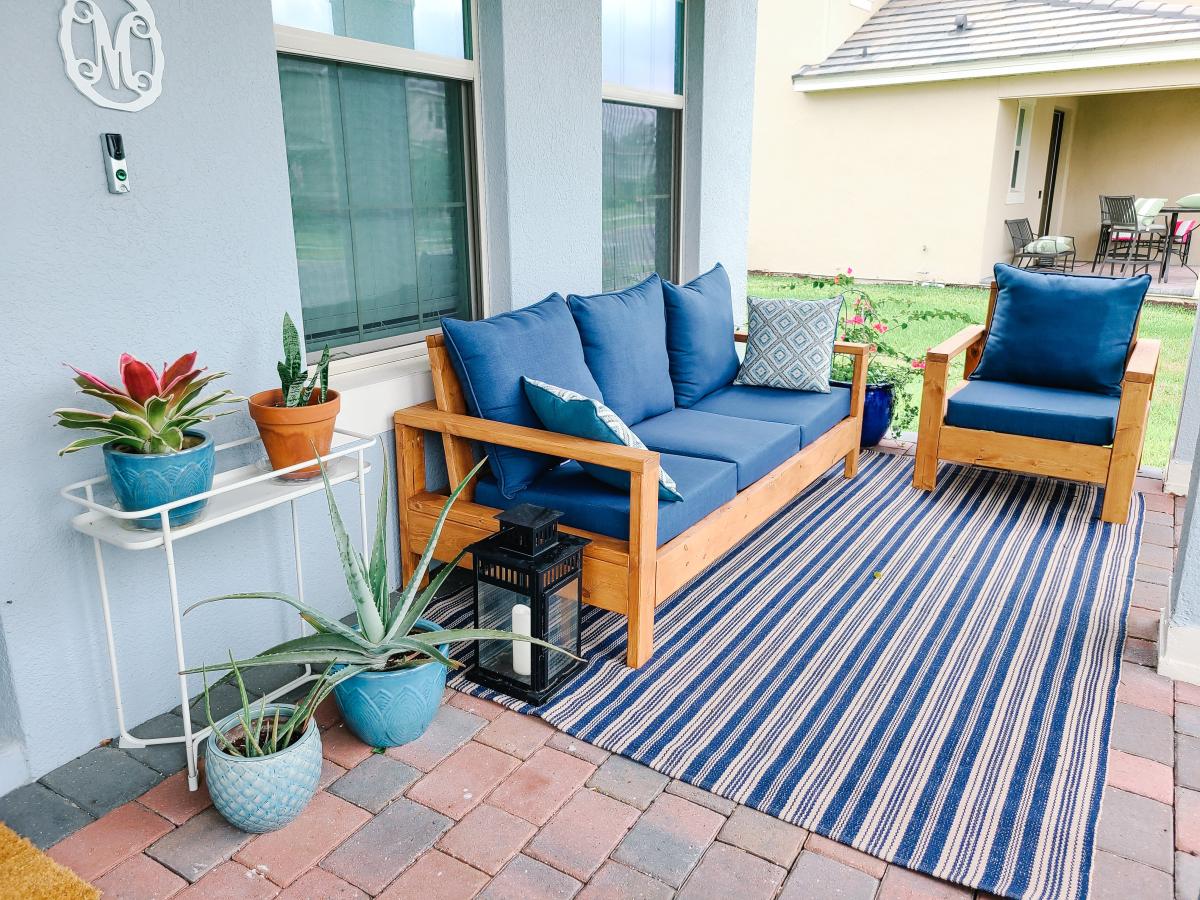
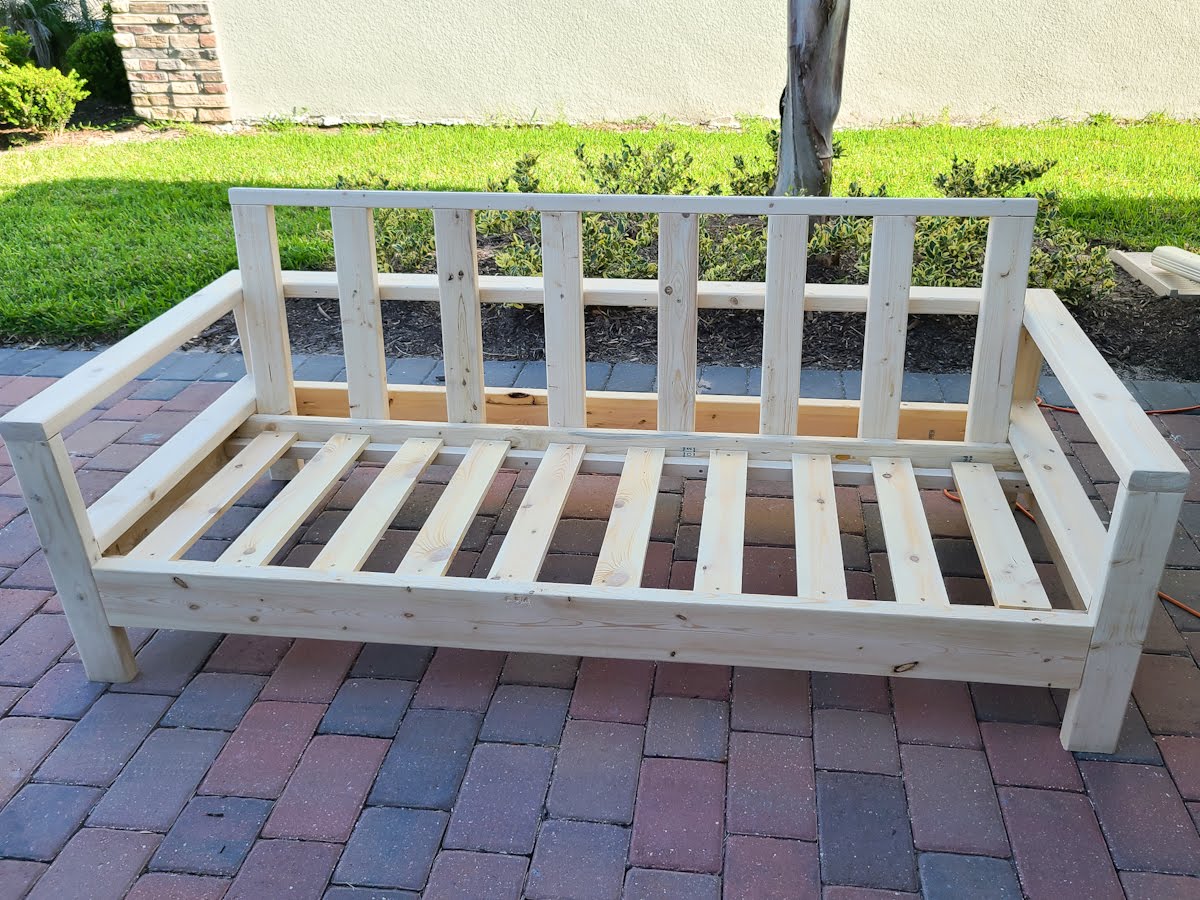
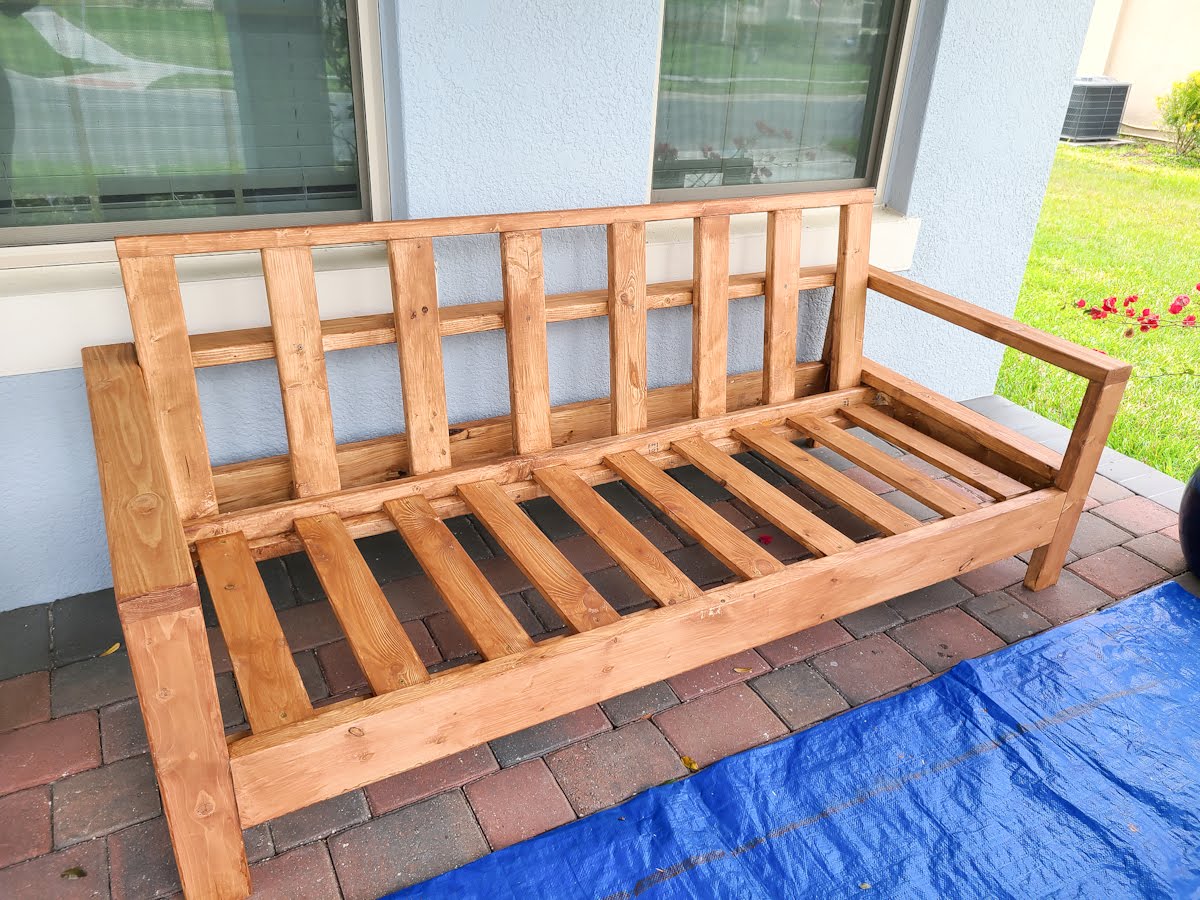
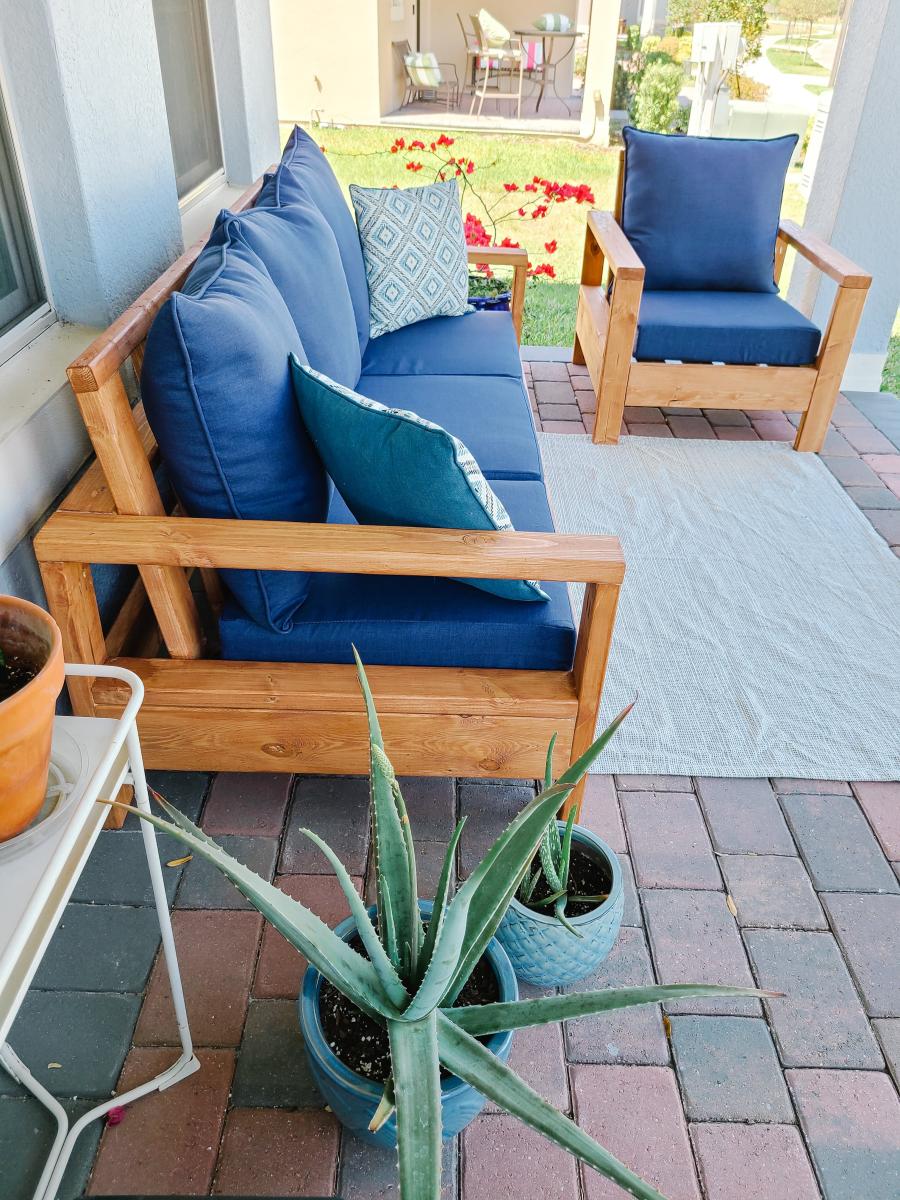
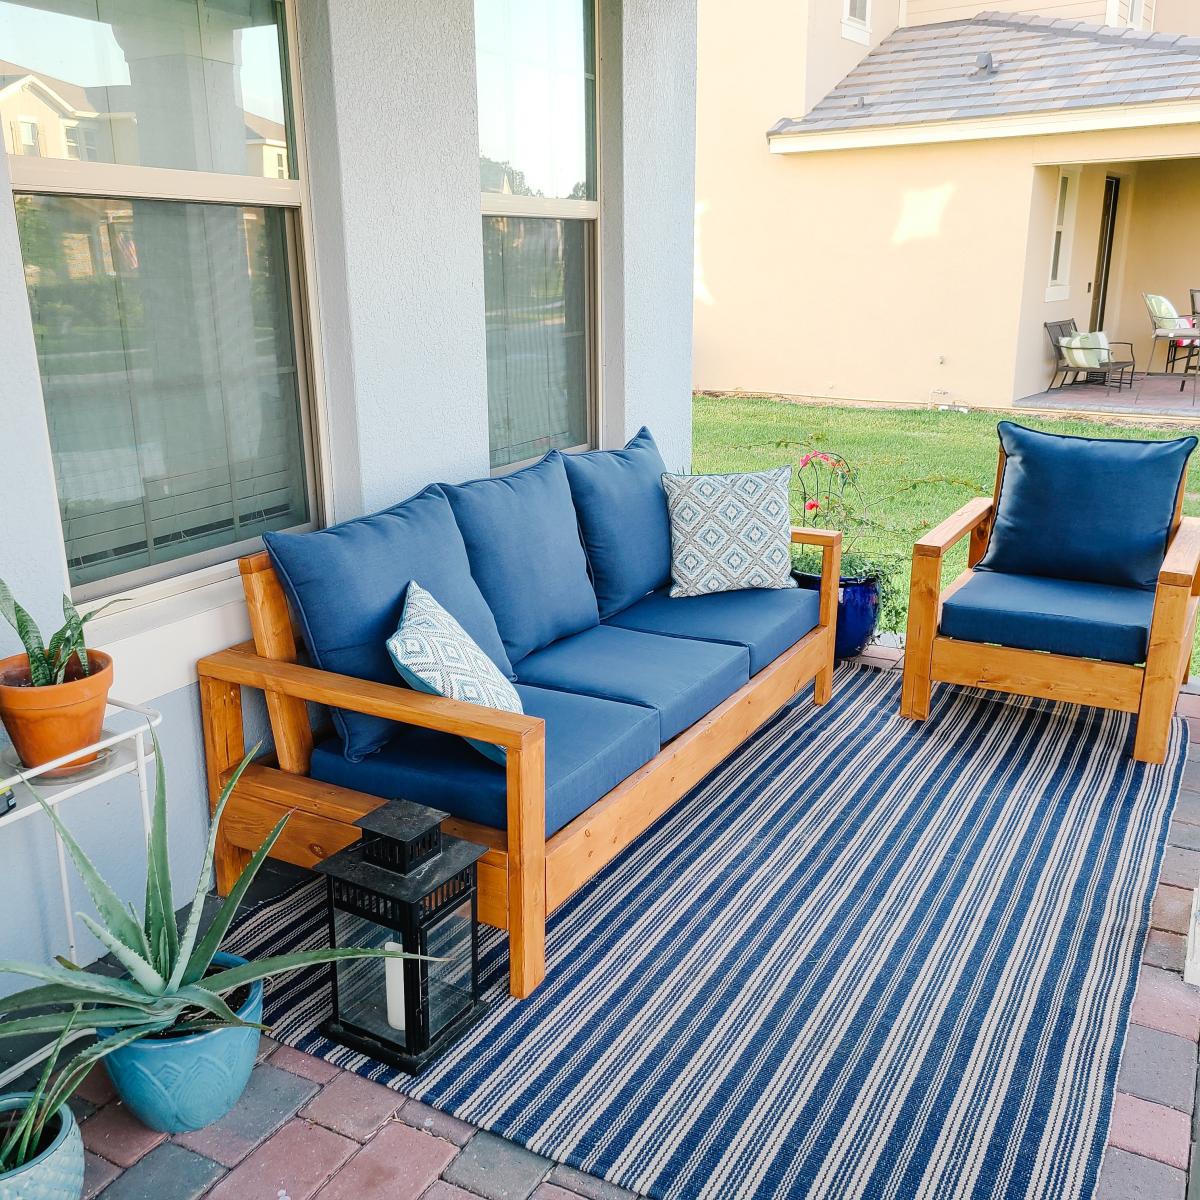
OK, I think this build may be my biggest project yet! It is definitely the heaviest. With the strong winds we can get here in Florida we needed substantial outdoor furniture.
I did make some modifications along the way measurement-wise so the sofa would fit my front porch better. All in all, this took 2 full days. I built the sofa first, stained it the next day and then decided (due to trying to get stain in all the nooks and crannies) to stain the chair pieces first before putting it together.
I am so happy with the results and so far, almost a year later, this furniture looks great and hasn't moved an inch in any of the thunderstorms we've had! Thank you Ana!!