Community Brag Posts
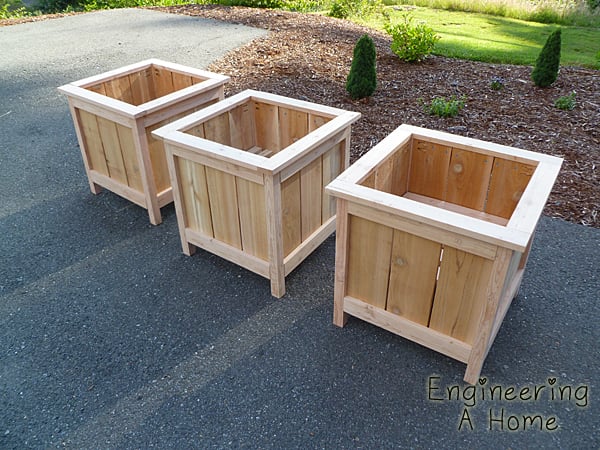
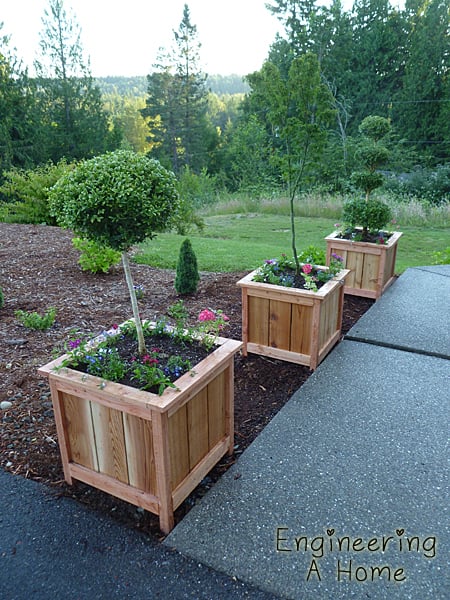
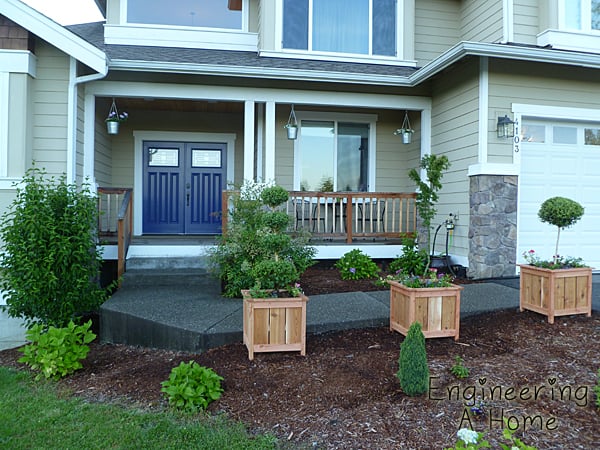
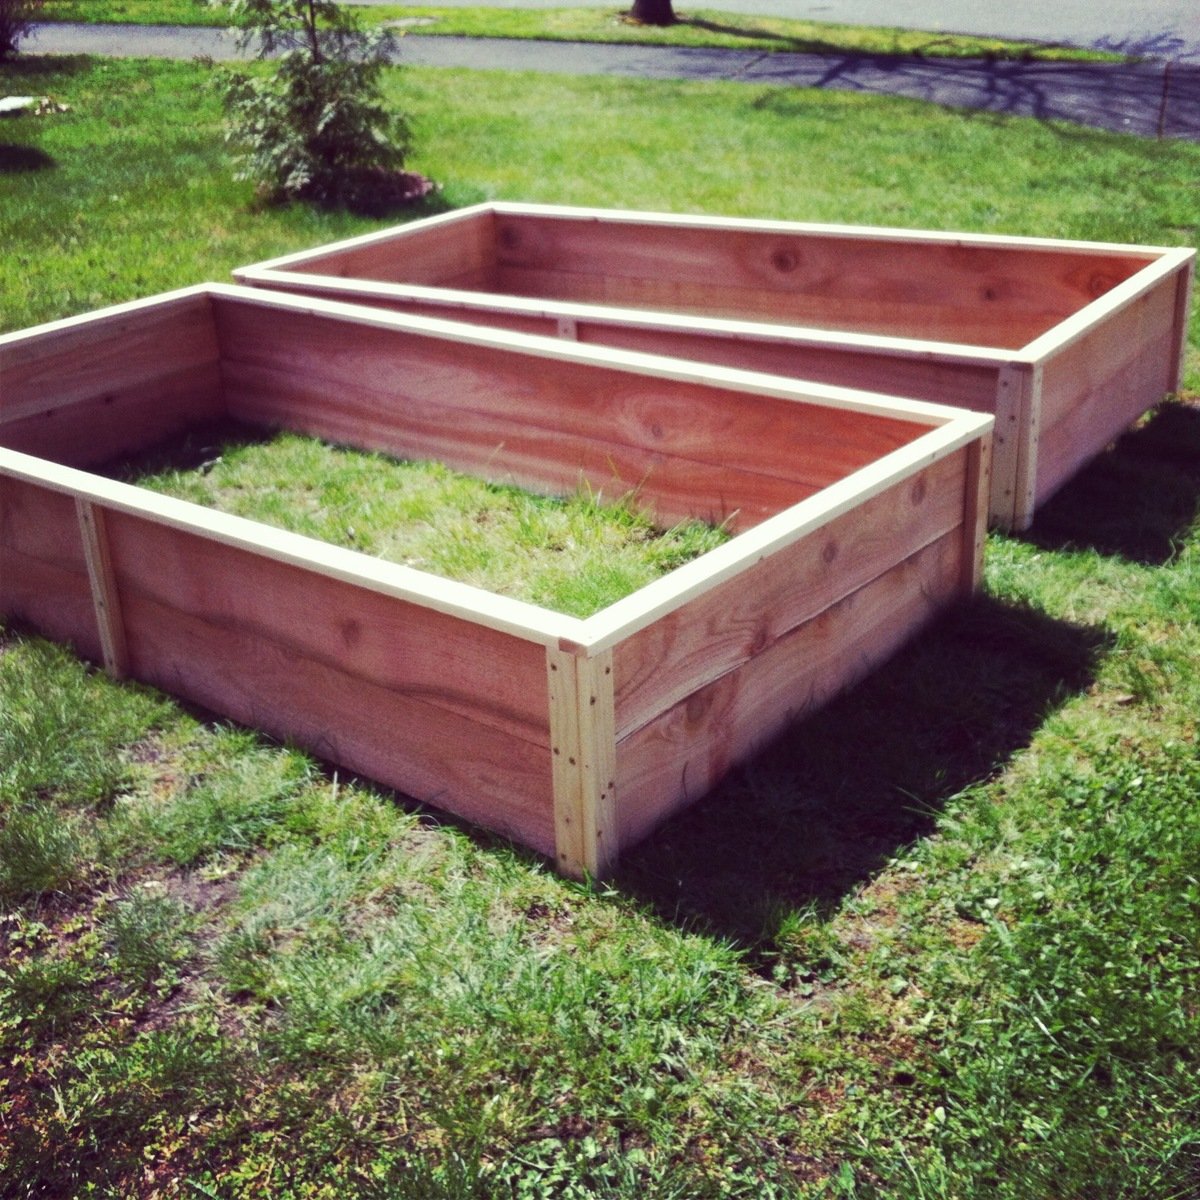
Cedar Planter Boxes
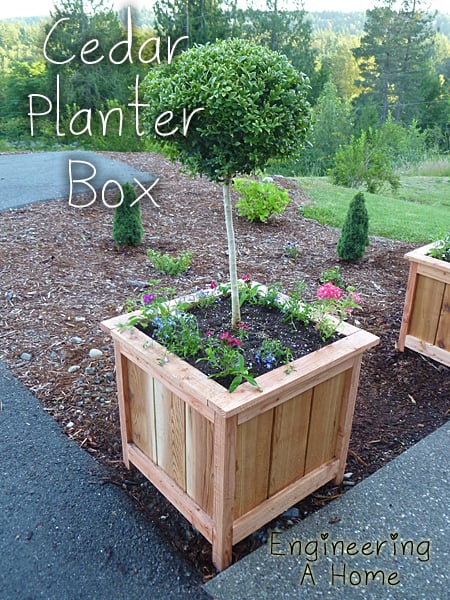
They were simple to make and the plan was easy to follow. The only modification I made was adding the 1x3 topper in place of the longer legs sticking out of the top.
Built from Plan(s)
Estimated Cost
$23
Estimated Time Investment
Day Project (6-9 Hours)
Finish Used
Thompson's Water Seal which I just brushed on using a cheap paint brush.
Recommended Skill Level
Beginner
Comments

Fri, 07/19/2013 - 06:36
These are great!
Adding these to my to-do list for spring (yes, I plan ahead). I'm thinking of elevating and elongating them to fit around a bay window.
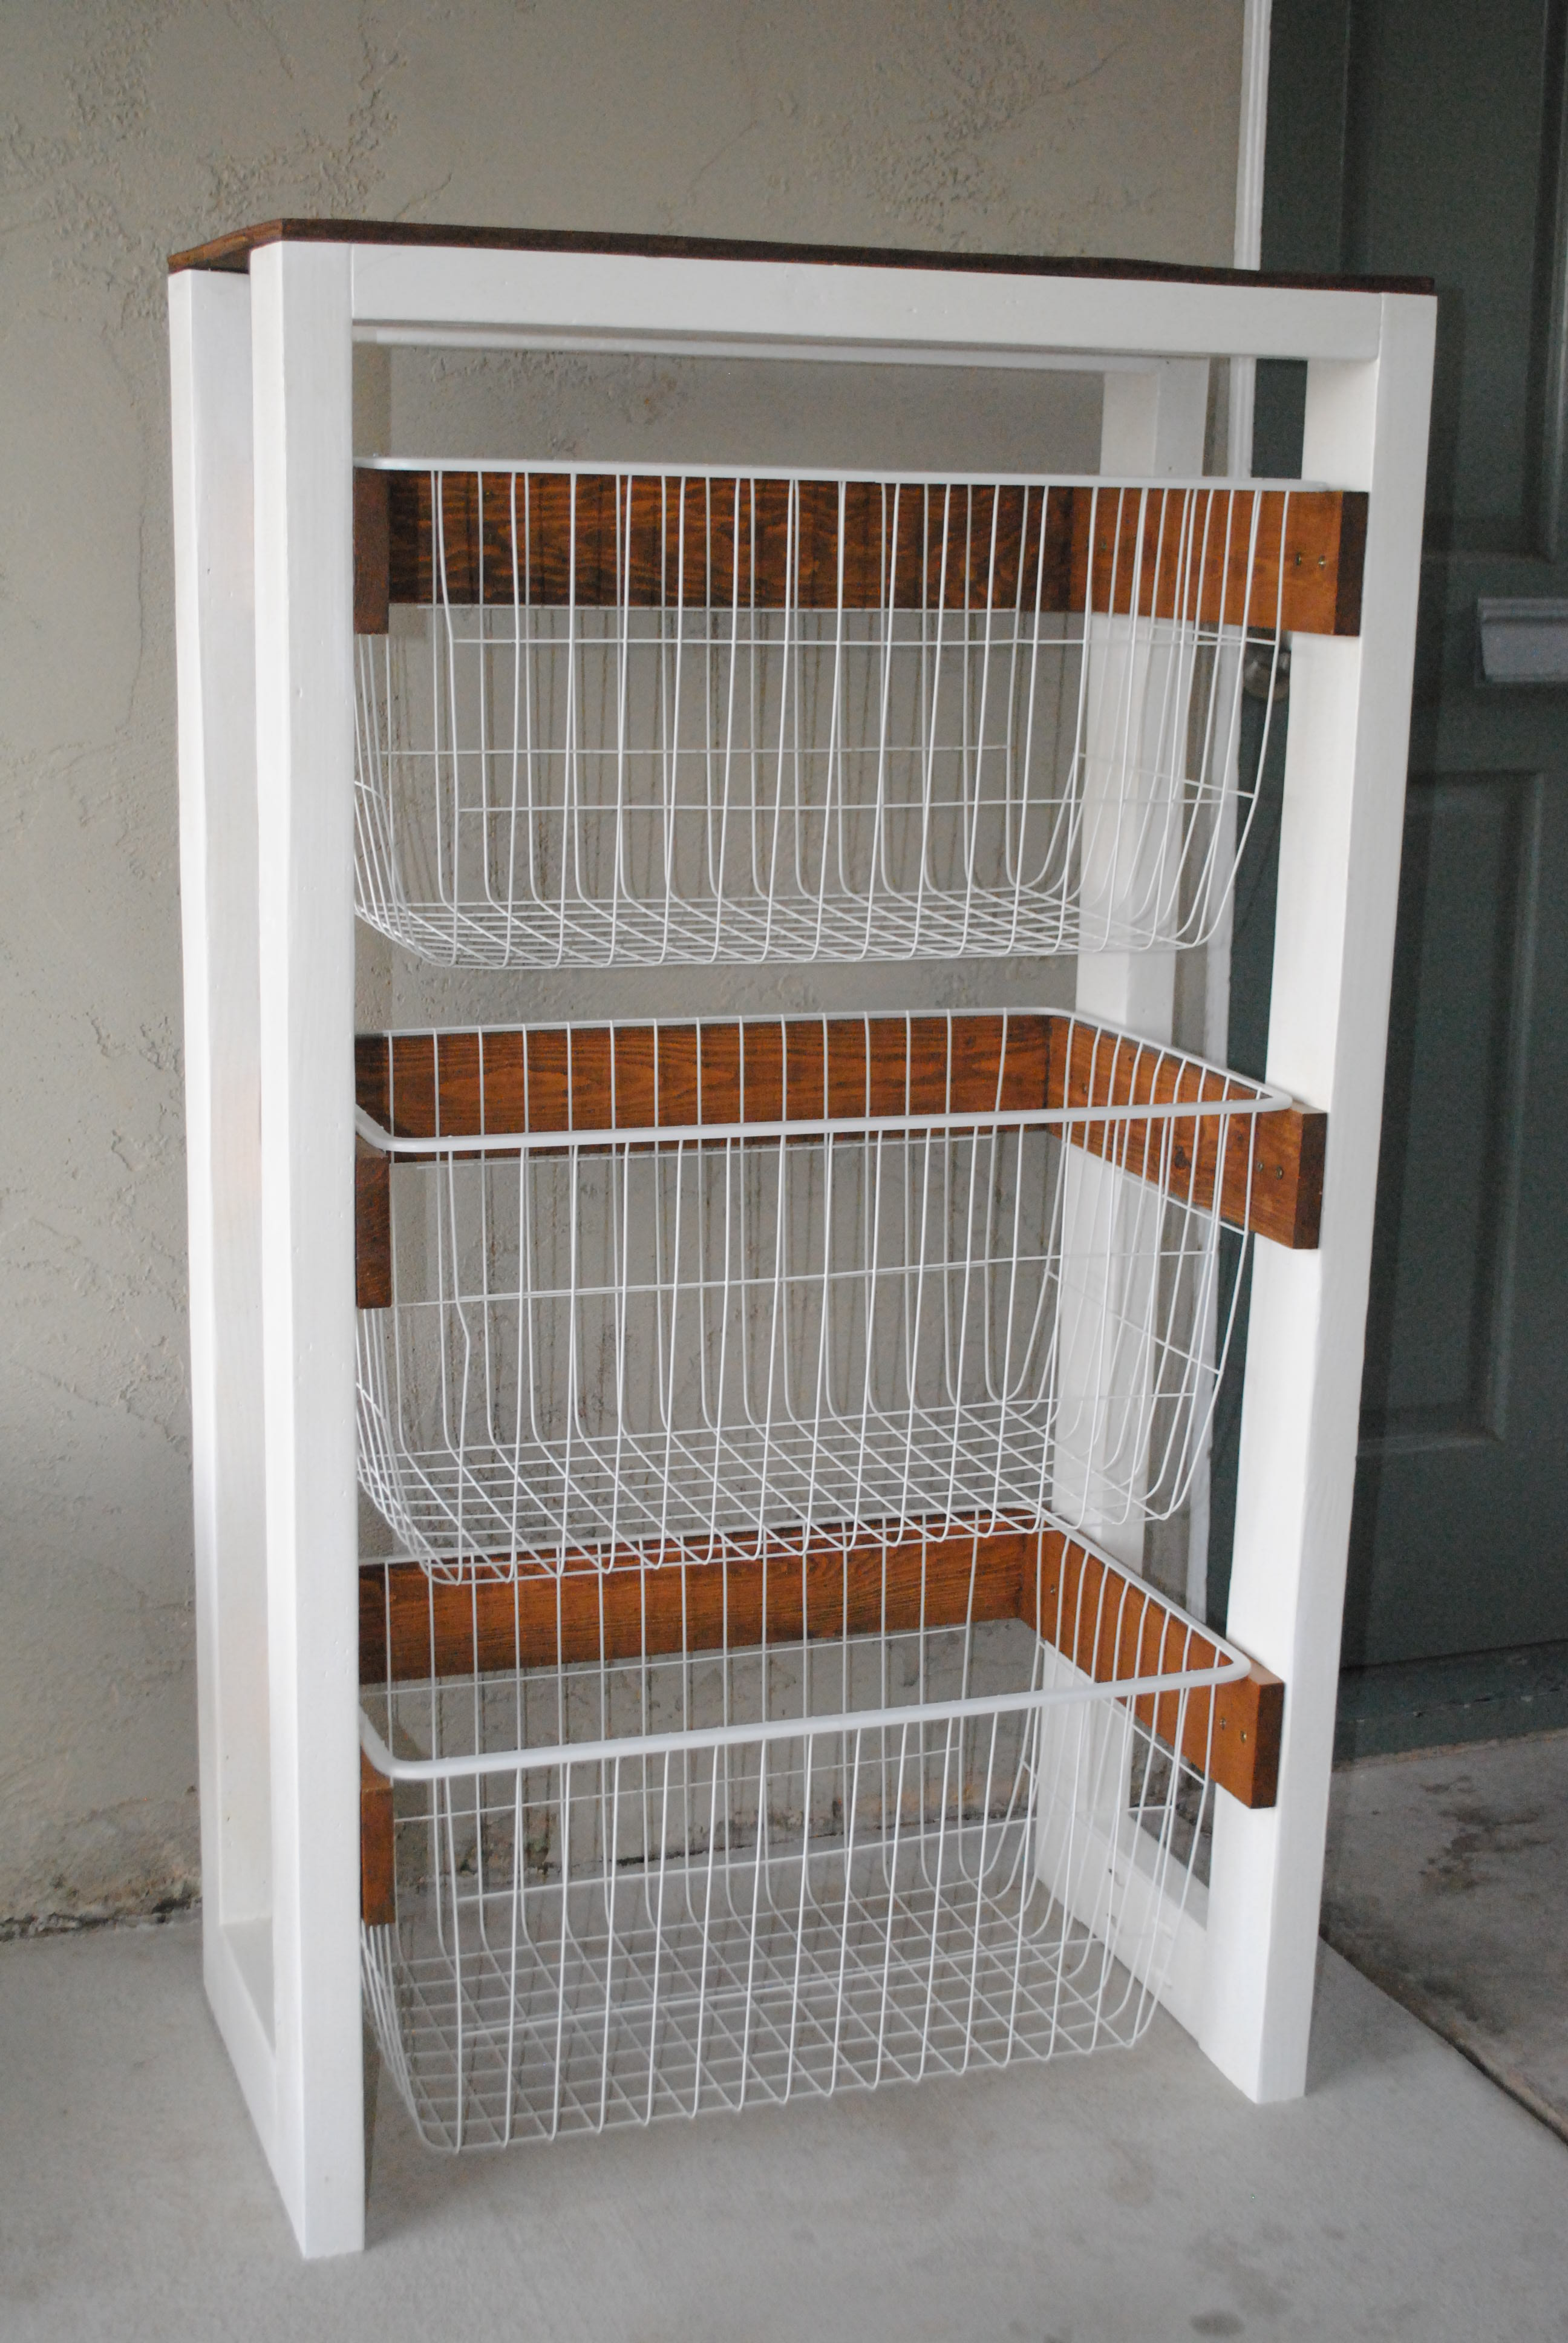
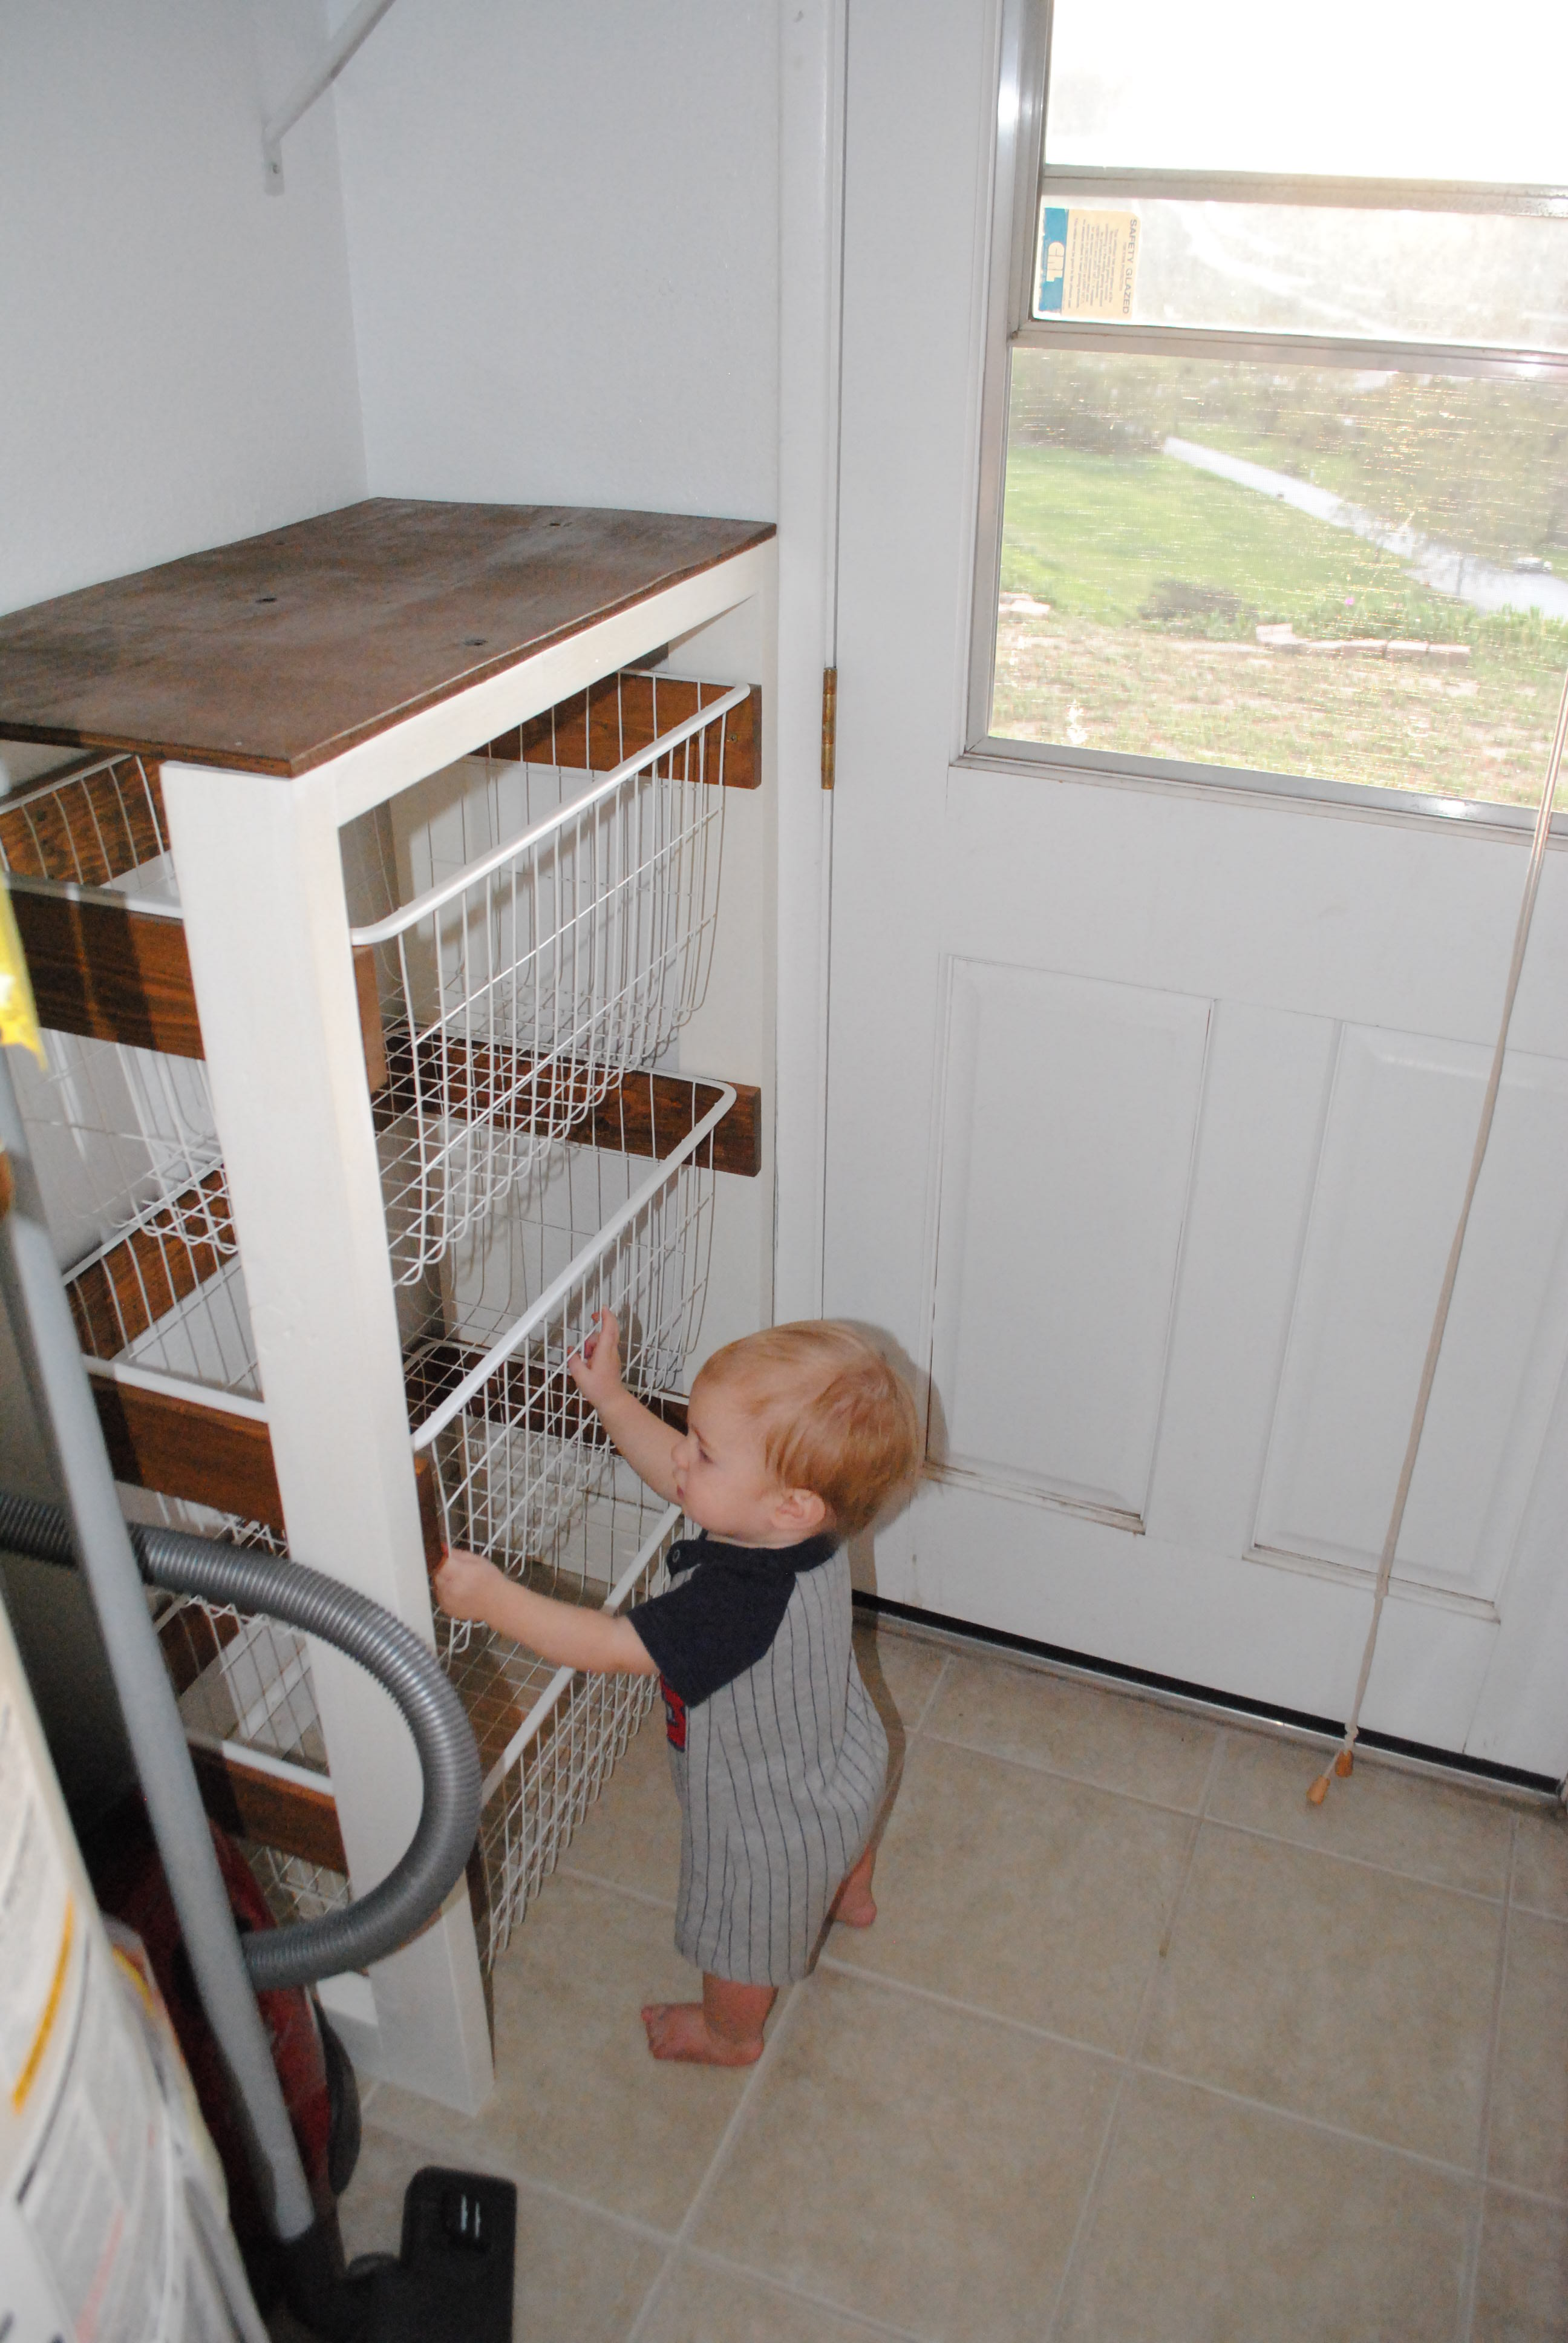
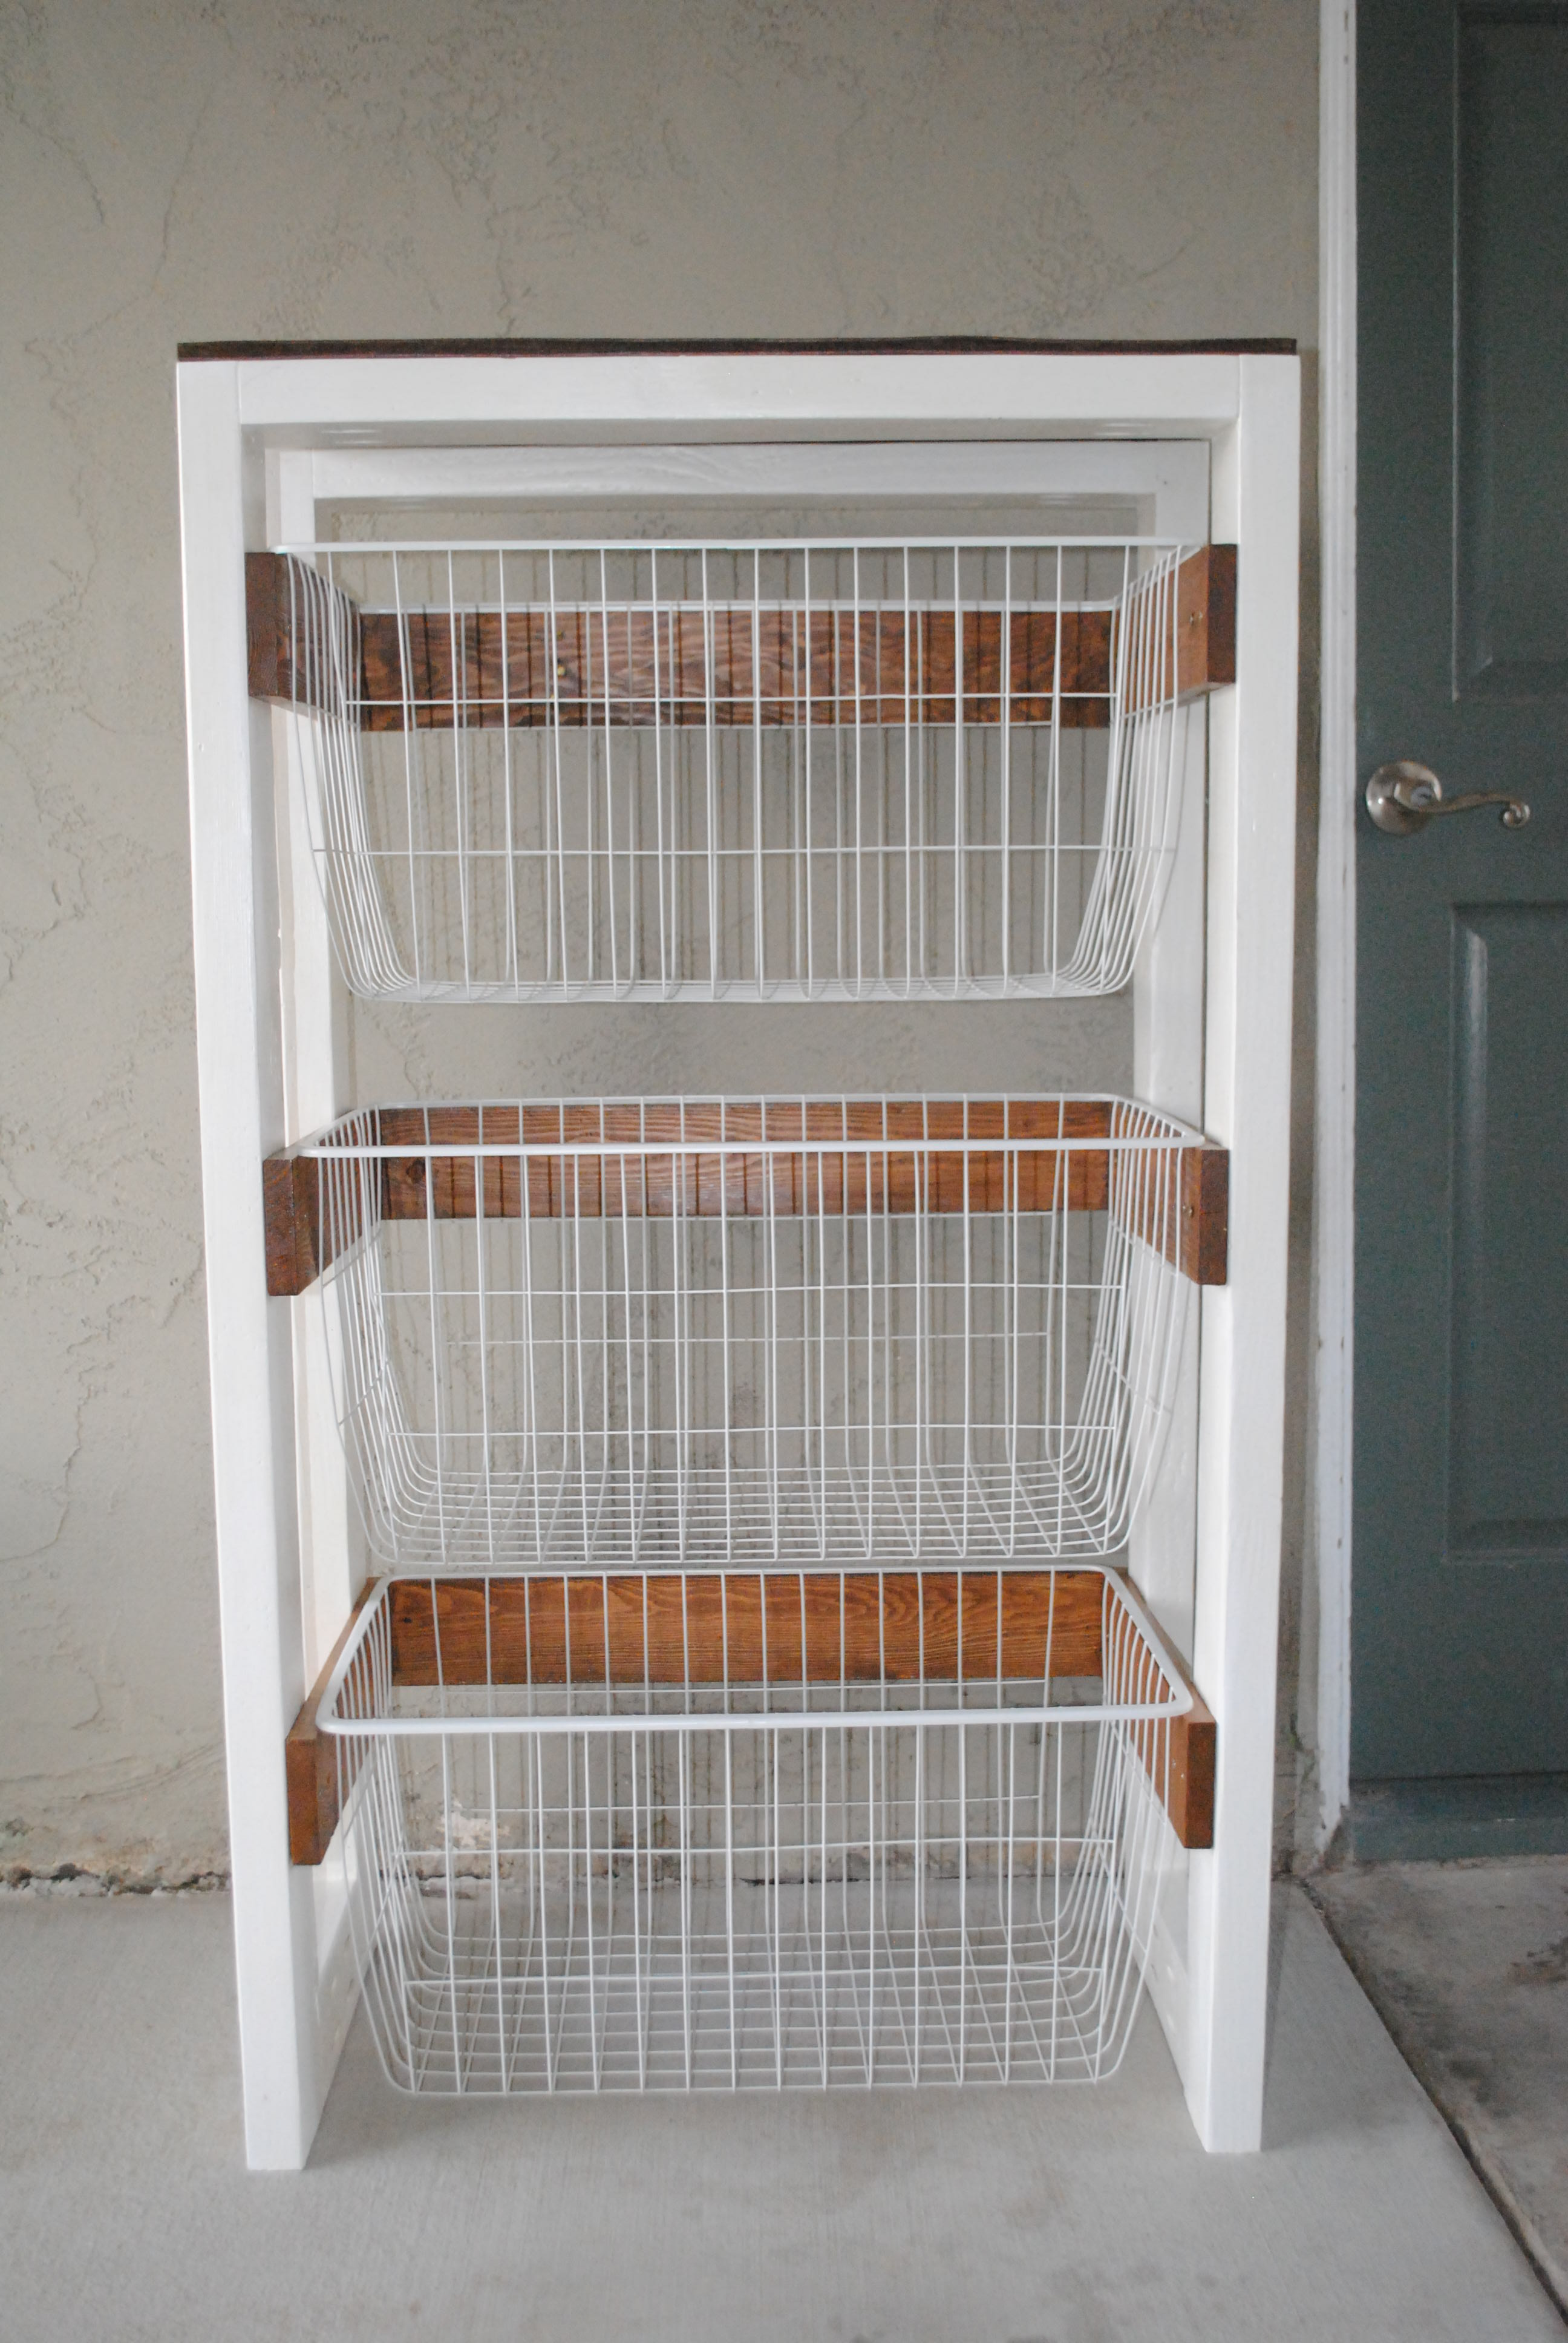
Laundry bins
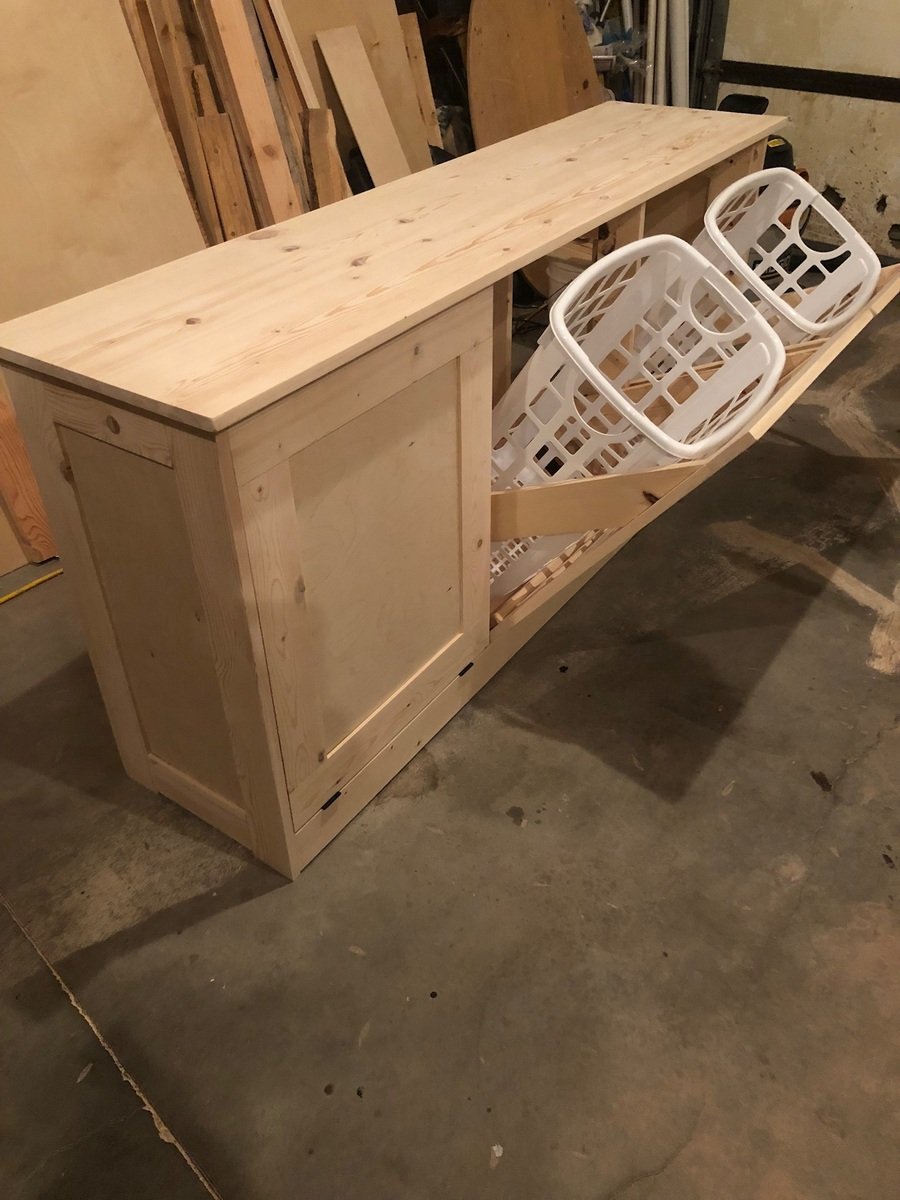
This was a build from a picture and made to fit into a space we have in the laundry room. Used the Kreg jig for much of it.
Estimated Time Investment
Week Long Project (20 Hours or More)
Finish Used
Will be painted and distressed
Recommended Skill Level
Intermediate
Comments

Tue, 06/05/2018 - 14:52
Amazing DIY Laundry Bins Sorter Cabinet
Awesome laundry sorter! Can't wait to see the paint/stain!
Thanks so much for sharing a brag post - much appreciated!
Ana
Twin over Full Bunk Beds
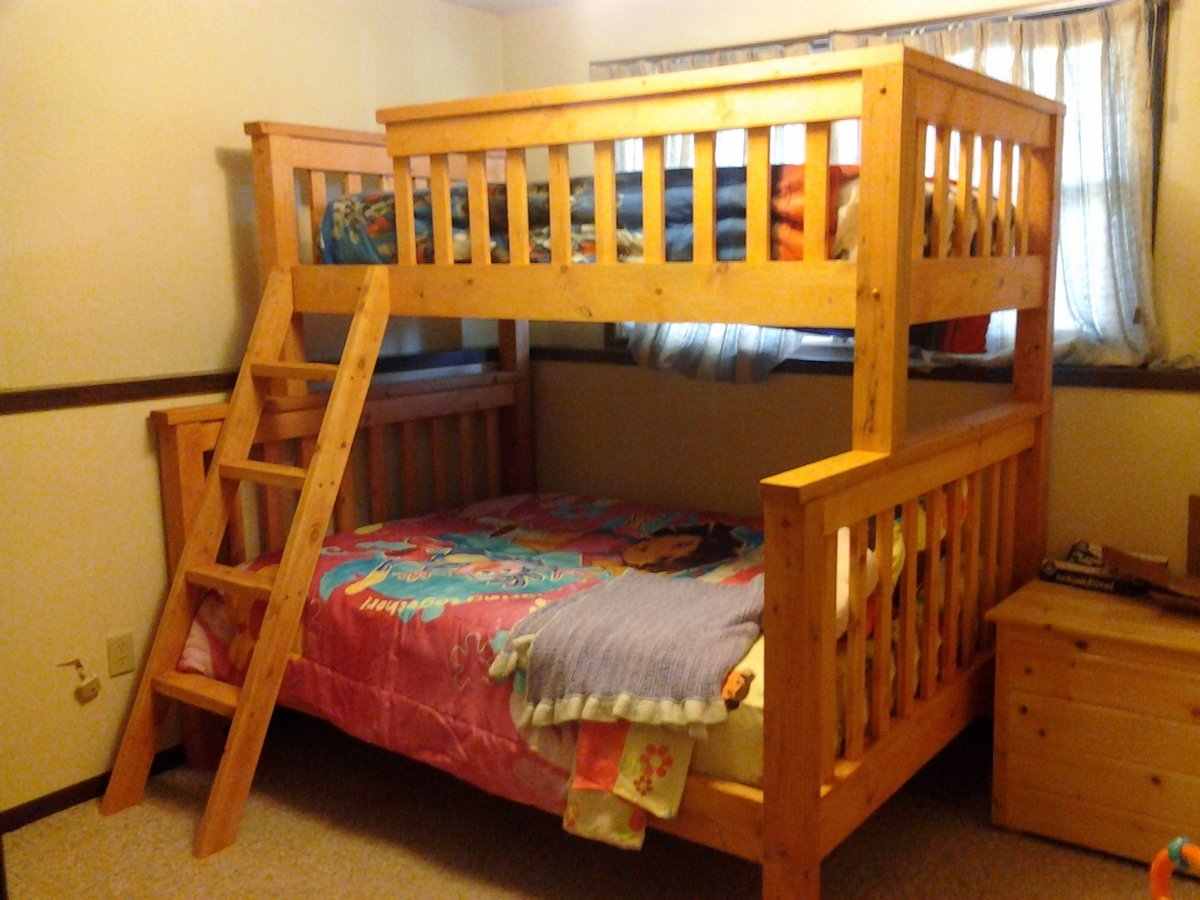
I wanted my kids to have more space in their shared room, but I did not want to pay a ton of money for a new bunk bed. My husband and I found a plan for this bunk on Ana-White and fell in love with the design. It turned out so great that we will still be using it in our next home whether it's needed or not. We did change a couple of things on the plan that we didn't care for. The first is that we added a side rail for safety. Secondly we also traded the 1x6 boards on the head and foot boards for 1x4s on the top but kept the 1x6s on the bottom.
Built from Plan(s)
Estimated Time Investment
Weekend Project (10-20 Hours)
Finish Used
Stain: Colonial Maple and polyurethane.
Used a sponge brush to apply stain and dry cloth to wipe off. Used a brush to apply poly.
Used a sponge brush to apply stain and dry cloth to wipe off. Used a brush to apply poly.
Recommended Skill Level
Intermediate
Comments
Mon, 01/09/2012 - 17:39
Repyl: Guardrail
With pocket screws on the bottom and then one screw through the 1x4s into the post before the 2x4 on the top goes on. And then the 2x4 is screwed onto the 1x4 and post with trim screws.
Wed, 03/28/2012 - 13:02
Re: price
Cost us about $300 and over an entire weekend of time spent on this project.
It's not for beginners. My husband has had many many years of experience in carpentry and woodmaking.
Good luck to you.
Also, he changed a few things in the plans we found in order to make it look better.
Thank you
Jillian
Wed, 03/28/2012 - 12:59
price
Cost us $300.00 to make and almost non-stop making it for the whole weekend. And then stained for hours.
This is with many years of experience in construction and woodmaking.
This is not a beginners project and then expect it to look amazing.
My husband changed these plans a bit to make it look better than the other ppls that we've seen on here.
But, good luck to you and make sure to have plenty of room and time.
Also, we had to make this bed in 10-15 different pieces and put together in the bedroom we wanted it in. There is absolutely no way it will fit otherwise.
Jillian
Sat, 10/25/2014 - 22:25
Full/Twin over Queen?
I don't see how you could put the fill/twin over a queen since the queen is longer. Obviously you could spin the queen around and make it an L-shape but then you are looking at a different build.
Sat, 10/25/2014 - 22:28
Love the modifications you made!
I really like the look of this ... I'm going to try to replicate!
What does the bottom of the guard-rail look like? Did you space out your slats a little more than the original design? I like the 2x4 topper instead of the 1x6.
Sat, 02/28/2015 - 16:46
Not Impressed with Design of this Bed
We made this bed over the course of a week, both of us have extensive experience in woodworking and building. Ours is very wobbly on the long axis. We had a friend who is a structural engineer come in and take a look. He offered suggestions to shore it up and nothing really worked. The 3/4" overlap is not enough to secure the side rails, imo, and we used a variety of brackets to make it not wobble, to no avail.
This bed is coming apart in a few weeks and will be stored. If it is ever used again, it will be as two separate beds. I spent about $400 on this. My son never felt safe sleeping on the top bunk and has slept on the bottom exclusively.
Just my $0.02.
Best Chairs Ever!

I made these modern Adirondack chairs for our business in Anchorage. GREAT and easy to build design by Ana - we upgraded the arms to tapered 2x6 and they're awesome!


Built from Plan(s)
Modern Laundry Basket Sorter
I built this project totally from pallet wood and leftover 2x4's. I already had the paint and stain from other projects, so the only cost was for the baskets, which were $6 a piece at Ikea. This project turned out even better than I expected and I couldn't be happier.
Built from Plan(s)
Estimated Cost
$20
Estimated Time Investment
Day Project (6-9 Hours)
Recommended Skill Level
Beginner
Comments
Garden Boxes
Made 4 of these garden boxes for the side of the house. I love how they turned out and it was easy to change the size of boxes just by changing the side lengths. I love the trim on the top. It makes them look so much more finished. Can't wait to fill them.
Built from Plan(s)
Estimated Time Investment
Day Project (6-9 Hours)
Finish Used
I didn't bother with the wood glue step but am sure they'll be fine. Also I couldn't find any 1" screws. But the 1.75" screws worked fine.
Recommended Skill Level
Beginner
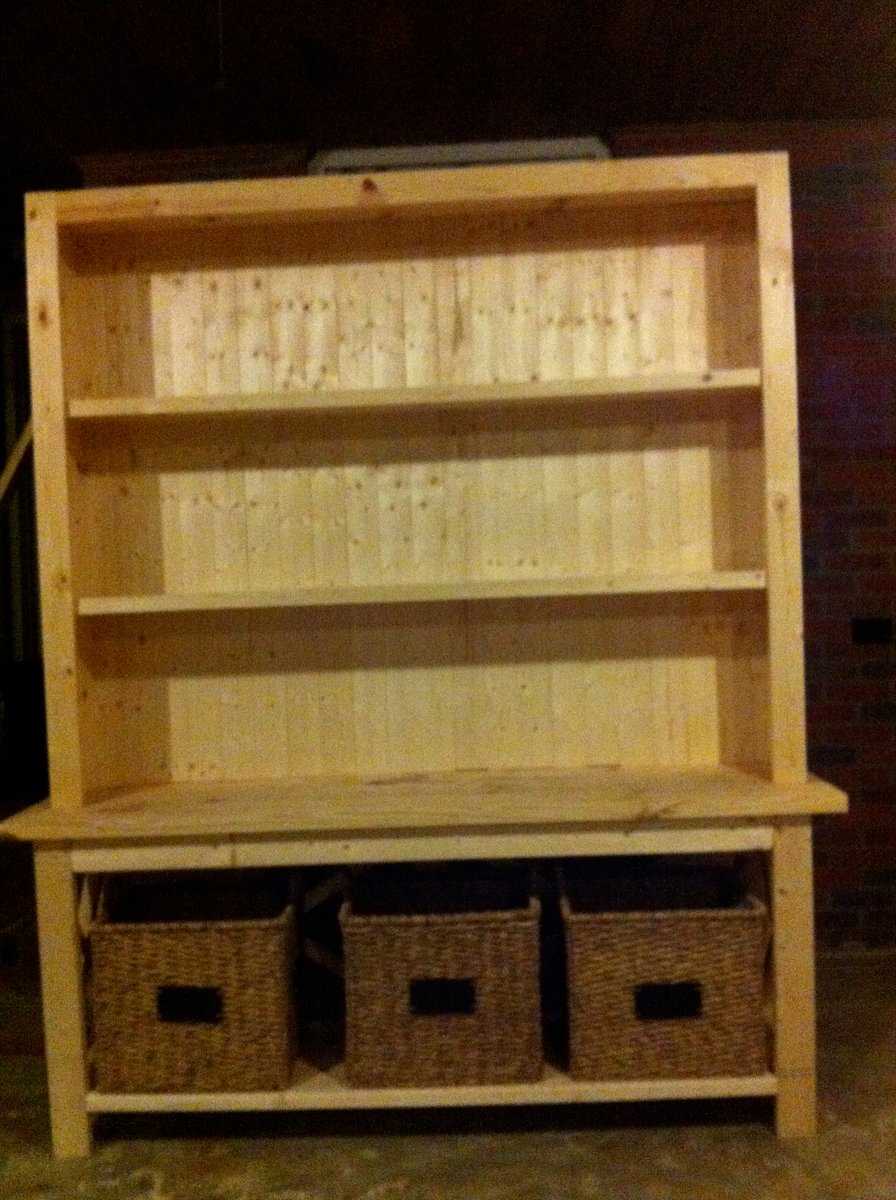
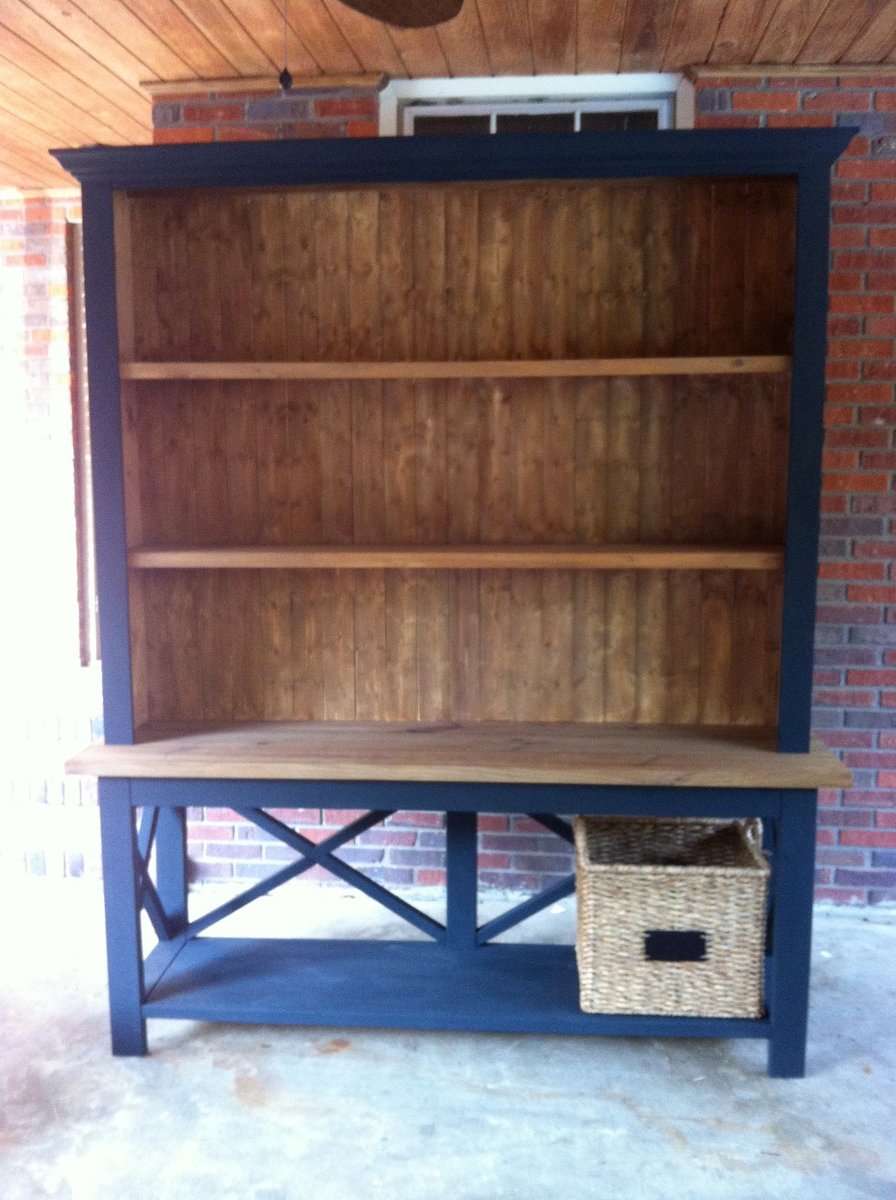
slightly modified x console table with added hutch

I have been dreaming about this piece of furniture for 3 yrs....I used Ana's plans for the rustic x console but took out the front middle support and made it a little deeper I also turned the 2x4 vertically and added an extra 2x4 behind it to add extra strength.....because I wanted to fit 3 baskets from Target underneath...the hutch i just winged!....Thank you so much Ana for giving me a place to start!...I am in love!......


Built from Plan(s)
Estimated Cost
$230
Estimated Time Investment
Week Long Project (20 Hours or More)
Finish Used
Maison Banche in Wrought Iron and vinegar stain (2cups vinegar 1/2 cup hydrogen peroxide and 2 things of steel wool)
Recommended Skill Level
Intermediate
Wine Cabinet

I took what was a single cabinet and doubled it.

Built from Plan(s)
Estimated Cost
500+
Estimated Time Investment
Week Long Project (20 Hours or More)
Finish Used
Destressed
Recommended Skill Level
Intermediate
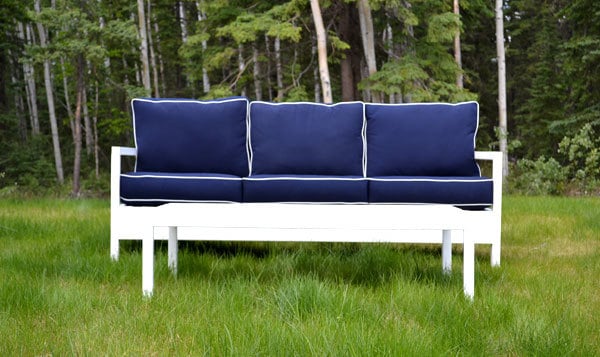
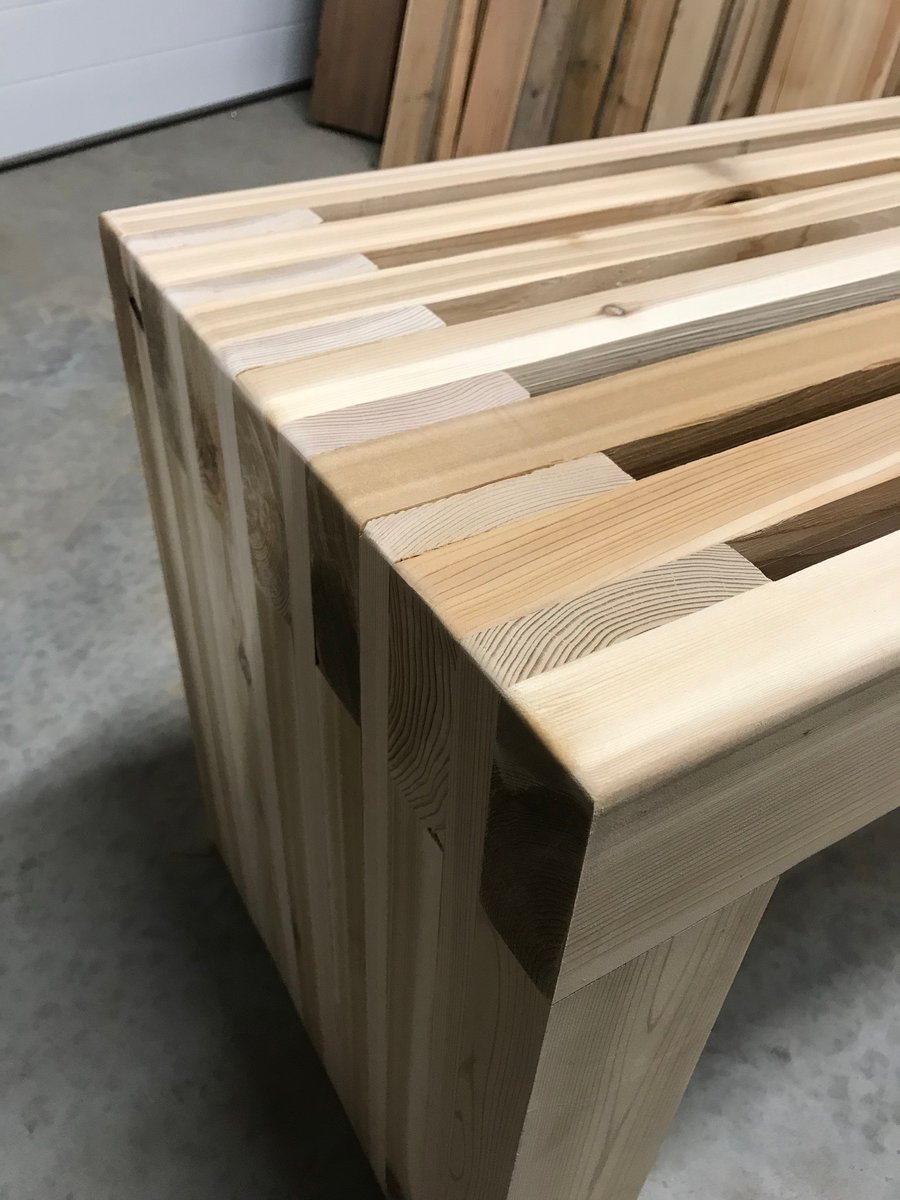
Cedar Slat Top Bench
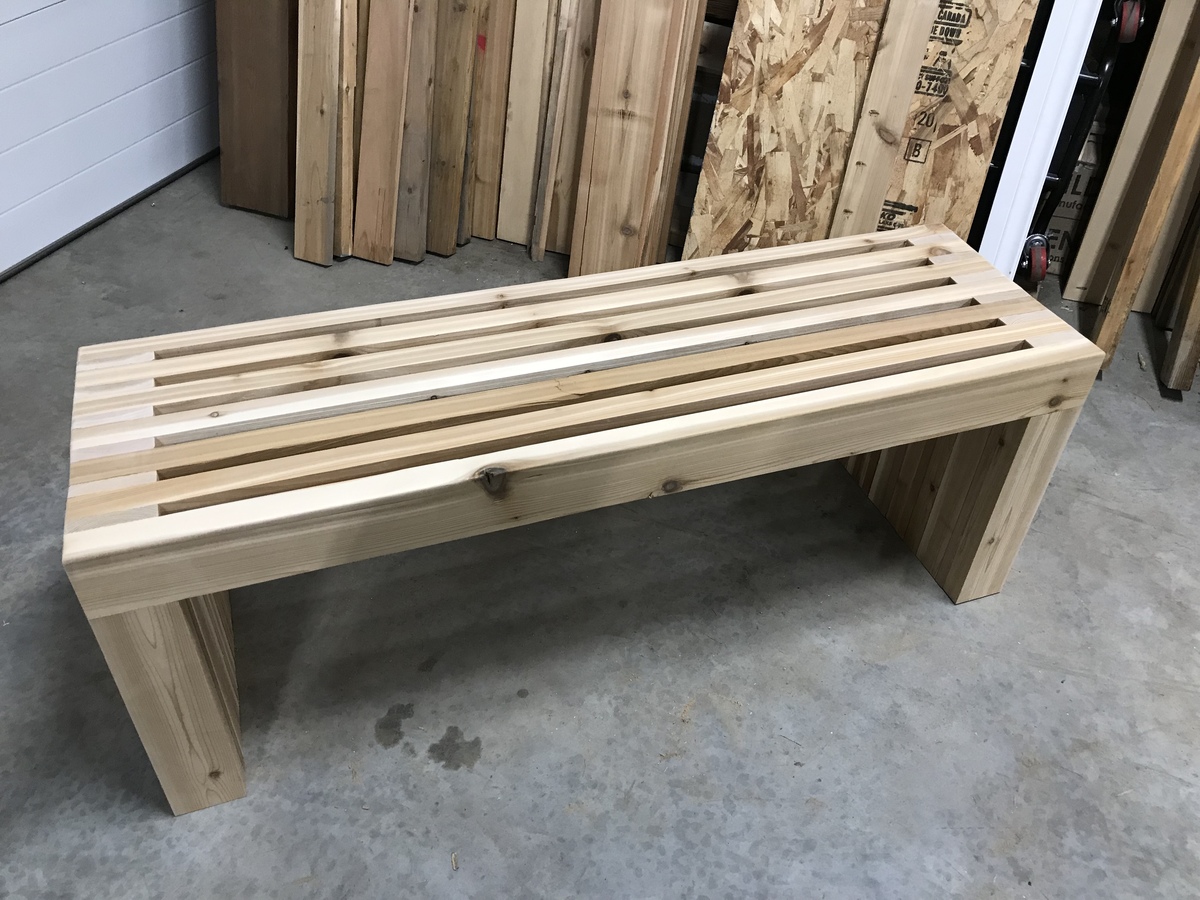
I really enjoy making this bench. I build them out of cedar and vary from 4’-6’. My customers love them. Simple prep work consisting of planing all boards to same dimensions can save a lot of time in sanding. Building 3 more this week.
Estimated Time Investment
An Hour or Two (0-2 Hours)
Recommended Skill Level
Beginner
Comments
Wed, 02/16/2022 - 07:12
Cedar Slat Top Bench - Plans
do you have the plans for the Cedar Slat Top Bench?
DIY Wood Shed
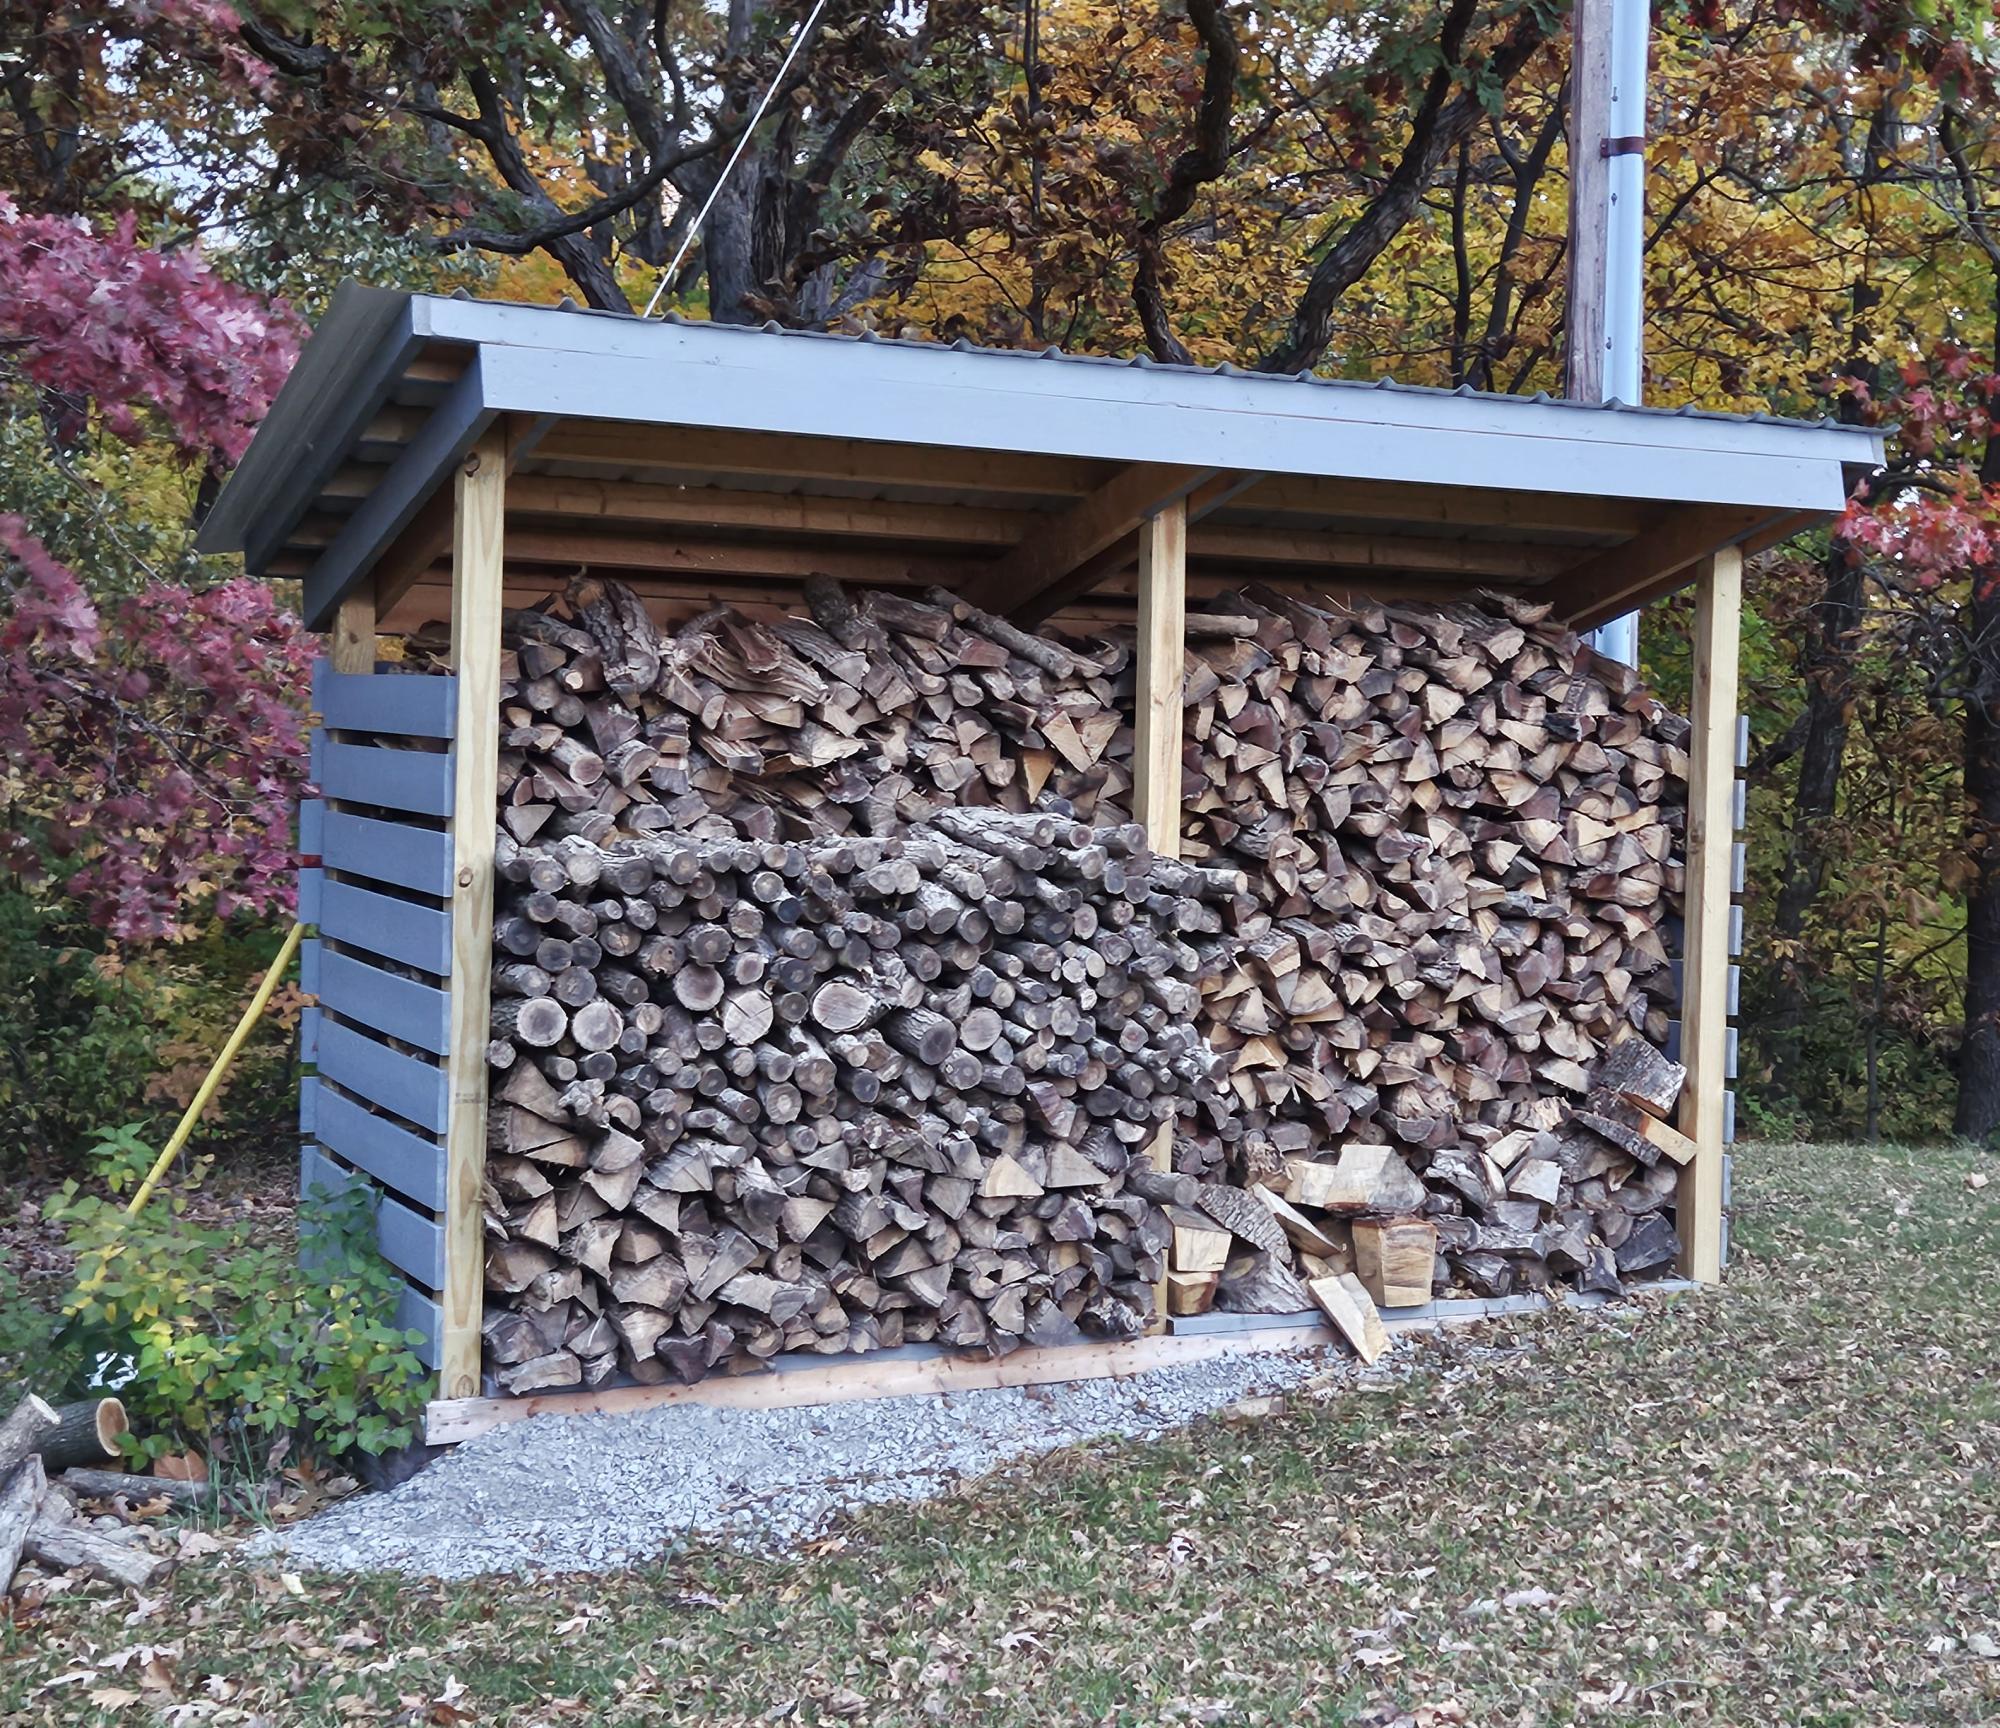
I am a mathematics teacher in Central IL. I teach a class called Geometry in Construction. I had my math students build this wood shed in pieces at the school, then I brought it home and put it together with a few of my son's friends. The students enjoy a math class that gets to go to the wood shop to apply their math skills to a wood working project. I am proud of my students hard work and dedication.
Shari Bruyn (I'm old, so I do not have Instagram or a blog page. lol)
Built from Plan(s)
Double Door Barn Greenhouse
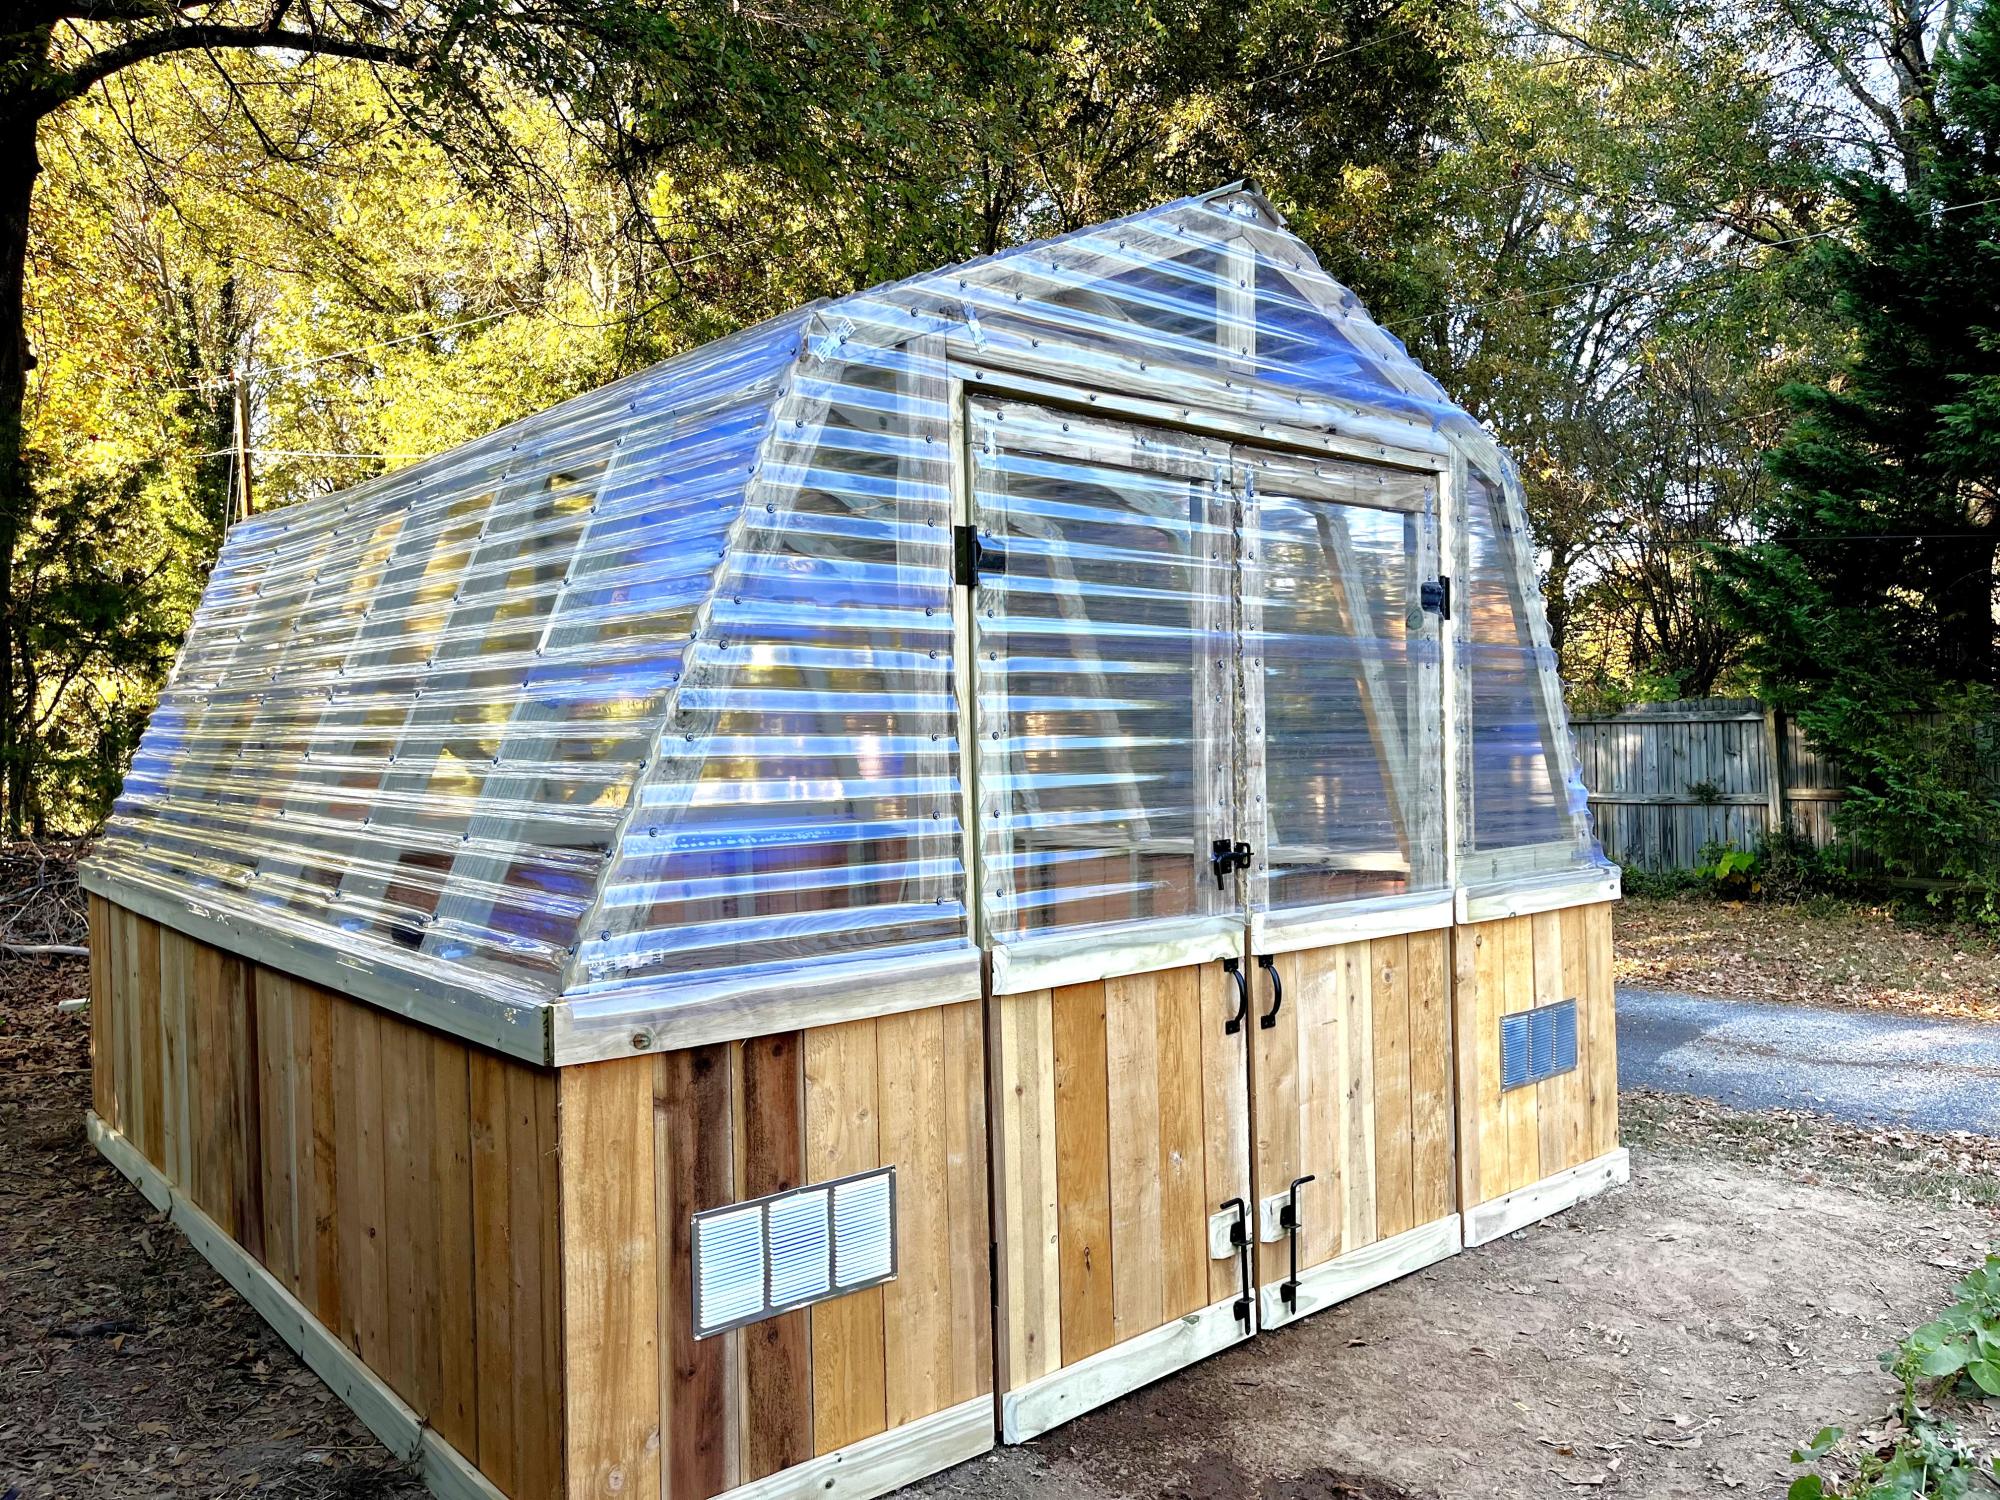
I loved this plan so much but I really wanted double doors so we made a few modifications to fit them. Can’t wait to build out the interior and start growing! Thank you for the amazing plans!
Built from Plan(s)
Seasonal And Holiday
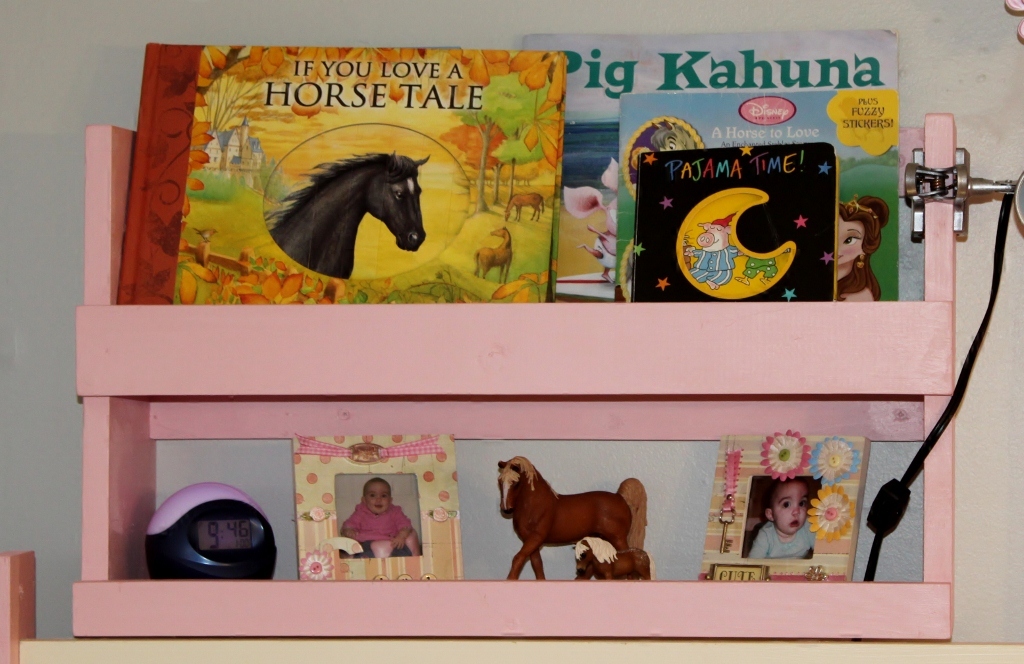
Bunk Bed Shelf Organizer
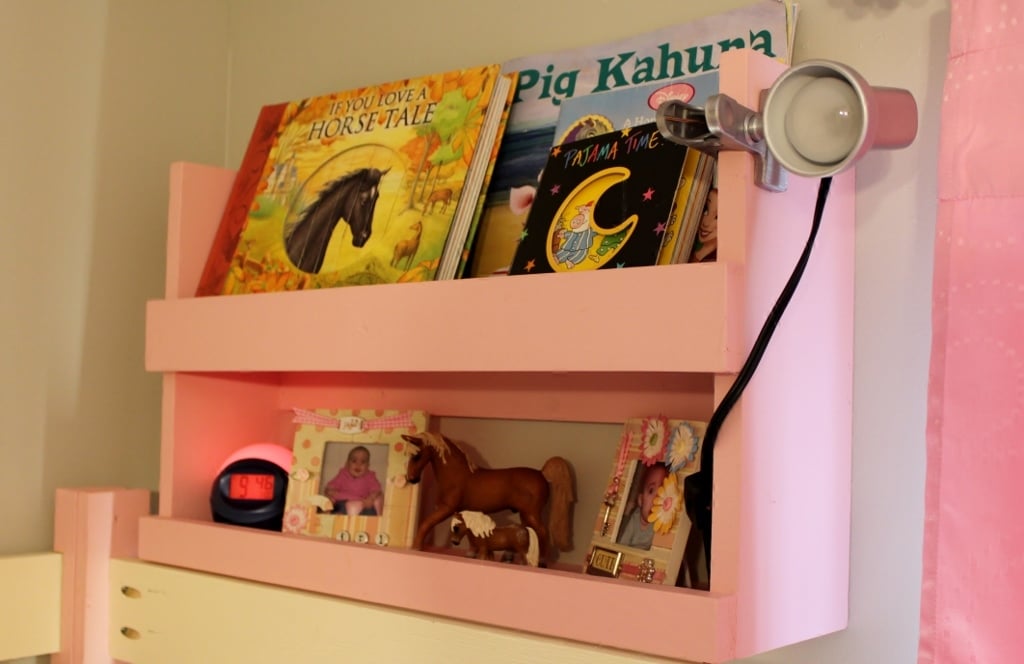
I had just finished my daughter's playhouse loft bed when I saw this plan. It was super easy to build and I used all left over wood from the playhouse. I used 6-inch boards for the sides and shelves since that was what I had left over. Other than that, I followed this plan exactly. Thanks for posting!
Built from Plan(s)
Estimated Time Investment
An Hour or Two (0-2 Hours)
Recommended Skill Level
Beginner
Comments

Hexagon Table
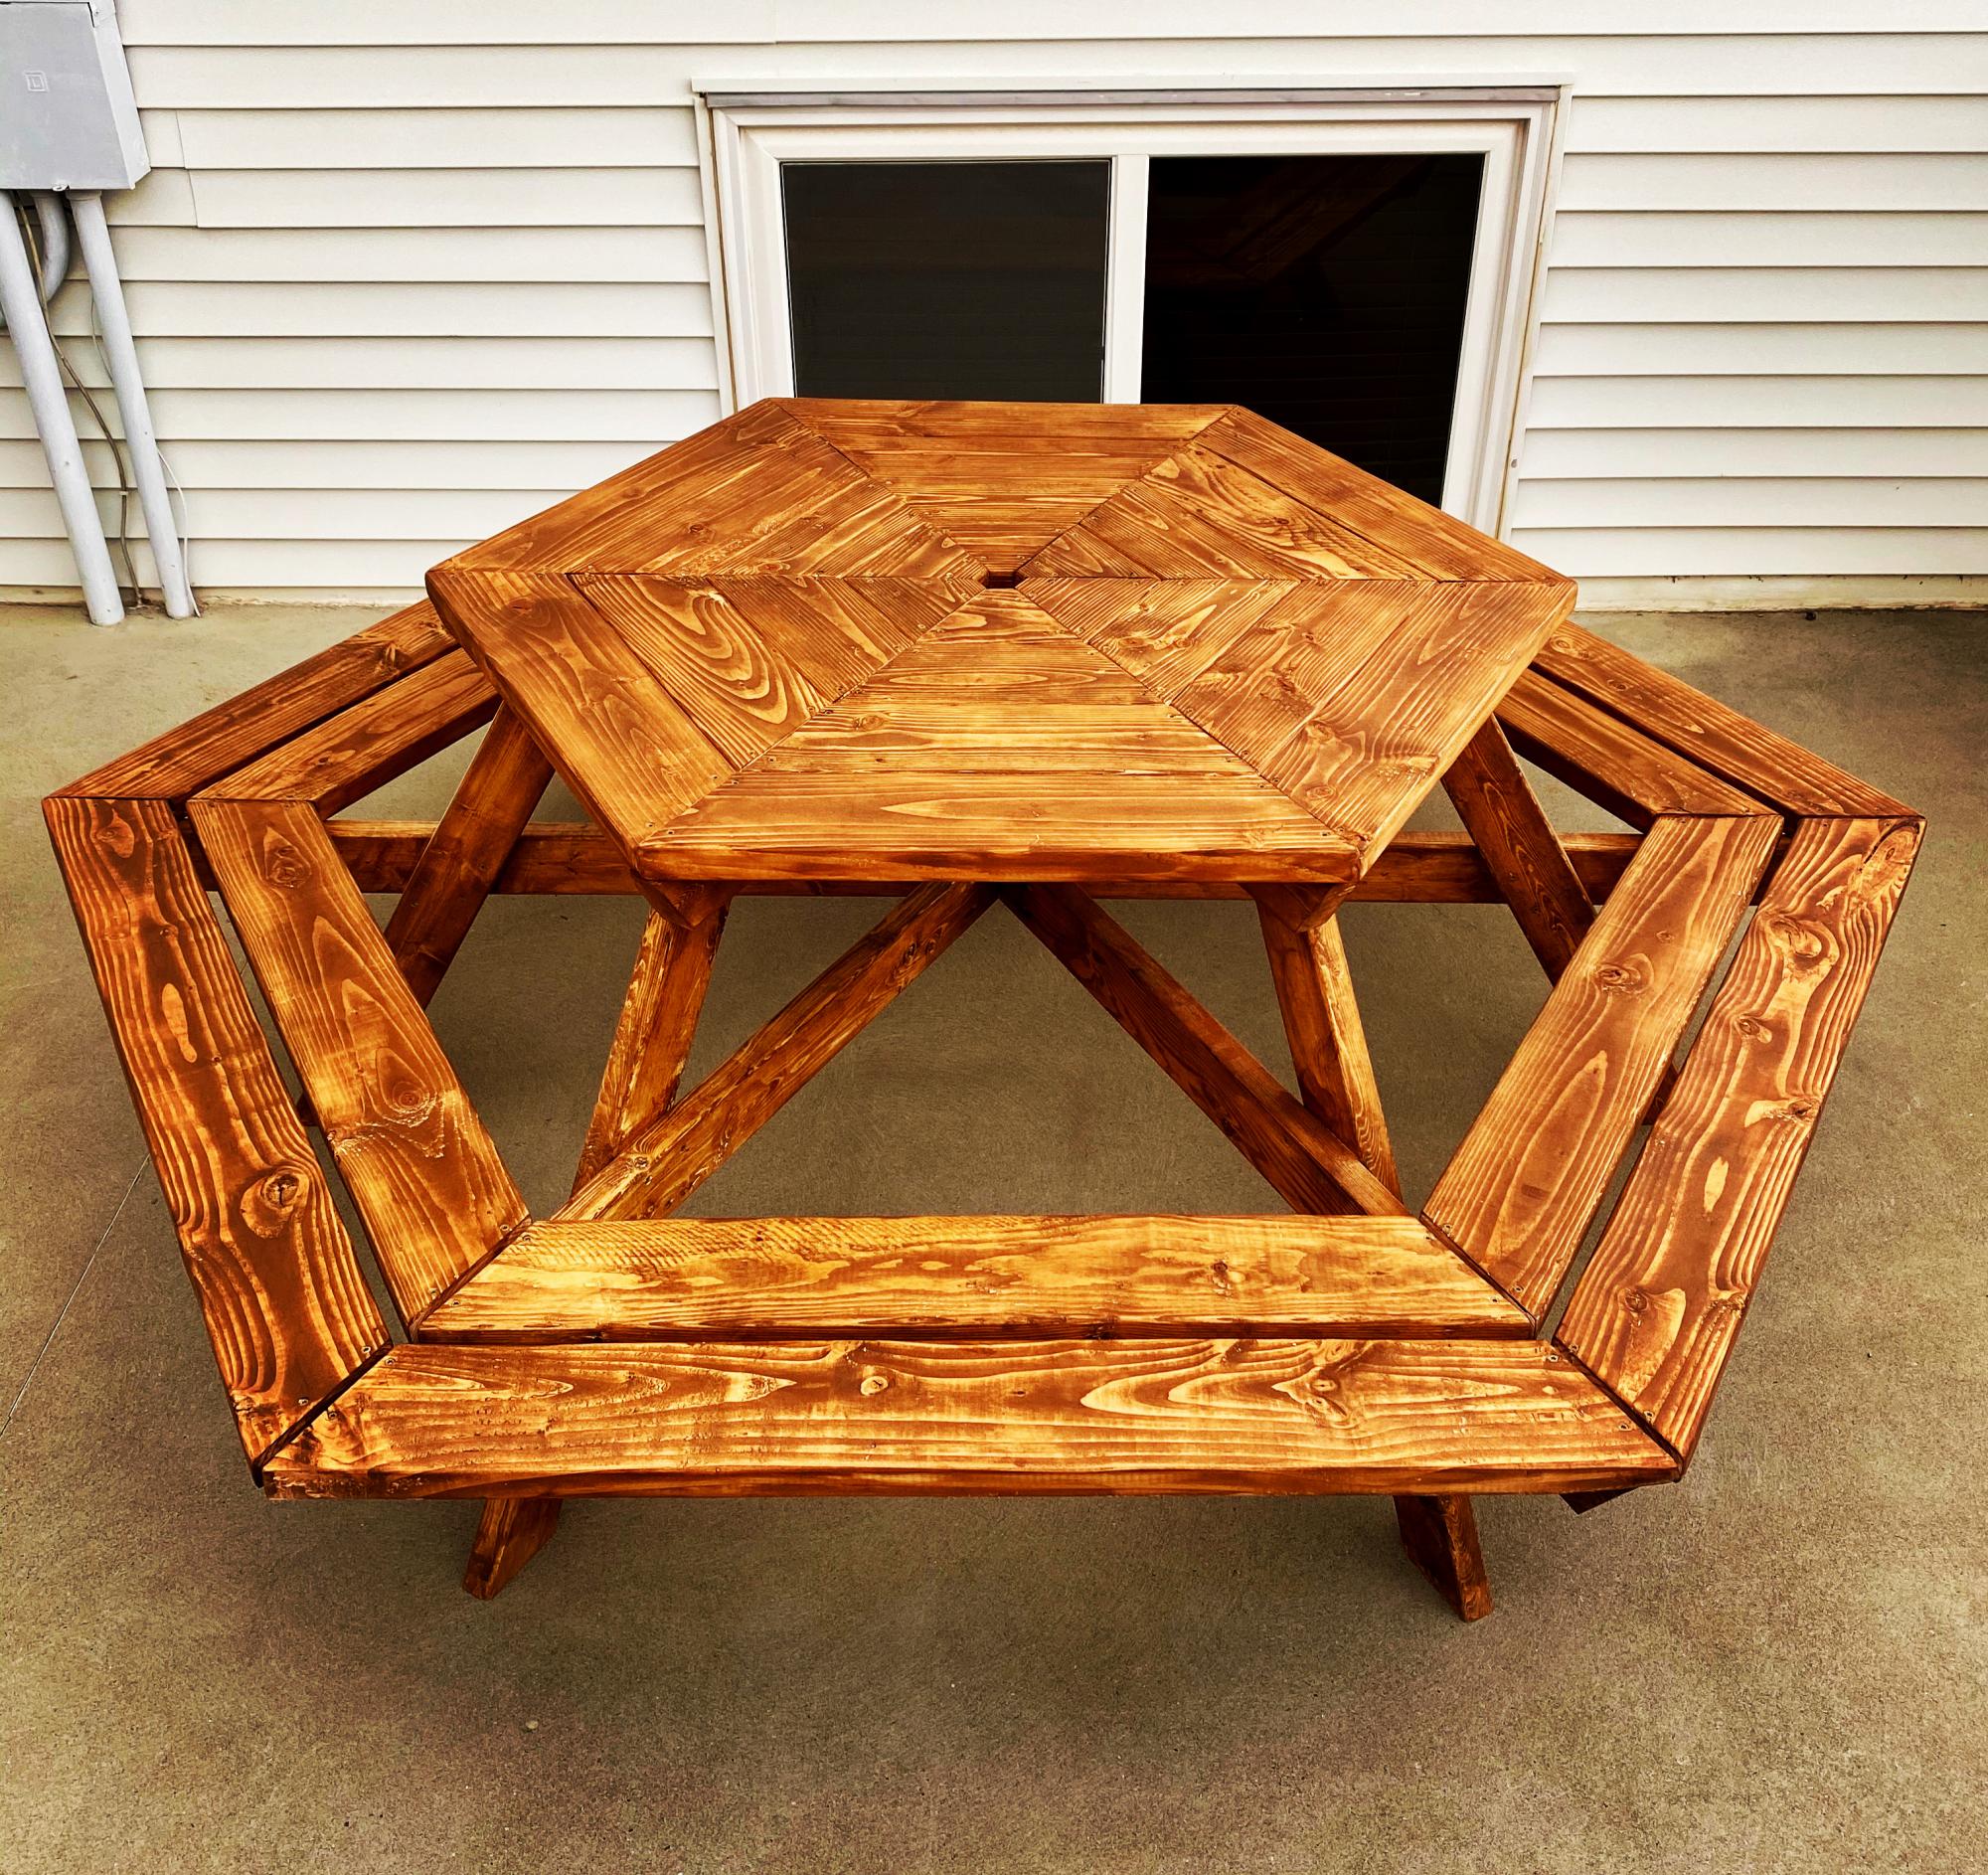
Great build for the patio!
Built from Plan(s)
Estimated Time Investment
Weekend Project (10-20 Hours)
Finish Used
Varathane Early American
Cabot waterproofing
Cabot waterproofing
Recommended Skill Level
Advanced
Corner Shelf for Nursery
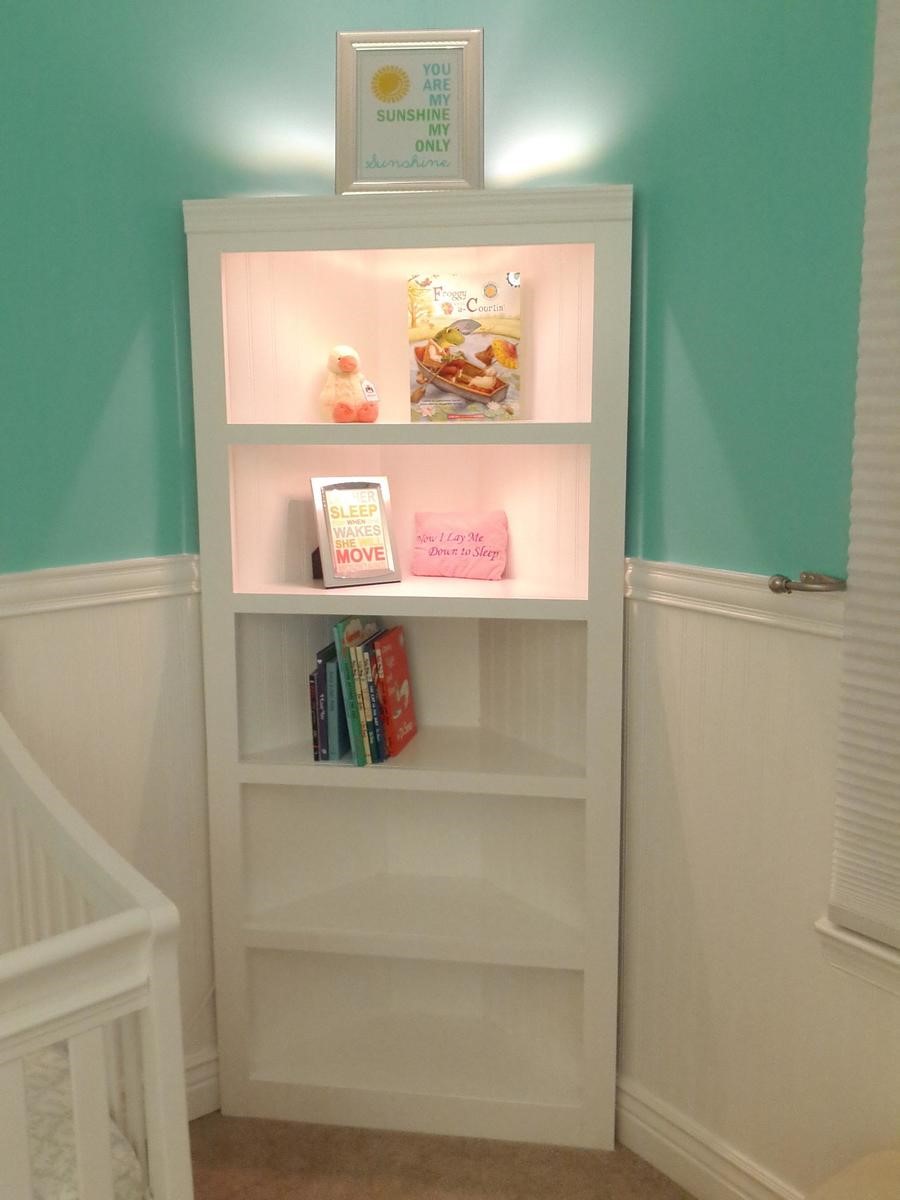
Super Easy.. I like it better without the doors. Recommend getting a KREG Jig. I have the Jr and it was perfect for this project.
Built from Plan(s)
Estimated Cost
$130
Estimated Time Investment
Afternoon Project (3-6 Hours)
Recommended Skill Level
Beginner
Comments
Larger A Frame Chicken Coop

A frame chicken coop with a few modifications- metal roof, insulation and slightly larger second floor.
By Chrystal
Built from Plan(s)
Built-in Desk with Dog Kennel
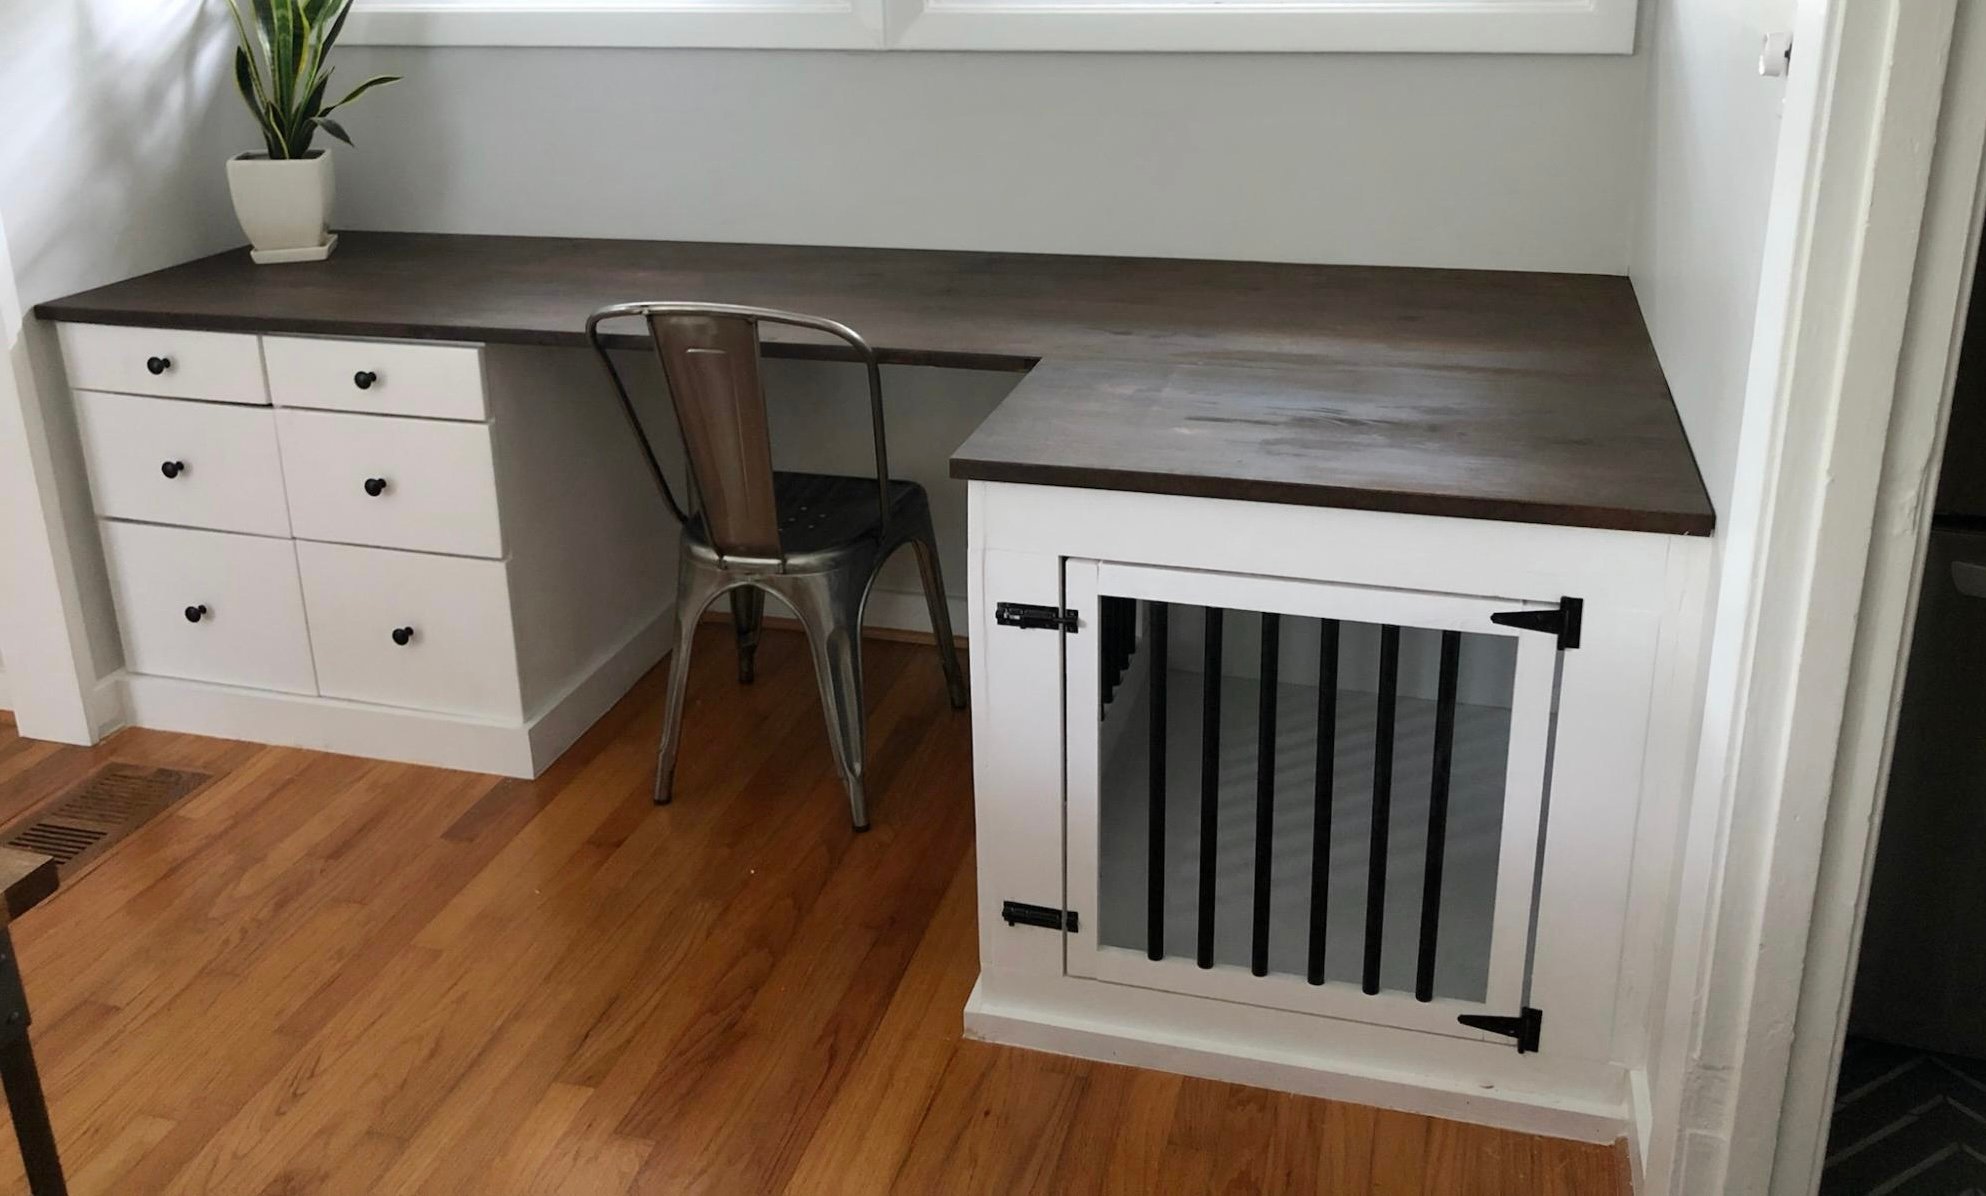
Built in desk with dog kennel complete with slide out printer drawer!
by Lisa
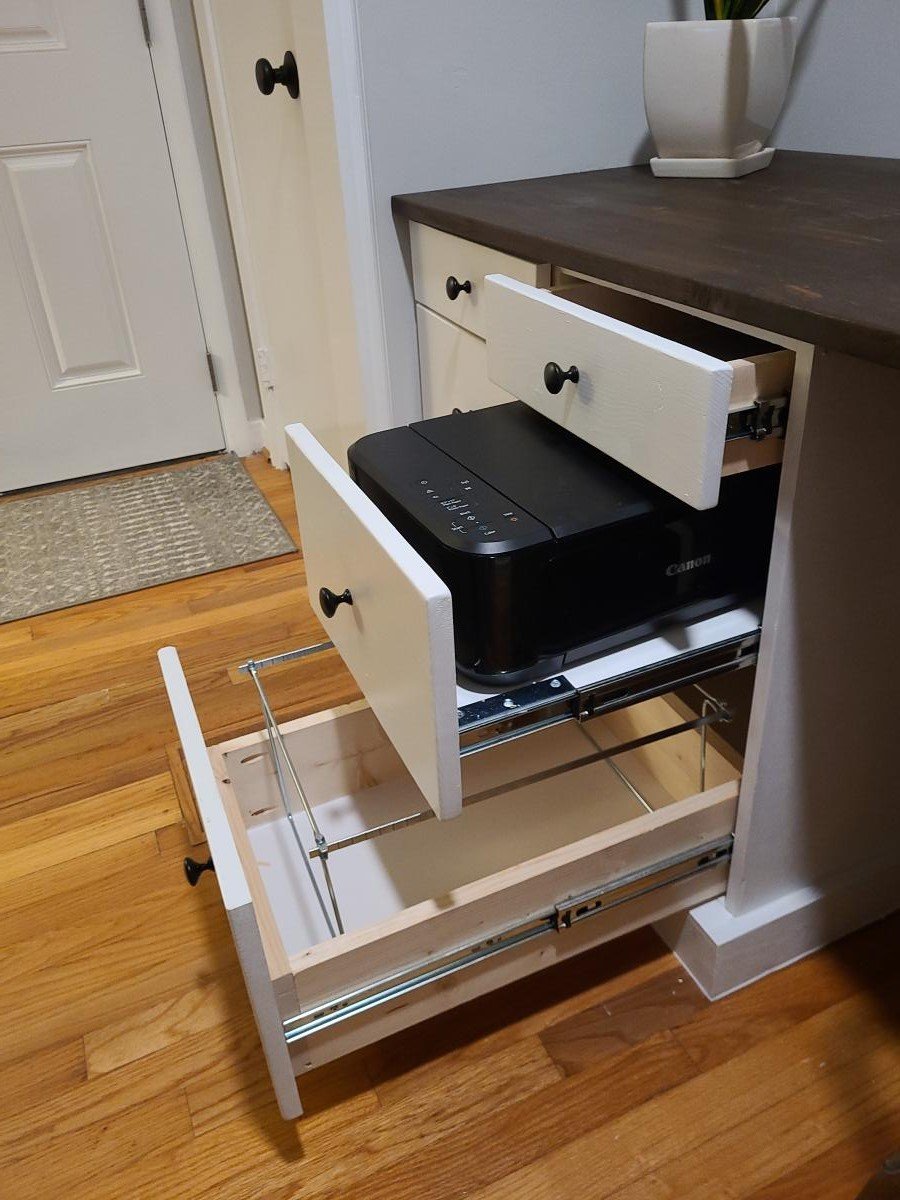
Built from Plan(s)
Nesting Grill Station
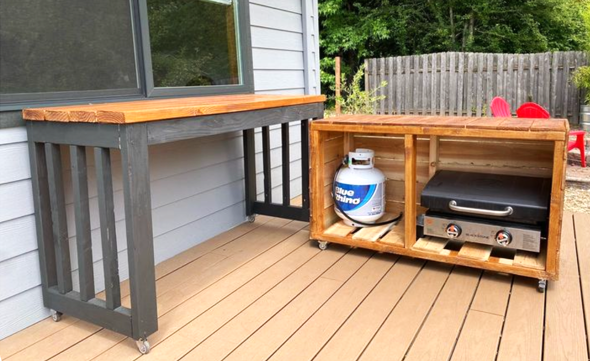
Nesting Grill Station
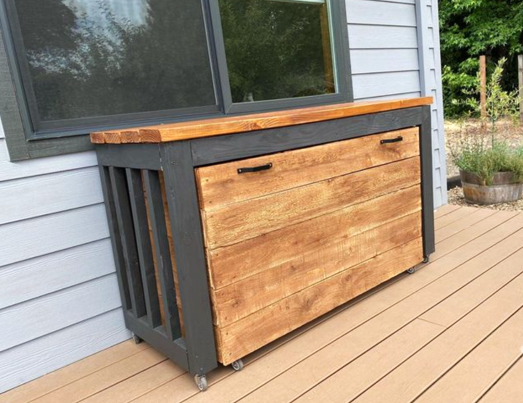
Built from Plan(s)
Wood Adirondack Chair
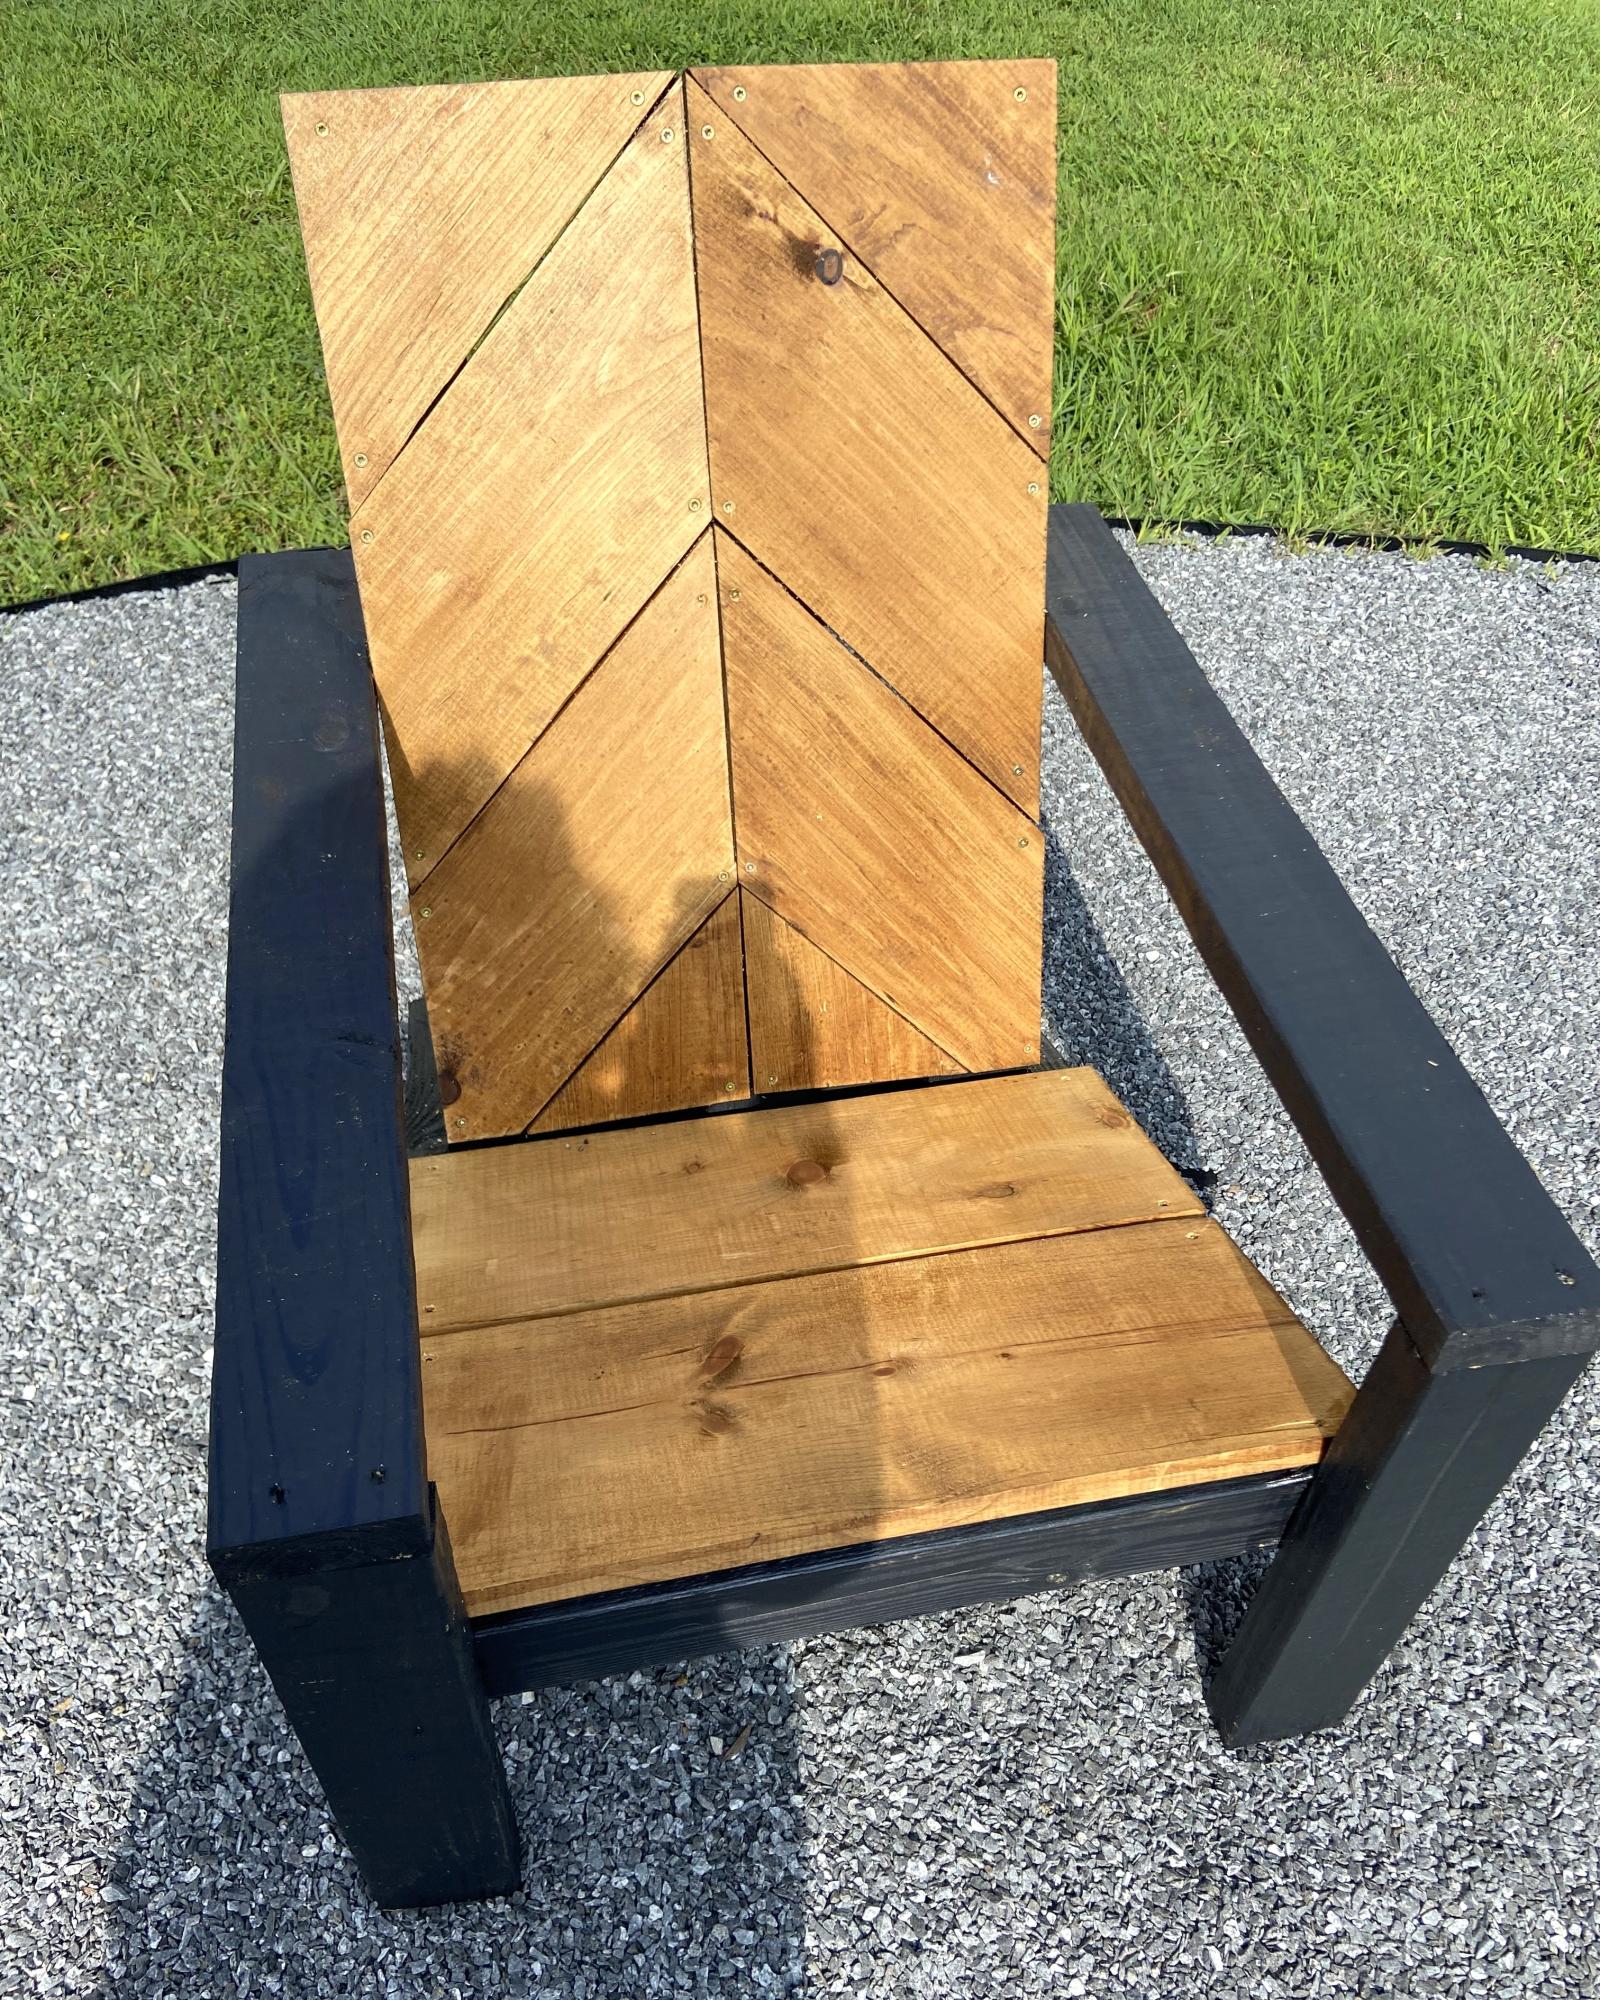
My young friend Carter used his own twist to your adiraondack chair with this herringbone pattern. He made six chairs from your pattern with three different design. These look so amazing around my firepit.
Susan Morris/Carter Tillman
Built from Plan(s)
Airbnb Picnic Tables by the Lake
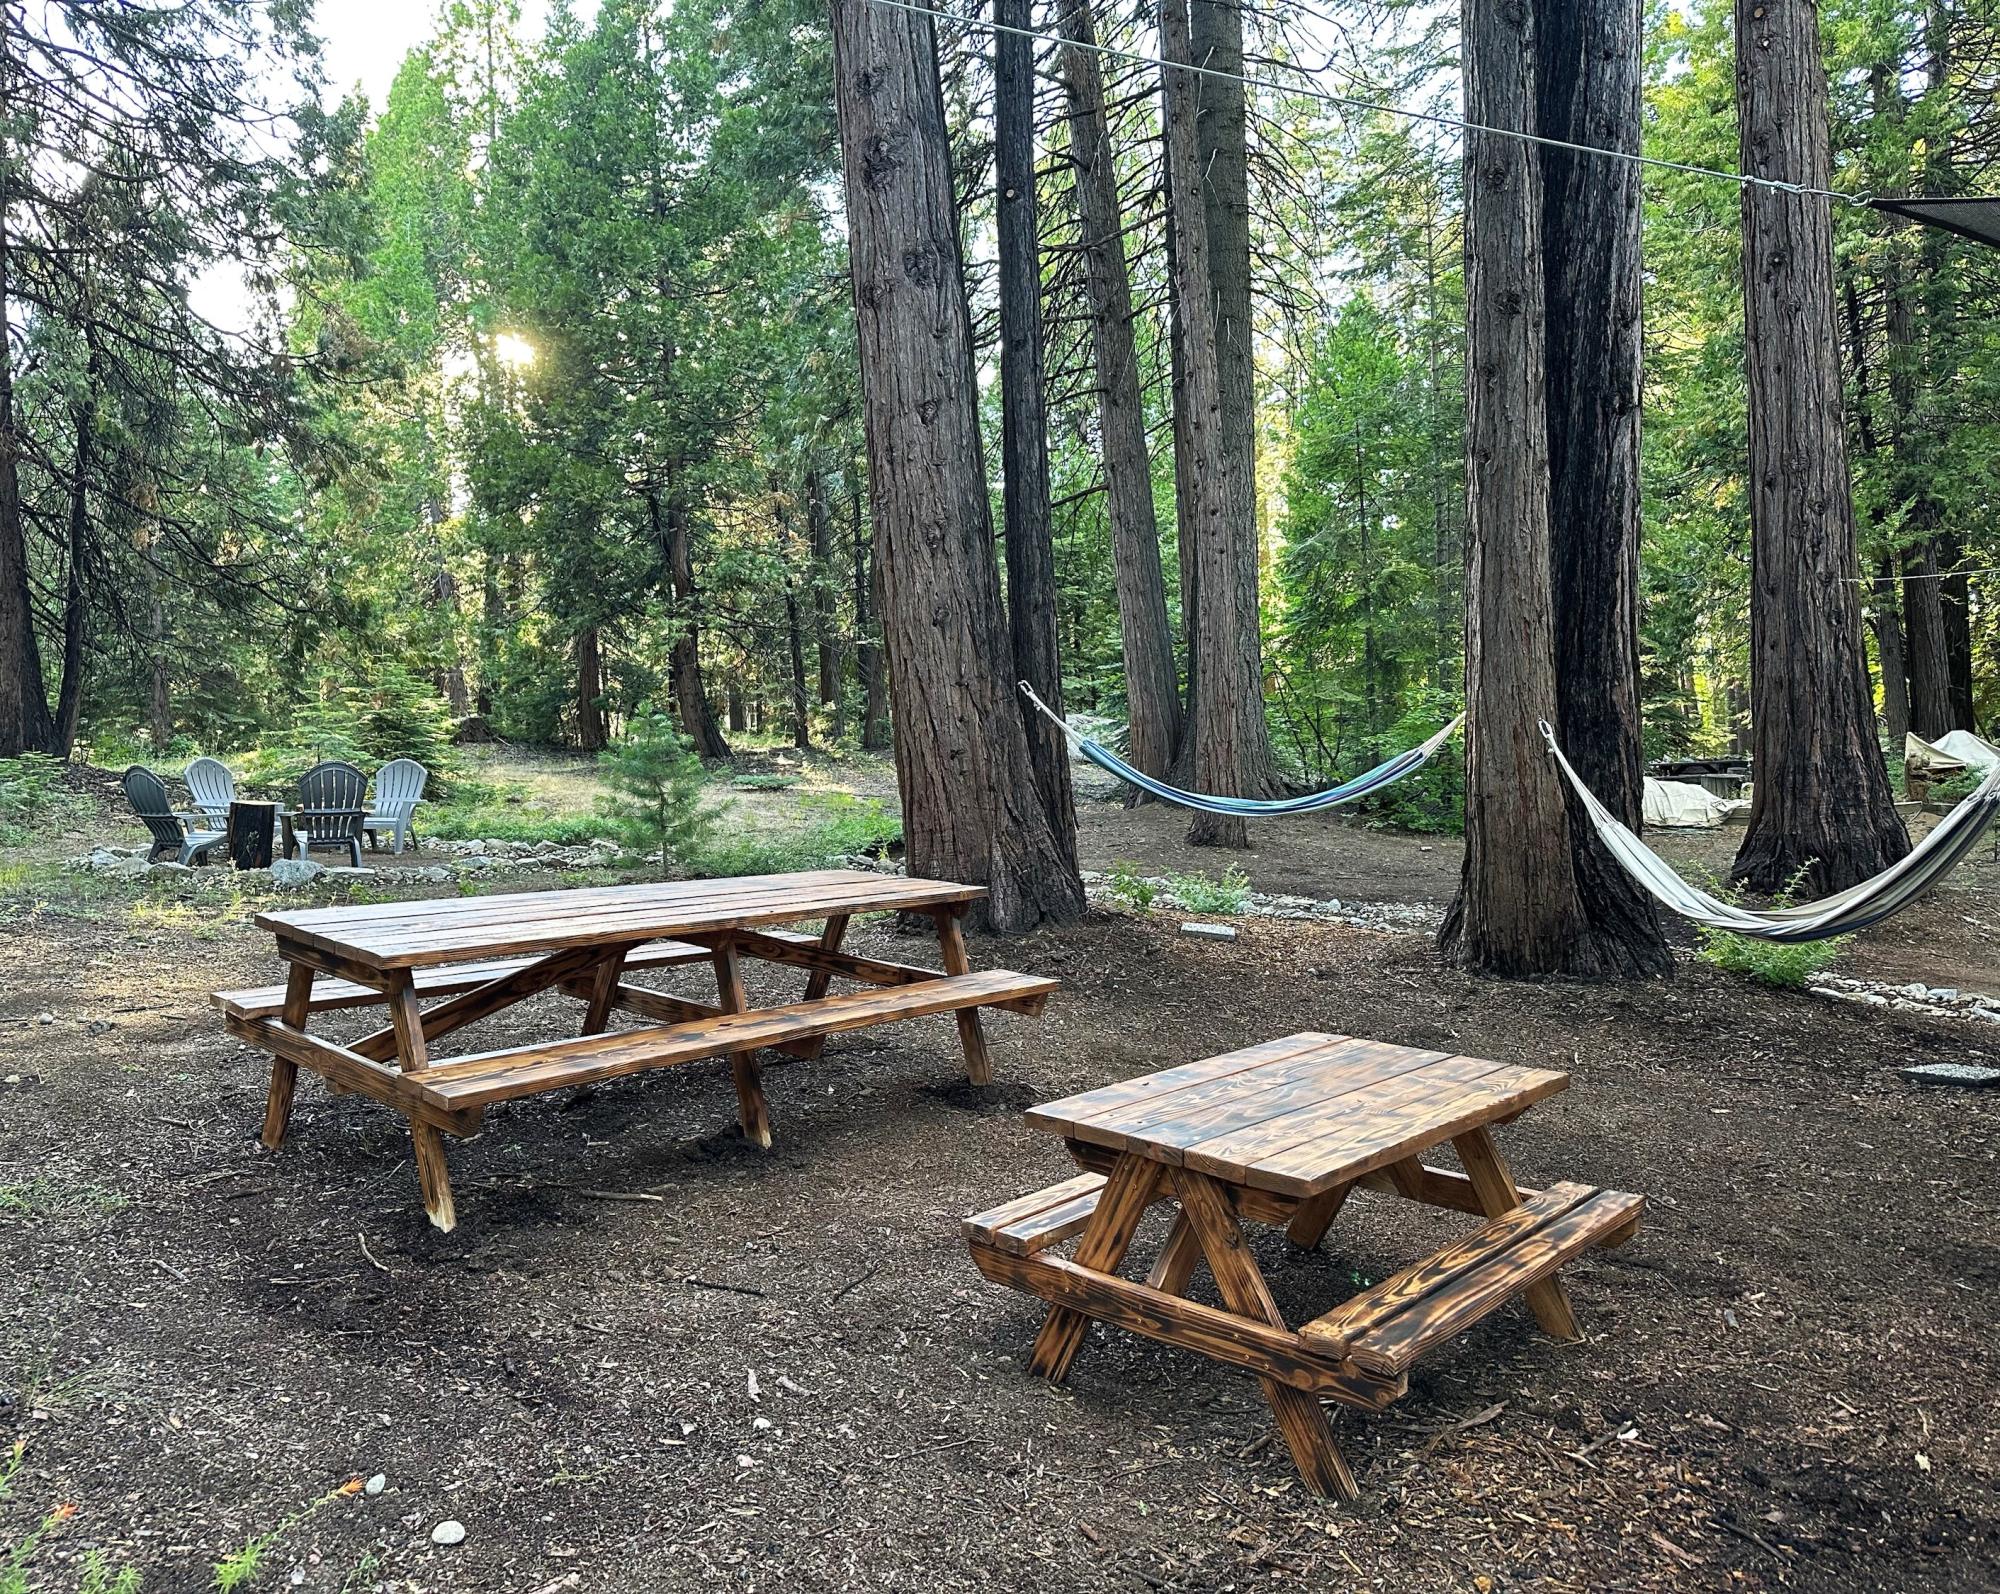
We have an Airbnb at a nearby lake. We built the large and kids picnic tables so our guests can enjoy the outdoors!!
Elaine Freitas
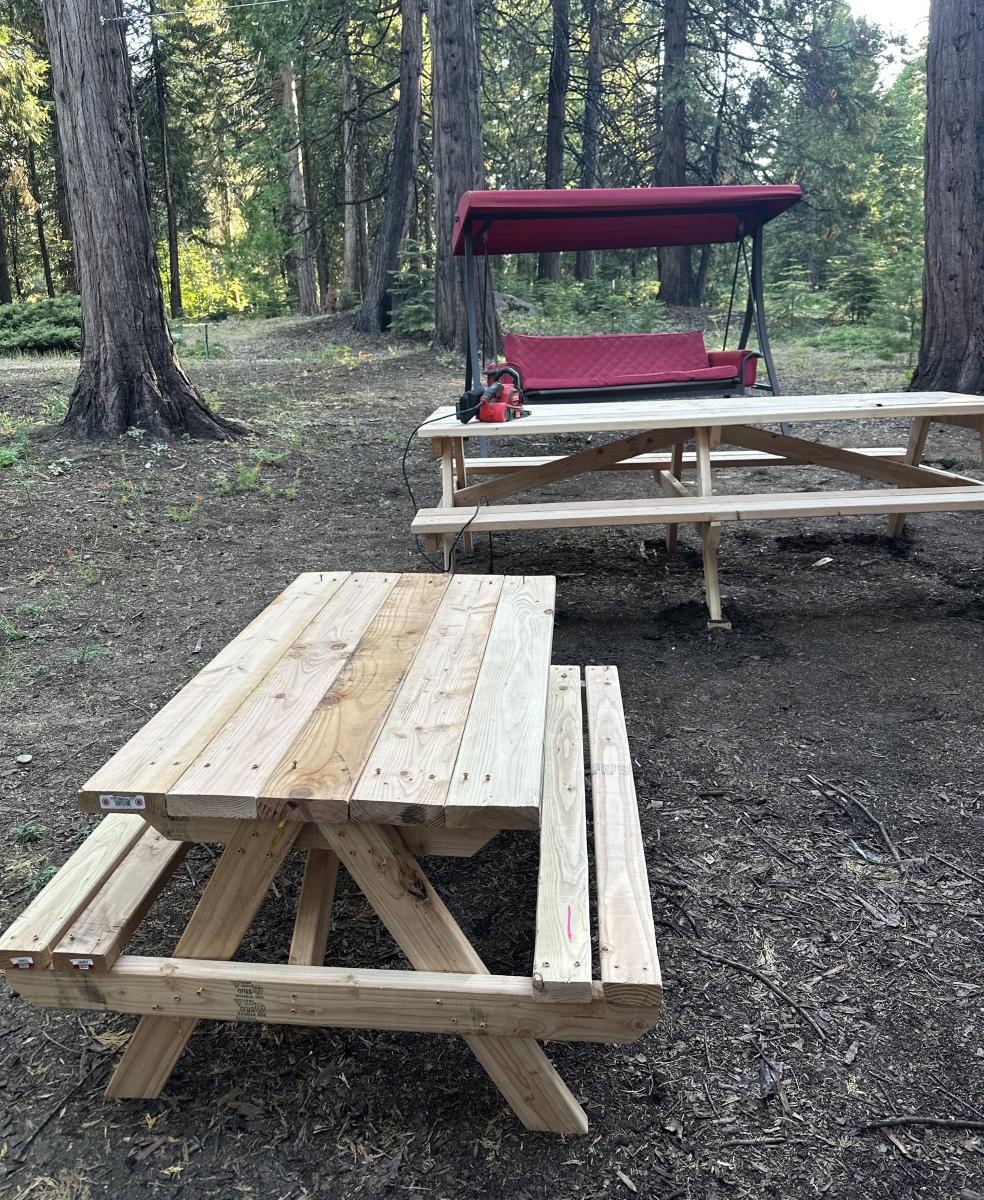
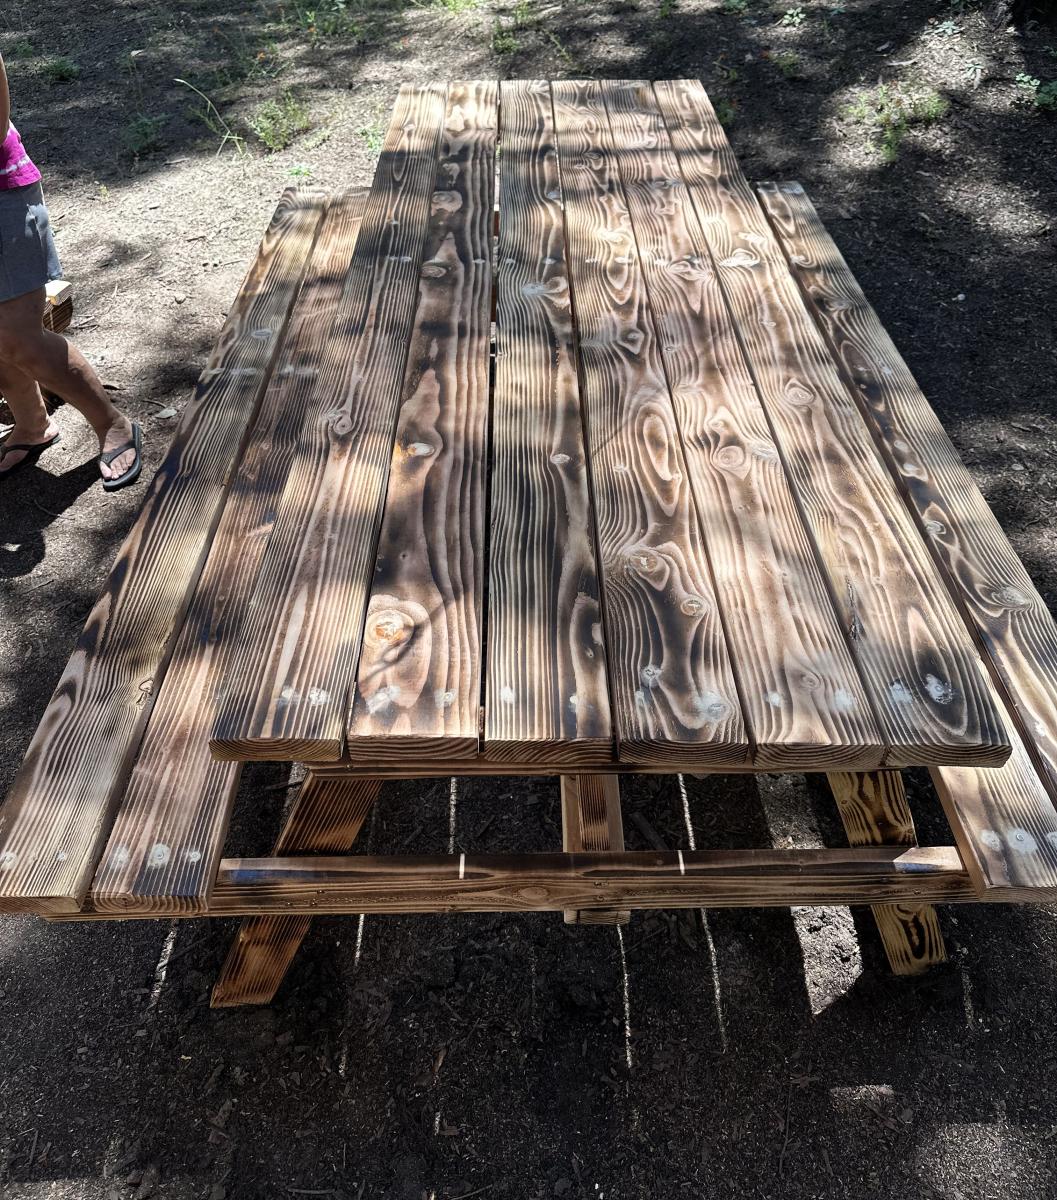
Built from Plan(s)
Modular Barbie Playhouse
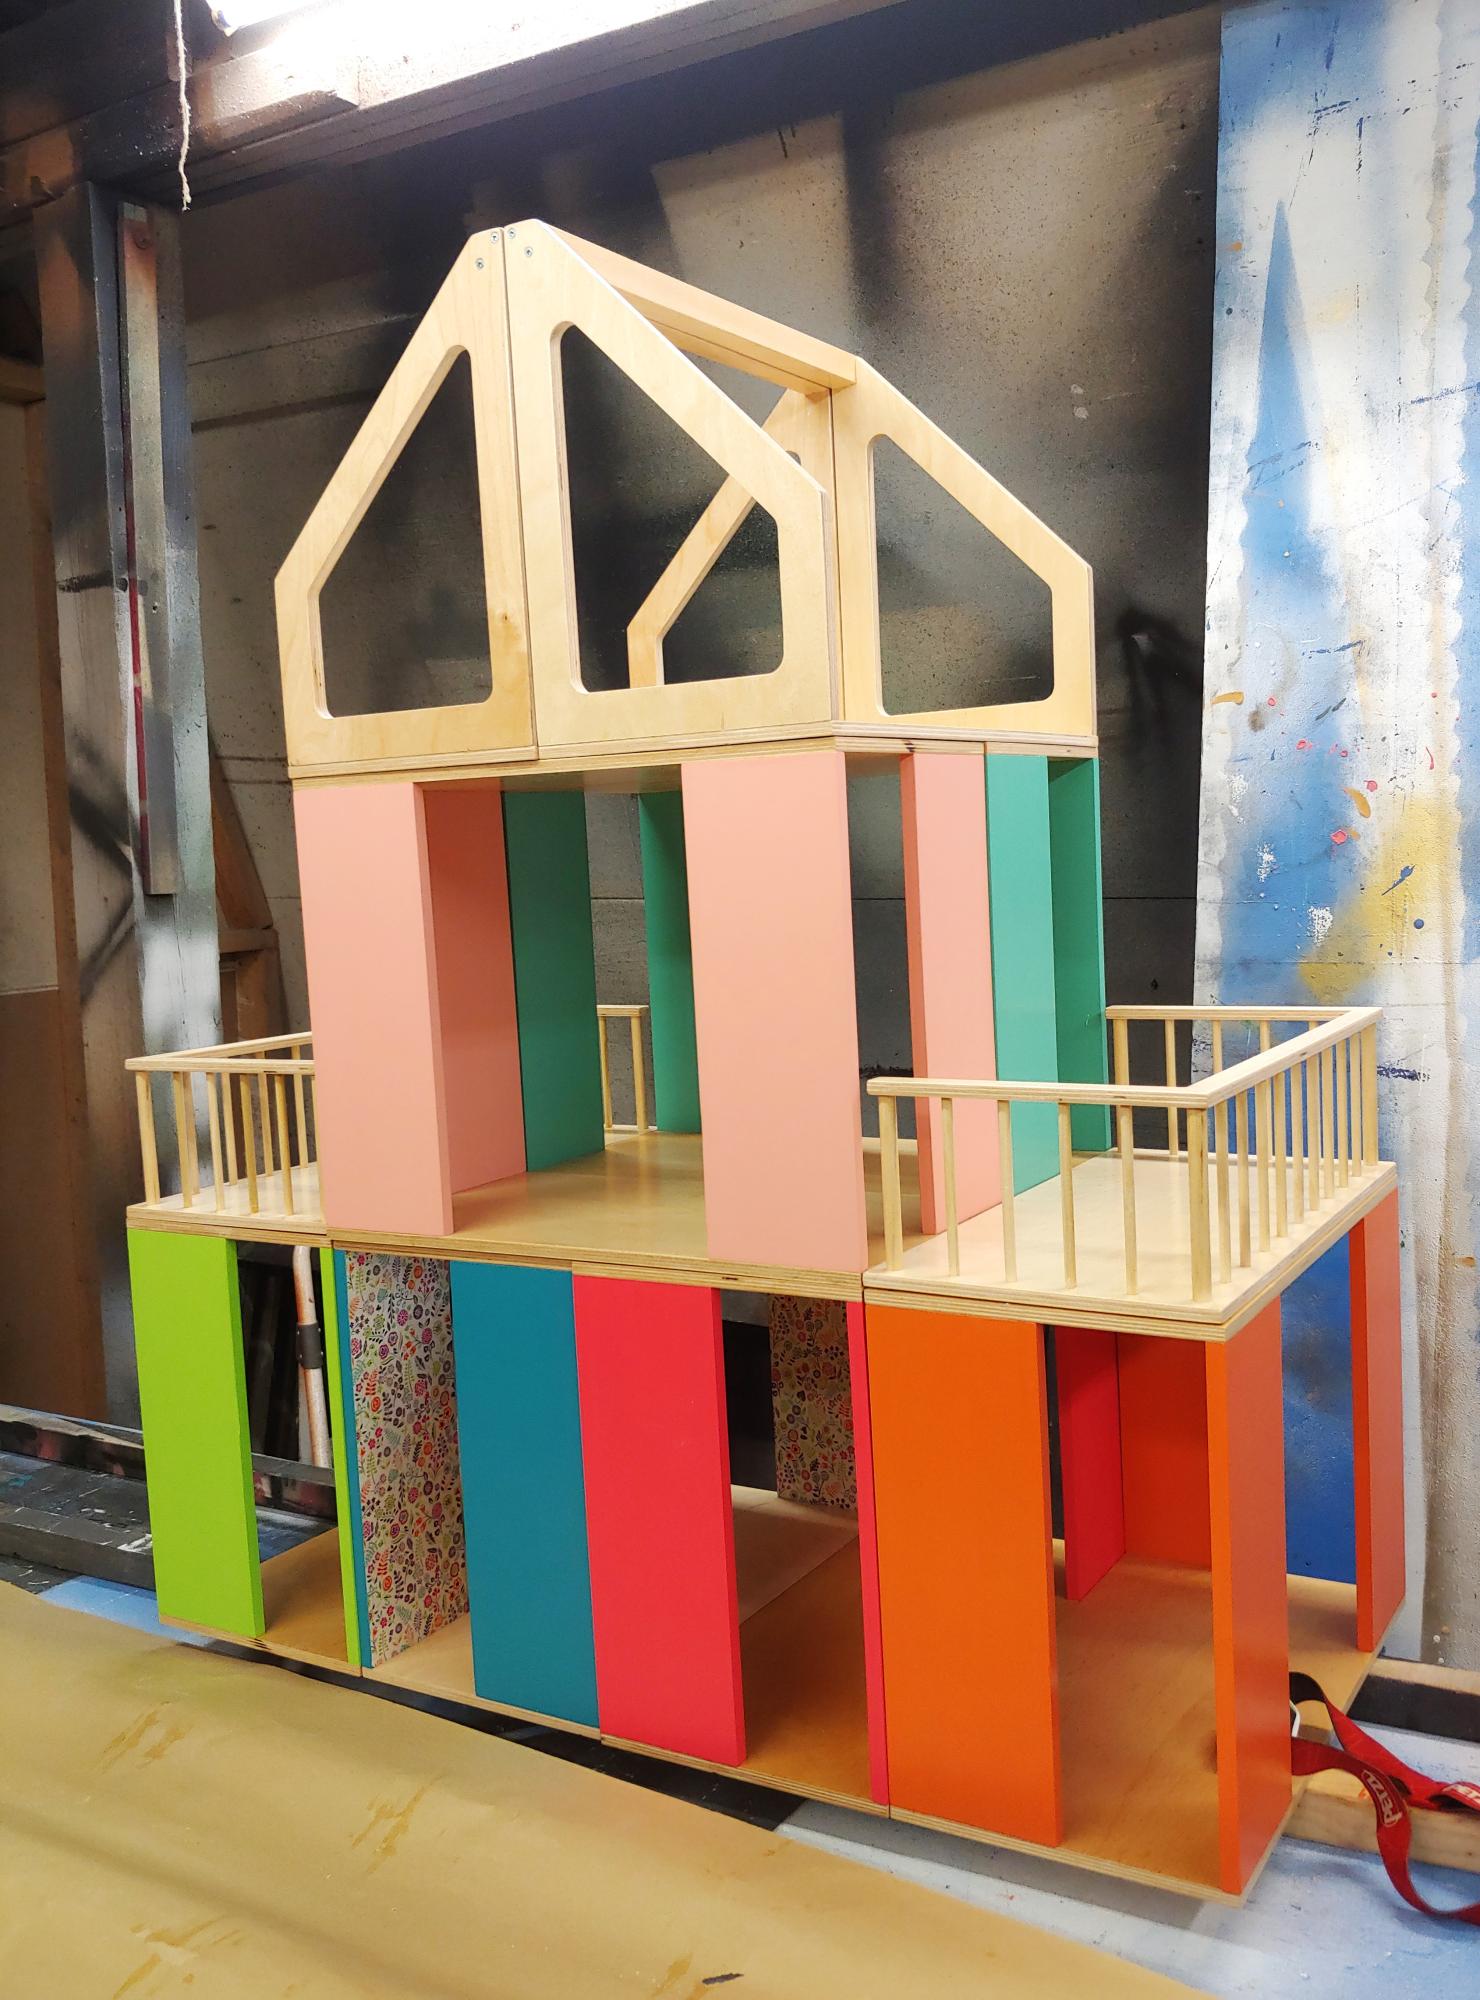
We modified the Ana-White modular dollhouse meant for small dolls to build this Barbie size house! (Please ignore the workshop walls in the background of our pics! Lol!) Our daughter loves to set up all sorts of houses/school/hospital/stores, and commercial modern barbie houses are all covered in specific printed paper that restricts what a room can be used for. This way she can make buildings however she likes! It isn't much bigger than her old barbie house, and the pieces/room boxes are easy for her to move/stack. Each room box is 9" (w) by 18"(L) by 13"(h), with wall panels 4.5" wide. We also love that these room boxes can become bookshelves once she outgrows barbies! Thank you!
Siemens Family, Alberta CA
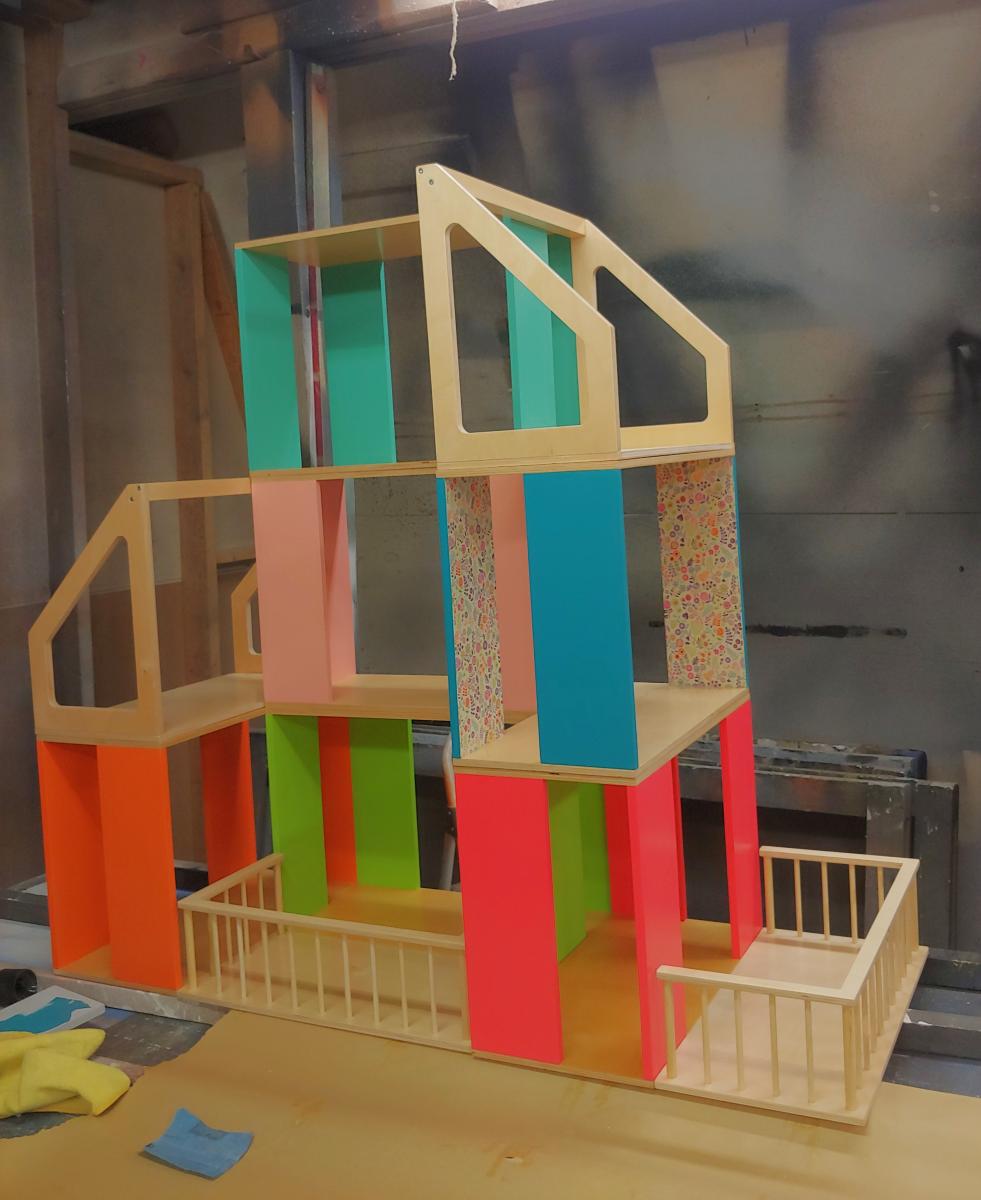
Built from Plan(s)